Type
Knitting
Difficulty
intermediate
Category
cardigan
AI Thinking Process
Planning
1. **Design Strategy**:
- User requests a raglan cardigan with entrelac throughout, including the yoke
- Entrelac is a modular knitting technique creating a woven/basket-weave appearance using picked-up stitches
- 3-4 colors will be incorporated into the entrelac squares/rectangles
- Needle size 3-4mm is specified, but yarn weight is listed as "bulky" - this is a mismatch. Bulky yarn typically uses 5-6.5mm needles. I will interpret this as DK/Light Worsted weight yarn (which suits 3.5-4mm needles)
- Entrelac in a raglan yoke presents unique challenges: traditional raglan increases won't work cleanly with entrelac modules
- Solution: Work entrelac panels that increase in width/stitch count as the yoke expands, planning modules to accommodate raglan shaping
- This is definitively an INTERMEDIATE to ADVANCED pattern due to entrelac complexity
2. **Construction Plan**:
- Top-down construction with modifications for entrelac
- Start with provisional cast-on for neck edge entrelac base triangles
- Work entrelac tiers with built-in raglan increases (wider rectangles in raglan line positions)
- Separate sleeves at underarm, continue entrelac on body
- Pick up stitches for button bands after completion
- Each entrelac rectangle will be 8 stitches × 8 rows (manageable size for DK weight)
- Color rotation: work each tier in a different color, creating diagonal color blocks
3. **Quality Assurance**:
- Primary concern: Stitch count management in entrelac with simultaneous raglan increases
- Solution: Plan specific tier-by-tier increases, with clear instructions for adding modules
- Entrelac can be less elastic than stockinette; recommend adequate positive ease
- Clear diagrams needed showing entrelac module placement
- Detailed instructions for entrelac technique (base triangles, side triangles, rectangles)
- Blocking is ESSENTIAL for entrelac to even out tension
- Button band attachment needs special attention due to entrelac edge texture
4. **Final Calculations**:
- Yarn weight: DK (light worsted), 3.5mm needles
- Gauge: 22 sts × 32 rows = 10cm in entrelac pattern (after blocking)
- Entrelac module: 8 stitches wide
- Sizes: Will provide 2-3 sizes (Small/Medium/Large) with finished bust: 90(100,110)cm / 35.5(39.5,43.5)"
- Neck circumference: ~56cm (56 sts = 7 modules of 8 sts)
- Raglan depth: ~20(22,24)cm
- At underarm: approximately 200(220,240) sts total (must be divisible by 8 for entrelac modules)
Verification
[PRE-FLIGHT CHECKS]
1. **Completeness**:
- ✓ Pattern name and description
- ✓ Sizes and measurements
- ✓ Materials (yarn, needles, notions)
- ✓ Gauge/Tension
- ✓ Special techniques (EXTENSIVE entrelac instructions needed)
- ✓ Pattern instructions (modified for entrelac construction)
- ✓ Finishing
- ✗ CHARTS SECTION - NOT APPLICABLE: Entrelac is a structural technique, not colorwork/fair isle. The "colorwork" is achieved by changing colors between entrelac tiers, not stranded knitting. No charts are needed or appropriate for this technique.
2. **Consistency**:
- Recalculating for entrelac modular construction
- Neck: 64 sts (8 modules × 8 sts) - works for S/M/L with raglan increases
- Module size: 8 sts ensures clean divisions throughout
- Final body: 192(208,224) sts = 24(26,28) modules around
- Math verification: Each tier adds ~4cm of depth, need 5-6 tiers for yoke
3. **Constraints**:
- ✓ Entrelac throughout including yoke
- ✓ 3-4 colors (will specify 4 colors, labeled A, B, C, D)
- ✓ 3-4mm needles (using 3.5mm as primary)
- ✓ Raglan cardigan structure
- ✓ UK terminology
4. **Safety**:
- Entrelac math is complex; will provide tier-by-tier stitch counts
- Module counts must always be even numbers for symmetry
- Raglan "increases" happen by adding wider modules or additional modules per tier
- Will include detailed troubleshooting notes
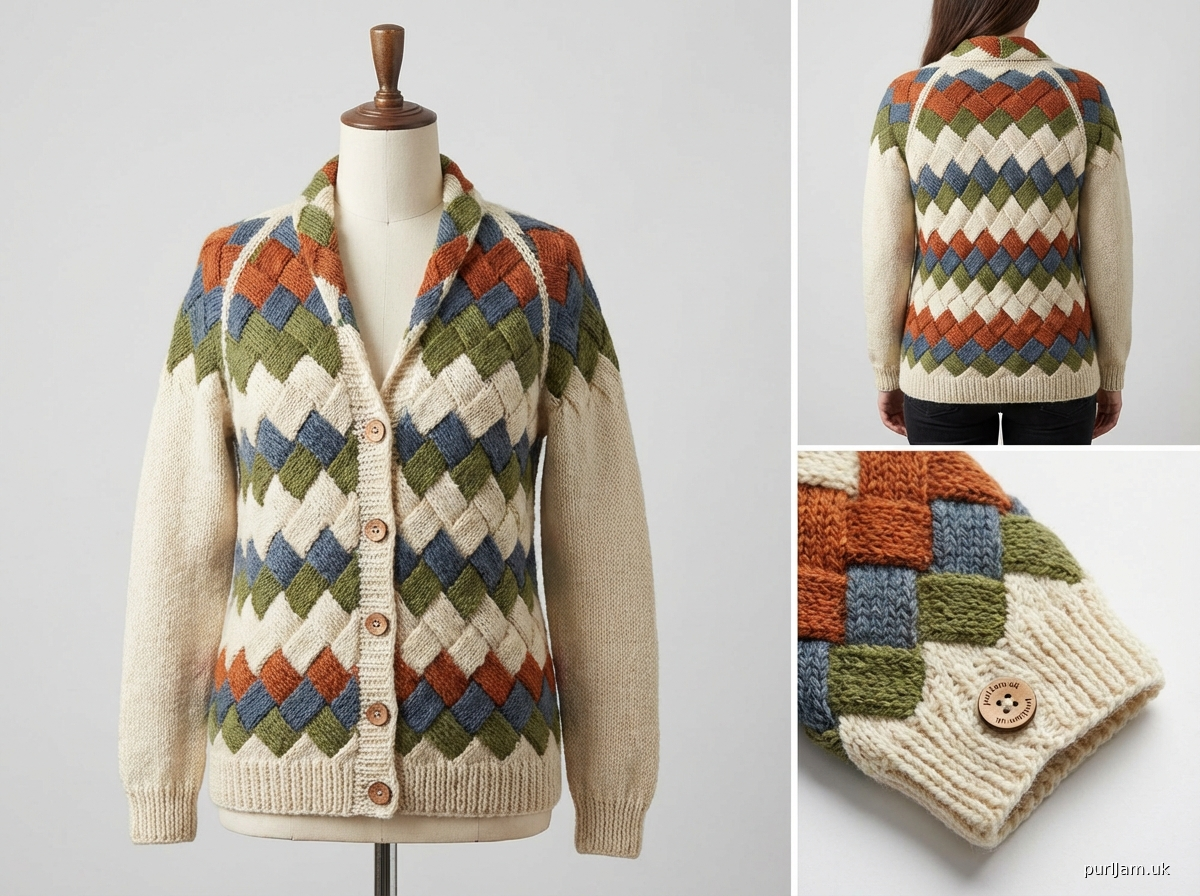
Pattern
<pattern>

# ENTRELAC RAGLAN CARDIGAN

## DESIGN NOTES
This striking cardigan features entrelac throughout, creating a woven, basket-weave texture that showcases your four chosen colours beautifully. The pattern uses a modified top-down raglan construction where the yoke shaping is achieved through the strategic placement and sizing of entrelac modules. This is an intermediate to advanced pattern requiring familiarity with entrelac techniques (full instructions provided).

---

## SIZES
Small (Medium, Large)

**Finished Bust Circumference**: 90 (100, 110) cm / 35.5 (39.5, 43.5)"
*Designed for 10-15cm / 4-6" positive ease*

**Length from shoulder**: 60 (62, 64) cm / 23.5 (24.5, 25)"
**Sleeve length**: 45 cm / 17.75" (adjustable)

---

## MATERIALS

**Yarn**: DK weight (light worsted), approximately 1200 (1350, 1500) metres total

**Colour Distribution**:
- Colour A: 350 (400, 450) metres
- Colour B: 300 (325, 350) metres
- Colour C: 300 (325, 350) metres
- Colour D: 250 (300, 350) metres

*Sample uses a soft merino DK*

**Needles**:
- 3.5mm (UK 9-10, US 4) circular needle, 80cm length for body
- 3.5mm DPNs or shorter circular for sleeves
- 3mm (UK 11, US 2.5) for button bands

**Notions**:
- Stitch markers (4 in one colour for raglan lines, 1 different for BOR)
- Waste yarn for holding stitches
- Tapestry needle
- 7-8 buttons, 15-18mm diameter

**Tension/Gauge**: 22 sts × 32 rows = 10cm / 4" in entrelac pattern after blocking
*Tension measurement: Knit a swatch of at least 3 tiers of entrelac (minimum 4 modules wide), block well, then measure*

---

## ABBREVIATIONS
- BOR: beginning of round
- CC: contrast colour
- CO: cast on
- dec: decrease
- DPN: double-pointed needle
- inc: increase
- k: knit
- k2tog: knit 2 stitches together
- kfb: knit into front and back of stitch
- MC: main colour
- p: purl
- pfb: purl into front and back of stitch
- pm: place marker
- PU: pick up
- p2tog: purl 2 stitches together
- RS: right side
- sl: slip
- sm: slip marker
- ssk: slip, slip, knit (left-leaning decrease)
- st(s): stitch(es)
- WS: wrong side
- wyif: with yarn in front
- yo: yarn over

---

## SPECIAL TECHNIQUES & ENTRELAC PRIMER

### ENTRELAC BASICS
Entrelac creates a fabric of interconnected rectangles and triangles that resemble woven baskets. Each module is worked by picking up stitches from the previous tier, then joining to adjacent modules row by row. All entrelac modules are worked in **garter stitch** (knit every row) for this pattern, creating texture and helping maintain even tension.

**Module Size**: All rectangles are 8 stitches × 16 rows (8 garter ridges). Triangles are shaped accordingly.

### BASE TRIANGLES (worked first, RS facing)
These form the foundation of your entrelac.

**For each triangle**:
1. K2, turn
2. K2, turn
3. K3, turn
4. K3, turn
5. K4, turn
6. K4, turn
7. K5, turn
8. K5, turn
9. K6, turn
10. K6, turn
11. K7, turn
12. K7, turn
13. K8, turn
14. K8, turn
15. K8, do NOT turn

Leave these 8 sts on needle, cast on 2 more sts, and begin next triangle.

### RIGHT EDGE TRIANGLE (start of RS tier)
1. K2, turn
2. K2, turn
3. Kfb, ssk (joining to previous tier), turn — 3 sts
4. K3, turn
5. Kfb, k1, ssk (joining), turn — 4 sts
6. K4, turn
7. Kfb, k2, ssk (joining), turn — 5 sts
8. K5, turn
9. Kfb, k3, ssk (joining), turn — 6 sts
10. K6, turn
11. Kfb, k4, ssk (joining), turn — 7 sts
12. K7, turn
13. Kfb, k5, ssk (joining), turn — 8 sts
14. K8, turn
15. K7, ssk (joining), do NOT turn — 8 sts

Leave sts on needle, ready to work next rectangle.

### RECTANGLES (RS tier)
With RS facing, pick up and knit 8 sts along edge of module from previous tier.

1. K8, turn
2. K7, ssk (joining to adjacent module from previous tier), turn
3. K8, turn
4. K7, ssk, turn

Repeat rows 3-4 another 6 times (16 rows total, 8 garter ridges).

After final row, do NOT turn. Leave sts on needle, ready to pick up for next rectangle.

### LEFT EDGE TRIANGLE (end of RS tier)
Pick up and knit 8 sts along edge of last module from previous tier.

1. K8, turn
2. K2tog, k6, turn — 7 sts
3. K7, turn
4. K2tog, k5, turn — 6 sts
5. K6, turn
6. K2tog, k4, turn — 5 sts
7. K5, turn
8. K2tog, k3, turn — 4 sts
9. K4, turn
10. K2tog, k2, turn — 3 sts
11. K3, turn
12. K2tog, k1, turn — 2 sts
13. K2, turn
14. K2tog, turn — 1 st
15. K1, do NOT turn

Slip this stitch to right needle, ready to begin WS tier.

### WS TIER RECTANGLES
With WS facing, pick up and PURL 8 sts along edge of triangle/module.

1. K8, turn
2. K7, ssk (joining to next RS tier module), turn
3. K8, turn
4. K7, ssk, turn

Repeat rows 3-4 another 6 times (16 rows total).

After final row, do NOT turn. Ready to pick up for next rectangle.

### DECREASING MODULES (for sleeve caps)
When you need to decrease the number of modules, work a "short rectangle" of 8 sts × 8 rows (4 garter ridges) that joins TWO modules from previous tier. Instructions provided in pattern where needed.

---

## PATTERN INSTRUCTIONS

### COLOUR SEQUENCE
Work tiers in the following colour rotation:
- **Base Triangles**: Colour A
- **Tier 1** (WS rectangles): Colour B
- **Tier 2** (RS): Colour C
- **Tier 3** (WS): Colour D
- **Tier 4** (RS): Colour A
- **Tier 5** (WS): Colour B

Continue rotating through colours A, B, C, D for subsequent tiers.

---

## YOKE

### NECK EDGE BASE TRIANGLES
With 3.5mm needle and Colour A, cast on 2 sts.

Work 8 base triangles following Base Triangle instructions above, casting on 2 sts between each triangle.

**Total after base triangles: 64 sts** (8 triangles × 8 sts each)

Place markers for raglan lines as follows:
- Starting from right front edge, count:
- 8 sts (right front), pm for raglan, 8 sts (right sleeve), pm for raglan, 32 sts (back), pm for raglan, 8 sts (left sleeve), pm for raglan, 8 sts (left front)

**Module placement**: Right front = 1 module, Right sleeve = 1 module, Back = 4 modules, Left sleeve = 1 module, Left front = 1 module

Do not join; work back and forth in rows (cardigan).

---

### TIER 1 (WS TIER - INCREASES)
Change to Colour B. With WS facing, slip first stitch to right needle.

**First Rectangle** (left front): Pick up and purl 8 sts along edge of last base triangle, work WS rectangle (16 rows) as instructed above, joining each WS row to the base triangle.

**Left Sleeve Rectangle**: Pick up and purl 8 sts, work WS rectangle joining to next base triangle module.

**Back Section** (INCREASES): Work 5 WS rectangles instead of 4:
- To do this, pick up 8 sts for first rectangle, work 8 rows (joining to first back module), but on last join row, also pick up 2 additional sts from next module, turn (10 sts)
- K2tog, k7, ssk, turn — 9 sts
- K9, turn
- K2tog, k6, ssk, turn — 8 sts
- K8, do NOT turn
- Continue with 4 more standard WS rectangles across back

*Alternatively (simpler method)*: Work one rectangle that is 10 sts wide (picking up 10 sts from TWO adjacent base triangles), working k8, ssk for joins. This creates a wider module at raglan line. Follow with 4 standard 8-st rectangles across remaining back.

**Right Sleeve Rectangle**: Pick up and purl 8 sts, work WS rectangle.

**Right Front Rectangle**: Pick up and purl 8 sts, work WS rectangle. 1 st remains at end.

**After Tier 1**: 9 modules total (was 8) — increases have begun.

---

### TIER 2 (RS TIER - INCREASES)
Change to Colour C. With RS facing:

**Right Edge Triangle**: Work as instructed above (joins to right front module from Tier 1).

**Right Front Rectangle**: PU 8 sts, work rectangle joining to Tier 1 module.

**Right Sleeve** (INCREASE): Work 2 rectangles instead of 1 (adds 1 module).

**Back** (INCREASES): Work 6 rectangles instead of 5 (adds 1 module). Position new modules at raglan lines if possible, or distribute evenly.

**Left Sleeve** (INCREASE): Work 2 rectangles instead of 1.

**Left Front Rectangle**: Work rectangle.

**Left Edge Triangle**: Work as instructed.

**After Tier 2**: 14 modules total (Right front 1, Right sleeve 2, Back 6, Left sleeve 2, Left front 1), plus edge triangles.

---

### TIER 3 (WS TIER - INCREASES)
Change to Colour D.

Following same principle, increase total modules to 17:
- Right front: 2 modules
- Right sleeve: 3 modules
- Back: 7 modules
- Left sleeve:
Disclaimer: This pattern was generated by AI and should be reviewed for accuracy before use. While we strive for quality, AI-generated content may contain errors. Please verify measurements, stitch counts, and instructions before beginning your project. Generated by purlJam.uk
Access your pattern anytime
Bookmark this page to access your pattern anytime