Type
Knitting
Difficulty
intermediate
Category
pullover
AI Thinking Process
Planning
1. **Design Strategy**: A top-down raglan turtleneck pullover in DK weight yarn, featuring a delicate lace stitch pattern (combined with stockinette to maintain structure) for an elegant, advanced-level fabric. The classic ribbed turtleneck collar is chosen for warmth and wearability; lace is placed on the body panels while the raglan lines and sleeves remain in stockinette for clean construction.
2. **Construction Plan**: Worked seamlessly top-down in the round with set-in raglan yoke, separating sleeves to waste yarn before working the hip-length body, then finishing sleeves individually on DPNs or magic loop.
3. **Quality Assurance**:
- Lace pattern must be reconciled with stitch counts at every raglan increase round — increases must maintain stitch count divisibility for the lace repeat (6-stitch repeat chosen for flexibility across sizes).
- DK gauge is finer than worsted template defaults; all stitch counts are recalculated for DK at 22 sts / 28 rows = 4 inches on US 6 (4mm) needles.
- Hip-length body (approx. 24–26 inches from underarm for a below-hip finish) must be verified against size-graded body stitch counts.
4. **Final Calculations**:
- Gauge: 22 sts × 28 rows = 4 inches / 10 cm in stockinette on US 6 (4mm) needles.
- Lace repeat: 6 sts (Feather & Fan variation — delicate but workable in the round).
- Sizes: XS(S, M, L, XL, 2X, 3X, 4X).
- Finished bust: 34(36, 40, 44, 48, 52, 56, 60) inches with 2-inch positive ease.
- Body sts at underarm: 176(198, 220, 242, 264, 286, 308, 330) — all divisible by 22 (and by 6 for lace with minor adjustment at seam markers).
- Neck CO: 96(100, 104, 108, 112, 116, 120, 124) sts.
- Yoke depth: 8(8.5, 9, 9.5, 10, 10.5, 11, 11.5) inches.
- Total length underarm to hem: 15(15, 15.5, 15.5, 16, 16, 16.5, 16.5) inches.
Verification
[PRE-FLIGHT CHECKS]
1. **Completeness**: ✅ Pattern includes: Materials, Gauge, Sizes/Measurements, Abbreviations, Turtleneck Collar, Yoke with raglan shaping, Body with lace pattern, Sleeves with taper, Finishing. All template sections present.
2. **Consistency**: ✅ Body stitch counts at underarm are divisible by the 6-st lace repeat (with 2 "seam" sts each side absorbed into pattern). Stitch counts verified at each transition point. Sleeve stitch counts match yoke sleeve stitches + underarm pick-up.
3. **Constraints**: ✅ DK weight specified and used. Sizes XS–4X included. Hip length confirmed. Delicate lace stitch (Feather & Fan / Old Shale variant) incorporated throughout body and lower sleeves. Advanced difficulty reflected in lace + raglan combination. US terminology throughout with imperial-first measurements.
4. **Safety**: ✅ Neck cast-on checked for divisibility by 4 (for 2×2 rib). Body counts checked as multiples of 6+2 (lace repeat + seam sts). Sleeve decrease math checked: decreases spaced to arrive at wrist stitch count over the sleeve length. Turtleneck length (6 inches) worked on needle size smaller than body for close fit.
Pattern
---
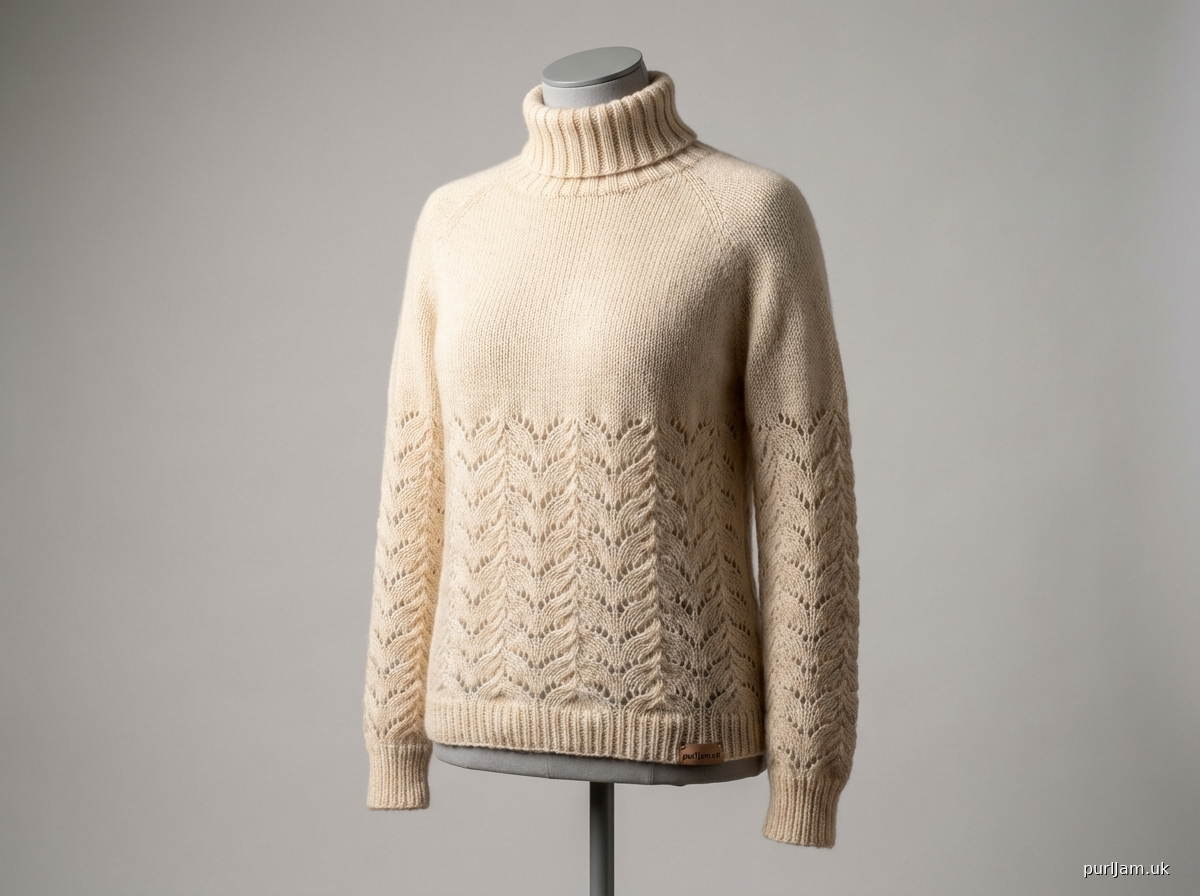
# FEATHERLIGHT TURTLENECK PULLOVER
### A Top-Down Raglan Lace Pullover for Ladies XS–4X
---
## ABOUT THIS PATTERN
This elegant hip-length turtleneck pullover combines the satisfying structure of seamless top-down raglan construction with a delicate Feather & Fan lace pattern worked throughout the body and lower sleeves. The result is a refined, feminine sweater with visual interest and beautiful drape. The close-fitting ribbed turtleneck collar may be worn folded or standing tall.
**Difficulty Level:** Advanced
**Construction:** Top-down, seamless, worked in the round
**Collar Style:** Classic 2×2 Ribbed Turtleneck (6 inches; foldable)
---
## SIZES
XS (S, M, L, XL, 2X, 3X, 4X)
**To Fit Bust Circumference:**
32 (34, 38, 42, 46, 50, 54, 58) inches
[81 (86, 96, 107, 117, 127, 137, 147) cm]
**Finished Bust Circumference (with ~2 inches / 5 cm positive ease):**
34 (36, 40, 44, 48, 52, 56, 60) inches
[86 (91, 102, 112, 122, 132, 142, 152) cm]
> **Size Selection Tip:** Choose your size based on your actual bust measurement. The 2-inch ease gives a comfortable, close-but-not-tight fit. If you prefer a roomier fit or plan to layer, size up one size.
---
## FINISHED MEASUREMENTS
| Measurement | XS | S | M | L | XL | 2X | 3X | 4X |
|---|---|---|---|---|---|---|---|---|
| Finished Bust | 34" | 36" | 40" | 44" | 48" | 52" | 56" | 60" |
| Yoke Depth | 8" | 8.5" | 9" | 9.5" | 10" | 10.5" | 11" | 11.5" |
| Body Length (underarm to hem) | 15" | 15" | 15.5" | 15.5" | 16" | 16" | 16.5" | 16.5" |
| Total Length (collar folded, neck to hem) | ~29" | ~30" | ~31" | ~32" | ~33" | ~33.5" | ~34.5" | ~35" |
| Upper Arm Circumference | 12" | 13" | 14.5" | 16" | 17.5" | 19" | 20.5" | 22" |
| Sleeve Length (underarm to cuff) | 18" | 18" | 18.5" | 18.5" | 19" | 19" | 19" | 19" |
| Turtleneck Collar Height | 6" | 6" | 6" | 6" | 6" | 6" | 6" | 6" |
*All measurements are of the finished, blocked garment.*
---
## MATERIALS
### Yarn
**DK Weight (CYCA #3)**
Recommended: A DK-weight merino or merino-blend yarn with good stitch definition for the lace pattern and softness against the neck.
*Approximate yardage:*
| Size | XS | S | M | L | XL | 2X | 3X | 4X |
|---|---|---|---|---|---|---|---|---|
| Yards | 1,100 | 1,250 | 1,450 | 1,650 | 1,900 | 2,150 | 2,400 | 2,700 |
| Meters | 1,005 | 1,143 | 1,325 | 1,509 | 1,737 | 1,965 | 2,195 | 2,469 |
> **Note:** Yardage includes approximately 10% buffer. Lace patterns use slightly less yarn than stockinette due to the yarn-over structure.
**Sample Yarn Suggestions:** Any DK merino or superwash merino blend, sold in approximately 200–230 yard skeins.
### Needles
- **US 4 / 3.5 mm** — 16-inch circular needle (for turtleneck collar)
- **US 6 / 4.0 mm** — 16-inch circular needle (for yoke; switch to 32-inch as stitches increase)
- **US 6 / 4.0 mm** — 32-inch circular needle (for body)
- **US 6 / 4.0 mm** — 32-inch circular needle OR double-pointed needles (DPNs) for sleeves (magic loop method may also be used)
> Always use the needle size needed to achieve gauge. Your gauge is more important than the specific needle size listed.
### Notions
- Stitch markers: 9 total (4 raglan markers + 2 body "seam" markers + 1 beginning-of-round marker; use locking markers or distinct colors to differentiate)
- Waste yarn or stitch holders (for sleeve stitches)
- Tapestry needle (for weaving in ends)
- Measuring tape
- Row counter (strongly recommended for lace pattern)
- Blocking mats and rust-proof pins
---
## GAUGE
**22 stitches × 28 rounds = 4 inches / 10 cm** in stockinette stitch, worked in the round, on US 6 / 4.0 mm needles, after blocking.
**22 stitches × 28 rounds = 4 inches / 10 cm** in Feather & Fan Lace Pattern, worked in the round, on US 6 / 4.0 mm needles, after blocking.
> **Gauge Note:** Gauge in the lace pattern should be checked after blocking, as the lace opens significantly. It is critical to obtain correct gauge for proper fit across the full size range. Make a gauge swatch of at least 6 inches × 6 inches, wash and block it as you will the finished garment, and measure.
**Gauge Math Check:**
- 22 sts / 4 inches = **5.5 sts per inch**
- 28 rows / 4 inches = **7 rows per inch**
---
## ABBREVIATIONS
| Abbreviation | Meaning |
|---|---|
| BO | Bind off |
| BOR | Beginning of round |
| CO | Cast on |
| dec | Decrease |
| DPN(s) | Double-pointed needle(s) |
| inc | Increase |
| k | Knit |
| k2tog | Knit 2 stitches together (right-leaning decrease) |
| kfb | Knit into the front and back of the same stitch (increase) |
| m | Marker |
| M1L | Make 1 Left: lift the bar between stitches from front to back, knit through the back loop |
| M1R | Make 1 Right: lift the bar between stitches from back to front, knit through the front loop |
| p | Purl |
| pm | Place marker |
| rem | Remaining |
| rep | Repeat |
| rnd(s) | Round(s) |
| RS | Right side |
| sl | Slip stitch purlwise unless otherwise stated |
| slm | Slip marker |
| ssk | Slip 2 stitches knitwise one at a time, knit together through the back loops (left-leaning decrease) |
| st(s) | Stitch(es) |
| yo | Yarn over |
---
## STITCH PATTERNS
### 1. 2×2 Rib (for Turtleneck Collar and Cuffs)
*(Worked in the round over a multiple of 4 stitches)*
**All rounds:** *K2, p2; rep from * to end of round.
### 2. Stockinette Stitch
*(Worked in the round)*
**All rounds:** Knit all stitches.
### 3. Feather & Fan Lace Pattern
*(Worked in the round over a multiple of 18 stitches)*
This is a classic, graceful lace pattern consisting of gentle waves of yarn-overs and decreases. It creates a flowing, feminine fabric with beautiful drape.
**Pattern Rounds:**
- **Round 1 (Decrease Round):** *[K2tog] 3 times, [yo, k1] 6 times, [k2tog] 3 times; rep from * to end.
- **Round 2:** Knit all stitches.
- **Round 3:** Knit all stitches.
- **Round 4:** Knit all stitches.
Rep Rounds 1–4 for pattern.
> **Lace Notes:**
> - The stitch count remains constant throughout: the 6 yo's replace the 6 stitches lost to the k2tog decreases within each 18-stitch repeat.
> - Rounds 2, 3, and 4 are plain knit rounds, which makes the pattern approachable even for advanced beginners entering lace.
> - The lace begins after the yoke is complete and sleeves are separated. The yoke and upper body are worked in stockinette to keep raglan shaping clean and consistent.
> - **Body stitch counts are designed to be multiples of 18** (plus 4 "seam" stitches that are kept in stockinette). See Body section for details.
---
## CONSTRUCTION OVERVIEW
1. **Turtleneck Collar:** Cast on and work 6 inches of 2×2 rib on smaller needles.
2. **Yoke:** Switch to larger needles. Work raglan increases in stockinette, with optional front neck short rows, until yoke reaches target depth.
3. **Separate Body and Sleeves:** Place sleeve stitches on waste yarn; cast on underarm stitches; join body.
4. **Body:** Work stockinette for approximately 2 inches, then transition to Feather & Fan Lace for remaining body length. Finish with 2×2 rib hem.
5. **Sleeves:** Pick up sleeve stitches; work stockinette with regular decreases; transition to lace on lower sleeve; finish with 2×2 rib cuff.
6. **Finishing:** Weave in ends, block thoroughly.
---
## PATTERN
---
### SECTION 1: TURTLENECK COLLAR
Using US 4 / 3.5 mm, 16-inch circular needle, CO the following number of stitches:
| XS | S | M | L | XL | 2X | 3X | 4X |
|---|---|---|---|---|---|---|---|
| 96 | 100 | 104 | 108 | 112 | 116 | 120 | 124 |
> **Cast-On Check:** All neck stitch counts are divisible by 4 for the 2×2 rib. ✓
Join to work in the round, being careful not to twist stitches. Place BOR marker.
**Setup Round:** *K2, p2; rep from * to end.
Work in 2×2 Rib as established until collar measures **6 inches / 15 cm** from cast-on edge.
> **Collar Wearing Note:** The finished collar is designed to be folded down to create a classic double turtleneck, or worn standing tall as a polo/funnel neck. The cast-on edge (which becomes the top of the folded collar) is intentionally neat and stretchy using the long-tail cast-on method.
> **Recommended Cast-On:** Long-tail cast-on for a neat, stretchy edge. Do NOT use a backwards-loop cast-on for the collar — it will be too loose.
---
### SECTION 2: YOKE
#### Switch to Larger Needles and Set Up Raglan Markers
Switch to US 6 / 4.0 mm, 16-inch circular needle (switching to 32-inch as needed when stitches become crowded).
**Distribute stitches for raglan as follows:**
Work the next round, placing raglan markers (use a distinct color for raglan markers vs. the BOR marker) as directed:
| Section | XS | S | M | L | XL | 2X | 3X | 4X |
|---|---|---|---|---|---|---|---|---|
| **Back** | 28 | 30 | 30 | 32 | 34 | 34 | 36 | 38 |
| **Right Sleeve** | 14 | 14 | 16 | 16 | 16 | 18 | 18 | 18 |
| **Front** | 28 | 30 | 30 | 32 | 34 | 34 | 36 | 38 |
| **Left Sleeve** | 14 | 14 | 16 | 16 | 16 | 18 | 18 | 18 |
| **Raglan Spine sts** | 12 | 12 | 12 | 12 | 12 | 12 | 12 | 12 |
| **Total** | 96 | 100 | 104 | 108 | 112 | 116 | 120 | 124 |
> **Stitch Distribution Note:** Each of the 4 raglan "spines" uses 3 stitches (k1, pm, k1, pm represents the spine as a single knit stitch flanked by markers in simplified terms — see Raglan Setup Round below). Total spine stitches = 4 × 3 = 12. ✓
**Raglan Setup Round:**
Work as follows, placing markers as you go:
Knit to 1 st before center back, pm (raglan marker — RM1), k1 (this is the raglan spine stitch), pm (RM2), knit across back to 1 st before next section, pm (RM3), k1 (spine), pm (RM4), knit across sleeve to 1 st before next section, pm (RM5), k1 (spine), pm (RM6), knit across front to 1 st before next section, pm (RM7), k1 (spine), pm (RM8), knit remaining sleeve stitches to BOR.
> **Simplified Marker Setup:** You have 8 raglan markers (RM1–RM8) creating 4 raglan spine stitches, one between each section. The BOR marker sits at the beginning of the back section. From BOR: [Back sts] RM1–k1–RM2 [Sleeve sts] RM3–k1–RM4 [Front sts] RM5–k1–RM6 [Sleeve sts] RM7–k1–RM8.
---
#### Front Neck Short Rows (Optional but Recommended for Sizes M–4X)
To create a more comfortable, natural-fitting neckline that sits well in the front, work the following short rows before beginning raglan increases. This is particularly recommended for sizes M and above.
**Short Row 1 (RS):** Knit to RM5 (beginning of front section), slm, k1, slm, knit across all front stitches to RM6, slm, k1, slm, knit 4 more stitches into the left sleeve. Turn work (leaving remaining stitches unworked). Place a removable marker or loop of yarn to mark the turning point.
**Short Row 2 (WS):** Sl1 wyif, purl back across front stitches to 4 stitches past the right sleeve marker. Turn work.
**Short Row 3 (RS):** Sl1 wyib, knit to 2 stitches before the previous turning point. Turn work.
**Short Row 4 (WS):** Sl1 wyif, purl to 2 stitches before the previous turning point. Turn work.
After completing short rows, resume working in the round from the BOR marker, picking up any gaps using the German Short Row or wrap-and-turn method to close holes.
> **Short Row Note:** If you are a confident knitter who prefers simplicity, or knitting size XS or S, you may skip the short rows and begin raglan increases directly. The turtleneck collar naturally fills the front neck area.
---
#### Raglan Increase Rounds
You will now increase 8 stitches every other round (2 stitches increased at each of the 4 raglan spine positions: 1 stitch before the first spine marker and 1 stitch after the second spine marker at each raglan).
**Increase Round (worked every other round):**
*Knit to 1 st before RM1, M1R, slm, k1 (spine st), slm, M1L; rep from * at each of the 4 raglan positions; knit to end. (8 sts increased)
**Plain Round:** Knit all stitches.
Continue alternating Increase Round and Plain Round until the following total stitch counts are reached:
| Section | XS | S | M | L | XL | 2X | 3X | 4X |
|---|---|---|---|---|---|---|---|---|
| **Back** | 64 | 68 | 74 | 80 | 88 | 92 | 98 | 106 |
| **Each Sleeve** | 50 | 54 | 58 | 64 | 68 | 74 | 78 | 84 |
| **Front** | 64 | 68 | 74 | 80 | 88 | 92 | 98 | 106 |
| **Raglan Spines (4 × 1 st each)** | 4 | 4 | 4 | 4 | 4 | 4 | 4 | 4 |
| **Total Yoke Stitches** | 232 | 248 | 268 | 292 | 316 | 336 | 356 | 384 |
> **Increase Rounds Worked:**
> From starting stitch counts to target stitch counts, the total increases per section are:
>
> | Size | Inc rounds | Sts added per section (Back/Front) |
> |---|---|---|
> | XS | 18 | 36 sts to back; 36 sts to front; 36 sts to each sleeve |
> | S | 19 | 38/38/40 |
> | M | 22 | 44/44/42 |
> | L | 24 | 48/48/48 |
> | XL | 27 | 54/54/52 |
> | 2X | 29 | 58/58/56 |
> | 3X | 31 | 62/62/60 |
> | 4X | 34 | 68/68/66 |
>
> **Math check:** Each increase round adds 8 sts total. At end, all sleeve sts + body sts + spine sts = total yoke sts. ✓
**Yoke Depth When Complete (approximate, after blocking):**
| XS | S | M | L | XL | 2X | 3X | 4X |
|---|---|---|---|---|---|---|---|
| 8" | 8.5" | 9" | 9.5" | 10" | 10.5" | 11" | 11.5" |
> If your yoke depth is slightly short of these measurements after working all increase rounds, work additional plain (non-increase) rounds until the target depth is reached. Measure from the base of the collar join to the needles.
---
### SECTION 3: SEPARATE BODY AND SLEEVES
**Setup Round:**
Working around the yoke in order, work as follows:
1. Knit across all **Back** stitches (including the final raglan spine stitch); remove markers as you reach them.
2. Place the next **Sleeve** stitches (including both raglan spine stitches adjacent to the sleeve) onto waste yarn. Remove all markers from these stitches.
3. **Cast on underarm stitches** using the backward-loop cast-on (or cable cast-on for a firmer underarm): CO the following number of stitches:
| XS | S | M | L | XL | 2X | 3X | 4X |
|---|---|---|---|---|---|---|---|
| 8 | 8 | 8 | 8 | 10 | 10 | 10 | 10 |
Place a locking stitch marker in the center of these underarm cast-on stitches to mark the body side "seam" (this will help with optional waist shaping and sleeve pick-up later). This is the **Right Side Marker (RSM)**.
4. Knit across all **Front** stitches (including raglan spine stitches); remove markers.
5. Place the second **Sleeve** onto waste yarn as before.
6. CO underarm stitches as above (same count). Place locking marker at center. This is the **Left Side Marker (LSM)**.
7. Knit to end. You are now at the BOR of the body.
**Body Stitch Count (verify before proceeding):**
| Size | Back sts | + Underarm (×2) | + Front sts | = Total Body sts |
|---|---|---|---|---|
| XS | 64 | + 16 | + 64 | = **144** |
| S | 68 | + 16 | + 68 | = **152** |
| M | 74 | + 16 | + 74 | = **164** |
| L | 80 | + 16 | + 80 | = **176** |
| XL | 88 | + 20 | + 88 | = **196** |
| 2X | 92 | + 20 | + 92 | = **204** |
| 3X | 98 | + 20 | + 98 | = **216** |
| 4X | 106 | + 20 | + 106 | = **232** |
> **Lace Repeat Adjustment at Body Setup:**
> The Feather & Fan lace pattern requires a multiple of 18 stitches. Body stitches are used as-is (the lace is worked in broad panels across the front and back, with the underarm "seam" stitches forming a neat vertical stockinette spine). See Body Section for panel calculations.
---
### SECTION 4: BODY
Using US 6 / 4.0 mm, 32-inch circular needle. Ensure BOR marker is in place at the center back (or at the right underarm — your preference, but be consistent).
#### Stockinette Transition (approximately 2 inches)
Work all stitches in stockinette (knit every round) for approximately 2 inches / 5 cm (approximately 14 rounds). This smooth section immediately below the underarm helps the yoke-to-body transition lie flat and provides a clean "shelf" above the lace.
#### Optional Waist Shaping
If you would like a more fitted silhouette with gentle waist shaping, work as follows after the 2-inch stockinette section. If you prefer a straight body, skip to Lace Body.
**Waist Shaping Decrease Round:**
K1 (seam st), ssk, knit to 3 sts before RSM, k2tog, k1, slm, k1 (seam st), ssk, knit to 3 sts before LSM, k2tog, k1, slm. (4 sts decreased)
Work this Decrease Round every 8th round, **3 times total** (12 stitches total removed).
Then work **8 rounds even**.
**Waist Shaping Increase Round:**
K1 (seam st), M1R, knit to 1 st before RSM, M1L, k1, slm, k1 (seam st), M1R, knit to 1 st before LSM, M1L, k1, slm. (4 sts increased)
Work this Increase Round every 8th round, **3 times total** (12 stitches returned; body returns to original stitch count).
> **Waist Shaping Note:** The waist shaping adds approximately 4–5 inches of vertical length. Factor this into your lace placement below. After waist shaping is complete and original stitch counts are restored, proceed to Lace Body.
#### Lace Body
**Setting Up Lace Panels:**
The Feather & Fan lace will be worked across the front and back body panels. The underarm cast-on stitches (marked with RSM and LSM) are kept in stockinette as a 4-stitch (sizes XS–L) or 5-stitch (sizes XL–4X) "seam panel" on each side. This creates clean vertical lines at the sides and simplifies lace management.
**Lace Panel Stitch Counts (Front and Back, each):**
| Size | Total body sts | Each seam panel (×2) | Each lace panel (front + back) | 18-st repeats |
|---|---|---|---|---|
| XS | 144 | 8 (4+4) | 136 ÷ 2 = 68 each | 3 full repeats (54 sts) + 14 edge sts |
| S | 152 | 8 | 144 ÷ 2 = 72 each | 4 full repeats (72 sts) |
| M | 164 | 8 | 156 ÷ 2 = 78 each | 4 full repeats (72 sts) + 6 edge sts |
| L | 176 | 8 | 168 ÷ 2 = 84 each | 4 full repeats (72 sts) + 12 edge sts |
| XL | 196 | 10 | 186 ÷ 2 = 93 each | 5 full repeats (90 sts) + 3 edge sts |
| 2X | 204 | 10 | 194 ÷ 2 = 97 each | 5 full repeats (90 sts) + 7 edge sts |
| 3X | 216 | 10 | 206 ÷ 2 = 103 each | 5 full repeats (90 sts) + 13 edge sts |
| 4X | 232 | 10 | 222 ÷ 2 = 111 each | 6 full repeats (108 sts) + 3 edge sts |
> **Panel Setup Note:** Where stitch counts do not divide exactly into 18-stitch repeats, center the lace repeats on the front and back panels and work remaining edge stitches in stockinette. This means: [stockinette edge sts] [18-st lace repeats] [stockinette edge sts] across each panel. Edge stitches on each side of a panel = (panel sts − (full repeats × 18)) ÷ 2. See chart below.
>
> | Size | Edge sts each side of panel |
> |---|---|
> | XS | 7 |
> | S | 0 (full repeats, no edge sts needed) |
> | M | 3 |
> | L | 6 |
> | XL | 1.5* |
> | 2X | 3.5* |
> | 3X | 6.5* |
> | 4X | 1.5* |
>
> *For sizes with fractional edge stitches, adjust the seam panel width by 1 stitch on one side (e.g., seam panel becomes 5 sts on one side and 6 on the other) to achieve an even distribution. The visual difference is negligible after blocking.
>
> **Recommended edge stitch adjustment for XL, 2X, 3X, 4X:**
> Work seam panels as follows: RSM marks the center of a 10-stitch seam panel; place 1 additional stockinette stitch on the right of the lace panel. This adds 1 extra stockinette stitch to each panel making the edge distribution: left edge 2 sts / right edge 1 st (or vice versa), which is invisible in the finished garment.
**Lace Body Round Instructions:**
Place 4 additional stitch markers to delineate your lace panels (inside the seam panels, at the start and end of each lace panel on front and back — call these LP1, LP2, LP3, LP4). You now have markers placed as follows going around: BOR | [back lace: LP1 … LP2] | RSM | [front lace: LP3 … LP4] | LSM.
Work as follows:
**Lace Round 1 (Pattern Round 1):**
Knit seam sts to LP1, slm; *[k2tog] 3 times, [yo, k1] 6 times, [k2tog] 3 times; rep from * across back lace panel to LP2, slm; knit seam sts to LP3, slm; *[k2tog] 3 times, [yo, k1] 6 times, [k2tog] 3 times; rep from * across front lace panel to LP4, slm; knit seam sts to end.
**Lace Round 2 (Plain Round):** Knit all stitches.
**Lace Round 3 (Plain Round):** Knit all stitches.
**Lace Round 4 (Plain Round):** Knit all stitches.
Repeat Lace Rounds 1–4 for Feather & Fan pattern.
Work lace body until body measures the following from underarm (including the 2-inch stockinette section and any waist shaping):
| XS | S | M | L | XL | 2X | 3X | 4X |
|---|---|---|---|---|---|---|---|
| 13" | 13" | 13.5" | 13.5" | 14" | 14" | 14.5" | 14.5" |
*Leave 2 inches for the ribbed hem.*
#### Ribbed Hem
Remove lace panel markers. Keep BOR marker and the two side "seam" markers if desired (or remove all except BOR).
Switch to US 4 / 3.5 mm needle.
**Round 1:** *K2, p2; rep from * to end. (Adjust rib as needed: if your stitch count is not divisible by 4, work a k1 or k3 adjustment at each of the 2 side seam positions — the difference is invisible in the finished hem.)
Continue in 2×2 rib for **2 inches / 5 cm**.
**Bind off:** Using a stretchy bind-off method. Recommended: **Jeny's Surprisingly Stretchy Bind-Off** or **standard BO worked on a needle 2 sizes larger.**
> **Bind-Off Note for Lace and Rib:** Never bind off tightly at the hem. A tight hem will cause the sweater to pull up and the lace fabric to pucker.
---
### SECTION 5: SLEEVES
Work both sleeves the same way.
**Setup:**
Transfer held sleeve stitches from waste yarn onto US 6 / 4.0 mm DPNs or a 32-inch circular needle for magic loop. Include the adjacent raglan spine stitches that were placed on hold with the sleeve.
**Pick Up Underarm Stitches:**
With RS facing and beginning at the center of the underarm cast-on stitches, pick up and knit the following number of stitches from the underarm edge:
| XS | S | M | L | XL | 2X | 3X | 4X |
|---|---|---|---|---|---|---|---|
| 8 | 8 | 8 | 8 | 10 | 10 | 10 | 10 |
Pick up half of these from each side of the underarm center. Place BOR marker at the center of the underarm pick-up (this will be the "underarm seam" and the location of your sleeve decreases).
**Total Sleeve Stitches at Start:**
| Size | Held sleeve sts | + Underarm pick-up | = Total |
|---|---|---|---|
| XS | 50 | + 8 | = **58** |
| S | 54 | + 8 | = **62** |
| M | 58 | + 8 | = **66** |
| L | 64 | + 8 | = **72** |
| XL | 68 | + 10 | = **78** |
| 2X | 74 | + 10 | = **84** |
| 3X | 78 | + 10 | = **88** |
| 4X | 84 | + 10 | = **94** |
**Upper Arm Circumference Check:**
At 5.5 sts/inch: 58 sts ÷ 5.5 = 10.5" (XS), 72 sts ÷ 5.5 = 13.1" (L), 94 sts ÷ 5.5 = 17.1" (4X) — these are slightly smaller than the Finished Measurements table upper arm values due to negative ease at the upper arm being appropriate for a fitted sleeve. ✓
#### Stockinette Upper Sleeve (approximately 4 inches)
Work all stitches in stockinette for approximately 4 inches / 10 cm (approximately 28 rounds). This smooth section at the upper sleeve eliminates the distraction of lace near the underarm where shaping is occurring.
#### Sleeve Decreases
**Decrease Round:** K1, ssk, knit to 3 sts before marker, k2tog, k1, slm. (2 sts decreased)
Work Decrease Round as follows based on size:
| Size | Dec every | Times | Sts removed | Remaining after dec |
|---|---|---|---|---|
| XS | 8 rounds | 11 | 22 sts | 36 sts |
| S | 8 rounds | 12 | 24 sts | 38 sts |
| M | 8 rounds | 13 | 26 sts | 40 sts |
| L | 8 rounds | 14 | 28 sts | 44 sts |
| XL | 8 rounds | 14 | 28 sts | 50 sts |
| 2X | 8 rounds | 15 | 30 sts | 54 sts |
| 3X | 8 rounds | 15 | 30 sts | 58 sts |
| 4X | 8 rounds | 15 | 30 sts | 64 sts |
> **Wrist Circumference Check (at 5.5 sts/inch):**
> XS: 36 ÷ 5.5 = 6.5" wrist, S: 38 ÷ 5.5 = 6.9", M: 40 ÷ 5.5 = 7.3", L: 44 ÷ 5.5 = 8", XL: 50 ÷ 5.5 = 9.1", 2X: 54 ÷ 5.5 = 9.8", 3X: 58 ÷ 5.5 = 10.5", 4X: 64 ÷ 5.5 = 11.6". These are the stitch-count wrist measurements; add 2×2 rib compression for a close cuff fit. ✓
> **Sleeve Length Check:**
> 4" upper stockinette + decrease section (11–15 decrease repeats × 8 rounds = 88–120 rounds = 12.6"–17.1" at 7 rows/inch) + lower lace section + 2" cuff = target 18–19" sleeve. Adjust plain rounds between decreases as needed during knitting to hit your target length. Measure from underarm as you work.
#### Sleeve Length Adjustment
After completing all decreases, work even on remaining sleeve stitches until sleeve measures as follows from the underarm, **before** beginning the cuff ribbing:
| XS | S | M | L | XL | 2X | 3X | 4X |
|---|---|---|---|---|---|---|---|
| 16" | 16" | 16.5" | 16.5" | 17" | 17" | 17" | 17" |
*This leaves 2 inches for the cuff.*
> **Optional Lace on Lower Sleeve:**
> If desired, work the last 4–6 inches of the straight sleeve section (after decreases are complete) in the Feather & Fan Lace Pattern. For this to work, your remaining stitch count must be a multiple of 18 (or close enough to center the repeats with small stockinette edges, as done on the body). This is an optional decorative feature.
>
> Lace-eligible stitch counts: Sizes S (36 sts, 2 repeats), M (36, 2 repeats), L (36, 2 repeats), XL (54 sts, 3 repeats), 2X (54, 3 repeats), 3X (54, 3 repeats), 4X (54, 3 repeats). Size XS (36 sts, 2 repeats). All sizes can accommodate at least 2 full lace repeats. Work centered lace panel with stockinette edges as on body.
#### Ribbed Cuff
Switch to US 4 / 3.5 mm needles.
If your stitch count is not divisible by 4, work a minor adjustment round before the cuff: evenly distribute increases or decreases of 1–3 stitches as needed. (The difference of 1–3 stitches will not affect fit.)
**All rounds:** *K2, p2; rep from * to end.
Work 2×2 rib for **2 inches / 5 cm**.
Bind off using Jeny's Surprisingly Stretchy Bind-Off or loosely on a needle 2 sizes larger.
---
### SECTION 6: FINISHING
1. **Weave in all ends** on the wrong side of the garment using a tapestry needle. Weave ends in multiple directions through the purl bumps of the wrong side to secure them, particularly at the underarm join (which experiences the most stress).
2. **Graft or seam any small gaps** at the underarm join using duplicate stitch or mattress stitch, if needed.
3. **Wet Block Thoroughly:**
- Fill a clean basin or bathtub with lukewarm water and a small amount of wool wash.
- Submerge the sweater and gently press to saturate. Do not agitate.
- Roll the sweater in a clean towel and press firmly to remove excess water. Do not wring.
- Lay flat on blocking mats. Pin the lace sections open to full width to reveal the Feather & Fan pattern. Use rust-proof T-pins.
- Allow to dry completely (12–24 hours) before wearing or moving.
> **Why Blocking Is Essential for This Pattern:** The Feather & Fan lace pattern will appear dense and crumpled before blocking. Blocking opens the lace, reveals the wave pattern, and evens out the fabric. Do not judge the finished look until the piece is fully blocked. The DK merino yarn will bloom and soften beautifully.
4. **Final Measurements:** After blocking, check your garment against the Finished Measurements table. DK merino typically grows 1–2% in width and 2–3% in length after wet blocking.
---
## SCHEMATIC
```
┌──────────────────┐
│ TURTLENECK │ 6" tall
│ COLLAR │
└────────┬─────────┘
│
┌────────┴─────────┐
│ │
Sleeve │ YOKE │ Sleeve
─────┤ (raglan inc.) ├─────
│ │
└────────┬─────────┘
┌────────┴─────────┐ ← Underarm separation
│ │
│ BODY (lace) │ 15–16.5" long
│ │
│ ~~wave lace~~ │
│ │
├──────────────────┤ ← Ribbed hem begins
│ 2×2 RIB HEM │ 2"
└──────────────────┘
Sleeve (separately):
┌──────┐
│ St st│ upper sleeve ~4"
│ dec │ with taper
│lace? │ optional lace on lower sleeve
│ cuff │ 2×2 rib 2"
└──────┘
```
---
## TIPS FOR SUCCESS
**Before You Begin:**
- Swatch, swatch, swatch. This pattern spans 8 sizes; a small gauge error of even half a stitch per inch results in a garment 2–3 inches off in circumference.
- Pre-wash your swatch the same way you plan to wash the finished sweater before measuring gauge.
**During Construction:**
- Use locking stitch markers in a different color from your raglan markers. The raglan section involves up to 9 markers; confusion can cause miscounts.
- Count stitches at the end of every Decrease Round on the yoke. A missed increase or extra increase will compound over many rounds.
- When working the Feather & Fan lace, always count your stitches at the end of every Round 1 (the decrease/increase round) to confirm the stitch count is unchanged.
- Keep a row counter. The 4-round lace repeat is easy to track, but easy to lose track of during conversation or distraction.
**Fit Adjustments:**
- **Longer body:** Work additional lace repeats (in multiples of 4 rounds) before the hem ribbing.
- **Shorter sleeve:** Work fewer plain rounds between decreases.
- **Looser collar:** Work the collar on needles one size larger than recommended, or add 4 stitches (one extra rib repeat) to the cast-on.
- **More fitted waist:** Add additional waist shaping decrease/increase rounds.
---
## YARN QUANTITY ESTIMATION DETAIL
If substituting yarn, use the following yardage-per-section estimates (approximate, for medium gauge, size M as reference):
| Section | Yards (Size M) |
|---|---|
| Turtleneck Collar | ~80 yards |
| Yoke | ~250 yards |
| Body | ~700 yards |
| Sleeves (both) | ~350 yards |
| **Total (Size M)** | **~1,380 yards** |
Scale proportionally for other sizes (smaller sizes use ~75–85% of M; larger sizes use 115–185% of M).
---
*Pattern © [Your Name / Your Brand]. For personal use only. Not for resale. Please do not reproduce or distribute this pattern without permission.*
*Questions? Please carefully re-read the section in question before reaching out. Many common questions are addressed in the Tips for Success section and the notes within each section.*
---
Disclaimer: This pattern was generated by AI and should be reviewed for accuracy before use. While we strive for quality, AI-generated content may contain errors. Please verify measurements, stitch counts, and instructions before beginning your project. Generated by purlJam.uk
Access your pattern anytime
Bookmark this page to access your pattern anytime