Type
Crochet
Difficulty
beginner
Category
amigurumi
AI Thinking Process
Planning
Verification
Pattern
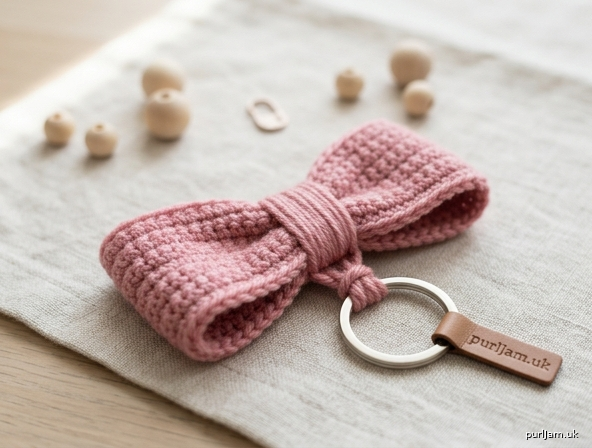
Flat Bow Keychain Charm
Beginner Crochet Pattern (US Terms)
Finished Size: Each strip measures approximately 4 inches wide by 1.5 inches tall (10 cm × 4 cm). Assembled bow is approximately 3.5 inches wide by 1.5 inches tall (9 cm × 4 cm), perfect for a keychain charm.
Difficulty: Beginner – uses only chain and single crochet.
Materials
- Worsted weight yarn (medium/4), any color (approx. 20 yards / 18 m total)
- Crochet hook: 4 mm (US G/6)
- Yarn needle (for weaving ends and wrapping)
- Keyring or lobster clasp
- Scissors
- Optional: 1 small jump ring (if you prefer metal attachment instead of yarn loop)
Abbreviations (US Terms)
- ch – chain (yarn over, pull through loop on hook)
- sc – single crochet (insert hook, yarn over, pull up loop, yarn over, pull through both loops on hook)
- st(s) – stitch(es)
- FO – fasten off (cut yarn, pull tail through last loop)
Gauge
4 sc and 4 rows = 1 inch (2.5 cm) in single crochet. (Gauge is important so your strips match the stated size. If your swatch is too big, try a smaller hook; if too small, try a larger hook.)
Pattern Instructions
Strip (make 2 identical)
Leave a 6-inch (15 cm) starting tail.
- Ch 17.
- Row 1: Sc in 2nd ch from hook and in each ch across. (16 sc)
- Row 2: Ch 1, turn. Sc in each st across. (16 sc)
- Rows 3–6: Repeat Row 2. (16 sc each row)
FO, leaving a 6-inch (15 cm) tail. Weave in the starting tail only; leave the ending tail for now (or weave it in later if preferred).
Repeat for second strip. You now have two identical rectangles, each 4" × 1.5".
Assembly – Forming the Bow
-
Fold and pinch first strip:
Lay one strip flat horizontally. Fold the two short ends toward the center so they meet (or slightly overlap) behind the middle. Pinch the center firmly between your fingers so the strip forms a classic bow shape with two loops on the sides. Hold the pinch. -
Fold and pinch second strip:
Repeat the exact same fold-and-pinch with the second strip.
(Optional but recommended: stack the second pinched strip on top of or slightly offset behind the first so the bow looks fuller. Keep both centers aligned and pinched together as one unit.) -
Wrap the center to secure:
Cut a separate strand of yarn about 12–15 inches (30–38 cm) long.
Place the middle of this strand against the back of the pinched center. Bring both ends to the front and wrap tightly around the pinched center 8–12 times, covering the pinch completely and hiding it.
Pull snug so the bow keeps its shape. Tie the two ends in a firm double knot at the back. Thread the ends onto your yarn needle and weave them securely into the wrapped center or into the back of the bow. Trim excess.
The wrapped center now holds both strips in a neat bow shape.
Attaching the Keyring
Option A – Yarn loop (no metal findings needed):
Cut an 8-inch (20 cm) strand of yarn. Fold it in half. Using the yarn needle, thread the folded end through the back of the wrapped center from front to back, creating a small loop. Pass the two cut ends through the folded loop and pull tight (lark’s-head knot). Tie the two ends together in a secure knot about ½ inch (1 cm) from the bow, forming a hanging loop. Trim ends. Slip your keyring onto this yarn loop.
Option B – Jump ring:
Open a small jump ring with pliers. Pass it through several strands of the wrapped yarn at the exact back center of the bow. Close the jump ring firmly. Attach your keyring to the jump ring.
Weave in any remaining tails. Gently fluff and shape the bow loops with your fingers.
Finishing Notes
- Your bow is ready to clip onto keys, a bag zipper, or a backpack!
- To make a slightly larger or smaller bow, add or subtract chains in pairs (and match the number of rows) while keeping the same gauge.
- Practice the pinch-and-wrap on scrap yarn first if you like; it becomes quick after one try.
Enjoy your handmade keychain charm!
Disclaimer: This pattern was generated by AI and should be reviewed for accuracy before use. While we strive for quality, AI-generated content may contain errors. Please verify measurements, stitch counts, charts, and instructions before beginning your project. Generated by purlJam.uk
Love this pattern?
Save this pattern to your free PurlJam libraryAccess your pattern anytime
Bookmark this page to access your pattern anytime