Type
Knitting
Difficulty
intermediate
Category
amigurumi
AI Thinking Process
Planning
Verification
Pattern
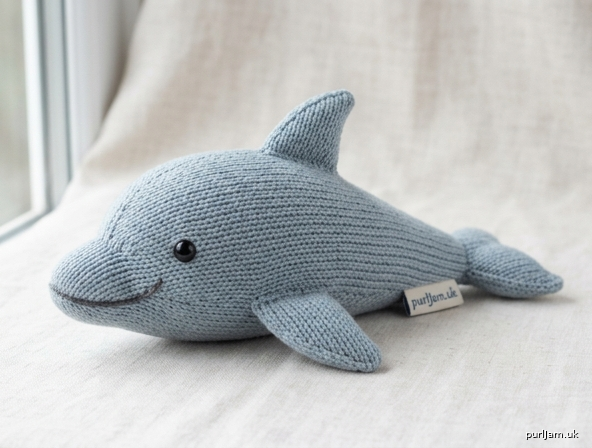
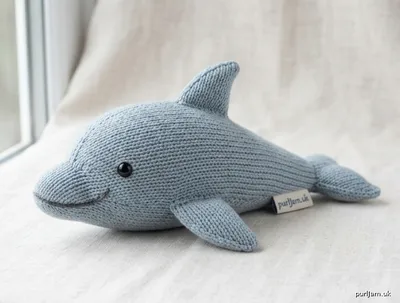
Flat-Knit Dolphin Soft Toy
Easy Knitted Amigurumi
A cheerful little dolphin worked entirely flat in stockinette stitch. Separate pieces are seamed with mattress stitch and firmly stuffed. Perfect first toy project—no double-pointed needles or magic loop required.
Finished Size
Approximately 9" (23 cm) long from nose to tail tip and 3.5" (9 cm) tall at the dorsal fin (excluding flippers).
Yarn
Worsted weight yarn (CYC 4), approx 100 yd (91 m) main color (MC) — light gray, blue-gray, or teal recommended.
Small amount of contrasting yarn or embroidery floss for mouth and any optional markings.
Sample used 90 yd MC + scrap dark gray for features.
Needles
US 5 (3.75 mm) straight needles or circular needle used flat, or size needed to obtain gauge.
(Use needles 1–2 sizes smaller than yarn label suggests for a firm fabric that hides stuffing.)
Notions
- Polyester fiberfill stuffing (approx 2 oz / 55 g)
- 9 mm safety eyes (pair) or black embroidery floss
- Tapestry needle
- Stitch markers (optional)
- Scissors
- Straight pins for assembly
Gauge
20 sts and 28 rows = 4" (10 cm) in stockinette stitch, blocked lightly.
Tight, even fabric is more important than exact stitch count for toys. Adjust needle size if necessary so stuffing does not show.
Abbreviations (US)
BO – bind off
CO – cast on
inc – increase (knit front and back = kfb)
k – knit
k2tog – knit 2 together
p – purl
RS – right side
ssk – slip, slip, knit
st(s) – stitch(es)
St st – stockinette stitch (knit RS rows, purl WS rows)
WS – wrong side
[ ] – work instructions in brackets as directed
BODY (make 2 identical pieces)
With MC, CO 12 sts.
Row 1 (RS): Knit.
Row 2 (WS): Purl.
Row 3: K1, inc, k to last 2 sts, inc, k1. (14 sts)
Row 4: Purl.
Rows 5–10: Repeat Rows 3–4 three more times. (20 sts after Row 9)
Rows 11–18: Work even in St st (k RS, p WS).
Row 19: K1, inc, k to last 2 sts, inc, k1. (22 sts)
Row 20: Purl.
Row 21: K1, inc, k to last 2 sts, inc, k1. (24 sts)
Rows 22–30: Work even in St st.
(This is the widest section—belly and mid-body.)
Shape head / nose
Row 31: K1, ssk, k to last 3 sts, k2tog, k1. (22 sts)
Row 32: Purl.
Rows 33–38: Repeat Rows 31–32 three more times. (16 sts after Row 37)
Row 39: K1, ssk, k to last 3 sts, k2tog, k1. (14 sts)
Row 40: Purl.
Row 41: K1, ssk, k to last 3 sts, k2tog, k1. (12 sts)
Row 42: Purl.
Row 43: K1, ssk, k2, k2tog, k1, ssk, k2tog, k1. (8 sts)
(Inline check: 12 − 4 = 8 ✓)
Row 44: Purl.
Row 45: K1, ssk, k2tog, k1, ssk, k2tog. (4 sts)
Row 46: Purl.
BO remaining 4 sts.
Fasten off, leaving a 12" tail for seaming.
Shape tail end (opposite side of cast-on)
With RS facing and working along CO edge, pick up and knit 12 sts evenly across cast-on edge.
Next row (WS): Purl.
Row 1 (RS): K1, ssk, k to last 3 sts, k2tog, k1. (10 sts)
Row 2: Purl.
Row 3: K1, ssk, k to last 3 sts, k2tog, k1. (8 sts)
Row 4: Purl.
Row 5: K1, ssk, k2, k2tog, k1. (6 sts)
Row 6: Purl.
BO 6 sts. Fasten off, leaving a long tail.
(Each body half measures approx 8.5–9" long × 4.75" at widest before seaming.)
FLIPPER / PECTORAL FIN (make 2)
With MC, CO 6 sts.
Row 1 (RS): Knit.
Row 2: Purl.
Row 3: K1, inc, k to last 2 sts, inc, k1. (8 sts)
Row 4: Purl.
Row 5: K1, inc, k to last 2 sts, inc, k1. (10 sts)
Rows 6–10: Work even in St st.
Row 11: K1, ssk, k to last 3 sts, k2tog, k1. (8 sts)
Row 12: Purl.
Row 13: K1, ssk, k2, k2tog, k1. (6 sts)
Row 14: Purl.
Row 15: K1, ssk, k2tog, k1. (4 sts)
Row 16: Purl.
BO 4 sts. Fasten off, leaving an 8" tail for seaming.
DORSAL FIN (make 1)
With MC, CO 8 sts.
Row 1 (RS): Knit.
Row 2: Purl.
Row 3: K1, ssk, k2, k2tog, k1. (6 sts)
Row 4: Purl.
Row 5: K1, ssk, k2tog, k1. (4 sts)
Row 6: Purl.
Row 7: Ssk, k2tog. (2 sts)
Row 8: P2tog. Fasten off.
Leave 8" tail.
TAIL FLUKE (make 2)
With MC, CO 4 sts.
Row 1 (RS): Knit.
Row 2: Purl.
Row 3: K1, inc, inc, k1. (6 sts)
Row 4: Purl.
Row 5: K1, inc, k2, inc, k1. (8 sts)
Rows 6–8: Work even in St st.
Row 9: K1, ssk, k2, k2tog, k1. (6 sts)
Row 10: Purl.
Row 11: K1, ssk, k2tog, k1. (4 sts)
Row 12: Purl.
BO 4 sts. Fasten off, leaving 8" tail.
ASSEMBLY & FINISHING
-
Body
Place the two body halves with WS together (RS facing out). Using mattress stitch and the long tails, seam from nose tip along the top edge (back) to the tail base, leaving the belly open. Seam the underside from nose toward the tail, stuffing firmly with fiberfill as you go—pay special attention to the nose and tail so they keep a smooth tapered shape. Close the final opening. Weave ends securely inside. -
Safety eyes or embroidery
If using safety eyes, insert them on the head section (approx 1.5" back from nose tip and ¾" above the side seam) before the head is fully closed, or embroider eyes with black floss using satin or French-knot stitches after seaming. Embroider a simple curved smile just below the nose with contrasting yarn or floss. -
Flippers
Pin one flipper to each side of the body, centered on the lower mid-body (about 3" back from nose). Seam securely with mattress stitch or whipstitch around the base. Angle them slightly backward for a natural swimming look. -
Dorsal fin
Center the dorsal fin along the top seam, about 4" back from the nose. Seam the cast-on edge firmly to the body. -
Tail flukes
Seam the two fluke pieces together along the long curved edges (leave the short BO edges open if desired for a flatter look, or seam fully). Attach the joined fluke to the tapered tail end of the body so the fluke sits horizontally. Stuff the base lightly if needed for stiffness. Weave all remaining ends inside the body. -
Final shaping
Roll the stuffed dolphin gently between your hands to even out the filling. Adjust seams if any stuffing peeks through. Optional: with a length of MC yarn, make a few long stitches through the body from belly to back to create subtle definition if desired.
Care
Spot clean or hand wash gently in cool water; reshape and air dry flat. Do not machine dry.
Enjoy your flat-knit dolphin!
(Pattern math validated: body halves 12 → 24 → 4 sts; flippers 6 → 10 → 4; all increases matched by later decreases; finished length ≈ 9" at given gauge.)
Disclaimer: This pattern was generated by AI and should be reviewed for accuracy before use. While we strive for quality, AI-generated content may contain errors. Please verify measurements, stitch counts, charts, and instructions before beginning your project. Generated by purlJam.uk
Love this pattern?
Save this pattern to your free PurlJam libraryAccess your pattern anytime
Bookmark this page to access your pattern anytime