Type
Knitting
Difficulty
intermediate
Category
amigurumi
AI Thinking Process
Planning
Verification
Pattern
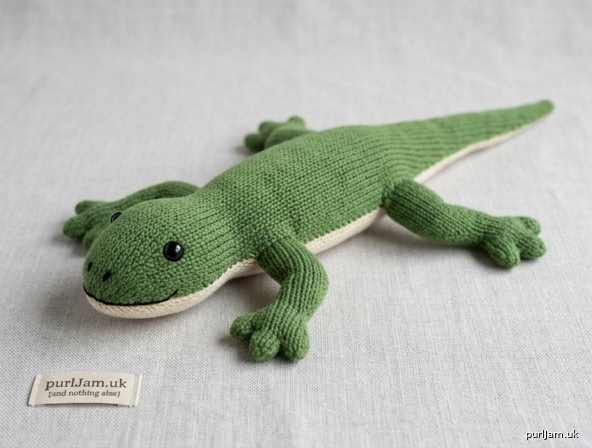
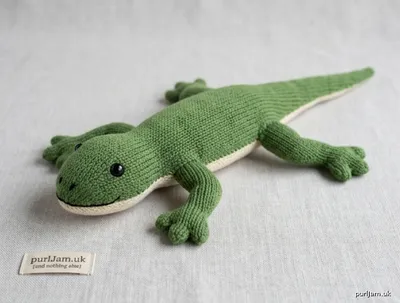
Flat-Knit Gecko Soft Toy
A beginner 3D stuffed gecko knitted entirely flat. Two matching silhouette pieces are seamed and stuffed to form the head, body, and tail; four small legs are folded, seamed, and sewn on in a sprawling gecko pose. No knitting in the round.
Skill level: Beginner
Skills used: Long-tail (or any) cast-on, knit, purl, kfb, k2tog, ssk, bind off, mattress stitch, stuffing
Finished size
About 11" (28 cm) long from snout to tail tip, 3" (7.5 cm) wide at the body, and 1½" (4 cm) tall when stuffed. Size will vary with stuffing firmness and gauge.
Yarn
Worsted weight (CYC 4)
- MC (top, legs — green suggested): 50 yd / 46 m
- CC (belly — cream, yellow, or pale tan suggested): 30 yd / 27 m
- Small amount of black or dark brown worsted or embroidery floss for mouth, nostrils, and optional spots
One-color version: 70 yd / 64 m of a single color; knit both body pieces alike.
Washable acrylic or superwash wool is ideal for toys.
Needles & notions
- US 6 / 4 mm straight needles (or a circular needle used flat)
- Tapestry needle
- Polyester fiberfill: about 2 oz (55 g)
- 2 safety eyes, 6–8 mm, or black yarn/floss to embroider eyes
- Scissors
- Optional: locking stitch markers, chopstick or pencil for stuffing the tail
Use a needle 1–2 sizes smaller than the yarn label recommends so the fabric is tight and stuffing does not show.
Gauge
20 stitches and 28 rows = 4" (10 cm) in stockinette stitch (knit RS, purl WS), after light blocking.
Exact stitch count is less important than a tight, even fabric. If stuffing peeks through, go down a needle size.
Abbreviations (US)
| Abbrev. | Meaning |
|---|---|
| BO | bind off |
| CC | contrasting color |
| CO | cast on |
| k | knit |
| k2tog | knit 2 stitches together (right-leaning decrease) |
| kfb | knit into the front and back of the same stitch (1 stitch increased) |
| MC | main color |
| p | purl |
| RS | right side |
| ssk | slip 1 knitwise, slip 1 knitwise, insert left needle into the fronts of both slipped stitches and knit them together (left-leaning decrease) |
| st(s) | stitch(es) |
| St st | stockinette stitch (knit on RS, purl on WS) |
| WS | wrong side |
kfb: Knit into the front of the stitch as usual but do not slip it off; knit into the back of the same stitch; then slip it off. You have made 2 stitches from 1.
Notes
- The gecko is knitted flat in stockinette. Pieces will curl at the edges; this is normal and disappears when seamed and stuffed.
- Make two identical body pieces: MC for the top, CC for the belly (or both in MC).
- Do not join in the round. Every piece is worked back and forth.
- Leave long yarn tails (12"/30 cm) at cast-on and bind-off for seaming.
- Safety: Do not use safety eyes on toys for children under 3 years — embroider the eyes instead.
Body (make 2)
Make 1 in MC (top) and 1 in CC (belly). Both pieces are identical.
Cast on 6 sts.
Snout and head
Row 1 (WS): Purl.
Row 2 (RS): Kfb, knit to last st, kfb. (6 + 2 = 8 sts ✓)
Row 3: Purl.
Row 4: Kfb, knit to last st, kfb. (8 + 2 = 10 sts ✓)
Row 5: Purl.
Row 6: Kfb, knit to last st, kfb. (10 + 2 = 12 sts ✓)
Row 7: Purl.
Row 8: Kfb, knit to last st, kfb. (12 + 2 = 14 sts ✓)
Beginning with a WS purl row, work 9 rows even in St st, ending with a WS row. (14 sts)
Neck
Next row (RS): K2tog, knit to last 2 sts, ssk. (14 − 2 = 12 sts ✓)
Beginning with a WS row, work 5 rows even in St st, ending with a WS row. (12 sts)
Body
Next row (RS): Kfb, knit to last st, kfb. (12 + 2 = 14 sts ✓)
Next row (WS): Purl.
Next row (RS): Kfb, knit to last st, kfb. (14 + 2 = 16 sts ✓)
Beginning with a WS row, work 21 rows even in St st, ending with a WS row. (16 sts)
Tail
Next row (RS): K2tog, knit to last 2 sts, ssk. (16 − 2 = 14 sts ✓)
Beginning with a WS row, work 5 rows even, ending with a WS row.
Next row (RS): K2tog, knit to last 2 sts, ssk. (14 − 2 = 12 sts ✓)
Beginning with a WS row, work 5 rows even, ending with a WS row.
Next row (RS): K2tog, knit to last 2 sts, ssk. (12 − 2 = 10 sts ✓)
Beginning with a WS row, work 5 rows even, ending with a WS row.
Next row (RS): K2tog, knit to last 2 sts, ssk. (10 − 2 = 8 sts ✓)
Beginning with a WS row, work 5 rows even, ending with a WS row.
Next row (RS): K2tog, knit to last 2 sts, ssk. (8 − 2 = 6 sts ✓)
Beginning with a WS row, work 3 rows even, ending with a WS row.
Next row (RS): K2tog, knit to last 2 sts, ssk. (6 − 2 = 4 sts ✓)
Beginning with a WS row, work 3 rows even, ending with a WS row.
Next row (RS): K2tog, ssk. (4 − 2 = 2 sts ✓)
Next row (WS): Purl.
Next row (RS): K2tog. (1 st ✓)
Fasten off, leaving a 12" (30 cm) tail. Pull the yarn through the last stitch.
Each body piece is about 11¾" (30 cm) long and 3¼" (8 cm) wide at the body before seaming.
Legs (make 4)
All in MC.
Cast on 8 sts, leaving a 12" (30 cm) tail.
Beginning with a RS knit row, work 8 rows even in St st, ending with a WS purl row. (8 sts)
Foot row (RS): Kfb, k2, kfb, kfb, k2, kfb. (8 + 4 = 12 sts ✓)
Beginning with a WS row, work 3 rows even in St st, ending with a WS row. (12 sts)
Next row (RS): Bind off knitwise. Leave a 12" (30 cm) tail.
Features (do this before closing the head)
Eyes
Safety eyes: On the MC piece only, insert 6–8 mm safety eyes about 1" (2.5 cm) back from the snout cast-on edge and about ¾" (2 cm) apart, centered on the head. Lock the washers on the wrong side.
Embroidered eyes (safer for young children): After assembly, with black yarn, make two small satin-stitch ovals or French knots in the same position. Add a tiny white highlight stitch if you like.
Mouth and nostrils (after stuffing)
With black or dark brown yarn and a tapestry needle:
- Mouth: A short V or shallow curve on the snout, sitting mostly on the CC belly just below the seam.
- Nostrils: Two tiny stitches on the snout, slightly above the mouth.
Optional spots
With a darker green or brown, scatter 5–8 small duplicate stitches or satin stitches over the MC back. Keep them off the seam lines.
Finishing
1. Seam the body
Hold the MC and CC pieces with wrong sides together (right sides facing out) and edges matched: snout to snout, tail tip to tail tip.
With MC, mattress stitch from the snout down one side all the way to the tail tip.
Return to the snout and mattress stitch the other side, leaving a 2½" (6.5 cm) opening along the body (not the tail) for stuffing.
The snout cast-on edges are seamed together to close the front of the head; the single remaining stitches at the tail tips are joined together.
2. Stuff
Using small pinches of fiberfill and a chopstick or pencil:
- Tail first — pack it firmly or the tail will flop empty.
- Head second — firm, and even around the eyes.
- Body last — firm but still squeezable.
Total stuffing is about 2 oz (55 g). Close the opening with mattress stitch. Weave the remaining ends to the inside.
3. Make the legs
Fold each leg in half lengthwise, right side out, so the foot is a small paddle.
Using the bind-off tail, mattress stitch from the toe, up the long open side, to the cast-on edge. Lightly stuff as you go — legs should be plump, not packed hard. Close the cast-on edge (top of the leg). Repeat for all 4 legs.
Optional toes: three short stitches on each foot pad with MC or brown.
4. Attach the legs
Geckos sprawl — legs stick out to the sides, not down under the body.
Pin in place:
- Front legs: at the neck-to-body transition, one on each side, feet pointing slightly forward and out.
- Back legs: at the body-to-tail transition, one on each side, feet pointing slightly out.
Check that left and right match. Sew each leg on firmly with MC, taking stitches through the body fabric (and a little into the stuffing) so they cannot twist off.
5. Final ends
Weave in every remaining end, burying them inside the body. Tug the snout and tail into shape with your fingers.
Assembly order (summary)
- Knit 2 body pieces and 4 legs.
- Insert safety eyes on the MC head (or skip and embroider later).
- Mattress stitch body pieces together, leaving a stuffing opening.
- Stuff tail → head → body; close opening.
- Fold, seam, and lightly stuff the 4 legs.
- Sew front legs at the neck, back legs at the hips, sprawling to the sides.
- Embroider mouth, nostrils, optional eyes and spots.
- Weave in all ends inside the toy.
Schematic (top view, after assembly)
          snout
         /------\
        |  o  o  |   head
         \-    -/
           |  |      neck
        /--------\
       |          |  body
        \--------/
      || ||  || ||   legs (sprawled)
           \  \
            \  \     tail
             \  \
              \__\
Your gecko is ready.
Disclaimer: This pattern was generated by AI and should be reviewed for accuracy before use. While we strive for quality, AI-generated content may contain errors. Please verify measurements, stitch counts, charts, and instructions before beginning your project. Generated by purlJam.uk
Love this pattern?
Save this pattern to your free PurlJam libraryAccess your pattern anytime
Bookmark this page to access your pattern anytime