Type
Crochet
Difficulty
beginner
Category
kimono
AI Thinking Process
Planning
1. **Design Strategy**: A beginner-friendly floral lace cardigan worked flat in simple rectangular kimono-style pieces, using a repeating shell/floral lace stitch for the body and easy hdc bands. Closed front achieved with button closure and front bands.
2. **Construction Plan**: Worked flat in rectangles (back, two fronts, two simple straight sleeves), seamed at shoulders and sides, with sleeves attached at right angles (dropped shoulder), then borders and buttonbands added.
3. **Quality Assurance**:
- Lace repeat must divide evenly into each piece's stitch count.
- Keep sleeves straight (no taper) to stay beginner-friendly.
- Ensure button band overlap is included so cardigan closes fully.
4. **Final Calculations**: Gauge: 14 sts & 8 rows = 4" in shell pattern (worsted, US H/5mm). Shell repeat = 6 sts + 1. Back widths by size; fronts = half back + overlap. Lengths 24–27". Sleeves 18" long, 14" wide.
Verification
[PRE-FLIGHT CHECKS]
1. **Completeness**: Includes materials, hook, gauge, abbreviations, sizing, finished measurements, body pattern, sleeve instructions, border, assembly, closure. ✓
2. **Consistency**: Gauge 14 sts = 4" → 3.5 sts/inch. Lace multiple of 6+1 used for all counts; verified each size below. ✓
3. **Constraints**: Closed/buttoned front added; beginner-friendly; floral lace; sizes XS–2XL; simple straight sleeves; cotton worsted yarn. ✓
4. **Safety**: Stitch counts checked to be (multiple of 6)+1 for lace alignment. ✓
Pattern
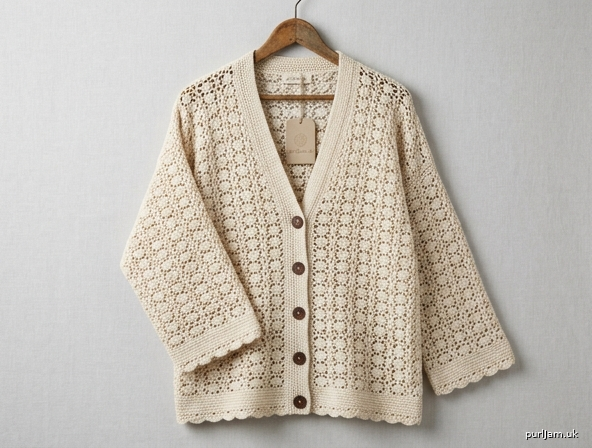
# Floral Lace Closed Cardigan
### A Beginner-Friendly Crochet Pattern (Sizes XS–2XL)

A relaxed, kimono-style cardigan made from simple rectangles, dressed up with an easy floral shell lace and a closed, buttoned front. No complicated shaping — if you can chain, single crochet, and double crochet, you can make this.

---

## MATERIALS

- **Yarn:** Worsted weight (Medium #4) cotton yarn (cotton gives crisp lace and good stitch definition)
- **Yardage required (approx.):**
  - XS: 1,150 yds
  - S: 1,300 yds
  - M: 1,450 yds
  - L: 1,600 yds
  - XL: 1,750 yds
  - 2XL: 1,950 yds
- **Hook:** US H/8 (5.0 mm) for body; US G/6 (4.0 mm) for borders
- **Notions:** Tapestry needle, stitch markers, scissors, 5–6 buttons (1" / 25 mm)

---

## GAUGE

In Floral Shell Lace pattern, with H/8 (5.0 mm) hook:
- **14 sts and 8 rows = 4" (10 cm)**
- That is **3.5 sts per inch**.

> Always make a gauge swatch (at least 6" wide). Lace stretches when blocked — block your swatch before measuring.

---

## ABBREVIATIONS (US TERMS)

| Abbr | Meaning |
|------|---------|
| ch | chain |
| sl st | slip stitch |
| sc | single crochet |
| hdc | half double crochet |
| dc | double crochet |
| sk | skip |
| st(s) | stitch(es) |
| sp | space |
| rep | repeat |
| RS / WS | right side / wrong side |
| beg | beginning |
| ( ) | work all instructions inside into same stitch/space |

---

## THE FLORAL SHELL LACE STITCH

Worked over a **multiple of 6 sts + 1**.

**Foundation:** Chain a multiple of 6 + 2 (the extra ch is your turning ch).

**Row 1 (RS):** Dc in 4th ch from hook (counts as first 2 dc), *sk 2 ch, (3 dc, ch 1, 3 dc) in next ch [shell made], sk 2 ch, dc in next ch; rep from * across. Turn.

**Row 2:** Ch 3 (counts as dc), dc in first dc, *ch 1, sc in ch-1 sp of shell, ch 1, (3 dc, ch 1, 3 dc) in next dc [the single dc between shells]; rep from *, ending dc in top of turning ch. Turn.

**Row 3:** Ch 3 (counts as dc), *(3 dc, ch 1, 3 dc) in next sc, dc in next dc; rep from * across, working last dc in top of turning ch. Turn.

**Rep Rows 2–3** for pattern.

> **Beginner tip:** The "flower" is the (3 dc, ch 1, 3 dc) shell. The single dc and sc are the "stems" that anchor each flower. Place a marker on the RS so you don't lose track.

---

## SIZING & FINISHED MEASUREMENTS

This is an oversized, boxy cardigan with a closed buttoned front. Choose based on **finished bust** (includes 6–10" positive ease).

| Size | To Fit Bust | Finished Bust | Body Length | Sleeve Length | Sleeve Width |
|------|------------|---------------|-------------|---------------|--------------|
| XS | 30–32" | 38" | 24" | 18" | 14" |
| S | 33–35" | 41" | 24.5" | 18" | 14" |
| M | 36–38" | 44" | 25" | 18" | 15" |
| L | 39–42" | 47" | 26" | 18" | 15" |
| XL | 43–46" | 50" | 26.5" | 18" | 16" |
| 2XL | 47–50" | 53" | 27" | 18" | 16" |

**Finished bust** = Back width + two Front widths (with overlap built into the front bands).

---

## STITCH COUNTS BY SIZE

All counts are **multiples of 6 + 1**, so the lace lines up perfectly.

**BACK** (worked as one rectangle):
| Size | Starting ch | Pattern sts |
|------|------------|-------------|
| XS | 68 | 67 |
| S | 74 | 73 |
| M | 80 | 79 |
| L | 86 | 85 |
| XL | 92 | 91 |
| 2XL | 98 | 97 |

> Check: 67, 73, 79, 85, 91, 97 are each (multiple of 6) + 1. ✓
> Back width example, M: 79 sts ÷ 3.5 sts/in ≈ 22.5" → both fronts + back ≈ 44" finished. ✓

**EACH FRONT** (make 2):
| Size | Starting ch | Pattern sts |
|------|------------|-------------|
| XS | 38 | 37 |
| S | 38 | 37 |
| M | 44 | 43 |
| L | 44 | 43 |
| XL | 50 | 49 |
| 2XL | 50 | 49 |

> Two fronts plus button band overlap close the cardigan fully across the chest.

**EACH SLEEVE** (make 2 — straight rectangle, NO tapering):
| Size | Starting ch | Pattern sts |
|------|------------|-------------|
| XS–S | 50 | 49 |
| M–L | 56 | 55 |
| XL–2XL | 56 | 55 |

> Sleeve width example, M: 55 sts ÷ 3.5 ≈ 15". ✓

---

## PATTERN

### BACK

1. Using H/8 hook, ch the **Starting ch** number for your size.
2. Work **Row 1** of Floral Shell Lace across.
3. Work **Rows 2–3** in pattern, repeating until piece measures **Body Length** for your size (see table), ending after a Row 3 (RS).
4. Fasten off. Set aside.

> Rows needed (approx.): Body Length ÷ 0.5" per row. Example M: 25" ÷ 0.5 = 50 rows. ✓

### LEFT FRONT (make 1)

1. Ch the Front **Starting ch** for your size.
2. Work Row 1, then Rows 2–3 in pattern.
3. Continue until the Front measures the **same length as the Back** (so seams match), ending after a Row 3.
4. Fasten off.

### RIGHT FRONT (make 1)

Work exactly the same as the Left Front. (Because the lace is symmetrical, both fronts are worked identically — mirror them when you assemble.)

### SLEEVES (make 2) — Simple Straight Sleeve

These are wide, dropped-shoulder rectangles. **No increases or decreases** — they stay the same width top to bottom for a comfortable, beginner-friendly kimono sleeve.

1. Using H/8 hook, ch the Sleeve **Starting ch** for your size.
2. Work Row 1, then Rows 2–3 in pattern.
3. Continue straight until the sleeve measures **18"** (or your desired length), ending after a Row 3.
4. Fasten off, leaving a long tail for seaming.

> **Want shorter sleeves?** Stop at 12" for a 3/4 sleeve or 8" for a short sleeve. The width stays the same.

---

## ASSEMBLY

Lay all pieces flat and **block lightly** before seaming — this opens the lace and makes edges even.

1. **Shoulder seams:** Lay the Back flat (RS up). Place each Front on top, RS together, matching top corners. Seam straight across the shoulders using mattress stitch or sl st, leaving the center open for the neck. For a roughly 9–10" neck opening, seam about **5–6" in from each outer edge** on each shoulder.
2. **Mark sleeve placement:** From each shoulder seam, measure down the body **7" on the front and 7" on the back** (14" total armhole opening). Mark with stitch markers.
3. **Attach sleeves:** Center the top edge of each sleeve at the shoulder seam and pin between the markers. Sew the sleeve to the body at a right angle (dropped shoulder).
4. **Side & sleeve seams:** Fold the cardigan RS together. Seam each side from the hem up to the underarm, then continue seaming the sleeve underside from underarm to cuff in one line.
5. Weave in all ends.

> **Math check:** Sleeve top edge = 18" of rows tall, attached over a 14" armhole opening. The slightly longer sleeve edge eases in gently — pin evenly. ✓

---

## BORDER PATTERN

Switch to the smaller **G/6 (4.0 mm)** hook for a neat, firm edge.

**Round 1 (Foundation – sc):** With RS facing, join yarn at the bottom right front corner. Sc evenly up the right front, around the back neck, and down the left front, then across the bottom hem. Work about **3 sc for every 4 row-ends** along vertical edges, and **1 sc per st** along the neck/hem. Place 3 sc in each outer corner. Join with sl st.

**Round 2 (hdc):** Ch 1, hdc in each sc around, working 3 hdc in each corner. Join.

**Cuff & hem edging:** Work 2 rounds of sc around each sleeve cuff and along the bottom hem to firm them up.

**Optional shell finish:** For a pretty edge, work one final round: *sk 1 st, 5 dc in next st, sk 1 st, sc in next st; rep from * around.

---

## CLOSING THE CARDIGAN (BUTTONBAND)

This makes the cardigan a **fully closed style**.

1. **Buttonhole band (right front for most wearers):** After Border Round 1, on the next row work hdc along the right front, spacing **5–6 buttonholes** evenly. To make a buttonhole: **ch 2, sk 2 sts, hdc in next st.** Continue. On the following row, work 2 hdc into each ch-2 space.
2. **Button band (left front):** Work the matching number of hdc rows with no holes.
3. **Sew buttons** on the left band opposite each buttonhole.
4. Button up — the fronts overlap and the cardigan closes fully.

> **Tip:** Space the top buttonhole near the neckline and the bottom one near the hem; distribute the rest evenly between.

---

## FINISHING

1. Weave in all remaining ends securely.
2. **Block the finished cardigan** to its final measurements: pin to size, mist or steam, and let dry. Blocking is essential for lace — it relaxes the flowers and evens the drape.
3. Try on, button up, and enjoy your closed floral lace cardigan!

---

### QUICK REFERENCE — FINISHED MEASUREMENTS RECAP
- **Bust:** 38–53" depending on size (oversized fit)
- **Body length:** 24–27"
- **Sleeve length:** 18" (adjustable)
- **Sleeve width:** 14–16"

Happy crocheting! 🌸
Disclaimer: This pattern was generated by AI and should be reviewed for accuracy before use. While we strive for quality, AI-generated content may contain errors. Please verify measurements, stitch counts, and instructions before beginning your project. Generated by purlJam.uk
Access your pattern anytime
Bookmark this page to access your pattern anytime