Type
Crochet
Difficulty
beginner
Category
kimono
AI Thinking Process
Planning
1. **Design Strategy**: A beginner-friendly T-shaped kimono cardigan worked flat in simple rectangles using worsted yarn in hdc for body/sleeves, with a feminine lace scalloped shell edging at the hem and borders. Keeps construction simple while delivering the requested "lace scalloped hem" through edge treatment rather than complex bodywork.
2. **Construction Plan**: Worked flat in five rectangles (back, two fronts, two sleeves), seamed at shoulders/sides/sleeves, then finished with a scalloped shell lace border.
3. **Quality Assurance**:
- Scallop edging requires multiples — ensure border base stitch counts are divisible by 6 for clean shells.
- Keep sleeves wide rectangles (NO tapering) per kimono construction.
- Beginner level: keep stitch repeats simple and clearly counted.
4. **Final Calculations**: Gauge: 14 hdc x 11 rows = 4" in hdc, worsted, US H/8 (5mm). Size S/M finished bust ~44". Back width 22" = 77 sts. Each front 11" = 38 sts. Sleeve width 16" = 56 sts. Body length 24", sleeve length 17". Shell border multiple of 6.
Verification
[PRE-FLIGHT CHECKS]
1. **Completeness**: Includes materials, gauge, sizing, all pieces (back, fronts, sleeves), assembly, scalloped lace border, blocking. ✓
2. **Consistency**: Gauge 14 sts/4" = 3.5 sts/inch. Back 22" × 3.5 = 77 sts ✓. Front 11" × 3.5 = 38.5 ≈ 38 sts ✓. Sleeve 16" × 3.5 = 56 sts ✓. Shell border bases adjusted to multiples of 6. ✓
3. **Constraints**: Beginner level (hdc + simple shells), worsted yarn, US terms, scalloped lace hem delivered via shell edging, open-front cardigan/kimono hybrid honored. ✓
4. **Safety**: Border counts reconciled to multiples of 6; math shown inline. ✓
Pattern
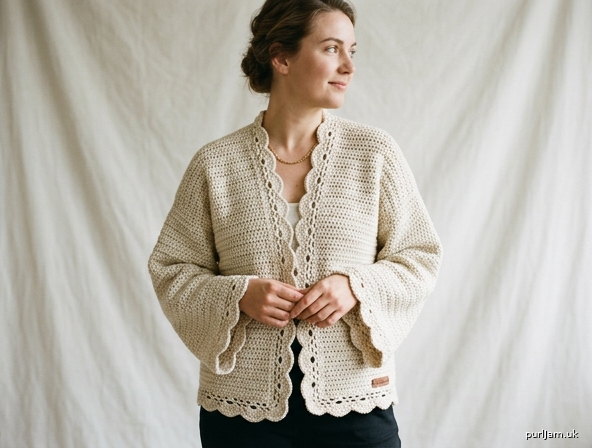
# Lace Scalloped Hem Cardigan
### A Beginner-Friendly T-Shaped Crochet Kimono Cardigan

A relaxed, open-front kimono-style cardigan worked flat in five simple rectangles — no complicated shaping. The romance comes from a delicate **lace scalloped shell border** that trims the hem, fronts, neckline, and cuffs. Perfect for confident beginners ready for their first garment.

---

## SKILL LEVEL
**Beginner** — All pieces are worked flat in straight rows. The only "fancy" element is a repeating shell stitch for the lace edging, which is fully charted in words below.

---

## SIZES
| | S/M | L/XL | 2XL/3XL |
|---|---|---|---|
| Finished Bust (buttoned/overlapped, approx) | 44" (112 cm) | 52" (132 cm) | 60" (152 cm) |
| Body Length (hem to shoulder, before border) | 24" (61 cm) | 25" (63.5 cm) | 26" (66 cm) |
| Sleeve Length (before cuff border) | 17" (43 cm) | 17.5" (44.5 cm) | 18" (46 cm) |
| Sleeve Width (flat, at top) | 16" (40.5 cm) | 17" (43 cm) | 18" (45.5 cm) |

*Designed with generous oversized ease (6–12"). Choose by desired finished bust. Instructions are written for **S/M** with **L/XL** and **2XL/3XL** in parentheses, like this: S/M (L/XL, 2XL/3XL).*

---

## MATERIALS
- **Yarn:** Worsted weight (#4), approx 1,100 (1,300, 1,550) yards. A drapey cotton or cotton/bamboo blend is ideal for lace; a soft wool blend gives more structure.
- **Hook:** US H/8 (5 mm) for body; US I/9 (5.5 mm) recommended for the foundation chain if you chain tightly.
- **Notions:** Tapestry needle, stitch markers, scissors, rust-proof pins for blocking.

---

## GAUGE
**14 hdc × 11 rows = 4" (10 cm)** in half double crochet, after blocking.
→ This equals **3.5 sts per inch** and **2.75 rows per inch**.

*Always make a swatch. Gauge is forgiving on this oversized fit, but it affects yardage and border counts.*

---

## ABBREVIATIONS (US TERMS)
- **ch** – chain
- **st(s)** – stitch(es)
- **sc** – single crochet
- **hdc** – half double crochet
- **dc** – double crochet
- **sl st** – slip stitch
- **sk** – skip
- **sp** – space
- **RS / WS** – right side / wrong side
- **rep** – repeat

---

## CONSTRUCTION NOTES
This is a **T-shaped kimono**: rectangular pieces, no armhole shaping, no shoulder shaping, dropped shoulders, and wide non-tapered sleeves. You will make:
- **1 Back** rectangle
- **2 Front** rectangles
- **2 Sleeve** rectangles

Then seam and add the **scalloped lace border**.

The turning chain at the start of each hdc row counts as the first stitch unless noted.

---

## PIECE 1 — BACK

Foundation: Ch **78 (92, 106)**.
→ *Math check: 77 (91, 105) hdc + 1 turning ch. Back width = 77 ÷ 3.5 = 22" (91 ÷ 3.5 = 26", 105 ÷ 3.5 = 30").*

**Row 1 (RS):** Hdc in 3rd ch from hook and in each ch across — **77 (91, 105) hdc**. Turn.

**Rows 2 and on:** Ch 2 (counts as first hdc), hdc in each st across — **77 (91, 105) hdc**. Turn.

Repeat until piece measures **24" (25", 26")** from foundation edge.
→ *Row count: 24 × 2.75 ≈ 66 rows (25 × 2.75 ≈ 69 rows, 26 × 2.75 ≈ 72 rows).*

Fasten off.

---

## PIECE 2 & 3 — FRONTS (Make 2)

These are half-width rectangles. No neckline angling needed for a beginner project — the open front and border create a soft drape.

Foundation: Ch **40 (47, 54)**.
→ *Math check: 39 (46, 53) hdc + 1 turning ch. Front width = 39 ÷ 3.5 = 11.1" (46 ÷ 3.5 = 13.1", 53 ÷ 3.5 = 15.1"). Two fronts = 22.2" (26.3", 30.3"), matching the back. ✓*

**Row 1 (RS):** Hdc in 3rd ch from hook and in each ch across — **39 (46, 53) hdc**. Turn.

**Subsequent rows:** Ch 2 (counts as first hdc), hdc in each st across — **39 (46, 53) hdc**. Turn.

Work until front measures **24" (25", 26")** — the SAME number of rows as the Back: **66 (69, 72) rows**. Fasten off.

Make a second front identical to the first.

---

## PIECE 4 & 5 — SLEEVES (Make 2)

Wide rectangles, **same width top to bottom — NO tapering** (this is what makes it a kimono).

Foundation: Ch **57 (61, 64)**.
→ *Math check: 56 (60, 63) hdc + 1 turning ch. Sleeve width = 56 ÷ 3.5 = 16" (60 ÷ 3.5 = 17.1", 63 ÷ 3.5 = 18"). ✓*

**Row 1 (RS):** Hdc in 3rd ch from hook and in each ch across — **56 (60, 63) hdc**. Turn.

**Subsequent rows:** Ch 2 (counts as first hdc), hdc in each st across. Turn.

Work until sleeve measures **17" (17.5", 18")**.
→ *Row count: 17 × 2.75 ≈ 47 rows (17.5 × 2.75 ≈ 48 rows, 18 × 2.75 ≈ 50 rows).*

Fasten off. Make a second sleeve identical.

---

## ASSEMBLY

Block all pieces flat to measurements before seaming for the cleanest result.

**Step 1 — Shoulder seams (straight, horizontal):**
Lay the Back RS up. Place each Front on top, RS together, aligning the top (shoulder) edges. Seam from the outer (armhole) edge inward, leaving the center open for the neck.
- Seam **5" (6", 7")** in from each outer edge for each shoulder, which leaves a center back neck opening of about **12 (14, 16)" of unworked Back top edge** for the neckline.
→ *Check: Back top = 22 (26, 30)". Two shoulder seams of 5 (6, 7)" = 10 (12, 14)". Neck opening = 22 − 10 = 12" (26 − 12 = 14", 30 − 14 = 16"). ✓*

**Step 2 — Attach sleeves (perpendicular / dropped shoulder):**
Find the center of each sleeve top edge and align it with the shoulder seam. Pin the sleeve to the body at a **right angle** (the sleeve hangs straight out from the body — this is the signature dropped-shoulder T-shape). Seam across.
→ *The sleeve top (16/17/18") attaches centered over the shoulder seam, with 8 (8.5, 9)" of body on each side of the seam.*

**Step 3 — Side seams:**
Fold the cardigan at the shoulders. Seam each side from the hem up to the underarm point (where the sleeve begins).

**Step 4 — Sleeve underarm seams:**
Continue seaming each sleeve from underarm to cuff.

Weave in all ends except where you'll begin the border.

---

## LACE SCALLOPED BORDER

The signature feature! A classic **shell edging** worked around the entire front opening, neckline, and hem in one continuous round, plus a matching shell trim on each cuff.

### The Shell Pattern (multiple of 6 sts + 1)
- **Setup:** Work 1 sc into each base stitch evenly around.
- **Shell Round:** *Sk 2 sts, 5 dc in next st (a shell), sk 2 sts, sc in next st*; rep from * around.
→ *Each shell repeat uses 6 base stitches and forms one scallop. This is why your edging base count must be a multiple of 6 plus 1.*

### Working the Main Border (Hem + Fronts + Neck)

**Round/Pass 1 (sc foundation):** With RS facing, join yarn at the bottom corner of one Front. Work sc evenly around the entire outer edge: up the front opening, around the back neck, down the other front, and across the entire bottom hem.
- **Evenly spacing guide:** On vertical row edges, work approximately **2 sc for every 3 rows**. On horizontal stitch edges (the hem), work **1 sc in each stitch**.
- When you reach the start, **count your total sc and adjust** by adding or skipping 1–4 sc on the next pass so the count is a **multiple of 6** (we ignore the +1 here since the border is continuous and we'll join smoothly).

**Round/Pass 2 (scallops) — Hem only or full edge:**
For the **scalloped hem look**, work the Shell Round across the **bottom hem edge only**, and work a simple **reverse sc (crab stitch)** or plain sc up the front edges and neck for a clean frame:

- Along the **front opening and neckline:** sc in each sc (keeps fronts tidy and non-stretchy).
- Along the **bottom hem:** *sk 2 sc, 5 dc in next sc, sk 2 sc, sc in next sc*; rep across the hem for scallops.

*Tip: If you'd like scallops everywhere (hem AND fronts), simply work the Shell Round around the entire edge — just make sure the count on each section is a multiple of 6.*

Fasten off and weave in ends.

### Cuff Scallops (both sleeves)

With RS facing, join yarn at the sleeve underarm seam at the cuff edge.

**Pass 1:** Sc evenly around the cuff opening. The cuff has **56 (60, 63)** base stitches.
→ *Adjust to a multiple of 6: work 54 (60, 60) sc evenly around. (54 = 6×9; 60 = 6×10.)*

**Pass 2 (scallops):** *Sk 2 sc, 5 dc in next sc, sk 2 sc, sc in next sc*; rep from * around. Join with sl st to first st.
→ *54 ÷ 6 = 9 scallops (60 ÷ 6 = 10 scallops, 60 ÷ 6 = 10 scallops).*

Fasten off. Repeat on second cuff.

---

## CLOSURE (Optional)

This cardigan is designed to be worn **open** for a flowing drape. If you'd like a closure:
- **Simple tie:** Make two chains (ch 60), each fastened to the front edge at bust height, and tie in a bow.
- **Single button:** Sew a button to one front; use a natural gap between shells on the opposite front as the buttonhole.

---

## FINISHING & BLOCKING

1. Weave in all remaining ends.
2. **Block firmly** — this is essential for opening up the lace scallops. Pin the cardigan flat to finished measurements, mist with water (or steam block), and pin each scallop into a gentle curve. Let dry completely.
3. Blocking will even out your hdc fabric and make the scalloped hem stand out beautifully.

---

## FINISHED MEASUREMENTS SUMMARY
| Measurement | S/M | L/XL | 2XL/3XL |
|---|---|---|---|
| Bust (overlap) | 44" | 52" | 60" |
| Body length (with border, approx) | 25.5" | 26.5" | 27.5" |
| Sleeve length (with cuff scallop) | 18" | 18.5" | 19" |
| Sleeve width | 16" | 17" | 18" |
| Scallops per cuff | 9 | 10 | 10 |

Enjoy your beautiful, breezy lace-trimmed cardigan! 🌸
Disclaimer: This pattern was generated by AI and should be reviewed for accuracy before use. While we strive for quality, AI-generated content may contain errors. Please verify measurements, stitch counts, and instructions before beginning your project. Generated by purlJam.uk
Access your pattern anytime
Bookmark this page to access your pattern anytime