Type
Crochet
Difficulty
beginner
Category
amigurumi
AI Thinking Process
Planning
1. **Design Strategy**: Creating a beginner-friendly shark using basic amigurumi shapes - an oval body, cone-shaped tail, triangular dorsal fin, and simple side fins. Will use gray/blue for body with white belly detail. Keeping construction simple with minimal pieces to assemble.
2. **Construction Plan**:
- Body: Extended oval shape worked in continuous rounds
- Tail: Cone shape attached to body
- Dorsal fin: Triangle worked flat then sewn on
- Side fins (x2): Small flattened ovals
- Eyes: Safety eyes or embroidered
- Teeth detail: Optional white felt or embroidered
- All pieces worked separately then assembled
3. **Quality Assurance**:
- Ensure stitch counts are clearly marked for beginner tracking
- Provide clear stuffing guidance (stuff before closing)
- Simple fin attachment instructions with placement guidance
- Alternative eye options for safety
- Clear color change instructions if using white belly
4. **Final Calculations**:
- Worsted weight yarn with 3.5mm hook
- Body max diameter: ~24 stitches = approximately 3-4 inches
- Final shark length: approximately 6-7 inches
- Gauge: Standard amigurumi (tight stitches, fabric shows no stuffing)
Verification
[PRE-FLIGHT CHECKS]
1. **Completeness**: Pattern includes materials, gauge, notes, all body parts (body, tail, fins), assembly, and finishing
2. **Consistency**: Stitch counts progress logically (6→12→18→24 increases, then reverse for decreases)
3. **Constraints**: Beginner-friendly with only sc stitches, basic shapes, clear instructions
4. **Safety**: All math verified - increase/decrease rounds calculate correctly, assembly order logical
Pattern
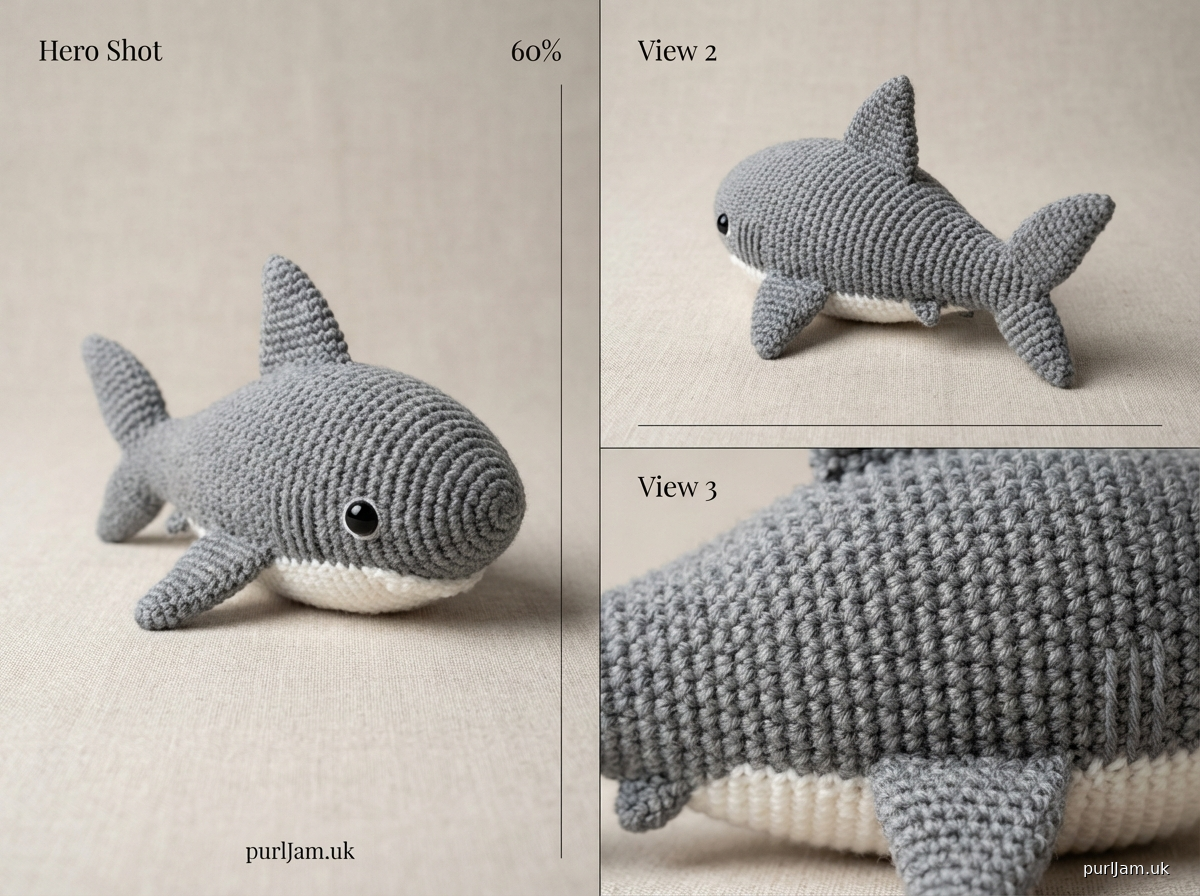
# Friendly Shark Amigurumi

A beginner-friendly crochet shark perfect for learning basic amigurumi techniques! This cute shark uses simple shapes and basic stitches to create an adorable ocean friend.

**Finished Size**: Approximately 6-7 inches (15-18 cm) long
**Difficulty**: Beginner
**Construction**: Worked in continuous rounds, minimal assembly required

---

## MATERIALS

**Yarn**:
- Worsted weight yarn (4) in gray or blue (main color - approximately 50 yards)
- Small amount of white for belly (optional, approximately 10 yards)
- Small amount of black for eyes (if embroidering)

**Recommended Yarns**: Any worsted weight acrylic (Red Heart Super Saver, Lion Brand Vanna's Choice, Caron Simply Soft)

**Hook**: US E-4 (3.5mm) or size needed to obtain gauge

**Other Supplies**:
- Fiberfill stuffing (polyester)
- Yarn needle for sewing
- Stitch marker
- 9mm safety eyes (2) OR black yarn for embroidering eyes
- Optional: White felt for teeth
- Scissors

---

## GAUGE

Gauge is not critical for this project, but stitches should be worked tightly enough that stuffing does not show through.

**Standard amigurumi gauge**: Approximately 6-7 sc per inch when worked tightly

**Note**: Use a hook 1-2 sizes smaller than recommended on yarn label for tight amigurumi fabric.

---

## PATTERN NOTES

- Work in continuous rounds unless otherwise stated; do not join or turn
- Use stitch marker to track beginning of round
- Ch 1 at beginning of rounds does NOT count as a stitch
- Stuff body firmly as you go - it's difficult to add stuffing after closing
- Use invisible decrease method for smoother appearance

**Abbreviations**:
- ch = chain
- sc = single crochet
- inc = increase (2 sc in same stitch)
- dec = invisible decrease (insert hook in front loops of next 2 sts, yarn over, pull through both loops, yarn over, pull through both loops on hook)
- st(s) = stitch(es)
- rnd(s) = round(s)
- [ ] = stitch count at end of round

---

## INSTRUCTIONS

### BODY

Starting at the nose, with gray yarn:

**Rnd 1**: 6 sc in magic ring [6]

**Rnd 2**: inc in each st around [12]
*Math check: 6 × 2 = 12 ✓*

**Rnd 3**: (sc, inc) around [18]
*Math check: 12 ÷ 2 = 6 repeats, 6 × 3 = 18 ✓*

**Rnd 4**: (2 sc, inc) around [24]
*Math check: 18 ÷ 3 = 6 repeats, 6 × 4 = 24 ✓*

**Rnd 5**: (3 sc, inc) around [30]
*Math check: 24 ÷ 4 = 6 repeats, 6 × 5 = 30 ✓*

**Rnds 6-12**: sc around [30]
*(7 rounds even - this creates the main body length)*

*Optional: Switch to white yarn for belly detail at Rnd 8, then back to gray at Rnd 11*

**Rnd 13**: (3 sc, dec) around [24]
*Math check: 30 ÷ 5 = 6 repeats, 6 × 4 = 24 ✓*

**Rnd 14**: sc around [24]

**Rnd 15**: (2 sc, dec) around [18]
*Math check: 24 ÷ 4 = 6 repeats, 6 × 3 = 18 ✓*

**Insert safety eyes between Rnds 8 and 9, approximately 6 stitches apart, before continuing.**

**Rnd 16**: sc around [18]

**BEGIN STUFFING FIRMLY NOW**

**Rnd 17**: (sc, dec) around [12]
*Math check: 18 ÷ 3 = 6 repeats, 6 × 2 = 12 ✓*

**Rnd 18**: sc around [12]

**Add more stuffing to body - stuff very firmly**

**Rnd 19**: dec around [6]
*Math check: 12 ÷ 2 = 6 ✓*

Fasten off, leaving long tail. Thread tail through remaining 6 sts and pull tight to close. Weave in end.

---

### TAIL

With gray yarn:

**Rnd 1**: 4 sc in magic ring [4]

**Rnd 2**: (sc, inc) around [6]
*Math check: 4 ÷ 2 = 2 repeats, 2 × 3 = 6 ✓*

**Rnd 3**: sc around [6]

**Rnd 4**: (2 sc, inc) around [8]
*Math check: 6 ÷ 3 = 2 repeats, 2 × 4 = 8 ✓*

**Rnd 5**: sc around [8]

**Rnd 6**: (3 sc, inc) around [10]
*Math check: 8 ÷ 4 = 2 repeats, 2 × 5 = 10 ✓*

**Rnds 7-8**: sc around [10]

**Stuff lightly**

**To create tail fin**: Flatten the opening. Working through both layers, sl st across to close (5 sl st total).

Fasten off, leaving long tail for sewing.

---

### DORSAL FIN (Top Fin)

Worked in rows to create triangle shape. With gray yarn:

**Row 1**: Ch 2, 3 sc in 2nd ch from hook, turn [3]

**Row 2**: Ch 1, inc in each st across, turn [6]
*Math check: 3 × 2 = 6 ✓*

**Row 3**: Ch 1, sc across, turn [6]

**Row 4**: Ch 1, sc across, turn [6]

**Row 5**: Ch 1, dec, 2 sc, dec, turn [4]
*Math check: 6 - 2 = 4 ✓*

**Row 6**: Ch 1, dec twice, turn [2]
*Math check: 4 ÷ 2 = 2 ✓*

**Row 7**: Ch 1, dec [1]

Fasten off, leaving long tail for sewing.

**Edging** (optional for neater appearance): With right side facing, join yarn at base corner, sc evenly around entire fin edge. Fasten off.

---

### SIDE FINS (make 2)

With gray yarn:

**Rnd 1**: 6 sc in magic ring [6]

**Rnd 2**: inc in each st around [12]
*Math check: 6 × 2 = 12 ✓*

**Rnd 3**: (sc, inc) around [18]
*Math check: 12 ÷ 2 = 6 repeats, 6 × 3 = 18 ✓*

**Rnd 4**: sc around [18]

**Do not stuff**

**To create flat fin**: Flatten the opening. Working through both layers, sl st across to close (9 sl st total).

Fasten off, leaving long tail for sewing.

---

## ASSEMBLY

1. **Attach tail**: Position tail at back end of body. Use tail yarn and yarn needle to whip stitch securely around the connection point. Weave in ends.

2. **Attach dorsal fin**: Position triangular fin on top center of body, approximately at Rnd 8-10. Pin in place if needed. Sew along the bottom edge of fin to body. Weave in ends.

3. **Attach side fins**: Position one fin on each side of body, approximately at Rnd 10-11, angled slightly downward. Pin in place. Sew along the top edge where fin meets body. Weave in ends.

4. **Embroider mouth** (optional): With black or gray yarn, embroider a simple curved smile below the eyes.

5. **Add teeth** (optional): Cut small triangles from white felt and glue or sew along mouth line.

---

## FINISHING

- Weave in all remaining ends
- If eyes look loose, add a dab of craft glue on back of safety eye washer
- Shape shark with hands to even out any lumpy areas
- If desired, lightly brush stuffing apart inside body for smoother appearance

---

## PATTERN VARIATIONS

**Hammerhead Shark**: After completing body, add two small cylindrical protrusions on sides of head for eyes

**Baby Shark**: Use DK weight yarn (3) and smaller hook (3.0mm) for miniature version

**Whale Shark**: Use gray yarn with white spots embroidered or sewn on as felt circles

**Color Options**:
- Classic gray with white belly
- Blue shark: light blue body
- Great white: gray back, white front
- Rainbow shark: use multicolor yarn

---

## CARE INSTRUCTIONS

- Hand wash in cool water with mild detergent
- Gently squeeze out excess water (do not wring)
- Reshape and lay flat to dry
- Do not machine wash or dry (safety eyes may come loose)

---

## TROUBLESHOOTING

**Stuffing shows through stitches**: Use smaller hook or work stitches more tightly

**Body is lopsided**: Redistribute stuffing evenly, add more stuffing to sparse areas

**Fins won't stay attached**: Use more stitches when sewing, go through body stitches multiple times

**Magic ring has hole**: Pull starting tail tighter, or close hole with yarn needle after completing Rnd 1

**Lost count of stitches**: Use stitch marker at beginning of each round, count frequently

---

## SKILL BUILDING

This pattern teaches:
- Magic ring technique
- Working in continuous rounds
- Basic increasing and decreasing
- Stuffing amigurumi properly
- Simple assembly and sewing
- Flat closure technique for fins

---

**Pattern Notes**: This pattern is designed for beginners learning amigurumi. Take your time, count your stitches at the end of each round, and don't worry about perfection - handmade charm is part of the appeal!

**Questions?** Common issues:
- If your shark is much larger/smaller than stated size, adjust hook size
- All pieces should be stuffed firmly except fins (which stay flat)
- Safety eyes should be inserted before closing body completely

---

*Pattern designed for beginner crocheters. Enjoy your adorable shark friend!*
Disclaimer: This pattern was generated by AI and should be reviewed for accuracy before use. While we strive for quality, AI-generated content may contain errors. Please verify measurements, stitch counts, and instructions before beginning your project. Generated by purlJam.uk
Access your pattern anytime
Bookmark this page to access your pattern anytime