Type
Crochet
Difficulty
easy
Category
cardigan
Pattern
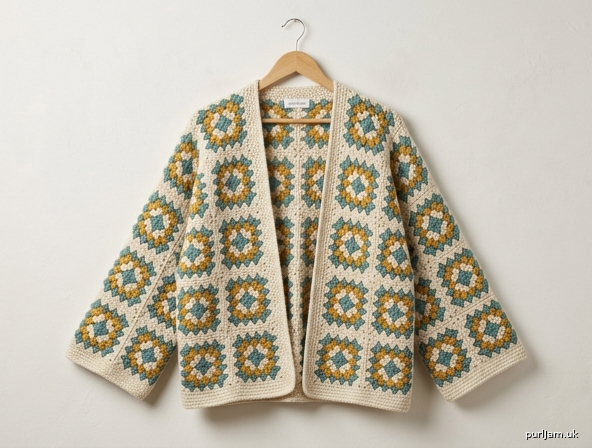
# Granny Square Kimono Cardigan
### An Easy, Boxy, Worked-in-Motifs Cardigan

A beginner-friendly take on the classic crochet kimono: instead of working long rectangles row by row, you crochet a stack of identical granny squares and join them into simple T-shaped panels. The result is an oversized, open-front cardigan with dropped shoulders and wide, straight (non-tapered) sleeves — pure kimono construction with cheerful granny-square texture.

---

## SKILL LEVEL
**Easy** — If you can chain, double crochet, and seam, you can make this. The only motif you need to learn is a basic 4-round granny square.

---

## SIZES
Written for **S/M (L/XL, 2XL/3XL)**. Instructions below are given as the number of 6" granny squares per panel.

| Size | Back (W × H) | Each Front (W × H) | Each Sleeve (W × H) |
|------|--------------|--------------------|---------------------|
| S/M  | 5 × 7        | 2 × 7              | 4 × 4               |
| **L/XL** | **6 × 7** | **3 × 7**          | **4 × 4**           |
| 2XL/3XL | 7 × 7      | 3 × 7              | 5 × 4               |

*All numbers below the table use **L/XL** as the worked example; substitute your size's square counts where noted.*

### Finished Measurements (L/XL, blocked, 6" squares)
- **Bust (laid flat, buttoned closed with center fronts meeting):** Back 36" + Front 18" + Front 18" = **72" total fabric**, worn as an open/overlapping cardigan it gives roughly **48–52" wearing bust** with generous positive ease.
- **Body length (hem to shoulder):** 7 squares × 6" = **42"**
- **Sleeve length (shoulder seam to cuff):** 4 squares × 6" = **24"**
- **Sleeve width (flat):** 4 squares × 6" = **24"** (a true wide kimono sleeve — same width top to bottom, NO taper)

> This is an **oversized, boxy kimono**. Choose your size by desired length and sleeve, not by exact bust.

---

## MATERIALS
- **Yarn:** Worsted weight (#4). Cotton, cotton blend, or a wool/acrylic blend for drape.
  - **Total yardage (L/XL):** approx. **1,500–1,700 yds** total.
  - Sample uses 3 colors: **Color A (main)** ~900 yds, **Color B** ~450 yds, **Color C** ~350 yds. *(Solid-color version: ~1,600 yds of one color.)*
- **Hook:** US H/8 (5 mm) — or size needed for gauge.
- Tapestry needle, scissors, rust-proof pins, blocking mat.
- Optional: 1 button/toggle (1.5"), or a sash belt.

---

## GAUGE
**1 granny square (4 rounds) = 6" × 6" (15 cm) after blocking.**

Gauge is forgiving on this oversized fit, **but every square MUST be the same size** or the panels won't line up. Make and block one square first; if it's larger than 6", go down a hook size; if smaller, go up.

---

## ABBREVIATIONS (US terms)
- **ch** = chain
- **sl st** = slip stitch
- **sc** = single crochet
- **dc** = double crochet
- **sp** = space
- **rep** = repeat
- **RS/WS** = right side / wrong side

---

## THE GRANNY SQUARE (make all squares the same way)

**Color sequence for sample (per square):** Rnd 1 = C, Rnd 2 = B, Rnds 3–4 = A. *(Or use any colors / one solid color.)*

**Foundation:** Ch 4, sl st in first ch to form a ring (or use a magic ring).

**Round 1:** Ch 3 (counts as first dc), 2 dc in ring, ch 2, *3 dc in ring, ch 2; rep from * twice more, sl st to top of beginning ch-3. **(4 groups of 3 dc, 4 ch-2 corner sps)**
Fasten off if changing color.

**Round 2:** Join new color in any ch-2 corner sp. Ch 3, (2 dc, ch 2, 3 dc) in same sp [first corner made], *ch 1, (3 dc, ch 2, 3 dc) in next corner sp; rep from * twice, ch 1, sl st to top of ch-3. **(8 groups of 3 dc, 4 corner sps, 4 side ch-1 sps)**
Fasten off if changing color.

**Round 3:** Join color in any ch-2 corner sp. Ch 3, (2 dc, ch 2, 3 dc) in same sp, *ch 1, 3 dc in next ch-1 sp, ch 1, (3 dc, ch 2, 3 dc) in corner sp; rep from * around, ending ch 1, 3 dc in last ch-1 sp, ch 1, sl st to top of ch-3. **(12 groups of 3 dc)**

**Round 4:** Sl st to next ch-2 corner sp. Ch 3, (2 dc, ch 2, 3 dc) in same sp, *[ch 1, 3 dc in next ch-1 sp] twice, ch 1, (3 dc, ch 2, 3 dc) in corner sp; rep from * around, ending [ch 1, 3 dc in ch-1 sp] twice, ch 1, sl st to top of ch-3. **(16 groups of 3 dc)**
Fasten off, leaving a 6" tail for joining. Weave in the round-change tails inside each square as you go.

**Each finished square has, per side: 4 dc-groups + 3 ch-1 sps between, plus a ch-2 corner at each end.** Block every square to exactly **6" × 6"**.

---

## HOW MANY SQUARES (L/XL)
- **Back:** 6 × 7 = **42 squares**
- **Left Front:** 3 × 7 = **21 squares**
- **Right Front:** 3 × 7 = **21 squares**
- **Left Sleeve:** 4 × 4 = **16 squares**
- **Right Sleeve:** 4 × 4 = **16 squares**
- **TOTAL = 42 + 21 + 21 + 16 + 16 = 116 squares** ✓

*(Check: Back 42 + Fronts 42 + Sleeves 32 = 116. ✓)*

For other sizes, multiply your table values: S/M = 35 + 14 + 14 + 16 + 16 = **95**; 2XL/3XL = 49 + 21 + 21 + 20 + 20 = **131**.

---

## JOINING THE SQUARES

Lay squares out in panel grids RS down. Join with your preferred method — both give a flat seam:

**Method A — Whipstitch (easiest):** Hold two squares RS together. With tapestry needle and matching yarn, whipstitch through the back loops only, corner to corner. Match stitch for stitch (you'll pass through each dc top once).

**Method B — Sl st join:** Hold squares RS together, insert hook through corresponding stitches, yarn over and sl st across.

**Join in strips first, then join strips together** to keep panels square. Press/block each completed panel flat.

---

## PANEL ASSEMBLY (rectangles — NO shaping)

Because this is a **kimono**, every panel is a plain rectangle. There is **no armhole shaping, no shoulder shaping, and no sleeve taper.**

### BACK — rectangle, 6 wide × 7 tall
Join 42 squares into a grid 6 squares across and 7 squares tall.
Finished: 36" wide × 42" tall. ✓

### LEFT & RIGHT FRONTS — rectangles, 3 wide × 7 tall (each)
Join 21 squares each into a grid 3 across × 7 tall.
Finished: 18" wide × 42" tall, each. ✓
*(Two fronts of 18" + back of 36" = 72" of fabric around the body — the open front overlaps for an oversized boxy fit.)*

### SLEEVES (make 2) — rectangles, 4 wide × 4 tall
Join 16 squares each into a grid 4 across × 4 tall.
Finished: 24" wide × 24" long, each. ✓ Same width top and bottom — a true wide kimono sleeve.

---

## CONSTRUCTION & SEAMING (kimono T-assembly)

Work on a flat surface. Use mattress stitch, whipstitch, or sl st seams throughout.

**1. Shoulder seams (straight, horizontal — NO shoulder shaping):**
Lay the Back RS up. Place each Front on top, RS together, aligning the top edges.
- The Back top edge is 6 squares (36") wide.
- Each Front top edge is 3 squares (18") wide.
- Seam the **outer 2 squares (12")** of each Front to the matching outer 2 squares of the Back at the top. This leaves the **center 2 squares (12") of the Back open for the neck**, and **1 inner square (6") of each Front open at the neck edge.** ✓
  *(Check: Front outer 2 + neck 1 = 3 squares total per front. ✓ Back: 2 + 2 (neck) + 2 = 6. ✓)*

**2. Attach sleeves (perpendicular, dropped shoulder — NO armhole shaping):**
Find the shoulder seam. Measure **12" down** the front and **12" down** the back from the shoulder line on each side — this 24" span is the armhole opening (matching the 24" sleeve top edge exactly). Center the top edge of each Sleeve over the shoulder seam and seam it flat to the body along this 24" opening. The sleeve hangs at a right angle to the body — classic dropped-shoulder T-shape.
*(Sleeve top = 24" = body armhole span 24". ✓)*

**3. Side seams:**
Seam each side from the hem up to the underarm (where the sleeve attachment ends). Body is 42" tall; sleeve covers the top 12", so seam the lower **30"** on each side.

**4. Sleeve underseams:**
Fold each sleeve and seam from the underarm to the cuff (24").

Weave in all remaining ends.

---

## EDGING

**Round 1 (stabilize):** With RS facing and Color A, join at the bottom corner of the right Front. Work **sc evenly** up the right Front, around the back neck, down the left Front, and across the bottom hem, working **3 sc in each outer corner** to keep it flat. Join with sl st. Aim for about **3 sc per inch** along the granny edges (roughly 1 sc in each dc and 1 in each ch-sp), adjusting so corners lie flat.

**Round 2 (optional crab stitch / reverse sc):** Ch 1, do not turn; work **reverse sc** (crab stitch) in each sc around for a neat corded edge. Fasten off.

**Cuff edging (both sleeves):** Join Color A at the sleeve underseam, work 1 round of sc around the cuff, then a round of reverse sc if desired. Fasten off.

---

## CLOSURE (choose one)
- **Worn open:** No fastening — recommended for the relaxed kimono look.
- **Single button:** Sew a 1.5" button to the right Front about 3" below the neck edge. Make a chain loop on the left Front: at the matching point, ch 8, sl st back into the edge to form a loop sized to your button.
- **Sash belt:** Crochet a tie 60–72" long × 2" wide (ch a length to fit, then dc rows until 2" wide). Wrap and tie at the waist; tack two belt loops at the side seams if desired.

---

## BLOCKING (do not skip)
Wet- or steam-block the finished cardigan. Pin to even out all squares and open up the drape, confirming Back = 36" × 42" and each Sleeve = 24" × 24". Let dry flat. Blocking is what makes granny-square fabric lie smooth and drape softly.

---

## FINISHED — Quick Stitch-Count Recap (L/XL)
- Squares total: **116** ✓
- Back rectangle: 6 × 7 = 36" × 42" ✓
- Fronts: 2 × (3 × 7) = each 18" × 42" ✓
- Sleeves: 2 × (4 × 4) = each 24" × 24" ✓
- Shoulder: 2 squares seamed each side + 2-square back neck + 1-square front neck ✓
- No armhole shaping, no shoulder shaping, no sleeve taper — true kimono construction ✓

Enjoy your cozy, colorful granny square kimono cardigan!
Disclaimer: This pattern was generated by AI and should be reviewed for accuracy before use. While we strive for quality, AI-generated content may contain errors. Please verify measurements, stitch counts, and instructions before beginning your project. Generated by purlJam.uk
Access your pattern anytime
Bookmark this page to access your pattern anytime