Type
Knitting
Difficulty
intermediate
Category
blanket
AI Thinking Process
Planning
Verification
Pattern
Half-Sunflower and Bee Queen Topper
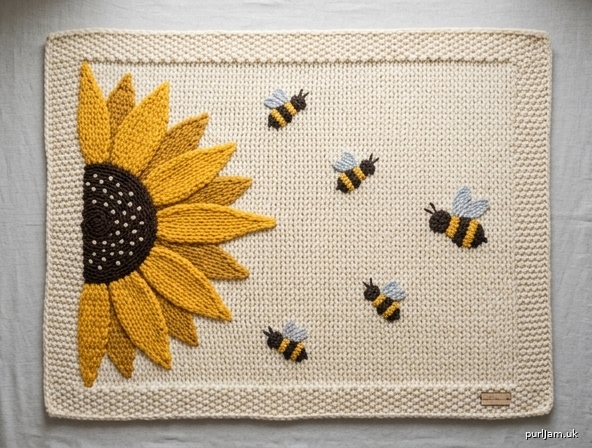
A queen mattress topper in jumbo yarn, knitted flat. A seed-stitch border frames a stockinette field. The right half of a sunflower sits on the left edge, centered from top to bottom, petals opening into the blanket. Five bees are scattered across the open field. The fabric is knitted first; the motifs are duplicate-stitched afterward so the jumbo cloth stays even.
This is the same stitch and row count as a topper of 40 stitches by 135 rows. It covers a standard queen mattress top (60 by 80 inches). It does not drop down the sides.
Skill level: Intermediate
Construction: One piece, worked flat from the cast-on edge to the top edge. Not worked in the round.
Finished measurements
- Width: 60 inches (152 cm)
- Length: 80 inches (203 cm)
- Side border: 4½ inches (11.5 cm), 3 stitches each side
- Top and bottom border: about 4¾ inches (12 cm), 8 rows each
- Stockinette field inside the border: 51 inches wide × about 70½ inches long (129.5 × 179 cm)
Measure on a flat surface. Jumbo fabric stretches when it hangs, and this topper is heavy.
Yarn
Jumbo weight (CYC category 7), in the yarn that gave you 40 stitches = 60 inches on your previous topper.
- Main color (MC), warm cream: about 900 yards (825 m), or the same amount used for your previous 40-stitch by 135-row topper
- Sunflower gold: about 120 yards (110 m)
- Center brown: about 40 yards (37 m)
- Bee charcoal: about 35 yards (32 m)
- Bee gold: about 25 yards (23 m)
- Wing gray (cooler and lighter than the cream, so the wings show): about 20 yards (18 m)
Yardage is approximate. Jumbo put-ups vary from short novelty skeins to longer cones. Buy extra sunflower gold if a skein has less than 50 yards. Motifs need strong contrast: petals brighter than the field, center darker, bee bodies the darkest marks on the blanket. If you change the field color, change the contrast colors to keep that relationship.
Needles and notions
- Circular needle, US 35–50 (19–25 mm), 40 inches (100 cm) long, or size needed to obtain gauge. Start with US 50 (25 mm) if you do not yet know your needle.
- Large-eye tapestry needle
- Tape measure
- 8 locking stitch markers or safety pins
- Optional: a piece of waste yarn for a radius guide
Worked flat. The circular needle only needs to hold the weight and the bulk. Do not join.
If you are using pre-looped jumbo yarn without needles, ignore the needle size. Treat 1 loop as 1 stitch, cast on 40 loops, and work 135 rows. Follow the motif placement by inches.
Gauge
8 stitches = 12 inches (30.5 cm) and 27 rows = 16 inches (40.5 cm) in stockinette stitch.
That is 2 stitches per 3 inches, and it is what turns 40 stitches and 135 rows into a 60 × 80 inch topper. It is a loose jumbo gauge. Match it. A tighter “label gauge” will make a much smaller blanket at this stitch count.
Swatch at least 8 stitches and 27 rows. Measure flat, unstretched. If you have more than 8 stitches in 12 inches, use a larger needle. If you have fewer, use a smaller needle. Your finished previous topper is a valid gauge swatch if it was 40 stitches = 60 inches and 135 rows = 80 inches.
Seed stitch may be slightly firmer than stockinette. A small pull-in at the border is acceptable. The finished width is measured across the stockinette field plus both borders, smoothed to 60 inches, not hanging.
Abbreviations
- BO — bind off
- CC — contrast color
- CO — cast on
- k — knit
- MC — main color
- p — purl
- RS — right side
- st(s) — stitch(es)
- St st — stockinette stitch (knit on RS, purl on WS)
- WS — wrong side
Notes
- Do not join in the round. Turn at the end of every row.
- On an even stitch count, seed stitch is k1, p1 across every row. Turning the work shifts the knits over the purls. If you “knit the knits and purl the purls,” you will get 1×1 rib, and the edge will pull in. Follow the written rows exactly.
- Slip no edge stitches. Every stitch is part of the seed border or the field.
- Use a loose knitted cast-on, or a long-tail cast-on with about a 5-yard (4.5 m) tail. A tight cast-on will make the bottom edge shorter than 60 inches.
- Bind off loosely in pattern. A tight bind-off will cup the top of a heavy blanket.
- Rest the growing fabric on a table or your lap. Do not let it hang from the needle while you measure.
- Weave in ends as you go, for 3 or 4 stitches, splitting jumbo plies when the yarn allows so the ends stay buried. Jumbo tails are bulky.
- Motifs are graphic on purpose. At this gauge a petal is about two stitches wide. Do not try to draw thin curves. Step back several feet to judge the shapes.
Stitch patterns
Seed stitch (over an even number of stitches)
Every row: *K1, p1; repeat from * to end.
Body row, RS (40 sts)
K1, p1, k1, k34, p1, k1, p1.
Body row, WS (40 sts)
K1, p1, k1, p34, p1, k1, p1.
Both body rows begin with k1, p1, k1 and end with p1, k1, p1. Only the center 34 stitches change: knit them on RS rows, purl them on WS rows. That is the 3-stitch seed border on each side, with stockinette between. (3 + 34 + 3 = 40 ✓)
Instructions
Bottom border
CO 40 sts loosely.
Work 8 rows in seed stitch: *K1, p1; repeat from * to end.
You now have 8 rows. Smoothed flat, the piece should be about 4¾ inches (12 cm) long and 60 inches (152 cm) wide. (8 stitches = 12 inches, so 40 stitches = 60 inches ✓.) If the size is far off, change needle size before continuing. Ripping jumbo yarn later is hard on the fiber.
Body
Work the RS body row, then the WS body row, until you have completed 119 body rows (pattern rows 9 through 127). (127 − 9 + 1 = 119 ✓.)
Row 9 is a RS row. Row 127 is a RS row. The top border may then begin on a WS row. Seed stitch is written the same on every row, so that does not change the border.
The body is 34 stockinette stitches between 3 seed stitches at each edge. Keep following the two written body rows. Do not switch the border to “work as the stitches appear.”
Checkpoint at the end of the body: 127 rows total, about 75¼ inches (191 cm) from the cast-on, still about 60 inches wide when smoothed flat.
Top border
Work 8 rows in seed stitch: *K1, p1; repeat from * to end.
Total rows: 8 + 119 + 8 = 135. (✓)
Length check: 135 rows × 16 inches / 27 rows = 80 inches. (✓)
Bind off
BO in pattern (knitwise on a knit, purlwise on a purl), loosely, at the same width as the cast-on. Weave in the end along the side.
Sunflower and bees
Work all motifs in duplicate stitch after the blanket is knitted, blocked to shape only by smoothing, and dry. Placement is by measurement, not by a counted color grid. Shapes are worked by eye inside the measurements below. At jumbo gauge they should look bold and simple from across the room.
Find the center
Fold the blanket in half so the cast-on meets the bind-off. Mark the fold on the left edge with a pin. That pin is the sunflower center, S. On an 80-inch blanket, S is 40 inches (101.5 cm) up from the cast-on. If your length drifted, trust the fold, not the 40-inch mark.
Half sunflower
This is the right-hand half of a sunflower. The flat side of the bloom is the left selvedge. The center sits on that edge, and the petals reach into the blanket, so the flower reads as looking in from the left side, centered from top to bottom.
The flower deliberately crosses the left seed border. Keep it clear of the top and bottom borders. The visible half is about 28 inches (71 cm) tall and 14 inches (35.5 cm) wide.
To reverse the facing (petals pointing toward the left edge, flat cut toward the middle of the blanket), put the flat side about 14 inches in from the left edge and aim the petals left. The steps below are for the edge-cut version.
- Leave pin S on the left edge.
- From S, measure 4 inches (10 cm) into the blanket and place a pin. This is the widest point of the seed disk. Swing the tape from S and place a few pins on that 4-inch half-circle, flat side along the left edge.
- Swing the tape again and place pins on a 14-inch (35.5 cm) half-circle for the outer petal tips. The top of this arc should fall about 14 inches above S, the bottom about 14 inches below S, and the farthest right pin 14 inches in from the left edge.
- Disk: Cover the 4-inch half-disk in center brown. Add a light scatter of darker brown or charcoal stitches inside it, like seeds. Do not cover every stitch a second time.
- Back petals: In sunflower gold, work about nine long petals in the visible half. Each is a tapered wedge, about 9–10 inches (23–25.5 cm) from the disk edge to the 14-inch arc, and about 3 inches (7.5 cm) wide at the base (about two stitches). Tips are a single stitch. Radiate them from the disk:
- one nearly along the left edge upward
- one nearly along the left edge downward
- one pointing straight right, level with S
- the others spaced by eye between those, like the right half of a clock
- Front petals: In the same gold, or a slightly deeper gold if you have it, work a shorter petal in each gap. These stop about 10–11 inches (25.5–28 cm) from S. Keep them in the spaces, not on top of the long petals, so both layers show.
- Stop at the pin arc. A petal that lands on seed-stitch border stitches is still covered. That is intentional.
No stem. The center is on the edge, so the bloom does not need one.
Five bees
Each bee is a small blocky mark, about 4–5 inches (10–12.5 cm) long and about 2½ inches (6.5 cm) wide, plus a short wing. One bee may be a little larger (about 6 inches / 15 cm) and one a little smaller (about 3½ inches / 9 cm). Vary them. Do not put a bee on the seed border, on the sunflower, or within about 4 inches (10 cm) of a petal tip.
Measure rightward from the left edge, and up or down from pin S.
| Bee | From left edge | From S | Facing | Check from cast-on if length is 80" |
|---|---|---|---|---|
| 1 | 20" (51 cm) | 6" (15 cm) above | left, toward the flower | about 46" (117 cm) up |
| 2 | 26" (66 cm) | 18" (45.5 cm) above | down-left | about 58" (147 cm) up |
| 3 | 42" (106.5 cm) | 26" (66 cm) above | right | about 66" (168 cm) up |
| 4 | 32" (81 cm) | 18" (45.5 cm) below | up-right | about 22" (56 cm) up |
| 5 | 48" (122 cm) | 4" (10 cm) below | left | about 36" (91.5 cm) up |
Pin all five. Step back. Shift a pin an inch or two if a bee looks lined up with another or cramped by the border. Then stitch.
Each bee, in order:
- Body in charcoal: a short horizontal or diagonal oval of covered stitches, head at the facing end.
- Two bee-gold bands across the body, each about one stitch wide.
- Two wing-gray marks just above the body, short and separate, not covering the stripes. On a cream field the wings must be cooler or lighter than the cream or they will disappear. Skip the wings rather than stitching them in a color that matches the field.
Bee 3 is the slightly larger one. Bee 4 is the slightly smaller one.
Duplicate stitch
Use this for every covered stitch in the sunflower and the bees.
- Cut contrast yarn no longer than 2 yards (1.8 m). Thread the tapestry needle.
- Bring the needle from wrong side to right side at the base of the stitch you want to cover, at the point of the V.
- Pass the needle under both legs of the stitch above, right to left. Take the full strand when you can. Do not pull the stitch above down.
- Return the needle to the wrong side at the same point you came up. The new yarn should lie over the old V like a new knit stitch.
- Run to the next stitch on the wrong side. Leave that carried yarn slack.
- Every few stitches, smooth the fabric. If it puckers, the yarn is too tight. Take that stitch out and rework it looser.
Work a petal from the wide base near the disk toward the tip. Keep the full width for the first third, then narrow it, then end in one stitch. Work the disk before the petals, the long petals before the short petals, and the bees last.
Start a new length of yarn rather than carrying jumbo across a gap. Long carries show and snag.
Finishing
- Weave in remaining ends on the wrong side for 3–4 stitches. Split plies if the yarn allows. Trim. Do not leave ends longer than an inch; they will work out under the weight of the blanket.
- Smooth the topper flat to 60 × 80 inches (152 × 203 cm). Pin only if the edges will not stay put.
- If the yarn is polyester, chenille, or anything the band says not to iron, do not steam and do not wash to block. Hand-smooth only.
- If the band allows wet blocking or light steam, use the gentlest method on the band. Do not press the duplicate stitch flat.
- Let it dry fully before moving it. Support the weight when you lift it so the fresh stitches do not pull.
Care
Follow the yarn band. Unless the band allows it, do not machine-wash, tumble-dry, or iron jumbo yarn. Spot-clean, reshape flat, and dry flat. This topper is a heavy mattress layer, not a lightweight throw. Keep it flat rather than hanging it for storage, so the jumbo stitches do not grow in length.
Disclaimer: This pattern was generated by AI and should be reviewed for accuracy before use. While we strive for quality, AI-generated content may contain errors. Please verify measurements, stitch counts, charts, and instructions before beginning your project. Generated by purlJam.uk
Love this pattern?
Save this pattern to your free PurlJam libraryAccess your pattern anytime
Bookmark this page to access your pattern anytime