Type
Knitting
Difficulty
intermediate
Category
cardigan
AI Thinking Process
Planning
Verification
Pattern
Happy Cardigan
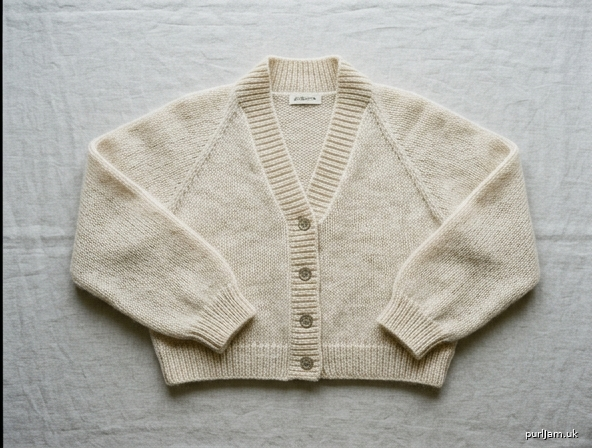
A short, oversized top-down raglan cardigan
Design: Maria Sølvtofte | Hobbii Design
Technically edited version for clarity
Skill level: Easy / beginner-friendly
This is a short, joyful raglan cardigan with wide sleeves, a tall ribbed collar, and glitter buttons. It is worked in one piece from the neck down. The main fabric uses one strand of Panettone and one strand of Diablo held together; all ribbing uses a single strand of Panettone on smaller needles.
How this cardigan is built
You start at the neck with a small number of stitches, place four raglan markers, and work flat in stockinette. Every right-side row you increase 8 stitches (one on each side of each raglan line), so the yoke grows into two fronts, two sleeves, and a back.
When the yoke is deep enough, the sleeve stitches are parked on waste yarn. A few stitches are cast on under each arm to form the underarm, and the fronts and back are joined into one body. The body is knit straight down (no waist shaping) to a ribbed hem.
Each sleeve is then worked in the round from the held stitches plus the picked-up underarm stitches. There is no sleeve decrease — the sleeves stay wide on purpose. Finally, ribbed button bands are picked up along the front edges, and a deep ribbed collar is picked up around the neck.
Women’s buttoning is used: buttonholes on the right front (as worn), buttons on the left.
Sizes
S (M, L, XL, 2XL)
Shown with a relaxed, oversized fit. Choose a size by finished bust, not by the size name on a commercial garment.
Finished measurements (after blocking)
| S | M | L | XL | 2XL | |
|---|---|---|---|---|---|
| Finished bust | 40½" (103 cm) | 42¾" (109 cm) | 46¼" (117.5 cm) | 48½" (123 cm) | 52" (132 cm) |
| Total length | 15¾" (40 cm) | 16½" (42 cm) | 17¼" (44 cm) | 18" (46 cm) | 18" (46 cm) |
| Yoke depth (approx.) | 8½" (21.5 cm) | 9" (23 cm) | 9½" (24 cm) | 9¾" (25 cm) | 10¼" (26 cm) |
| Upper sleeve circ. | 16¼" (41.5 cm) | 17" (43 cm) | 18" (45.5 cm) | 18½" (47 cm) | 19¾" (50 cm) |
| Sleeve length to cuff | 13" (33 cm) | 13¾" (35 cm) | 14½" (37 cm) | 14½" (37 cm) | 14½" (37 cm) |
Intended ease is about 4–8" (10–20 cm) positive ease at the bust. If you are between sizes and want the original boxy look, size up.
Yarn
Main fabric (held together throughout yoke, body, and sleeves):
- 1 strand Panettone, Hobbii (87% cotton, 7% polyamide, 6% metallic fiber; 131 yd / 120 m per 1.75 oz / 50 g), color 03
6 (7, 8, 9, 9) balls — approx. 785 (915, 1050, 1180, 1180) yd / 720 (840, 960, 1080, 1080) m - 1 strand Diablo, Hobbii (40% acrylic, 30% mohair, 30% polyamide; 246 yd / 225 m per 0.88 oz / 25 g), color 59
3 (4, 4, 5, 5) balls — approx. 740 (985, 985, 1230, 1230) yd / 675 (900, 900, 1125, 1125) m
Ribbing (hem, cuffs, button bands, collar): Panettone only, included in the amounts above.
Substitution: Any worsted-weight yarn held with a lace-weight mohair/silk (or mohair/acrylic) that matches gauge. A single heavy-worsted or aran yarn that knits at 14 sts = 4" (10 cm) on US 10¾ / 7 mm may also be used for the main fabric; still use a lighter cotton or smooth worsted alone for the ribbing if you want the same firm edges.
Needles
- US 10¾ / 7 mm circular, 32" (80 cm), for yoke and body
- US 10¾ / 7 mm needles for sleeves: 32" (80 cm) circular for magic loop, or DPNs (a 16" / 40 cm circular is optional but snug)
- US 6 / 4 mm circular, 32" (80 cm), for hem and button bands
- US 6 / 4 mm circular, 16" (40 cm) or 32" (80 cm), for cuffs and collar
Adjust needle size to obtain gauge.
Notions
- 8 stitch markers (4 pairs to isolate the raglan stitches; 2 of a different color are helpful at the underarms later)
- Waste yarn or stitch holders
- Tapestry needle
- 5 (5, 6, 6, 6) buttons, ¾" (18 mm) — original uses Hobbii “glitter” buttons
Gauge
14 stitches and 20 rows = 4" (10 cm) in stockinette stitch with both yarns held together on US 10¾ / 7 mm needles, after blocking.
Work a swatch at least 6" (15 cm) square. Block it the same way you will block the cardigan. Gauge controls both width and raglan depth — if you have more stitches per 4" (10 cm), the cardigan will be smaller and the neck tighter; if you have fewer, it will be larger.
Row gauge also matters: length measurements in this pattern assume 20 rows = 4" (10 cm).
Abbreviations (US)
| Abb. | Meaning |
|---|---|
| BO | bind off |
| CO | cast on |
| k | knit |
| k2tog | knit 2 stitches together (right-leaning decrease) |
| M1L | make 1 left (left-leaning increase; see Special stitches) |
| M1R | make 1 right (right-leaning increase; see Special stitches) |
| p | purl |
| pm | place marker |
| rep | repeat |
| RS | right side |
| sm | slip marker |
| st(s) | stitch(es) |
| St st | stockinette stitch |
| WS | wrong side |
| wyib | with yarn in back |
| yo | yarn over |
Special stitches
Stockinette stitch, worked flat: Knit RS rows, purl WS rows.
Stockinette stitch, in the round: Knit every round.
M1R (right-leaning increase): Insert the left needle from back to front under the horizontal bar between the stitch just worked and the next stitch. Knit this bar through the front loop.
M1L (left-leaning increase): Insert the left needle from front to back under the horizontal bar between the stitch just worked and the next stitch. Knit this bar through the back loop.
Backwards-loop cast-on: Loop the working yarn over your thumb and transfer each loop to the right needle. Keep these stitches slightly loose so the underarm does not draw in.
1×1 rib (k1, p1), worked flat: *K1, p1; rep from * to end (or as directed).
1×1 rib, in the round: *K1, p1; rep from * to end of round.
Buttonhole: Yo, k2tog. The yo makes the hole; k2tog keeps the stitch count stable.
Pattern notes
- Two strands (Panettone + Diablo) are held together for the entire yoke, body, and sleeves. Drop Diablo and work with Panettone only for all ribbing.
- The cardigan is worked flat through the yoke and body (it has an open front). Sleeves are worked in the round.
- Stitch counts are given as S (M, L, XL, 2XL). When only one number is given, it applies to all sizes.
- The 4 single raglan stitches sit between paired markers. They are knitted every RS row and become part of the body when you divide, not part of the sleeves.
- There is no body waist shaping and no sleeve taper. Both are intentional.
- Slip the first stitch of every collar row for a chain edge.
- Bind off all ribbing in pattern (knit the knits, purl the purls) and keep the bind-off loose so hems and cuffs stretch.
Yoke
With US 10¾ / 7 mm, 32" (80 cm) circular needle and one strand of Panettone and one strand of Diablo held together, CO 64 (68, 72, 76, 80) sts using a long-tail or other firm cast-on. Do not join; the piece is worked flat.
Set-up row (WS): Purl, placing markers to isolate the 4 raglan stitches as follows:
P 11 (12, 13, 14, 15) (right front), pm, p1 (raglan), pm,
p 9 (right sleeve), pm, p1 (raglan), pm,
p 20 (22, 24, 26, 28) (back), pm, p1 (raglan), pm,
p 9 (left sleeve), pm, p1 (raglan), pm,
p 11 (12, 13, 14, 15) (left front).
Check: 11 + 1 + 9 + 1 + 20 + 1 + 9 + 1 + 11 = 64 sts for size S ✓
(M: 12+1+9+1+22+1+9+1+12 = 68 ✓; L: 72 ✓; XL: 76 ✓; 2XL: 80 ✓)
Raglan increases
You will increase 8 sts every RS row — M1R before each raglan stitch and M1L after it.
Row 1 (RS): *Knit to marker, M1R, sm, k1 (raglan st), sm, M1L; rep from * 3 more times, knit to end.
8 sts increased.
Row 2 (WS): Purl.
Rep Rows 1–2 a total of 21 (22, 23, 24, 25) times.
Stitch count: 64 + (21 × 8) = 232 sts (S) ✓
68 + (22 × 8) = 244 sts (M) ✓
72 + (23 × 8) = 256 sts (L) ✓
76 + (24 × 8) = 268 sts (XL) ✓
80 + (25 × 8) = 280 sts (2XL) ✓
After the last WS row, the sections are:
| Section | S | M | L | XL | 2XL |
|---|---|---|---|---|---|
| Right front | 32 | 34 | 36 | 38 | 40 |
| Raglan st | 1 | 1 | 1 | 1 | 1 |
| Right sleeve | 51 | 53 | 55 | 57 | 59 |
| Raglan st | 1 | 1 | 1 | 1 | 1 |
| Back | 62 | 66 | 70 | 74 | 78 |
| Raglan st | 1 | 1 | 1 | 1 | 1 |
| Left sleeve | 51 | 53 | 55 | 57 | 59 |
| Raglan st | 1 | 1 | 1 | 1 | 1 |
| Left front | 32 | 34 | 36 | 38 | 40 |
| Total | 232 | 244 | 256 | 268 | 280 |
Front 11 + 21 incs = 32 (S) ✓; sleeve 9 + (21 × 2) = 51 (S) ✓; back 20 + (21 × 2) = 62 (S) ✓.
Yoke should measure about 8½ (9, 9½, 9¾, 10¼)" / 21.5 (23, 24, 25, 26) cm from the cast-on edge, including the set-up row. Because this is an oversized, wide-sleeved shape, the armhole is meant to be deep.
Divide body and sleeves
Worked on the RS. The 4 raglan stitches are knit with the body. Remove markers as you come to them.
Dividing row (RS):
K 33 (35, 37, 39, 41) (right front + its raglan st),
slip next 51 (53, 55, 57, 59) sts to waste yarn (right sleeve),
CO 6 (6, 8, 8, 10) sts using the backwards-loop method (right underarm),
k 64 (68, 72, 76, 80) (back + both of its raglan sts),
slip next 51 (53, 55, 57, 59) sts to waste yarn (left sleeve),
CO 6 (6, 8, 8, 10) sts using the backwards-loop method (left underarm),
k 33 (35, 37, 39, 41) (left front + its raglan st).
Body stitches on the needle:
33 + 6 + 64 + 6 + 33 = 142 sts (S) ✓
35 + 6 + 68 + 6 + 35 = 150 sts (M) ✓
37 + 8 + 72 + 8 + 37 = 162 sts (L) ✓
39 + 8 + 76 + 8 + 39 = 170 sts (XL) ✓
41 + 10 + 80 + 10 + 41 = 182 sts (2XL) ✓
Body
Continue even in stockinette stitch, worked flat (knit RS, purl WS), until the piece measures 14¼ (15, 15¾, 16½, 16½)" / 36 (38, 40, 42, 42) cm from the neck cast-on edge, or 1½" (4 cm) less than the length you want.
End with a WS purl row.
Hem ribbing
Change to US 6 / 4 mm, 32" (80 cm) circular needle and Panettone only (drop Diablo; cut it, leaving a tail to weave in).
The next row increases the stitch count so the smaller-needle ribbing does not pull in too much.
Increase row (RS): *K2, M1L; rep from * to last 2 sts, k2.
Increases worked: (142 − 2) ÷ 2 = 70, 142 + 70 = 212 sts (S) ✓
(150 − 2) ÷ 2 = 74, 150 + 74 = 224 sts (M) ✓
(162 − 2) ÷ 2 = 80, 162 + 80 = 242 sts (L) ✓
(170 − 2) ÷ 2 = 84, 170 + 84 = 254 sts (XL) ✓
(182 − 2) ÷ 2 = 90, 182 + 90 = 272 sts (2XL) ✓
Work in 1×1 rib (k1, p1) until the hem measures 1½" (4 cm).
BO in rib, loosely.
Total length from neck: 15¾ (16½, 17¼, 18, 18)" / 40 (42, 44, 46, 46) cm.
Sleeves
Work one sleeve at a time. Use US 10¾ / 7 mm needles and both yarns held together again.
Place the 51 (53, 55, 57, 59) held sleeve stitches onto the needle. With RS facing, beginning at the center of the underarm, pick up and knit 6 (6, 8, 8, 10) sts along the backwards-loop cast-on (one stitch in each cast-on st). Pick up an extra stitch in each underarm corner if a hole appears, then k2tog those extras on the next round so the count is exact.
57 (59, 63, 65, 69) sts.
51 + 6 = 57 (S) ✓; 53 + 6 = 59 (M) ✓; 55 + 8 = 63 (L) ✓; 57 + 8 = 65 (XL) ✓; 59 + 10 = 69 (2XL) ✓
Place a marker at the center of the picked-up underarm stitches. This is the beginning of the round.
Join to work in the round. Knit every round in stockinette until the sleeve measures 13 (13¾, 14½, 14½, 14½)" / 33 (35, 37, 37, 37) cm from the underarm, or 1½" (4 cm) less than the desired sleeve length. There are no decreases — the sleeve stays wide.
Cuff
Change to US 6 / 4 mm needles and Panettone only.
Increase round: *K2, M1L; rep from * until 3 (1, 1, 3, 3) sts remain, knit to end.
(57 − 3) ÷ 2 = 27 incs, 57 + 27 = 84 sts (S) ✓
(59 − 1) ÷ 2 = 29 incs, 59 + 29 = 88 sts (M) ✓
(63 − 1) ÷ 2 = 31 incs, 63 + 31 = 94 sts (L) ✓
(65 − 3) ÷ 2 = 31 incs, 65 + 31 = 96 sts (XL) ✓
(69 − 3) ÷ 2 = 33 incs, 69 + 33 = 102 sts (2XL) ✓
Work 1×1 rib in the round for 1½" (4 cm).
BO in rib, loosely.
Work the second sleeve the same way.
Button bands
Worked flat in 1×1 rib with US 6 / 4 mm, 32" (80 cm) circular needle and Panettone only.
Pick up with the RS of the cardigan facing you. Along the stockinette front edge, pick up about 3 stitches for every 4 rows; along the hem ribbing, pick up 1 stitch for every stitch. Adjust by a stitch or two so the band lies flat without flaring or pulling, and so you have an odd number of stitches (this lets both long edges of a k1, p1 band begin and end with a knit st).
Left button band (buttons; wearer’s left front)
Starting at the neck edge of the left front, pick up and knit down to the hem (or hem to neck — be consistent on both fronts).
Work 8 rows of 1×1 rib.
BO in rib, loosely.
Right button band (buttonholes; wearer’s right front)
Sizes S and M use 5 buttons; sizes L, XL, and 2XL use 6 buttons.
Lay the finished left band next to the right front and mark 5 (5, 6, 6, 6) button positions on the left band: first and last buttons about ⅜–½" (1 cm) from the top and bottom edges of the band, remaining buttons spaced evenly between them. Transfer those positions to the right front with locking markers as you work Row 4.
Pick up and knit the same number of stitches along the right front edge as you did on the left.
Rows 1–3: Work in 1×1 rib.
Row 4 (buttonhole row): Work in established rib to the first buttonhole marker, [yo, k2tog], *work in rib to the next buttonhole marker, yo, k2tog; rep from * until all 5 (5, 6, 6, 6) buttonholes are made, work in rib to end.
Stitch count is unchanged (each yo is paired with a k2tog) ✓.
Rows 5–8: Work in 1×1 rib.
BO in rib, loosely.
Collar
With US 6 / 4 mm needle, Panettone only, and RS facing, pick up and knit 85 (90, 95, 100, 105) sts around the neck opening. Pick up in the neck cast-on stitches and in the spaces between them so the collar has enough fabric to sit nicely, and pick up in the top edges of both button bands.
Stitch count check: you are picking up more sts than the original 64 (68, 72, 76, 80) neck CO so the collar is full, not tight.
Work flat in 1×1 rib. Slip the first stitch of every row wyib for a chain edge.
Continue until the collar measures 4 (4½, 4¾, 4¾, 4¾)" / 10 (11, 12, 12, 12) cm.
BO in rib, loosely.
The collar is deep on purpose. Wear it standing or folded over.
Finishing
- Weave in all ends, closing any small gaps at the underarms with the yarn tails.
- Block the cardigan to the finished measurements. Pin the bust width, total length, and sleeve length; do not stretch the ribbing aggressively. Cotton holds its blocked shape; mohair will bloom and soften the fabric.
- Sew the 5 (5, 6, 6, 6) buttons to the left band, aligned with the buttonholes.
- After blocking, check that the bands are the same length and that the collar sits evenly.
Quick stitch-count summary
| Stage | S | M | L | XL | 2XL |
|---|---|---|---|---|---|
| Neck CO | 64 | 68 | 72 | 76 | 80 |
| After raglan | 232 | 244 | 256 | 268 | 280 |
| Each sleeve on hold | 51 | 53 | 55 | 57 | 59 |
| Body after divide | 142 | 150 | 162 | 170 | 182 |
| After hem increases | 212 | 224 | 242 | 254 | 272 |
| Sleeve after pickup | 57 | 59 | 63 | 65 | 69 |
| After cuff increases | 84 | 88 | 94 | 96 | 102 |
| Collar pickup | 85 | 90 | 95 | 100 | 105 |
| Buttons | 5 | 5 | 6 | 6 | 6 |
Enjoy your Happy Cardigan.
Disclaimer: This pattern was generated by AI and should be reviewed for accuracy before use. While we strive for quality, AI-generated content may contain errors. Please verify measurements, stitch counts, charts, and instructions before beginning your project. Generated by purlJam.uk
Love this pattern?
Save this pattern to your free PurlJam libraryAccess your pattern anytime
Bookmark this page to access your pattern anytime