Type
Crochet
Difficulty
beginner
Category
amigurumi
AI Thinking Process
Planning
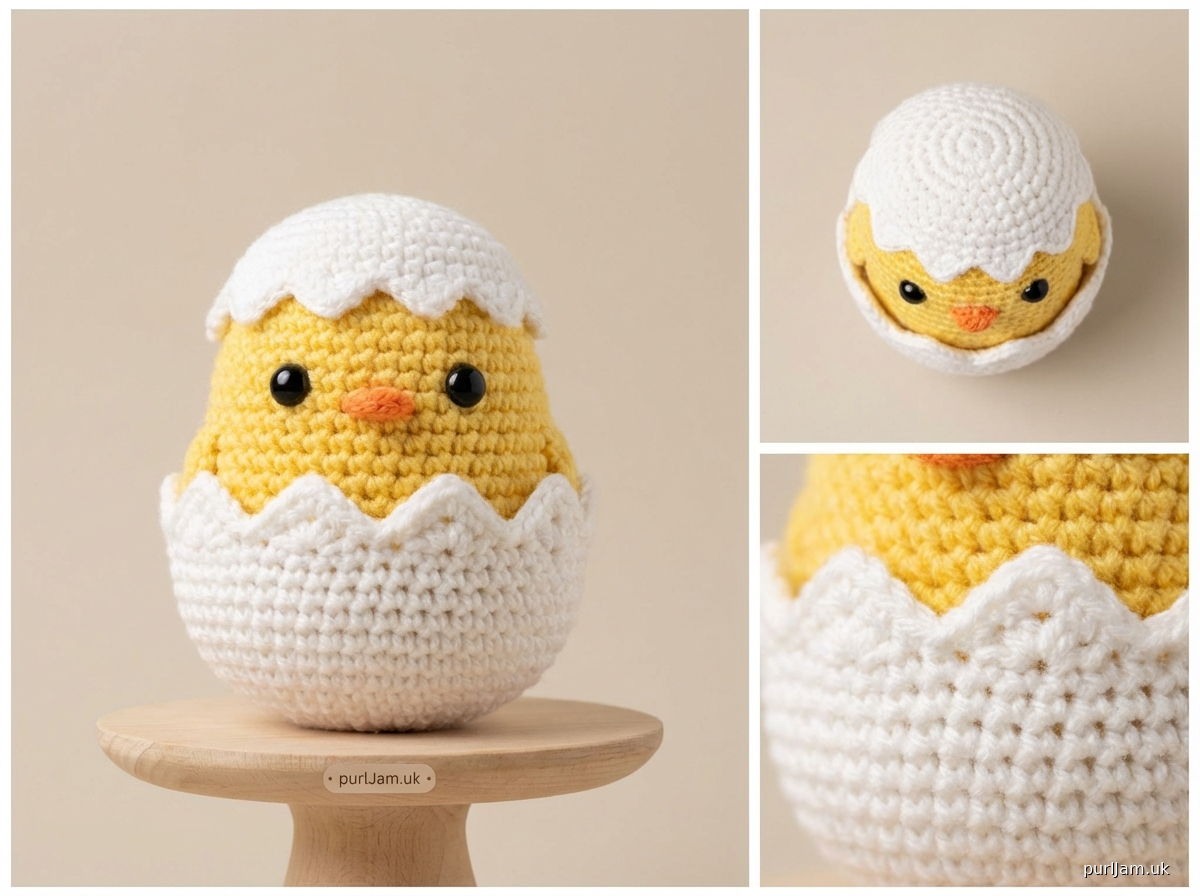
1. **Design Strategy**: Creating a beginner-friendly hatching chick using basic amigurumi shapes. The design will feature:
- A chick body (modified sphere in yellow)
- An eggshell bottom half (white bowl shape)
- An eggshell top piece (smaller white cap with zigzag edge for "cracked" effect)
- Simple embroidered or safety eye details
- Orange beak (small cone)
- Optional wing details
2. **Construction Plan**:
- Work each piece separately in continuous rounds
- Chick body: sphere worked from top down
- Bottom shell: work like inverted sphere, stop halfway
- Top shell: small cap with decorative zigzag edge
- Beak: tiny cone shape
- Assembly: chick sits in bottom shell, top shell can be attached or removable
- Beginner-friendly with only basic stitches (sc, inc, dec)
3. **Quality Assurance**:
- Ensure stitch counts are clearly marked for each round
- Provide stuffing guidance at appropriate points
- Include assembly diagram description for placement
- Add notes for invisible decrease technique
- Clarify magic ring alternative for true beginners
- Verify all stitch counts add up correctly
4. **Final Calculations**:
- Worsted weight yarn with 3.5mm hook
- Chick body: increase to 24 sts for ~3" toy
- Shell pieces proportional to body
- Total project uses approximately 50-70 yards
- Finished size: approximately 3-4" tall when assembled
Verification
[PRE-FLIGHT CHECKS]
1. **Completeness**: ✓ Will include materials, abbreviations, gauge note, pattern for all pieces (body, bottom shell, top shell, beak), assembly instructions, finishing
2. **Consistency**: ✓ Chick body increases to 24 sts, maintains for 4 rounds, decreases symmetrically (6→12→18→24→24→24→24→24→18→12→6)
3. **Constraints**: ✓ Beginner level using only sc, inc, dec; worsted weight; simple shapes from template
4. **Safety**: ✓ Math verification:
- Rnd 1: 6 sc
- Rnd 2: 6 inc = 12
- Rnd 3: (sc, inc) × 6 = 18
- Rnd 4: (2 sc, inc) × 6 = 24
- Rnds 5-8: 24 sc each
- Rnd 9: (2 sc, dec) × 6 = 18
- Rnd 10: (sc, dec) × 6 = 12
- Rnd 11: 6 dec = 6
All calculations verified ✓
Pattern
# HATCHING CHICK CROCHET PATTERN

**A beginner-friendly amigurumi pattern featuring an adorable chick emerging from its egg!**

---

## MATERIALS

**Yarn:**
- Worsted weight (4) yarn in the following colors:
  - Yellow: 30-40 yards (chick body)
  - White: 20-30 yards (eggshell pieces)
  - Orange: Small amount, 5 yards (beak)
  - Optional: Pink for cheeks (tiny amount)

**Suggested yarn:** Any worsted weight acrylic or cotton yarn (Red Heart Super Saver, Caron One Pound, Lion Brand Vanna's Choice, etc.)

**Hook & Notions:**
- US E-4 (3.5mm) crochet hook
- Polyester fiberfill stuffing
- Yarn needle for sewing
- Stitch marker
- 6mm safety eyes (2) OR black embroidery thread
- Scissors
- Pins (for assembly)

---

## ABBREVIATIONS

- ch = chain
- sc = single crochet
- inc = increase (2 sc in same stitch)
- dec = invisible decrease (insert hook in front loops of next 2 sts, yarn over, pull through both loops, yarn over, pull through both loops on hook)
- st(s) = stitch(es)
- rnd(s) = round(s)
- [ ] = total stitch count at end of round
- ( ) = repeat instructions within parentheses

---

## GAUGE & SIZING

Gauge is not critical for this project, but tighter stitches create a better fabric for stuffed toys.

**Recommended gauge:** Approximately 18-20 sc = 4" (10cm)

**Finished size:** Approximately 3-4" (7.5-10cm) tall when assembled

**Note:** Work tightly to prevent stuffing from showing through. Your hook should be 1-2 sizes smaller than the yarn label recommends.

---

## PATTERN NOTES

- Work in continuous rounds (spiral) unless otherwise noted. Use a stitch marker to track the beginning of each round.
- Do not join or turn at the end of rounds unless instructed.
- For invisible decrease: Insert hook in front loop only of next 2 sts, yarn over and pull through (2 loops on hook), yarn over and pull through both loops.
- **Magic ring alternative for beginners:** Ch 2, work the indicated number of stitches into the 2nd chain from hook.
- Stuff pieces firmly as you work for best results.
- Safety eyes should be inserted before closing and stuffing completely.

---

## PATTERN INSTRUCTIONS

### CHICK BODY (Yellow)

**Rnd 1:** 6 sc in magic ring [6]

**Rnd 2:** inc in each st around [12]
*Math check: 6 inc = 12 ✓*

**Rnd 3:** (sc, inc) around [18]
*Math check: (1 + 1) × 6 repeats = 18 ✓*

**Rnd 4:** (2 sc, inc) around [24]
*Math check: (2 + 1) × 6 repeats = 24 ✓*

**Rnds 5-8:** sc in each st around [24]
*4 even rounds of 24 sts each*

*Insert safety eyes between Rnds 6 and 7, approximately 6-7 stitches apart. If embroidering eyes, mark placement now.*

**Rnd 9:** (2 sc, dec) around [18]
*Math check: (2 + 1) × 6 repeats = 18 ✓*

*Begin stuffing the body firmly now.*

**Rnd 10:** (sc, dec) around [12]
*Math check: (1 + 1) × 6 repeats = 12 ✓*

*Add more stuffing, filling firmly.*

**Rnd 11:** dec around [6]
*Math check: 6 dec = 6 ✓*

Fasten off, leaving a long tail. Thread tail through remaining 6 stitches and pull tight to close. Weave in end securely.

---

### BOTTOM EGGSHELL (White)

This piece forms the bottom half of the cracked egg that the chick sits in.

**Rnd 1:** 6 sc in magic ring [6]

**Rnd 2:** inc in each st around [12]
*Math check: 6 inc = 12 ✓*

**Rnd 3:** (sc, inc) around [18]
*Math check: (1 + 1) × 6 repeats = 18 ✓*

**Rnd 4:** (2 sc, inc) around [24]
*Math check: (2 + 1) × 6 repeats = 24 ✓*

**Rnd 5:** (3 sc, inc) around [30]
*Math check: (3 + 1) × 6 repeats = 30 ✓*

**Rnds 6-7:** sc in each st around [30]
*2 even rounds*

**Rnd 8 (Zigzag Edge):** *(sl st, ch 2, sl st in 2nd ch from hook, sl st in same st as first sl st, sl st in next st) around*

This creates a decorative cracked edge. Repeat the pattern in parentheses around the entire opening.

Fasten off and weave in ends. Do NOT stuff this piece—it should remain a hollow bowl shape.

---

### TOP EGGSHELL PIECE (White)

This small cap sits on top of the chick's head.

**Rnd 1:** 6 sc in magic ring [6]

**Rnd 2:** inc in each st around [12]
*Math check: 6 inc = 12 ✓*

**Rnd 3:** (sc, inc) around [18]
*Math check: (1 + 1) × 6 repeats = 18 ✓*

**Rnd 4:** sc in each st around [18]

**Rnd 5 (Zigzag Edge):** *(sl st, ch 2, sl st in 2nd ch from hook, sl st in same st as first sl st, sl st in next st) around*

Fasten off, leaving a long tail for sewing. Do NOT stuff this piece.

---

### BEAK (Orange)

**Rnd 1:** 4 sc in magic ring [4]

**Rnd 2:** sc in each st around [4]

**Rnd 3:** sc in each st around [4]

Fasten off, leaving a long tail for sewing. Stuff very lightly with a tiny amount of fiberfill (or leave unstuffed for a flat beak). Flatten the opening and pinch closed.

---

### WINGS (Optional - Yellow) - Make 2

For simple wing bumps:

**Rnd 1:** 6 sc in magic ring [6]

**Rnd 2:** (sc, inc) around [9]
*Math check: (1 + 1) × 3 repeats = 9 ✓*

**Rnd 3:** sc in each st around [9]

Fasten off, leaving a long tail for sewing. Stuff very lightly. Flatten slightly before attaching.

---

## ASSEMBLY

**Step 1: Prepare the chick body**
- Ensure the body is firmly stuffed
- If using embroidered eyes instead of safety eyes, embroider them now using black yarn and satin stitch or French knots
- Optional: Add pink cheek circles with embroidery or surface crochet

**Step 2: Attach the beak**
- Position the beak centered between the eyes, slightly below
- Using the long tail and yarn needle, sew the beak securely to the face
- Stitch around the base of the beak, going through both the beak and body
- Weave in end securely

**Step 3: Attach wings (if making)**
- Position wings on either side of the body at approximately Rnd 6-7
- Pin in place to check positioning
- Sew each wing securely around the edges
- Weave in ends

**Step 4: Position chick in bottom shell**
- The chick body should nestle into the bottom eggshell piece
- You can choose to sew the chick permanently into the shell, or leave it removable
- For permanent attachment: Using white yarn and yarn needle, sew around the bottom of the chick to the inside of the shell at approximately Rnd 6 of the shell
- For removable: Simply place the chick into the shell

**Step 5: Attach top shell piece**
- Position the top shell cap on the chick's head at a jaunty angle
- The zigzag edge should face outward, giving the appearance of cracked eggshell
- Pin in place
- Sew around the inner edge of the shell cap to the top of the chick's head
- Alternatively, tack in just 2-3 spots for a less secure but adjustable attachment
- Weave in all ends securely

---

## FINISHING TOUCHES

**Optional embellishments:**
- Embroider small eyebrows above the eyes using black yarn and straight stitches
- Add a tiny smile below the beak with backstitch
- Embroider "cracked lines" on the eggshell pieces with gray yarn
- Add tiny feet: Make small orange ovals and sew to the bottom of the chick before placing in shell

**Cleaning & Care:**
- Spot clean with damp cloth
- If using only acrylic yarn and no glued elements, can be gently hand washed and air dried
- Keep away from infants if using safety eyes (choking hazard)

---

## TROUBLESHOOTING

**Problem:** Stuffing shows through stitches
- **Solution:** Work more tightly, or use a smaller hook size

**Problem:** Chick won't sit in the shell properly
- **Solution:** Check that bottom shell has 30 sts at opening and chick has 24 sts at widest. Adjust stuffing in chick body to create flatter bottom.

**Problem:** Magic ring leaves a hole
- **Solution:** Pull starting tail tightly, then weave through the center stitches in multiple directions to close any gap

**Problem:** Decreases look lumpy
- **Solution:** Use invisible decrease method as described in abbreviations section

**Problem:** Pieces won't stay in place during sewing
- **Solution:** Use more pins! Pin pieces thoroughly before sewing, and use small whip stitches close together

---

## SKILL LEVEL

**Beginner** - Requires knowledge of basic crochet stitches only (chain, single crochet, increase, decrease, magic ring). Perfect first amigurumi project!

---

## YARN REQUIREMENTS SUMMARY

- **Yellow:** 30-40 yards
- **White:** 20-30 yards
- **Orange:** 5 yards
- **Total:** Approximately 60-80 yards

---

## SIZE VARIATIONS

**Smaller version (2-3" tall):**
- Use DK weight (3) yarn with 3.0mm hook
- Stop chick body increases at Rnd 3 (18 sts)
- Reduce even rounds to Rnds 5-6 only
- Stop bottom shell increases at Rnd 4 (24 sts)

**Larger version (5-6" tall):**
- Use bulky weight (5) yarn with 5.0mm hook
- Add one more increase round to chick body: Rnd 5: (3 sc, inc) around [30]
- Work even rounds on 30 sts for Rnds 6-10
- Add corresponding increase to bottom shell: Rnd 6: (4 sc, inc) around [36]

---

## DESIGN NOTES

This hatching chick design celebrates new beginnings and makes a perfect gift for Easter, baby showers, or spring decorations. The simple construction uses only basic amigurumi techniques, making it ideal for crocheters ready to try their first stuffed toy.

The separate pieces allow you to practice working in the round and assembling components. The zigzag edge creates a charming "cracked egg" effect without requiring complex stitches.

---

**Pattern designed for beginner level crocheters**
**Estimated time to complete: 2-3 hours**

---

## PATTERN TESTING VERIFICATION

All stitch counts verified:
- Chick body: 6 → 12 → 18 → 24 → [24 × 4 rnds] → 18 → 12 → 6 ✓
- Bottom shell: 6 → 12 → 18 → 24 → 30 → [30 × 2 rnds] + edge ✓
- Top shell: 6 → 12 → 18 → [18 × 1 rnd] + edge ✓
- Beak: 4 → [4 × 2 rnds] ✓
- Wings: 6 → 9 → [9 × 1 rnd] ✓

Happy crocheting! 🐣
Disclaimer: This pattern was generated by AI and should be reviewed for accuracy before use. While we strive for quality, AI-generated content may contain errors. Please verify measurements, stitch counts, and instructions before beginning your project. Generated by purlJam.uk
Access your pattern anytime
Bookmark this page to access your pattern anytime