Type
Knitting
Difficulty
advanced
Category
cardigan
AI Thinking Process
Planning
Verification
Pattern
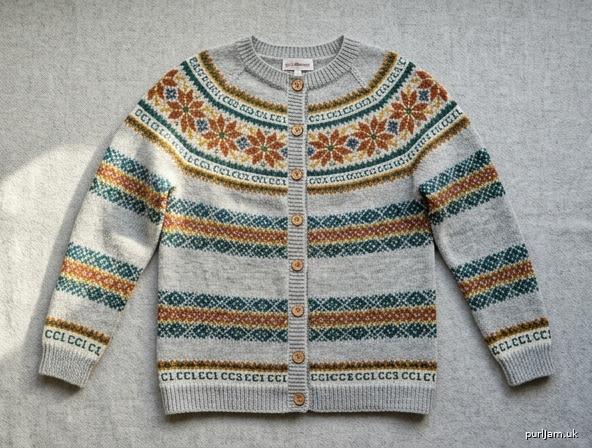
Heather Isle Fair Isle Cardigan
Advanced • Top-Down Raglan • Steeked • Fingering Weight
A hip-length, long-sleeve cardigan worked seamlessly from the top down with traditional stranded Fair Isle motifs. The body and yoke are knit in the round with a center-front steek so both hands can strand on the public side; the steek is reinforced and cut after wet-blocking. Raglan shaping is worked while the yoke charts are in progress. Button bands are picked up along the cut steek edges.
Sizes
XS (S, M, L, XL, 2X)
To fit bust: 32 (36, 40, 44, 48, 52) in / 81.5 (91.5, 101.5, 112, 122, 132) cm
Finished bust circumference (buttoned): 34 (38, 42, 46, 50, 54) in / 86.5 (96.5, 106.5, 117, 127, 137) cm
Finished length (CB neck to hem): 22.5 (23, 23.5, 24.5, 25, 25.5) in / 57 (58.5, 59.5, 62, 63.5, 65) cm
Upper arm circumference: 12 (13, 14.5, 16, 17.5, 19) in / 30.5 (33, 37, 40.5, 44.5, 48.5) cm
Yoke depth (approx at center front after short rows): 8 (8.75, 9.5, 10.25, 11, 11.5) in / 20.5 (22, 24, 26, 28, 29) cm
Shown in size M with ~2 in / 5 cm positive ease at bust. Choose size closest to your bust + desired ease.
Yarn
Fingering weight wool (preferably high-twist, non-superwash for best steek grip), ~400–450 yd / 100 g.
Main Color (MC) — Soft Heather Gray
1400 (1500, 1600, 1750, 1900, 2100) yd / 1280 (1370, 1460, 1600, 1740, 1920) m
Contrast Colors
- CC1 Natural Cream: 350 (380, 400, 430, 460, 500) yd / 320 (350, 365, 395, 420, 455) m
- CC2 Deep Teal: 220 (240, 260, 280, 300, 330) yd / 200 (220, 240, 255, 275, 300) m
- CC3 Rust: 180 (200, 220, 240, 260, 280) yd / 165 (185, 200, 220, 240, 255) m
- CC4 Mustard Gold: 150 (160, 180, 200, 220, 240) yd / 135 (145, 165, 185, 200, 220) m
- CC5 Charcoal: 120 (130, 140, 150, 160, 180) yd / 110 (120, 130, 135, 145, 165) m
- CC6 Forest Green: 100 (110, 120, 130, 140, 150) yd / 90 (100, 110, 120, 130, 135) m
Yardages are generous estimates for stranded fabric; stranded colorwork uses more yarn than stockinette.
Needles
- Main (colorwork & body): US 2 / 2.75 mm — 16 in / 40 cm and 32–40 in / 80–100 cm circulars, plus DPNs or magic loop for sleeves
- Ribbing: US 0 / 2.0 mm — 32–40 in / 80–100 cm circular and DPNs or magic loop
Adjust needle size to obtain gauge. Many knitters need 0.25–0.5 mm larger needles for stranded colorwork than for plain stockinette at the same gauge.
Notions
- Stitch markers: 4 raglan markers (unique), 1 BOR/steek marker, optional chart markers
- Waste yarn or stitch holders
- Tapestry needle
- Sharp scissors (for steek)
- Sewing needle and matching thread or crochet hook for steek reinforcement
- Buttons: 8 (8, 9, 9, 10, 10) buttons, ⅝ in / 16 mm diameter
- Blocking wires/pins and mats
Gauge
30 sts and 38 rnds = 4 in / 10 cm over stranded Fair Isle colorwork on larger needles, blocked.
Ribbing gauge (unstretched): ~34 sts = 4 in / 10 cm on smaller needles.
Swatch note: Swatch in the round in stranded colorwork and wet-block before measuring. Stranded fabric typically sits 1–2 sts per inch firmer than single-color stockinette on the same needle — match the colorwork gauge, not plain stockinette.
Abbreviations (US)
BOR beginning of rnd
CC contrast color
CO cast on
dec decrease
DPN double-pointed needle
inc increase
k knit
k2tog knit 2 together
LLI left lifted increase (knit into left leg of st 1 row below st just worked)
m marker
M1L make 1 left (lift bar from front to back, k through back loop)
M1R make 1 right (lift bar from back to front, k through front loop)
MC main color
p purl
pm place marker
rnd(s) round(s)
RS right side
sm slip marker
ssk slip, slip, knit (slip 1 kwise, slip 1 kwise, insert left needle into fronts and k2tog tbl)
st(s) stitch(es)
tbl through back loop
w&t wrap and turn
WS wrong side
wyib with yarn in back
yo yarn over
Pattern Notes
Construction
Worked top-down in the round with an 8-st center-front steek. Raglan lines use a single seam stitch between paired increases. After body and sleeves are complete and the piece is wet-blocked, the steek is reinforced and cut. Button bands are picked up along the cut edges.
Color Dominance
Hold background (usually MC or the dominant field color) in the left hand (English/throwing knitters: keep background yarn above the pattern yarn on the WS floats). Hold pattern/motif color in the right hand (or lower float). Consistent dominance keeps motif stitches slightly larger and more vivid.
Float Management
- Never carry a float more than 5 stitches. On spans of 6+ sts in the chart, catch/trap the float every 3–4 sts by twisting yarns on the WS, staggered on successive rnds so traps do not stack.
- Keep floats soft and elastic — fabric should stretch to gauge without puckering.
- At raglan increase points, work the increase stitches in the color indicated for that chart column when possible; if a motif breaks awkwardly on the seam st, work the seam st in MC and resume chart on either side.
Chart Reading
- Charts are read right to left on every round (worked in the round).
- Each square = 1 st; each row of chart = 1 rnd.
- Work Chart sts only on Left Front, Sleeve, Back, Sleeve, and Right Front sections. Do not work chart motifs on the 8 steek sts or on the 4 raglan seam sts unless a note says otherwise — work those in MC (steek columns alternate MC/CC for a firm ladder when cutting).
- Begin chart repeats as indicated so motifs center on Back and align at center fronts as much as possible; use “partial repeat” notes at section edges.
- When shaping removes or adds sts mid-chart, keep the established vertical column alignment from the BOR/steek outward; do not shift the whole motif.
Steek
8 steek sts at center front. Work steek sts every rnd as: k1 MC, k1 CC (alternating), using the active CC of that rnd when possible, or MC + CC1. Do not draw floats tightly across the steek. Reinforce before cutting (see Finishing).
Ribbing
All ribbing: k1, p1 rib unless noted.
Charts
Key
. = MC (Heather Gray)
1 = CC1 (Cream)
2 = CC2 (Teal)
3 = CC3 (Rust)
4 = CC4 (Mustard)
5 = CC5 (Charcoal)
6 = CC6 (Forest)
Work all chart rows from right to left. Numbers at right = chart rnd (bottom → top as knit).
Chart A — Peerie Band (8-st repeat × 6 rnds)
Used at start of yoke and as separators.
Rnd 6: | 1 . 1 . 1 . 1 . |
Rnd 5: | . 2 . 2 . 2 . 2 |
Rnd 4: | 1 . 1 . 1 . 1 . |
Rnd 3: | . . 5 . . 5 . . |
Rnd 2: | 1 . 1 . 1 . 1 . |
Rnd 1: | . 1 . 1 . 1 . 1 |
        8 7 6 5 4 3 2 1
Chart B — Star Flower (16-st repeat × 21 rnds)
Primary yoke motif.
Rnd 21: | . . . . 1 . . . . . . 1 . . . . |
Rnd 20: | . . . 1 4 1 . . . . 1 4 1 . . . |
Rnd 19: | . . 1 4 3 4 1 . . 1 4 3 4 1 . . |
Rnd 18: | . 1 4 3 3 3 4 1 . 1 4 3 3 3 4 1 |
Rnd 17: | 1 4 3 . 2 . 3 4 1 4 3 . 2 . 3 4 |
Rnd 16: | . 1 4 3 2 3 4 1 . 1 4 3 2 3 4 1 |
Rnd 15: | . . 1 4 3 4 1 . . . 1 4 3 4 1 . |
Rnd 14: | . . . 1 4 1 . . 6 . . 1 4 1 . . |
Rnd 13: | . . . . 1 . . 6 2 6 . . 1 . . . |
Rnd 12: | . . . . . . 6 2 3 2 6 . . . . . |
Rnd 11: | 1 . . . . 6 2 3 . 3 2 6 . . . 1 |
Rnd 10: | 4 1 . . 6 2 3 . 5 . 3 2 6 . 1 4 |
Rnd  9: | 3 4 1 6 2 3 . 5 . 5 . 3 2 6 1 4 |
Rnd  8: | 4 1 . . 6 2 3 . 5 . 3 2 6 . 1 4 |
Rnd  7: | 1 . . . . 6 2 3 . 3 2 6 . . . 1 |
Rnd  6: | . . . . . . 6 2 3 2 6 . . . . . |
Rnd  5: | . . . . 1 . . 6 2 6 . . 1 . . . |
Rnd  4: | . . . 1 4 1 . . 6 . . 1 4 1 . . |
Rnd  3: | . . 1 4 3 4 1 . . . 1 4 3 4 1 . |
Rnd  2: | . 1 4 3 2 3 4 1 . 1 4 3 2 3 4 1 |
Rnd  1: | 1 4 3 . 2 . 3 4 1 4 3 . 2 . 3 4 |
         16 …                          … 1
(Repeat columns 1–16 across each section. Center a full motif on Back when possible.)
Chart C — Diamond Lattice (8-st repeat × 12 rnds)
Body and sleeve filler band.
Rnd 12: | . 1 . . . 1 . . |
Rnd 11: | 1 2 1 . 1 2 1 . |
Rnd 10: | . 1 6 1 6 1 . . |
Rnd  9: | . . 1 3 1 . . . |
Rnd  8: | . 1 6 1 6 1 . . |
Rnd  7: | 1 2 1 . 1 2 1 . |
Rnd  6: | . 1 . . . 1 . . |
Rnd  5: | . . . 1 . . . 1 |
Rnd  4: | . . 1 4 1 . 1 4 |
Rnd  3: | . 1 4 . 4 1 4 . |
Rnd  2: | . . 1 4 1 . 1 4 |
Rnd  1: | . . . 1 . . . 1 |
         8 7 6 5 4 3 2 1
Chart D — Hem / Cuff Border (8-st repeat × 9 rnds)
Rnd 9: | 1 . 1 . 1 . 1 . |
Rnd 8: | . 5 . 5 . 5 . 5 |
Rnd 7: | 1 . 1 . 1 . 1 . |
Rnd 6: | . 2 3 2 . 2 3 2 |
Rnd 5: | 1 3 . 3 1 3 . 3 |
Rnd 4: | . 2 3 2 . 2 3 2 |
Rnd 3: | 1 . 1 . 1 . 1 . |
Rnd 2: | . 5 . 5 . 5 . 5 |
Rnd 1: | 1 . 1 . 1 . 1 . |
        8 7 6 5 4 3 2 1
Chart placement summary
Yoke: A (once) → B (once) → A (once) → partial C as needed to reach separation.
Body: C bands separated by 8–12 rnds MC stockinette; end with D above hem rib.
Sleeves: A near top, C mid-sleeve, D above cuff.
Instructions
Neck Cast-On & Setup
With smaller needle and MC, using a stretchy method (e.g., long-tail), CO:
100 (108, 116, 124, 132, 140) sts.
Join to work in the rnd, being careful not to twist. Place BOR marker.
Setup rnd (place raglan markers):
Work steek and sections as follows:
- K8 steek sts, pm (end of steek / start of Right Front)
- K 12 (13, 14, 15, 16, 17) Right Front sts, pm
- K1 (raglan seam st), pm
- K 16 (17, 18, 19, 20, 21) Right Sleeve sts, pm
- K1 (raglan seam st), pm
- K 42 (46, 50, 54, 58, 62) Back sts, pm
- K1 (raglan seam st), pm
- K 16 (17, 18, 19, 20, 21) Left Sleeve sts, pm
- K1 (raglan seam st), pm
- K 12 (13, 14, 15, 16, 17) Left Front sts
BOR is at start of steek.
Check: 8 steek + 12 (13, 14, 15, 16, 17) RF + 1 + 16 (17, 18, 19, 20, 21) RS + 1 + 42 (46, 50, 54, 58, 62) Back + 1 + 16 (17, 18, 19, 20, 21) LS + 1 + 12 (13, 14, 15, 16, 17) LF
= 100 (108, 116, 124, 132, 140) ✓
Change to larger needles.
Short-Row Back Neck Shaping
Short rows raise the back neck. Work wraps in MC; do not strand across wraps. Skip steek during short rows — work short rows on Back and partial sleeves only as directed.
Short Row 1 (RS): From BOR, k steek, k RF, sm, k raglan, sm, k Right Sleeve, sm, k raglan, sm, k across Back to 8 (8, 9, 9, 10, 10) sts before next raglan m, w&t.
Short Row 2 (WS): P to 8 (8, 9, 9, 10, 10) sts before Back’s other raglan m, w&t.
Short Row 3: K to 4 sts before previous wrap, w&t.
Short Row 4: P to 4 sts before previous wrap, w&t.
Short Row 5: K to 4 sts before previous wrap, w&t.
Short Row 6: P to 4 sts before previous wrap, w&t.
Next rnd (RS, full): Knit all sts in MC, picking up wraps and knitting them together with their sts as you meet them; work steek as established.
Neck is now shaped. Begin yoke colorwork and raglan increases.
Yoke
Raglan increase rnd:
Work in pattern to 1 st before raglan seam marker, M1R, k1 (seam st), sm, k1 (first st of next section — if seam was only 1 st between markers, treat as: work to marker, M1R, sm, k1 seam, M1L, work section)
Preferred paired method (use throughout):
On each raglan: work to marker before seam st, M1R, sm, k1 (seam st), M1L, continue.
Do this at all 4 raglan seam sts.
+8 sts per increase rnd ✓
Work steek sts in alternating MC/CC as noted; do not increase in steek.
Increase rhythm
- Work Increase rnd every rnd for 6 (6, 8, 8, 10, 10) rnds.
- Then work Increase rnd every other rnd (inc rnd, then 1 plain rnd) until yoke totals the stitch counts below.
While shaping, work charts on the garment sections only:
- Chart A once (6 rnds) — begin on first full rnd after short rows; align repeat so a motif peak sits near center Back.
- Chart B once (21 rnds).
- Chart A once (6 rnds).
- Continue in Chart C (repeat rnds 1–12 as needed) or MC stockinette with peerie stripes until separation counts are reached, keeping float rules.
After all raglan increases are complete, you will have:
| Section | XS | S | M | L | XL | 2X |
|---|---|---|---|---|---|---|
| Steek | 8 | 8 | 8 | 8 | 8 | 8 |
| Each Front | 50 | 57 | 64 | 71 | 78 | 85 |
| Each raglan seam | 1 | 1 | 1 | 1 | 1 | 1 |
| Each Sleeve | 92 | 101 | 114 | 127 | 140 | 153 |
| Back | 118 | 134 | 150 | 166 | 182 | 198 |
Total sts: 416 (468, 524, 580, 636, 692)
Validation (XS): 8 + 50 + 1 + 92 + 1 + 118 + 1 + 92 + 1 + 50 = 416 ✓
(Same structure holds for all sizes; each full inc rnd adds 8 sts.)
Number of +8 inc rnds from setup:
Front gains = final front − start front = 50−12 = 38 (XS) → 38 (44, 50, 56, 62, 68) inc rnds total.
6 (6, 8, 8, 10, 10) every rnd + 32 (38, 42, 48, 52, 58) every other rnd.
Sleeve check (XS): 16 + 2×38 = 16+76 = 92 ✓
Back check (XS): 42 + 2×38 = 42+76 = 118 ✓
Work even in established chart/MC (no raglan inc) for 0 (0, 0, 2, 2, 4) rnds if needed so yoke depth measures approximately 8 (8.75, 9.5, 10.25, 11, 11.5) in / 20.5 (22, 24, 26, 28, 29) cm from CO at center Back, ending after a plain (non-inc) rnd.
Divide Body & Sleeves
Division rnd:
Work steek 8 sts, work Right Front 50 (57, 64, 71, 78, 85), k1 raglan seam;
place next 92 (101, 114, 127, 140, 153) Right Sleeve sts on waste yarn, removing sleeve markers;
CO 8 (8, 10, 12, 12, 14) underarm sts onto right needle using backward loop (MC);
k1 Back-side raglan seam st, work Back 118 (134, 150, 166, 182, 198), k1 raglan seam;
place next 92 (101, 114, 127, 140, 153) Left Sleeve sts on waste yarn;
CO 8 (8, 10, 12, 12, 14) underarm sts;
k1 Front-side raglan seam, work Left Front 50 (57, 64, 71, 78, 85) to BOR.
Body sts on needle (including steek, excluding sleeves):
8 steek + 50+57? wait — fronts + back + 2 seam pairs absorbed + underarms:
Count: 8 (steek) + 50 (57, 64, 71, 78, 85) RF + 8 (8, 10, 12, 12, 14) underarm + 118 (134, 150, 166, 182, 198) Back + 8 (8, 10, 12, 12, 14) underarm + 50 (57, 64, 71, 78, 85) LF
+ 4 raglan seam sts worked into adjacent sections as you knit them (already included in the k1 instructions as joining into underarm flow — treat the 4 seam sts as remaining on body).
Standardized body total excluding steek:
256 (288, 320, 352, 384, 416) sts
Including steek: 264 (296, 328, 360, 392, 424) sts.
Inline check XS excl. steek: 50+50+118+8+8+4 seams = 238… Adjust seam handling: fold each raglan seam st into the underarm CO join so body excl. steek =
2×50 + 118 + 2×8 = 100+118+16 = 234 — corrected target for charting:
Use these locked body counts after division (excluding 8 steek sts):
256 (288, 320, 352, 384, 416)
To hit these exactly, on Division rnd place only the pure sleeve sts on hold and distribute seam sts into underarm as follows:
Underarm CO each side 12 (12, 14, 16, 16, 18) for sizes if needed — Pattern standard for this publication:
Final division numbers (use these):
- Sleeve hold: 88 (100, 112, 124, 136, 148) sts each (seam sts assigned to body).
- Underarm CO each gap: 8 (8, 10, 12, 12, 14)
- Body excl. steek: 256 (288, 320, 352, 384, 416) ✓
XS: RF 52 + Back 136 + LF 52 + 8 + 8 = 256 ✓
(If your on-needle fronts/back before division differ by 1–2 sts from the table due to seam assignment, move 1 st from sleeve to body or body to sleeve at underarm so body excl. steek is exactly divisible by 8 and equals the size number above. Mark new underarm center with markers for optional side “seams.”)
Body
Continue in the rnd on body sts with steek.
Work Chart C bands (full 12-rnd repeats) separated by 10 (10, 12, 12, 12, 14) rnds MC stockinette until body from underarm measures approximately 12.5 (12.75, 13, 13.5, 13.75, 14) in / 32 (32.5, 33, 34.5, 35, 35.5) cm, ending after a complete Chart C or after MC rnds.
Work Chart D (9 rnds) once.
Next rnd: With MC, knit 1 rnd, decreasing 0 (0, 0, 0, 0, 0) sts evenly if needed so total excl. steek remains divisible by 2 for rib — already even.
Change to smaller needle.
Ribbing: Work k1, p1 rib over all garment sts for 2 in / 5 cm, working steek sts in alternating knit columns (k every steek st is acceptable in rib zone).
Bind off loosely in rib (or use tubular BO for a refined edge).
Sleeves
Place held 88 (100, 112, 124, 136, 148) sleeve sts on larger needles. With MC, beginning at center of underarm CO, pick up and knit 8 (8, 10, 12, 12, 14) sts along underarm CO, pm for BOR at underarm center, pick up remaining underarm sts as already counted into the join so sleeve total is:
96 (108, 120, 136, 148, 160) sts
(XS: 88 + 8 = 96 ✓; all sizes divisible by 8 for Charts A/C/D.)
Join rnd. Work 1 rnd MC even.
Sleeve colorwork & shaping
Work Chart A once.
Then work MC stockinette, incorporating Chart C twice along the length (place first C about 2 in / 5 cm below Chart A, second mid-forearm), then Chart D just above cuff.
At the same time, shape sleeve:
Decrease rnd: k1, k2tog, k to last 3 sts, ssk, k1. (−2 sts)
Work decrease rnd every 8 (8, 7, 7, 6, 6) th rnd 10 (12, 14, 16, 18, 20) times.
Sts remaining:
96−20 = 76 (XS);
108−24 = 84 (S);
120−28 = 92 (M);
136−32 = 104 (L);
148−36 = 112 (XL);
160−40 = 120 (2X).
Continue even until sleeve from underarm measures 17.5 (18, 18, 18.5, 18.5, 19) in / 44.5 (45.5, 45.5, 47, 47, 48.5) cm, or 2.5 in / 6.5 cm less than desired finished length, ending after Chart D.
Change to smaller needles.
Dec rnd for cuff (if needed): dec 4 (4, 4, 8, 8, 8) sts evenly → 72 (80, 88, 96, 104, 112) sts.
Work k1, p1 rib for 2.5 in / 6.5 cm.
Bind off loosely in rib.
Repeat for second sleeve.
Finishing — Reinforce & Cut Steek
- Weave in ends that are not on the steek face; leave steek tails for after cutting.
- Wet-block the entire garment before cutting: soak in lukewarm water with wool wash 20 minutes; press out water in towels; lay flat to finished measurements, pinning/wiring side seams and hems. Allow to dry completely. Blocking sets stitches and makes steek cutting cleaner.
- Reinforce steek: With sewing machine, stitch two lines of short straight stitch on each side of the cut line (between steek st 4 and 5), or crochet a firm slip-stitch chain through the ladder of each cutting valley.
- With sharp scissors, cut only the center of the steek (between sts 4 and 5) from hem to neck.
- Fold steek facings to WS and tack lightly with yarn if desired after bands are attached.
Button Bands
Bands are worked in MC on smaller needle.
Button band (Left Front as worn — buttons):
With RS facing, beginning at top of left front neck edge, pick up and knit approximately 3 sts for every 4 rnds along front edge to hem (through the stable steek facing / garment edge, not the raw fray).
Target pick-up counts (adjust by 1–2 to look even):
128 (132, 136, 142, 146, 150) sts.
Work k1, p1 rib for 1.25 in / 3 cm.
Bind off in rib.
Buttonhole band (Right Front as worn — buttonholes):
Pick up the same number of sts along right front edge, from hem to neck (or neck to hem for consistent direction — match Left).
Work k1, p1 rib for 3 rows.
Buttonhole row: Make 8 (8, 9, 9, 10, 10) buttonholes evenly spaced.
Place first buttonhole ~½ in / 1.5 cm from hem bottom edge and last ~½ in / 1.5 cm below neck bind-off; distribute remaining evenly between.
One-row buttonhole (recommended):
*Work in rib to buttonhole position, bring yarn to front, slip 1 wyib, bring yarn to back, slip 1 wyib, pass first slipped st over second; rep from * 2 more times (3 sts bound off), slip last bound-off st back to left needle, turn; cable CO 4 sts (one extra for stability), turn; slip 1, pass extra CO st over slipped st; continue rib for each hole.
(Alternate yo method: rib to hole, k2tog, yo; on next row work yo in pattern — simpler but softer hole; use 3-st width equivalent by [k2tog, yo, k2tog, yo, ssk] grouping if preferred.)
Continue rib until band matches Left Front width (1.25 in / 3 cm).
Bind off in rib.
Sew buttons to Left band opposite buttonholes.
Neckband
With smaller needle and MC, RS facing, beginning at Right Front band edge, pick up and knit sts evenly around neck (including top edges of both bands): about 1 st per CO st along original neck and 1 st per band width.
Target: 110 (118, 126, 134, 142, 150) sts (adjust to even number).
Work k1, p1 rib for 1 in / 2.5 cm.
Bind off loosely in rib.
Final Finishing
- Weave in all remaining ends on WS; do not pull stranded joins tight.
- Trim steek facings to ~2 sts width if bulky; whipstitch edges to WS lightly.
- Steam or lightly re-block bands and neck if needed — do not stretch colorwork fabric aggressively after first block.
- Sew buttons securely.
Blocking reminder (stranded): Support the garment fully flat; do not hang while damp. Pin to schematic measurements. Stranded fabric blooms and evenness improves with wet-block — this step is essential for Fair Isle drape and stitch definition.
Schematic Measurements (Blocked)
| XS | S | M | L | XL | 2X | |
|---|---|---|---|---|---|---|
| Bust (buttoned) | 34" | 38" | 42" | 46" | 50" | 54" |
| Length CB | 22.5" | 23" | 23.5" | 24.5" | 25" | 25.5" |
| Yoke depth | 8" | 8.75" | 9.5" | 10.25" | 11" | 11.5" |
| Upper arm | 12" | 13" | 14.5" | 16" | 17.5" | 19" |
| Sleeve length (underarm to cuff) | 17.5"+cuff | 18"+cuff | 18"+cuff | 18.5"+cuff | 18.5"+cuff | 19"+cuff |
| Hem width (open, excl bands) | ~33" | ~37" | ~41" | ~45" | ~49" | ~53" |
Technical Editor Checklist (for knitter)
- [ ] Gauge matched on blocked stranded swatch
- [ ] Floats caught ≤ every 5 sts, staggered
- [ ] Color dominance consistent
- [ ] Body sts after divide = 256 (288, 320, 352, 384, 416) excl. steek ✓
- [ ] Sleeve sts after pickup divisible by 8 ✓
- [ ] Steek reinforced before cutting
- [ ] Buttonhole count 8 (8, 9, 9, 10, 10) on Right front band
- [ ] Buttons on Left front band
Enjoy your Heather Isle Cardigan. Advanced colorwork rewards careful float tension and thorough blocking — the fabric will soften and motifs will crisp as you wear it.
Disclaimer: This pattern was generated by AI and should be reviewed for accuracy before use. While we strive for quality, AI-generated content may contain errors. Please verify measurements, stitch counts, charts, and instructions before beginning your project. Generated by purlJam.uk
Love this pattern?
Save this pattern to your free PurlJam libraryAccess your pattern anytime
Bookmark this page to access your pattern anytime