Type
Knitting
Difficulty
intermediate
Category
custom
AI Thinking Process
Planning
Verification
Pattern
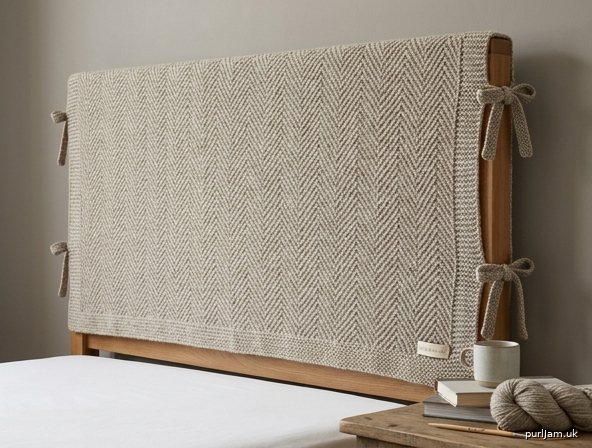
Herringbone Headboard Cover
A sturdy, textured knitted cover that slips over a standard bed headboard and ties securely in place. Worked in classic herringbone stitch for a woven-like fabric that looks polished from across the room. Designed for beginners comfortable with knits, purls, and simple decreases; the herringbone pattern is repetitive and meditative once the rhythm is learned. Choose your size to match a Twin, Full/Queen, or King headboard.
Materials
- Yarn: Worsted weight (category 4) wool or wool-blend, approx. 1100 (1650, 2100) yards / 1005 (1510, 1920) m. Sample uses Cascade 220 (100% wool; 220 yd / 200 m per 100 g skein): 5 (8, 10) skeins.
- Needles: US 8 / 5 mm straight or circular needles (32" / 80 cm or longer recommended for larger sizes), or size needed to obtain gauge.
- Notions: Tapestry needle, scissors, locking stitch markers (optional), measuring tape.
- Optional: Fabric backing or non-slip rug pad cut to size if extra stability against the headboard is desired.
Gauge
18 stitches and 28 rows = 4" / 10 cm in Herringbone Stitch, blocked. Important: Herringbone creates a dense fabric. Swatch at least 6" / 15 cm square, wash and block exactly as you will the finished piece, then measure. Change needle size if necessary—most knitters go up one size from their usual worsted needle.
Sizes
Twin (Full/Queen, King) Finished measurements after blocking (width × height):
- Twin: 40" × 30" / 101.5 × 76 cm
- Full/Queen: 60" × 30" / 152.5 × 76 cm
- King: 76" × 30" / 193 × 76 cm
Choose the width closest to your headboard face. Height covers a typical 24–28" headboard with a little extra to wrap the top edge. Pattern is written for Twin with Full/Queen and King in parentheses.
Abbreviations
- BO: bind off
- CO: cast on
- k: knit
- k2tog: knit 2 stitches together
- p: purl
- p2tog: purl 2 stitches together
- rep: repeat
- RS: right side
- st(s): stitch(es)
- WS: wrong side
- wyib: with yarn in back
- wyif: with yarn in front
Pattern Notes
- Herringbone Stitch is worked over an even number of stitches and produces a firm, non-curling fabric with a distinctive diagonal texture that reverses direction every two rows.
- The stitch “travels,” so count carefully at the end of every row for the first 10 rows until the motion becomes automatic.
- Garter-stitch borders (knit every row) keep edges straight and make seaming or tying easier.
- The cover is a simple rectangle. Ties are worked separately and sewn on so you can position them exactly where your headboard posts or frame require.
- Weave in ends as you go when possible; the dense fabric hides tails well.
- Block aggressively—herringbone relaxes and the diagonals open beautifully with wet-blocking.
Special Stitch – Herringbone Stitch (flat)
Worked over an even number of sts.
- Row 1 (RS): *K2tog, leave both sts on left needle, insert right needle into first st only and knit it again, drop both sts off left needle; rep from * to end.
- Row 2 (WS): *P2tog, leave both sts on left needle, insert right needle into first st only (purlwise) and purl it again, drop both sts off left needle; rep from * to end. Repeat Rows 1–2 for pattern. Tip for beginners: On RS, you are always knitting into the back of the second stitch first, then the front of the first. On WS, purl into the second stitch first, then the first. Keep tension even; the fabric should feel slightly firm but not stiff.
Instructions
Main Cover
With US 8 / 5 mm needles, CO 188 (278, 350) sts using the long-tail method (or preferred stretchy cast-on).
Garter bottom border Rows 1–8: Knit every stitch (4 garter ridges).
Begin Herringbone with side borders Next row (RS): K6 (garter border), place marker, work Herringbone Row 1 to last 6 sts, place marker, K6 (garter border). Next row (WS): K6, slip marker, work Herringbone Row 2 to marker, slip marker, K6.
Continue in established pattern—keeping the first and last 6 sts in garter stitch (knit every row) and the center 176 (266, 338) sts in Herringbone Stitch—until piece measures 28" / 71 cm from cast-on edge, ending after a WS row. (Approximately 196 herringbone rows; count 14 full 4" repeats + a little extra if needed.)
Garter top border Next 8 rows: Knit every stitch, removing markers on first row. BO all sts knitwise on RS. Cut yarn, leaving a 6" / 15 cm tail.
Ties (make 8)
CO 6 sts. Work in garter stitch (knit every row) until tie measures 20" / 51 cm. BO knitwise. Cut yarn, leaving a 12" / 30 cm tail for sewing.
Finishing
- Weave in all ends securely on the WS using the tapestry needle. Because herringbone is dense, split the plies of the yarn when weaving for invisibility.
- Wet-block the main piece to exact finished measurements: 40 (60, 76)" width × 30" height / 101.5 (152.5, 193) × 76 cm. Pin the diagonals straight so the herringbone pattern is crisp. Allow to dry completely.
- Block ties lightly if desired.
- Attach ties: With RS of cover facing, sew one tie securely at each corner (4 ties) and one tie at the midpoint of each long side (2 ties) plus one additional pair spaced evenly on the short sides if your headboard is tall (total 8). Use the long cast-on/bind-off tails and mattress stitch or whipstitch through the garter border for strength. Position ties so they can wrap around headboard posts or frame and tie in bows or square knots on the reverse side.
- Optional lining: If desired, cut a piece of cotton fabric or non-slip matting 1" / 2.5 cm smaller than the blocked cover on all sides. Hand-stitch to WS with loose running stitches so the knitting can still drape.
- Place cover over headboard, wrap top edge if needed, and tie all ties snugly. Adjust until the herringbone pattern hangs straight.
Care: Hand wash cold, roll in towel to remove excess water, and lay flat to dry. Refresh blocking if the piece stretches with use.
Enjoy your custom herringbone headboard—soft enough for leaning against, sturdy enough for everyday life!
Disclaimer: This pattern was generated by AI and should be reviewed for accuracy before use. While we strive for quality, AI-generated content may contain errors. Please verify measurements, stitch counts, charts, and instructions before beginning your project. Generated by purlJam.uk
Love this pattern?
Save this pattern to your free PurlJam libraryAccess your pattern anytime
Bookmark this page to access your pattern anytime