Type
Knitting
Difficulty
intermediate
Category
custom
AI Thinking Process
Planning
Verification
Pattern
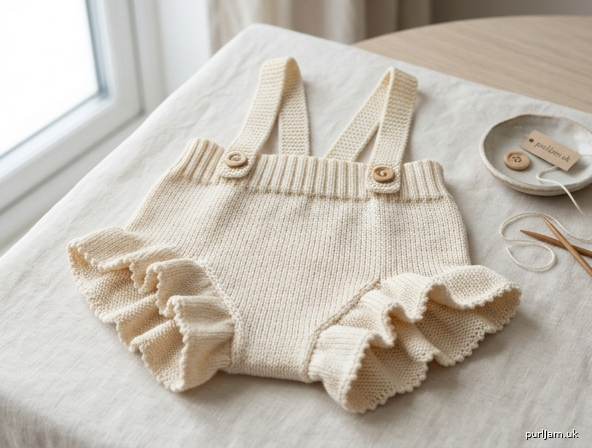
Newborn Ruffled Diaper Cover with Straps
A soft cotton soaker with leg ruffles and button-on shoulder straps
This beginner-friendly diaper cover is worked top-down in the round. It features a stretchy ribbed waistband, a gently shaped body with higher back rise, pretty ruffled leg openings, and adjustable shoulder straps. Perfect over a cloth or disposable diaper for a newborn.
Materials
- Fingering-weight cotton yarn (approx. 2.5–3 mm / category 1–2); 180–200 yards (165–185 m). Sample uses soft mercerized cotton.
- Circular needles US 1.5 / 2.5 mm, 16" (40 cm) length (or DPNs / magic-loop equivalent)
- Spare DPNs or second circular in same size for legs (optional)
- Stitch markers (4)
- Tapestry needle
- 2 small buttons (½" / 12 mm diameter)
- ½" (1.2 cm) wide soft elastic, 14" (35.5 cm) long (optional, for waist)
- Sewing needle and matching thread (for elastic and buttons)
Gauge
26 stitches and 36 rounds = 4" (10 cm) in stockinette stitch worked in the round, after light blocking. Take time to check gauge. User knits softly/loosely; if your swatch is tighter than 26 sts = 4", go up one needle size.
Size
Newborn (7–10 lb / 3–4.5 kg)
- Waist (relaxed): 14¾" (37.5 cm); stretches to ~17" (43 cm)
- Front rise: 5½" (14 cm)
- Back rise: 7" (18 cm)
- Leg opening circumference (with ruffle relaxed): 7" (18 cm) each
- Crotch width: 2½" (6.5 cm)
Abbreviations (US)
- BO: bind off
- CO: cast on
- k: knit
- k2tog: knit 2 together
- kfb: knit into front and back of stitch (1 st increased)
- p: purl
- pm: place marker
- rep: repeat
- rnd(s): round(s)
- RS: right side
- sl: slip
- sm: slip marker
- st(s): stitch(es)
- St st: stockinette stitch (knit every rnd in the round; knit RS / purl WS flat)
- w&t: wrap and turn
- WS: wrong side
- yo: yarn over
Pattern Notes
- The cover is seamless except for strap ends and optional elastic join.
- Short rows create the higher back without complicated shaping. Beginner tip: when you hit a wrap, pick it up and knit it together with its stitch to hide the gap.
- Ruffle is formed by simple yarn-overs; it is intentionally full (2×) but still stretchy.
- Straps button at the front waist for easy on/off and growth room. Make buttonholes larger if using bigger buttons.
- Cotton has no memory—do not over-stretch while knitting. Block lightly by patting flat.
- All stitch counts are confirmed after every key step.
Instructions
Waistband
With US 1.5 / 2.5 mm circular needle, CO 96 sts using a stretchy cast-on (long-tail or alternate cable). Place marker for beginning of rnd and join to work in the round, being careful not to twist.
Rnd 1–10: *K2, p2; rep from * to end. (1" / 2.5 cm of 2×2 rib)
Optional eyelet rnd for drawstring/elastic (Rnd 11): *K2, yo, k2tog, p2; rep from * to end. (still 96 sts) If omitting eyelets, work one more plain rib rnd instead.
Work 2 more rnds in established 2×2 rib. (Waistband total ~1¼" / 3 cm)
Body
Change to St st (knit every rnd).
Inc rnd: *K24, kfb; rep from * to end. (4 sts increased → 96 + 4 = 100 sts ✓)
Next rnd: Knit.
Inc rnd: *K25, kfb; rep from * to end. (4 sts increased → 100 + 4 = 104 sts ✓)
Work even in St st until piece measures 3" (7.5 cm) from end of rib (front rise beginning).
Short-Row Back Shaping
The following short rows raise the back. Markers divide the work: beginning-of-rnd marker is center front.
Set-up: K26, pm (right back), k52, pm (left back), k26 to end.
Short-row 1 (RS): K to 2 sts before left-back marker, w&t. Short-row 2 (WS): P to 2 sts before right-back marker, w&t. Short-row 3: K to 4 sts before left-back marker, w&t. Short-row 4: P to 4 sts before right-back marker, w&t. Short-row 5: K to 6 sts before left-back marker, w&t. Short-row 6: P to 6 sts before right-back marker, w&t. Short-row 7: K to 8 sts before left-back marker, w&t. Short-row 8: P to 8 sts before right-back marker, w&t.
Next rnd: Knit all the way around, picking up each wrap and knitting it together with its stitch. Remove the two back markers on this rnd. (104 sts still)
Work even in St st until front rise measures 5½" (14 cm) from end of rib (back will automatically be ~7" / 18 cm).
Crotch and Leg Division
K13 (right front), BO 26 sts for right leg, k26 (back crotch section), BO 26 sts for left leg, k13 (left front). (52 sts remain: 13 + 26 + 13 ✓)
Note: You now have two sets of live stitches separated by the BO leg gaps. Place the 26 back sts on a holder or spare needle. The 26 front sts (13+13) stay on the working needle.
Join crotch: Using a third needle or the working needle, graft or use a 3-needle BO to join the 13 left-front sts to the first 13 back sts, and the 13 right-front sts to the remaining 13 back sts, creating a 2½" (6.5 cm) double-thick crotch. Alternatively, for true beginners: BO all remaining 52 sts, then sew the crotch seam with mattress stitch later (½" / 1.3 cm seam allowance each side). Either method yields a sturdy 2½" crotch.
Leg Ruffles (make 2 identical)
With RS facing and beginning at center of crotch seam, pick up and knit 46 sts evenly around one leg opening (approx. 1 st per BO st + extra at crotch corners for ease). (46 sts)
Join to work in the round. Pm for beginning of rnd.
Ruffle rnd 1: *K1, yo; rep from * to end. (46 sts increased → 46 + 46 = 92 sts ✓)
Ruffle rnds 2–6: Knit.
Ruffle rnd 7 (picot edge, optional but pretty): *K2tog, yo; rep from * to end.
BO all sts loosely knitwise (use a larger needle if needed so the ruffle stays stretchy).
Repeat for second leg.
Shoulder Straps (make 2)
With US 1.5 / 2.5 mm needles, CO 8 sts.
Work in garter stitch (knit every row) or 1×1 rib until strap measures 10" (25.5 cm).
Buttonhole row: K3, BO 2 sts, k3. Next row: K3, CO 2 sts over the gap, k3. (8 sts restored ✓)
Work 4 more rows garter/rib. BO all sts.
Finishing
- Weave in all ends securely on WS.
- Block lightly: pat into shape, never stretch cotton aggressively. Let dry flat.
- Attach straps: Sew the non-buttonhole end of each strap to the back waistband, spaced ~3" (7.5 cm) apart on either side of center back, using whipstitch or mattress stitch for strength.
- Sew buttons to front waistband, aligned with straps and ~1½" (4 cm) below top edge so straps sit comfortably on shoulders. Try on a doll or diapered baby if possible for exact placement.
- Optional elastic: Thread 14" (35.5 cm) elastic through waistband (use eyelets or open a small rib channel), overlap ends ½" (1.2 cm) and sew firmly.
- Final check: All ruffles should flare softly; straps should button without strain; leg openings stretch over a diaper easily.
Your newborn ruffled diaper cover is ready! Soft, cute, and practical.
Disclaimer: This pattern was generated by AI and should be reviewed for accuracy before use. While we strive for quality, AI-generated content may contain errors. Please verify measurements, stitch counts, charts, and instructions before beginning your project. Generated by purlJam.uk
Love this pattern?
Save this pattern to your free PurlJam libraryAccess your pattern anytime
Bookmark this page to access your pattern anytime