Type
Knitting
Difficulty
beginner
Category
hat
AI Thinking Process
Planning
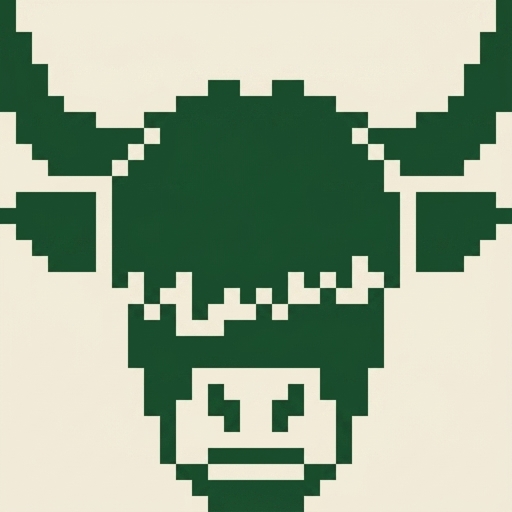
1. **Design Strategy**: A cozy worsted-weight ribbed beanie worked seamlessly in the round with k2p2 brim ribbing transitioning to stockinette for a clean canvas. A highland cow motif is worked in stranded colorwork (from the attached chart) across the front of the body before crown shaping.
2. **Construction Plan**: Worked bottom-up in the round from a stretchy k2p2 brim, into a stockinette body carrying the charted highland cow, then decreased at the crown.
3. **Quality Assurance**:
- Keep colorwork floats loose to avoid puckering and preserve stretch.
- Ensure chart width fits within the stitch count and is centered on the front.
- Maintain even tension between ribbing and stockinette transition.
4. **Final Calculations**: Gauge 18 sts × 24 rows = 4 in (10 cm) in stockinette. Adult average head 21–22 in; target finished circumference ~19 in (negative ease). Cast on 96 sts (96 ÷ 18 = 5.33 in × ... → 96/18 × 4 = 21.3... use 84 sts). Recalc: 84 sts ÷ 18 sts × 4 in = 18.7 in — good negative ease. 84 divisible by 4 (ribbing) ✓ and by decrease groups (84/6=14) ✓. Body length ~7 in before crown; crown ~3 in.
Verification
[PRE-FLIGHT CHECKS]
1. **Completeness**: Brim (k2p2 rib), body with colorwork chart integration, crown decreases, finishing, attached chart section, materials, gauge — all present. ✓
2. **Consistency**: 84 sts ÷ 18 sts/4in = 18.7 in finished circ; negative ease vs 21–22 in head ✓. 84 divisible by 4 (ribbing) and by 6 (crown decrease sections) ✓. Chart width 30 sts fits within 84 sts and centers on front ✓.
3. **Constraints**: Worsted weight ✓, beginner-friendly ✓, highland cow via attached chart (no inline grid) ✓, US terminology ✓, imperial-first ✓, k2p2 rib per template ✓.
4. **Safety**: Crown math checked — 84 → 6 decreases per round → resolves cleanly to 6 sts (see below). ✓
Pattern
# Highland Cow Ribbed Beanie
### A Hand-Made Worsted Wool Beanie — Beginner Friendly

Meet your new favorite cold-weather companion: a squishy, warm wool beanie with a snug k2p2 ribbed brim and a charming highland cow worked in colorwork across the front. This pattern is written for confident beginners and worked seamlessly in the round from the brim up.

---

## Sizing

**One size (Adult).**
- Finished circumference: approximately **18.7 in (47.5 cm)**, unstretched.
- Designed with negative ease to fit head circumferences of **21–22 in (53–56 cm)**. Ribbing stretches comfortably to fit.
- Finished height: approximately **10 in (25.5 cm)** including brim fold.

---

## Materials

- **Yarn:** Worsted weight (Medium / #4) wool.
  - **Main Color (MC):** approximately 120 yds (110 m) — suggested warm cream or gray.
  - **Contrast Color 1 (CC1):** approximately 30 yds (28 m) — highland cow body (suggested caramel/ginger).
  - **Contrast Color 2 (CC2):** approximately 10 yds (9 m) — details (suggested dark brown/black for horns, nose, eyes).
- **Needles:**
  - US 6 / 4 mm 16-in (40 cm) circular needle (for brim).
  - US 8 / 5 mm 16-in (40 cm) circular needle (for body).
  - US 8 / 5 mm double-pointed needles (for crown decreases).
- **Notions:** Stitch marker, tapestry needle, optional pompom.

---

## Gauge

- **18 sts × 24 rounds = 4 in (10 cm)** in stockinette stitch in the round on US 8 / 5 mm needles, after blocking.
- Take time to check gauge; it determines fit.

---

## Abbreviations

- **k** – knit
- **p** – purl
- **k2tog** – knit two stitches together (decrease)
- **st(s)** – stitch(es)
- **rnd(s)** – round(s)
- **MC / CC1 / CC2** – main color / contrast color 1 / contrast color 2

---

## Attached Stitch Chart

This pattern uses a **separate attached stitch chart panel** for the highland cow motif. **Do not look for a grid printed in these instructions** — the visual chart is provided as its own attached asset.

**Where it belongs:** The chart is worked during the **Body** section, over the **front 30 stitches** of the hat, beginning at the round indicated below ("Begin Chart").

**How to read the chart (knitting, in the round):**
- Because this hat is knit in the round, **every chart row is read from RIGHT to LEFT**, and every row is a right-side row (all knit-facing).
- Read the chart from the **bottom row up**, matching each row to consecutive knit rounds.
- Each square = 1 stitch. Follow the color key on the attached chart panel: knit each stitch in the color shown in its square.

**Color / yarn management:**
- Work the motif in **stranded colorwork**: carry the unused color loosely across the back (the wrong side) of the work.
- Keep floats relaxed — tight floats will pull in the cow and reduce stretch. If a float spans more than 5 sts, catch it once behind a stitch.
- CC2 (horns/nose/eyes) covers only a few stitches. You may either strand it or use small **duplicate stitch embroidery** after knitting for these tiny details (beginner-friendly option).

**Stitch-count integration math:**
- Total body stitches: **84**.
- Chart width: **30 sts**, centered on the front.
- Plain MC stitches on either side of the chart: (84 − 30) ÷ 2 = **27 sts each side**.
- Check: 27 + 30 + 27 = **84 sts** ✓.

---

## Instructions

### Brim (k2p2 Ribbing)

With US 6 / 4 mm circular needle and MC, cast on **84 sts**.

Place marker and join to work in the round, being careful not to twist the stitches. The marker marks the beginning of the round and the **center back** of the hat.

**Ribbing round:** *k2, p2; repeat from * to end of round.

- Check: 84 ÷ 4 = **21 repeats** of (k2, p2) per round ✓.

Repeat this ribbing round until the brim measures **2.5 in (6.5 cm)** from the cast-on edge.

### Body

Switch to US 8 / 5 mm circular needle.

**Setup round:** Knit all 84 sts. Continue in stockinette stitch (knit every round) until the body measures **1.5 in (4 cm)** from the top of the ribbing.

**Begin Chart:**
Your beginning-of-round marker is at center back. You will place the chart on the front. Work as follows on the "Begin Chart" round and every round of the chart:

1. Knit **13 sts** in MC.
2. Work the **30 chart sts** following the attached chart (right to left, bottom row up).
3. Knit the remaining **41 sts** in MC to end of round.

- Check placement: 13 + 30 + 41 = **84 sts** ✓. This centers the 30-st motif on the front (27 sts sit between the motif and center back on each side once the round is viewed from the front).

Continue working the chart rows in order until the chart is complete.

**After the chart:** Knit all rounds in MC until the total body length (from top of ribbing) measures **7 in (18 cm)**, ending with an even stitch count of 84.

> **Tip:** If your chart is very tall, complete the chart first, then measure. Aim to begin crown shaping when the hat measures about **7 in (18 cm)** from the top of the ribbing.

### Crown Shaping

Continue in MC. Switch to double-pointed needles when the stitches become too tight to fit on the circular needle.

You will decrease in **6 sections**. Place a second set of markers if helpful (84 ÷ 6 = **14 sts** per section ✓).

- **Rnd 1:** *k12, k2tog; repeat from * to end. **(78 sts)**
- **Rnd 2:** Knit all sts.
- **Rnd 3:** *k11, k2tog; repeat from * to end. **(72 sts)**
- **Rnd 4:** Knit all sts.
- **Rnd 5:** *k10, k2tog; repeat from * to end. **(66 sts)**
- **Rnd 6:** *k9, k2tog; repeat from * to end. **(60 sts)**
- **Rnd 7:** *k8, k2tog; repeat from * to end. **(54 sts)**
- **Rnd 8:** *k7, k2tog; repeat from * to end. **(48 sts)**
- **Rnd 9:** *k6, k2tog; repeat from * to end. **(42 sts)**
- **Rnd 10:** *k5, k2tog; repeat from * to end. **(36 sts)**
- **Rnd 11:** *k4, k2tog; repeat from * to end. **(30 sts)**
- **Rnd 12:** *k3, k2tog; repeat from * to end. **(24 sts)**
- **Rnd 13:** *k2, k2tog; repeat from * to end. **(18 sts)**
- **Rnd 14:** *k1, k2tog; repeat from * to end. **(12 sts)**
- **Rnd 15:** *k2tog; repeat from * to end. **(6 sts)**

- Final check: each "repeat from *" divides evenly (e.g., 84÷6=14, 72÷6=12, 60÷6=10 ...), ending cleanly at **6 sts** ✓.

---

## Finishing

1. Cut the yarn, leaving a **10-in (25 cm)** tail.
2. Thread the tail onto a tapestry needle, run it through the remaining **6 sts**, and pull tight to close the crown. Secure on the inside.
3. If you chose the duplicate-stitch option for CC2, embroider the horns, nose, and eye details now, following the attached chart placement.
4. Weave in all ends on the wrong side. Trim excess.
5. **Block** the hat by soaking in cool water with wool wash, gently squeezing out excess water, and shaping over a rounded form (a balloon or bowl works). Let dry fully — this evens out the colorwork stitches.

### Optional Pompom

For extra flair, make or attach a **3-in (7.5 cm)** pompom in MC or CC1 to the crown. Sew securely through the closed crown center.

---

## Notes for Beginners

- **Colorwork tension:** The single biggest tip — keep your floats loose. Stretch the fabric on the needle as you work each color change.
- **Reading the chart:** Since you never turn the work, every chart round is read right to left. Use a sticky note or magnetic marker to track your current row on the attached chart.
- **Tiny details:** Don't stress the small CC2 dots — duplicate stitch after knitting is a clean, easy way to add the eyes, nose, and horn tips.
- **Fit adjustment:** For a slouchier hat, add 1 in (2.5 cm) of plain knitting before starting the crown. For a snugger fit, cast on 80 sts (still divisible by 4) and note the crown math will shift slightly.

Enjoy your cozy highland cow beanie!
Disclaimer: This pattern was generated by AI and should be reviewed for accuracy before use. While we strive for quality, AI-generated content may contain errors. Please verify measurements, stitch counts, and instructions before beginning your project. Generated by purlJam.uk
Access your pattern anytime
Bookmark this page to access your pattern anytime