Type
Crochet
Difficulty
intermediate
Category
blanket
AI Thinking Process
Planning
Verification
Pattern
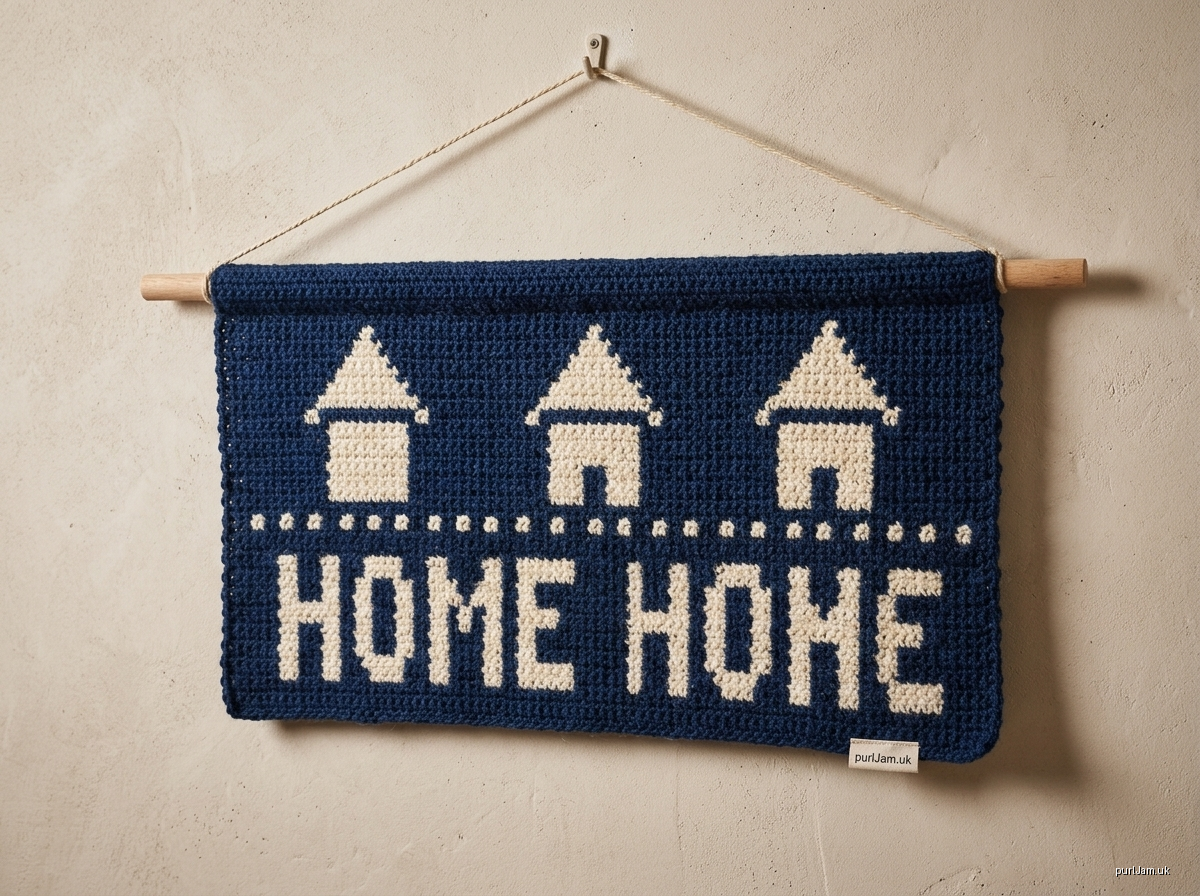
HOME Sweet House — Filet Crochet Wall Hanging
Skill level: Intermediate Technique: Filet crochet (single color), worked flat in rows
Materials
- Worsted weight yarn (#4), about 150 yd (137 m), in one solid light color. Light colors show the filet design best.
- US H-8 (5 mm) crochet hook
- Tapestry needle
- Scissors
- Dowel or rod, 22 in (56 cm) long and up to 0.5 in (13 mm) in diameter, plus 24 in of yarn or cord for hanging
Gauge
16 sts and 9 rows = 4 in (10 cm) in filet mesh, after blocking. This equals about 5⅓ squares across and 9 rows down per 4 in.
Gauge swatch:
- Ch 24. Dc in 4th ch from hook and in each ch across (22 sts).
- Turn and work rows of: ch 3 (counts as dc), [ch 2, skip 2, dc in next st] 7 times (7 spaces).
- Work 8 rows, block the swatch, then measure.
Finished measurements
Shape: Rectangle
| Measurement | One size |
|---|---|
| Width | 20.25 in (51.5 cm) |
| Length | 9.75 in (25 cm) |
Before the edging, the body measures 19.75 in × 9.33 in (50 × 23.7 cm).
Abbreviations (US)
- ch: chain
- dc: double crochet
- sc: single crochet
- sl st: slip stitch
- st(s): stitch(es)
- sp: space
- RS: right side
- WS: wrong side
Filet Stitch Guide
- Each square uses 3 sts. The last dc of one square is shared with the next square, which is why a row has 26 × 3 + 1 = 79 sts.
- Row start: Turn, then ch 3. This counts as the first dc, which forms the outer edge of the first square.
- Block (B): Work 1 dc in each of the next 3 sts.
- Over a previous block, that means 1 dc in each dc.
- Over a previous space, work 2 dc in the ch-2 sp, then 1 dc in the next dc.
- Space (sp): Ch 2, skip the next 2 sts (or the ch-2 sp), then dc in the next dc.
- Last stitch of a row: The final dc of each row goes into the top of the turning ch-3.
- How to read the rows: "2 sp" means work 2 spaces in a row. Each row is written in working order, from the first square after the turning ch to the last.
- Odd rows are RS rows.
- Even rows are WS rows.
- The letters are already reversed where needed. Simply work the squares in the order given.
Instructions
Foundation: Ch 81.
Row 1 (RS) — bottom frame: Dc in 4th ch from hook. The skipped 3 ch count as the first dc. Dc in each remaining ch across.
- Result: 26 B (78 dc + 1 = 79 sts ✓).
Row 2 (WS): Ch 3, 1 B, 24 sp, 1 B (26 squares, 79 sts).
Word "HOME" (Rows 3–7)
The letters occupy squares 4–23. There are 2 margin spaces on each side inside the frame.
Row 3 (RS — bottom of letters): Ch 3, 1 B, 2 sp, 4 B, 1 sp, 1 B, 3 sp, 1 B, 1 sp, 4 B, 1 sp, 1 B, 2 sp, 1 B, 2 sp, 1 B.
- Tally: 1+2+4+1+1+3+1+1+4+1+1+2+1+2+1 = 26 ✓ (79 sts).
Row 4 (WS): Ch 3, 1 B, 2 sp, 1 B, 2 sp, 1 B, 1 sp, 1 B, 2 sp, 1 B, 1 sp, 1 B, 3 sp, 1 B, 1 sp, 1 B, 5 sp, 1 B.
- Tally: 26 ✓ (79 sts).
Row 5 (RS — center bar of H and E): Ch 3, 1 B, 3 sp, 3 B, 1 sp, 1 B, 1 sp, 1 B, 1 sp, 1 B, 1 sp, 1 B, 2 sp, 1 B, 1 sp, 4 B, 2 sp, 1 B.
- Tally: 1+3+3+1+1+1+1+1+1+1+1+2+1+1+4+2+1 = 26 ✓ (79 sts).
Row 6 (WS): Ch 3, 1 B, 2 sp, 1 B, 2 sp, 1 B, 1 sp, 1 B, 2 sp, 1 B, 1 sp, 2 B, 1 sp, 2 B, 1 sp, 1 B, 5 sp, 1 B.
- Tally: 26 ✓ (79 sts).
Row 7 (RS — top of letters): Ch 3, 1 B, 2 sp, 4 B, 1 sp, 1 B, 3 sp, 1 B, 1 sp, 4 B, 1 sp, 1 B, 2 sp, 1 B, 2 sp, 1 B.
- Tally: 26 ✓ (79 sts). This row is the same as Row 3.
Gap
Rows 8 (WS) and 9 (RS): Ch 3, 1 B, 24 sp, 1 B (79 sts each row).
House Body (Rows 10–14)
The house walls occupy squares 10–17. The door is at squares 13–14. All house rows are symmetrical, so they read the same in either direction.
Row 10 (WS): Ch 3, 1 B, 8 sp, 3 B, 2 sp, 3 B, 8 sp, 1 B.
- Tally: 1+8+3+2+3+8+1 = 26 ✓ (79 sts).
Row 11 (RS): Work as Row 10 (79 sts).
Row 12 (WS — windows begin, top of door): Ch 3, 1 B, 8 sp, 1 B, 1 sp, 1 B, 2 sp, 1 B, 1 sp, 1 B, 8 sp, 1 B.
- Tally: 26 ✓ (79 sts).
Row 13 (RS): Ch 3, 1 B, 8 sp, 1 B, 1 sp, 4 B, 1 sp, 1 B, 8 sp, 1 B.
- Tally: 1+8+1+1+4+1+1+8+1 = 26 ✓ (79 sts).
Row 14 (WS — top of walls): Ch 3, 1 B, 8 sp, 8 B, 8 sp, 1 B.
- Tally: 26 ✓ (79 sts).
Roof (Rows 15–19)
Row 15 (RS — eaves, overhanging the walls by 1 square on each side): Ch 3, 1 B, 7 sp, 10 B, 7 sp, 1 B.
- Tally: 26 ✓ (79 sts).
Row 16 (WS): Ch 3, 1 B, 8 sp, 8 B, 8 sp, 1 B (26 ✓, 79 sts).
Row 17 (RS): Ch 3, 1 B, 9 sp, 6 B, 9 sp, 1 B (26 ✓, 79 sts).
Row 18 (WS): Ch 3, 1 B, 10 sp, 4 B, 10 sp, 1 B (26 ✓, 79 sts).
Row 19 (RS — roof peak): Ch 3, 1 B, 11 sp, 2 B, 11 sp, 1 B (26 ✓, 79 sts).
Top Frame
Row 20 (WS): Ch 3, 1 B, 24 sp, 1 B (79 sts).
Row 21 (RS): Ch 3, 26 B. Remember to work 2 dc in each ch-2 sp and 1 dc in each dc.
- Result: 79 sts ✓. Do not fasten off.
Edging
Round 1 (RS): Ch 1. Work sc around the whole piece as follows:
- Top edge: Work 3 sc in the first st, sc in each of the next 77 sts, then 3 sc in the last st (83 sc).
- Left side: Work 2 sc around the post of each row-end of Rows 21 through 1 (42 sc).
- Bottom edge: Working into the foundation ch loops, work 3 sc in the first ch, sc in each of the next 77 ch, then 3 sc in the last ch (83 sc).
- Right side: Work 2 sc around the post of each row-end of Rows 1 through 21 (42 sc).
- Sl st to the first sc to join.
- Total: 83 + 42 + 83 + 42 = 250 sc ✓.
- Fasten off, leaving a 30 in tail.
Rod Casing
- With the WS facing, fold the top edge down by 1 in (2.5 cm). The top-edge sc meet the dc of Row 19.
- Using the tail, whipstitch the top sc row to the back loops of Row 19 across all 79 sts.
- Leave the side ends open for the dowel.
Finishing
- Weave in all ends along solid blocks, where they will be hidden.
- Wet-block the piece to 20.25 × 9.75 in. Pin each open square square-ish and the edges straight, then let it dry fully.
- Insert the 22 in dowel through the casing so that 0.75 in extends on each side.
- Tie the 24 in hanging cord to the dowel ends, 0.25 in in from each tip.
Placement check (RS view, squares counted from the left):
- Letters: H at squares 4–7, O at 9–12, M at 14–18, E at 20–23.
- House: Centered over the O and M, with walls at squares 10–17 and the door at squares 13–14 directly above the gap between O and M.
Disclaimer: This pattern was generated by AI and should be reviewed for accuracy before use. While we strive for quality, AI-generated content may contain errors. Please verify measurements, stitch counts, charts, and instructions before beginning your project. Generated by purlJam.uk
Love this pattern?
Save this pattern to your free PurlJam libraryAccess your pattern anytime
Bookmark this page to access your pattern anytime