Type
Crochet
Difficulty
advanced
Category
blanket
AI Thinking Process
Planning
Verification
Pattern
Ronaldo 7 Double Crochet Blanket
Beginner Colorwork Throw — 71" × 79" (180 × 200 cm)
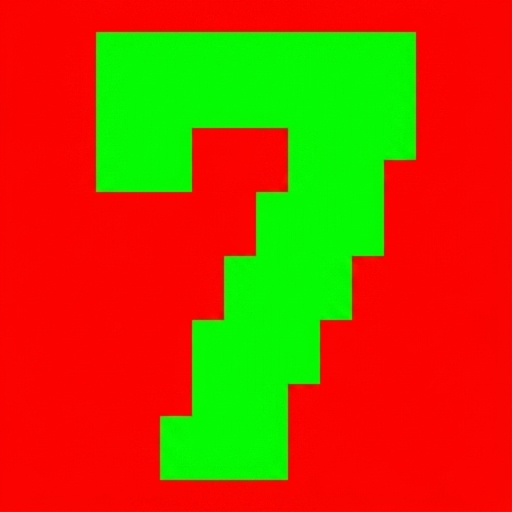
A straightforward double-crochet blanket with a solid red background and a bold green number 7 (Ronaldo) centered on the field. Worked flat in rows from an attached stitch chart. Ideal first colorwork project.
Skill Level
Beginner (basic DC, simple color changes, reading a chart)
Finished Measurements
- Width: 71" (180 cm)
- Length: 79" (200 cm)
- Measurements after light blocking, including border.
Materials
Yarn (worsted weight / medium #4; approx. 200 yd / 100 g per skein — adjust to your brand)
- MC (Main Color) — Red: 2,800 yd / 2,560 m (about 14 skeins)
- CC (Contrast Color) — Green: 180 yd / 165 m (about 1 skein)
Hook
- US I/9 (5.5 mm), or size needed to obtain gauge
Notions
- Yarn needle
- Stitch markers (4–6)
- Scissors
- Optional: bobbins for CC (intarsia)
Gauge
15 dc and 8 rows = 4" × 4" (10 × 10 cm) in double crochet, unblocked
Make a 6" swatch, measure the center 4".
If you have fewer than 15 dc in 4", go down a hook size; if more, go up a hook size. Matching gauge is essential for size and yarn amounts.
Abbreviations (US)
- ch — chain
- dc — double crochet
- sc — single crochet
- sl st — slip stitch
- st(s) — stitch(es)
- RS — right side
- WS — wrong side
- MC — main color (red)
- CC — contrast color (green)
- rep — repeat
Pattern Notes
- Blanket is worked flat, back and forth in rows, bottom edge to top edge.
- Turning chain: ch 3 at start of each DC row counts as first dc throughout body.
- Colorwork for the 7 uses the Attached Stitch Chart (separate panel). Do not invent a grid — follow that chart only.
- Recommended color method for beginners: intarsia — use a separate short length or bobbin of CC for the 7 so you are not carrying long floats across the full width. Twist yarns when changing color to avoid holes.
- Alternate method: tapestry crochet (carry unused color along the row and work over it). Only use this if you are comfortable; it can bulk the fabric and show MC through CC.
- Always change color in the last yarn-over of the previous stitch so the new color sits ready for the next stitch.
- Keep an even tension at color changes so the 7 stays crisp.
- RS rows are odd-numbered chart rows (read right → left on the chart as noted in the Attached Stitch Chart section). Confirm with the chart key.
- Weave ends as you go where practical; leave 6" tails at color changes.
- Border is worked in MC after the body is complete.
Stitch Pattern (Body)
Double crochet fabric
Row: Ch 3 (counts as dc), dc in each st across, turn.
Stitch count remains 267 dc every row unless noted.
Attached Stitch Chart
Use the separate attached chart panel supplied with this pattern for the green number 7. There is no inline grid in this text.
Where the chart sits in the pattern
- The chart is a separate visual asset packaged with these instructions (chart panel / download companion).
- In the written pattern below, the chart is worked during Body Section B (Chart Zone) only. Sections A and C are solid MC.
How to read the chart (crochet)
- Each chart square = 1 dc in the indicated color.
- Chart is worked in rows matching blanket rows (bottom of chart = lower edge of the 7).
- RS (odd) rows: read the chart from right to left.
- WS (even) rows: read the chart from left to right.
- Blank / red squares = MC; marked / green squares = CC (see chart legend).
- Work every stitch as dc; the chart controls color only, not stitch type.
- Do not add extra chains inside the chart zone; stitch count stays 267.
Color & stitch-count integration
- Chart width (in stitches) and height (in rows) are defined on the attached panel. Call chart width W sts and height H rows as printed on that panel.
- Side margins (plain MC each side of chart):
Left margin M = (267 − W) ÷ 2
Right margin = 267 − W − M
(If W is odd, left gets the extra stitch so margins differ by at most 1.) - Lower plain section before chart: 40 rows MC.
- Chart zone: H rows following the attached chart, with M MC sts, then W chart sts, then remaining MC sts.
- Upper plain section after chart: continue in MC until 158 body rows total (see Body instructions).
- Example check: M + W + right margin = 267 ✓ every chart row.
- Yarn management: wind 2–3 small CC bobbins if the 7 has separated blocks; snip and restart CC rather than carrying across large MC gaps when using intarsia.
- If your gauge differs slightly, keep 267 sts and accept a small size change, or adjust foundation using gauge so width still hits ~71".
Instructions
Foundation
With MC, loosely ch 270.
Row 1 (RS): Dc in 4th ch from hook (3 skipped ch count as first dc), dc in each ch across.
267 dc. Turn.
Place a marker in the first and last st of the row to help track edges. Move markers up every few rows.
Body Section A — Lower Red Field
Rows 2–40: Ch 3 (counts as dc), dc in each dc across.
267 dc. Turn.
Work entirely in MC.
(40 rows ≈ 20" / 51 cm at gauge.)
Body Section B — Chart Zone (Centered 7)
Rows 41 through (40 + H): Continue in dc across all 267 sts, changing colors per the Attached Stitch Chart.
Each chart-zone row:
- Ch 3 (counts as dc) in MC (unless chart shows CC in the first stitch — rare; follow chart).
- Work M stitches in MC (left margin; on WS rows this is the margin that appears on the left when the piece is facing you — follow chart direction).
- Work the next W stitches following the attached chart row for colors (MC or CC).
- Work remaining stitches in MC to end of row (right margin).
- Turn. 267 dc.
- Follow RS/WS reading directions in the Attached Stitch Chart section.
- Twist MC and CC at each color change.
- When a chart row is complete, cut CC if it will not be used within the next row’s nearby stitches, leaving a 6" tail to weave later.
- After the final chart row (row 40 + H), cut CC and secure. Resume MC only.
Sanity check: After Section B you have completed 40 + H rows; stitch count still 267 ✓.
Body Section C — Upper Red Field
Continue with MC only:
Rows (41 + H) through 158: Ch 3, dc in each dc across.
267 dc. Turn.
Total body rows = 158 (158 ÷ 8 × 4" = 79" length before border ✓).
If H is large and 40 + H already nears 158, reduce Section A or C evenly so the 7 stays vertically centered and total body rows remain 158. Target: plain rows above chart ≈ plain rows below chart when possible.
Fasten off MC after Row 158 if you prefer to rejoin for the border; or keep yarn attached to begin border on the RS.
Border
Join MC with sl st in any corner if fastened off. Work with RS facing.
Round 1: Ch 1, sc evenly across edge to next corner, work 3 sc in corner; rep from * around entire blanket, joining with sl st to first sc.
Spacing guide: Along top/bottom (row-end edges of foundation/last row), 1 sc per dc. Along side edges (row ends), work approx. 2 sc per DC row (about 316 sc per long side before corners) so edges lie flat — adjust by 1–2 sts if ruffling or cupping.
Corners: Always 3 sc in the same corner st/space.
Round 2: Ch 1, sc in each sc around, working 3 sc in each corner sc; join with sl st to first sc.
Round 3 (optional): Rep Round 2 for a slightly wider edge.
Fasten off.
Finishing
- Weave in all ends securely on WS, especially around the 7 — split plies and weave in multiple directions so green tails do not peek through.
- Block lightly: Mist or wet-block. Pin to 71" × 79" (180 × 200 cm) on a flat surface. Do not stretch aggressively; DC fabric needs only gentle shaping so the numeral stays proportional. Dry completely.
- Steam is optional: hover iron over fabric; do not press flat or crush stitches.
- Trim remaining tails after blocking.
Schematic (text)
┌─────────────────────────────────────┐  ↑
│         MC border (sc rounds)       │  │
│  ┌───────────────────────────────┐  │  │
│  │     Section C — MC DC         │  │  79"
│  │                               │  │  (200 cm)
│  │     ┌─────────────┐           │  │  │
│  │     │  Chart: 7   │  ← CC     │  │  │
│  │     │  (centered) │           │  │  │
│  │     └─────────────┘           │  │  │
│  │     Section A — MC DC         │  │  │
│  └───────────────────────────────┘  │  │
│         MC border                   │  │
└─────────────────────────────────────┘  ↓
←──────────── 71" (180 cm) ────────────→
Foundation & body: 267 dc width
Yarn Amount Check
- Body area ≈ 71 × 79 = 5,609 in².
- At worsted DC gauge, ~0.45–0.5 yd/in² → ~2,500–2,800 yd MC + small CC allowance.
- CC ~180 yd covers a large centered 7 with ends. Buy an extra MC skein if your tension is tight or you add a wider border.
Customization Tips (optional)
- Swap MC/CC for team or room colors; keep strong contrast so the 7 reads clearly.
- For a smaller throw, use the same chart and reduce plain margins/rows proportionally; recalculate foundation from gauge.
- Add a second CC outline around the 7 only if the attached chart includes it — do not freehand extra columns or the centering math will break.
Quick Reference Counts
| Item | Value |
|---|---|
| Foundation chains | 270 |
| Stitches per row | 267 dc |
| Body rows | 158 |
| Lower plain rows | 40 |
| Chart rows | H (from attached chart) |
| Upper plain rows | 158 − 40 − H |
| Side margins each chart row | M and 267 − W − M |
| Gauge | 15 dc × 8 rows = 4" |
| Finished size | 71" × 79" (180 × 200 cm) |
End of pattern. Work the green 7 exclusively from the attached stitch chart panel; this written pattern supplies placement, margins, and construction only.
Disclaimer: This pattern was generated by AI and should be reviewed for accuracy before use. While we strive for quality, AI-generated content may contain errors. Please verify measurements, stitch counts, charts, and instructions before beginning your project. Generated by purlJam.uk
Love this pattern?
Save this pattern to your free PurlJam libraryAccess your pattern anytime
Bookmark this page to access your pattern anytime