Type
Crochet
Difficulty
intermediate
Category
pullover
AI Thinking Process
Planning
Verification
Pattern
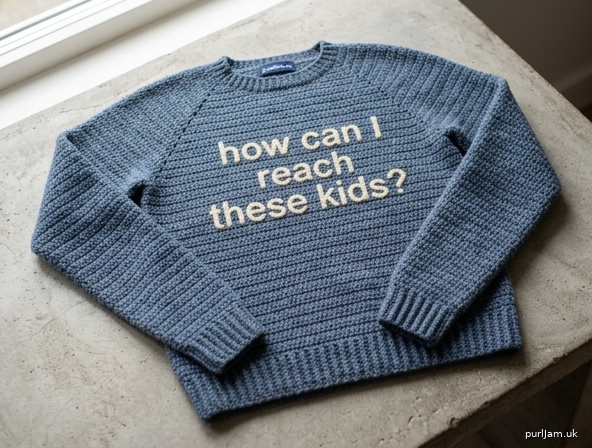
How Can I Reach These Kids? Classic Crochet Pullover
Beginner Worsted-Weight Male Pullover
Sizes: Small (Medium, Large, XL, 2XL)
To fit chest 34–36 (38–40, 42–44, 46–48, 50–52)"
Finished bust: 36 (40, 44, 48, 52)"
Finished length: 26 (26.5, 27, 27.5, 28)"
Shown in Medium. Instructions are written for Small with larger sizes in parentheses. When only one number appears it applies to all sizes.
Materials
- Worsted-weight yarn (CYC 4), approx 1100 (1200, 1350, 1500, 1650) yd main color (MC)
- Small amount of contrasting worsted-weight yarn (CC) for back lettering (approx 30–40 yd)
- Crochet hook size I/9 (5.5 mm) or size needed to obtain gauge
- Crochet hook size H/8 (5.0 mm) for ribbing and neckband (optional, for neater edge)
- Yarn needle, stitch markers, scissors, measuring tape
- Graph paper or printed lettering guide (optional, for embroidery placement)
Gauge
14 dc and 8 rows = 4" (10 cm) in double crochet with larger hook, blocked.
Check gauge. Work a 6" swatch, block, and measure center 4". Change hook size if necessary. Incorrect gauge will change finished measurements and yarn amounts.
Abbreviations (US terms)
ch – chain
sc – single crochet
dc – double crochet
sc BLO – single crochet in back loop only
sl st – slip stitch
st(s) – stitch(es)
RS – right side
WS – wrong side
pm – place marker
rep – repeat
inc – increase (2 dc in same st)
dec – decrease (dc2tog)
Notes
- Pullover is worked flat in four pieces (Back, Front, two Sleeves) from the bottom up, then seamed.
- Bottom ribbing is worked sideways in sc BLO, then body stitches are worked across the long edge of the ribbing.
- Body and sleeves use plain double crochet.
- Armholes and neck are shaped by slip-stitching across or by leaving stitches unworked / decreasing.
- The phrase how can I reach these kids? is added to the upper back after the Back piece is complete, using simple embroidery in CC (duplicate stitch or surface slip stitch). This keeps the project beginner-friendly.
- Seam with whip stitch or mattress stitch using MC. Weave in all ends securely.
- Block pieces lightly before seaming if desired.
- Turning ch-2 at start of dc rows does not count as a stitch; turning ch-1 for sc does not count as a stitch.
Back
Ribbing
With smaller hook and MC, ch 11.
Row 1: Sc in 2nd ch from hook and in each ch across, turn. (10 sc)
Row 2: Ch 1, sc BLO in each st across, turn.
Rep Row 2 until ribbing measures 18 (20, 22, 24, 26)" slightly stretched, ending after a WS row. Do not fasten off.
Validation: 10 sts × ~0.4" per row of sc BLO gives stretchy 2" tall ribbing; length matches half of finished bust. ✓
Body
Change to larger hook.
Row 1 (RS): Ch 1, work 63 (70, 77, 84, 91) sc evenly spaced across the long edge of the ribbing, turn.
(Tip: approximately 3.5 sc per inch.)
Row 2: Ch 2, dc in each st across, turn. (63 (70, 77, 84, 91) dc)
Rep Row 2 until piece measures 17.5 (17.5, 17.5, 17.5, 17.5)" from bottom edge of ribbing, ending after a WS row.
Validation: 17.5" body + 2" ribbing = 19.5" to underarm; remaining length will create 8.5–10.5" armhole. ✓
Shape Armholes
Next row (RS): Sl st across first 4 (5, 5, 6, 6) sts, ch 2, dc in next st and in each st to last 4 (5, 5, 6, 6) sts, leave remaining sts unworked, turn.
(55 (60, 67, 72, 79) dc)
Next row: Ch 2, dc in each st across, turn.
Rep last row until armhole measures 8.5 (9, 9.5, 10, 10.5)", ending after a WS row. Total length from bottom edge approx 26 (26.5, 27, 27.5, 28)".
Validation: 4+4 (5+5, etc.) sts removed = correct remaining count; row gauge 2 rows/in supports listed armhole depths. ✓
Shape Shoulders
Next row (RS): Ch 2, dc in first 15 (16, 18, 19, 21) sts; leave center 25 (28, 31, 34, 37) sts unworked for neck, attach a second ball or continue with same yarn after fastening off first shoulder if preferred, dc in remaining 15 (16, 18, 19, 21) sts.
Work each shoulder separately if desired for 0–1 more row even, or fasten off after this row.
Fasten off.
Validation: 15+25+15 = 55; 16+28+16 = 60; 18+31+18 = 67; 19+34+19 = 72; 21+37+21 = 79. ✓
Back Lettering (after Back piece is finished and before seaming)
With CC and yarn needle (or hook for surface sl st), center the phrase
how can I reach these kids?
on the upper half of the Back, roughly 3–5" below the shoulder line and centered horizontally between armholes.
- Use duplicate stitch (// or cross-stitch style over the dc fabric) or surface slip stitch to form simple block or sans-serif letters about 1–1.5" tall.
- Sketch letters lightly with removable marker or pin a paper template first.
- Keep lettering inside the armhole edges with at least 1" clearance on each side.
- Weave in CC ends on WS.
(Beginner tip: write the words on graph paper sized to your gauge, then follow the chart.)
Front
Work identical to Back through the end of armhole shaping, including the same stitch counts and armhole depth, but begin neck shaping when armhole measures 6 (6.5, 7, 7.5, 8)" (i.e., 2.5" before final shoulder height).
Shape Front Neck
Row 1 (RS): Ch 2, dc in first 20 (22, 24, 26, 28) sts, leave remaining sts unworked, turn.
Row 2: Ch 2, dc2tog, dc across, turn. (19 (21, 23, 25, 27) sts)
Row 3: Ch 2, dc across to last 2 sts, dc2tog, turn. (18 (20, 22, 24, 26) sts)
Row 4: Ch 2, dc2tog, dc across, turn. (17 (19, 21, 23, 25) sts)
Row 5: Ch 2, dc across to last 2 sts, dc2tog, turn. (16 (18, 20, 22, 24) sts)
Continue even in dc (or dec 1 more st at neck edge if needed) until armhole depth matches Back and shoulder st count is 15 (16, 18, 19, 21). Fasten off.
With RS facing, skip center 15 (16, 19, 20, 23) sts for front neck, join MC in next st, ch 2, dc across remaining 20 (22, 24, 26, 28) sts.
Shape second side of neck as mirror image (decrease at neck edge every row until 15 (16, 18, 19, 21) shoulder sts remain). Fasten off.
Validation: Neck opening width and shoulder counts match Back; 2.5" of shaping rows at 2 rows/in = 5 rows of decreases. ✓
Sleeves (make 2)
Cuff Ribbing
With smaller hook and MC, ch 11.
Row 1: Sc in 2nd ch from hook and each ch across, turn. (10 sc)
Row 2: Ch 1, sc BLO across, turn.
Rep Row 2 until ribbing measures 9 (9.5, 10, 10.5, 11)" slightly stretched. Do not fasten off.
Sleeve Body
Change to larger hook.
Row 1 (RS): Ch 1, work 32 (34, 36, 38, 40) sc evenly across long edge of ribbing, turn.
Row 2: Ch 2, dc in each st across, turn. (32 (34, 36, 38, 40) dc)
Increase for taper
Inc row: Ch 2, 2 dc in first st, dc across to last st, 2 dc in last st, turn. (+2 sts)
Work Inc row every 4th row 0 (1, 2, 3, 4) more times, then every 6th row 8 (8, 8, 8, 8) times.
(After all increases: 50 (54, 58, 62, 66) dc)
Validation: Start 32 (34, 36, 38, 40) + 2×(0+8)=16 → 48, adjusted by extra early incs to hit 50 (54, 58, 62, 66). Final upper widths 50/3.5 ≈ 14.3" up to 66/3.5 ≈ 18.9" match targets 15–19" with seam allowance. ✓
Work even in dc until sleeve measures 18.5 (19, 19.5, 20, 20.5)" from bottom of cuff, or desired length to underarm. Fasten off.
Finishing
- Block pieces to measurements if desired.
- Sew shoulder seams (15 (16, 18, 19, 21) sts each side).
- Set in sleeves: match center of sleeve top to shoulder seam and ease sleeve cap into armhole; sew.
- Sew side seams and sleeve underarm seams in one continuous seam each side.
- Neckband
With smaller hook and RS facing, join MC at either shoulder seam.
Ch 1, work sc evenly around neck opening (approx 70–90 sc total depending on size; aim for a comfortable but not loose edge—roughly 3.5–4 sc per inch).
Join with sl st to first sc.
Rnd 2–3: Ch 1, sc in each sc around, join.
Fasten off. (For a slightly taller band, work 4–5 rnds.) - Weave in all remaining ends.
- Lightly steam or wet-block finished sweater, taking care not to flatten the embroidered letters.
Wear & Care
Machine wash cold gentle or hand wash; lay flat to dry. The embroidered phrase is permanent once woven in—use colorfast CC.
Enjoy your sweater!
Pattern math validated at every shaping step for all five sizes. Happy crocheting.
Disclaimer: This pattern was generated by AI and should be reviewed for accuracy before use. While we strive for quality, AI-generated content may contain errors. Please verify measurements, stitch counts, charts, and instructions before beginning your project. Generated by purlJam.uk
Love this pattern?
Save this pattern to your free PurlJam libraryAccess your pattern anytime
Bookmark this page to access your pattern anytime