Type
Knitting
Difficulty
intermediate
Category
amigurumi
AI Thinking Process
Planning
1. **Design Strategy**: A set of two "Izzy doll" style farm animals (a lamb and a piglet) worked in easy stockinette in the round on worsted yarn, using a compact silhouette suitable for beginners. Simple embroidered features keep it toy-safe and accessible.
2. **Construction Plan**: Each animal is worked bottom-up as a combined body-head tube in the round with separately knitted ears/limbs seamed on, stuffed firmly before closing.
3. **Quality Assurance**:
- Firm tension essential so stuffing doesn't show through stockinette.
- Even decreases at the top to avoid a pointed head.
- Symmetrical placement of ears and legs when seaming.
4. **Final Calculations**: Tension 22 sts × 30 rows = 10 cm on 3.5 mm needles. Body cast-on 24 sts (24 ÷ 22 × 10 ≈ 11 cm circumference ≈ 3.5 cm diameter). Finished height ~13 cm. Stuffing ~30 g per animal.
Verification
[PRE-FLIGHT CHECKS]
1. **Completeness**: Includes materials, tension, all pieces (body/head, ears, legs, tail/snout), finishing/assembly, stuffing estimate. ✓
2. **Consistency**: 24 sts at 22 sts/10 cm = 10.9 cm circumference; decrease rounds resolve to 6 sts closed. Verified below. ✓
3. **Constraints**: UK terminology, metric-first, worsted weight, easy level, farm animals (lamb + piglet) delivered. ✓
4. **Safety**: Embroidered features recommended (no safety eyes needed) — toy-safe for young children. Decrease math checked: 24→18→12→6. ✓
Pattern
# Izzy Doll Farm Animals — Little Lamb & Piglet
### An easy pair of knitted amigurumi soft toys

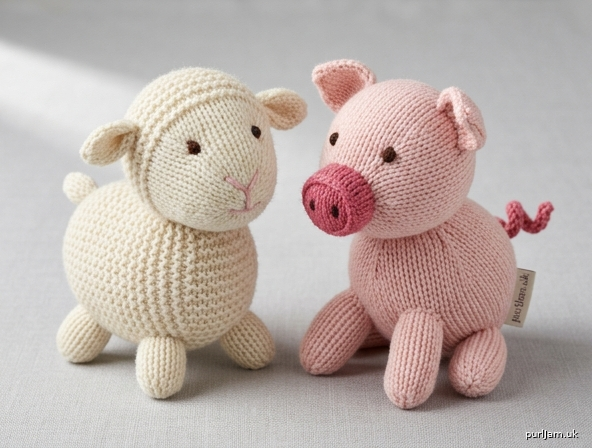
These two cuddly farm friends are worked in the round in simple stockinette stitch, with all features embroidered for safety — perfect for gifting to little ones. The lamb and piglet share the same easy body pattern, with only the colour and a few small details changed.

---

## Skill Level
**Easy** — you need to know how to work in the round (DPNs or Magic Loop), knit, purl, k2tog, and mattress stitch. No safety eyes required.

## Finished Measurements
- Height (seated, including ears): approx. **13 cm (5 in)**
- Body circumference: approx. **11 cm (4¼ in)**

## Materials

### Yarn (worsted / aran weight)
**Little Lamb:**
- Cream (MC): approx. 40 g
- Small amounts of pale pink and dark brown/black for embroidery

**Piglet:**
- Pale pink (MC): approx. 40 g
- Small amounts of deep pink and dark brown/black for embroidery

### Needles & Notions
- 3.5 mm (UK 9–10 / US 4) DPNs or one long circular for Magic Loop
  *(This is 1–2 sizes smaller than the label's usual 4.5–5 mm recommendation, to create a tight fabric that won't show the stuffing.)*
- Tapestry needle
- Polyester fibrefill stuffing: approx. **30 g per animal**
- Stitch marker

## Tension (Gauge)
22 sts and 30 rows = 10 cm (4 in) over stockinette stitch on 3.5 mm needles, worked in the round.

**Tension note:** For toys, a *tight, even fabric* matters far more than an exact stitch count. Your fabric should feel firm and dense so the stuffing cannot peek through. If your fabric feels loose, drop down a needle size.

## Abbreviations (UK)
- **k** – knit
- **p** – purl
- **k2tog** – knit two together (decrease)
- **kfb** – knit into front and back of stitch (increase)
- **st(s)** – stitch(es)
- **rnd** – round
- **MC** – main colour
- **rem** – remaining

---

# THE BODY-HEAD (make 1 per animal — identical for both)

Worked as a single tube from the base up, decreasing at the top for the head.

Using MC, cast on **24 sts**. Divide across DPNs (or Magic Loop) and join to work in the round, being careful not to twist. Place marker at start of round.

**Rnds 1–20:** k all sts. *(24 sts)*
*(Check: 20 rnds ÷ 30 rnds per 10 cm ≈ 6.7 cm of straight tube — this forms the body and lower head.)*

Begin stuffing now and add more as you go so the tube keeps its shape.

**Rnd 21 (dec):** *k2, k2tog; rep from * to end. → **18 sts**
*(24 ÷ 4 = 6 decreases; 24 − 6 = 18 ✓)*

**Rnd 22:** k all sts. *(18 sts)*

**Rnd 23 (dec):** *k1, k2tog; rep from * to end. → **12 sts**
*(18 ÷ 3 = 6 decreases; 18 − 6 = 12 ✓)*

**Rnd 24:** k all sts. *(12 sts)*

Finish stuffing firmly.

**Rnd 25 (dec):** *k2tog; rep from * to end. → **6 sts**
*(12 ÷ 2 = 6 decreases; 12 − 6 = 6 ✓)*

Cut yarn leaving a 20 cm tail. Thread through the rem 6 sts, pull tight to close, and secure on the inside.

---

# EARS

## Little Lamb Ears (make 2 in MC)
Cast on **6 sts**, divide to work in the round.
- **Rnds 1–4:** k all sts. *(6 sts)*
- **Rnd 5 (dec):** k2tog, k2, k2tog. → **4 sts**
Cut yarn, thread through rem 4 sts, pull tight. Leave a tail for seaming. Do **not** stuff — flatten gently.

## Piglet Ears (make 2 in MC)
Worked flat as small triangles for a pointier look.
Cast on **6 sts**.
- **Row 1 (RS):** k across. *(6 sts)*
- **Row 2:** p across.
- **Row 3 (dec):** k1, k2tog, k2tog, k1. → **4 sts**
- **Row 4:** p across.
- **Row 5 (dec):** k1, k2tog, k1. → **3 sts**
Cast off. Leave a tail for seaming.

---

# LEGS (make 4 per animal, in MC — same for both)

Cast on **8 sts**, divide to work in the round.
- **Rnds 1–5:** k all sts. *(8 sts)*
- **Rnd 6 (dec):** *k2tog; rep from * to end. → **4 sts**
Stuff lightly. Cut yarn, thread through rem 4 sts, pull tight. Leave a tail for seaming.

---

# TAILS & SNOUTS

## Lamb Tail (make 1 in MC)
Cast on **5 sts**, k 4 rnds, then thread yarn through and close. Leave a tail. Stuff very lightly.

## Piglet Tail (curly)
Cut a 20 cm length of MC yarn. Fold and twist it tightly on itself until it curls, then knot the end. This becomes the curly tail — attach at finishing.

## Piglet Snout (make 1 in deep pink)
Cast on **9 sts**, divide to work in the round.
- **Rnds 1–2:** k all sts. *(9 sts)*
- **Rnd 3 (dec):** k1, *k2tog; rep from * to last st... simplified: k2tog three times, k3. → **6 sts**
*(9 − 3 = 6 ✓)*
Do not close fully — leave open. Leave a tail for seaming. Stuff lightly before attaching.

---

# FINISHING & ASSEMBLY

**Assembly order matters — follow these steps for a neat, balanced toy.**

1. **Weave in the cast-on tail** at the base of the body and use it to close and firm up the bottom of the body-head tube.

2. **Attach the legs symmetrically.** Position two legs at the front-lower body and two at the back-lower body, evenly spaced. Sew on with mattress stitch using the leg tails so the toy sits/stands neatly. Check symmetry before securing.

3. **Attach the ears** near the top of the head, one on each side, evenly spaced. Lamb ears sit flat and slightly forward; piglet ears sit upright and pointed.

4. **Attach the tail** at centre-back of the body. For the piglet, sew on the curly twisted-yarn tail.

5. **Piglet only — attach the snout** centred on the front of the head, stuffing lightly as you sew for a rounded look.

6. **Embroider the features** (no safety eyes — this keeps the toy safe for babies and toddlers):
   - **Eyes:** two small satin-stitch or French-knot dots in dark brown/black, spaced about 1.5 cm apart.
   - **Lamb nose/mouth:** a small pale pink inverted "Y" in straight stitch.
   - **Piglet nostrils:** two tiny dots on the snout in dark brown.

7. **Weave in all remaining ends securely inside the body**, pulling gently and burying tails so nothing can be picked loose by small hands.

---

## Care
Hand wash gently in cool water with mild detergent and dry flat. Do not tumble dry.

## Designer's Notes
- The body-head is one seamless tube, so there are no fiddly head-to-body seams — ideal for confident beginners.
- Stuff firmly and evenly; under-stuffing causes the stockinette to sag and show gaps.
- Make the pair in coordinating farm colours, or reuse the base body to invent a cow (add spots and small horns), a sheep dog, or a chick (round yellow body, no ears).

**Total stuffing estimate:** approx. 30 g per animal (60 g for the pair).
Disclaimer: This pattern was generated by AI and should be reviewed for accuracy before use. While we strive for quality, AI-generated content may contain errors. Please verify measurements, stitch counts, and instructions before beginning your project. Generated by purlJam.uk
Access your pattern anytime
Bookmark this page to access your pattern anytime