Type
Crochet
Difficulty
beginner
Category
amigurumi
AI Thinking Process
Planning
Verification
Pattern
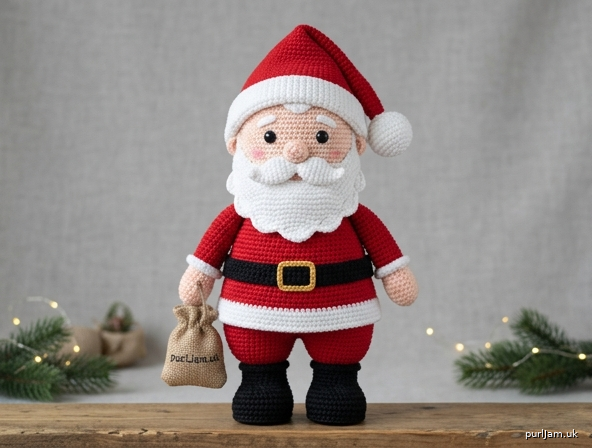
Jolly Santa Amigurumi
A plump, standing Santa Claus worked from simple amigurumi shapes: a sphere head, cylinder legs joined into a chubby torso, cylinder arms, and a pointed cone hat with a fold-up brim. Intermediate construction (joining legs, clean color changes, and a sewn beard/mustache) but only basic stitches.
Skill level: Intermediate
Finished size: Approximately 13½–15" (34–38 cm) tall including the hat, and about 12–13" (30.5–33 cm) to the top of the head, with stated yarn, hook, and gauge. Size varies with stuffing firmness and how far the hat flops.
Materials
Yarn: Worsted weight (4), acrylic or wool-blend.
| Color | Role | Amount |
|---|---|---|
| A Red | Body, arms, hat, pants | 220 yd / 200 m (about 100 g) |
| B White | Brim, cuffs, hem, beard, mustache, hair, pompom | 110 yd / 100 m (about 50 g) |
| C Peach or light beige | Head, hands, nose | 65 yd / 60 m (about 35 g) |
| D Black | Boots, belt, eyes (if embroidered) | 45 yd / 41 m (about 25 g) |
| E Gold or yellow | Belt buckle | 10 yd / 9 m (scraps) |
| F Pink (optional) | Cheeks | scraps |
Hook: US G-6 (4.0 mm), or the hook needed to match gauge. For a tighter fabric and a toy closer to 12" (30.5 cm), use US F-5 (3.75 mm) or US E-4 (3.5 mm).
Notions:
- Polyester fiberfill, 8–10 oz (225–280 g)
- 12 mm safety eyes (1 pair) or black embroidery yarn
- Stitch marker
- Yarn needle
- Pins
- Scissors
- Optional: two 1½" (4 cm) cardboard or plastic-canvas circles for boot soles (helps him stand)
- Optional: pink embroidery floss or felt for cheeks
Safety note: Safety eyes are a choking hazard. Do not use them on toys for children under 3 years; embroider the eyes instead.
Gauge
5 sc and 5 rnds = 1" (2.5 cm) in single crochet, worked tightly in the round.
Work a 12-st tube for 10 rnds and measure. Fabric should be dense enough that stuffing does not show. If your swatch is larger than 1" (2.5 cm) across 5 sts, go down a hook size; if smaller, go up a hook size. Gauge affects height more than width on this design.
Abbreviations (US)
- BLO — back loop only
- ch — chain
- dec — invisible decrease (insert hook in front loop of next st, then front loop of following st, yarn over, pull through both loops, yarn over, pull through 2) or sc2tog
- FO — fasten off
- hdc — half double crochet
- inc — 2 sc in same stitch
- MR — magic ring (adjustable ring)
- rnd(s) — round(s)
- sc — single crochet
- sl st — slip stitch
- st(s) — stitch(es)
- [ ] — stitch count at end of rnd/row
Pattern Notes
- Work in a continuous spiral unless the piece is written in turned rows (beard, buckle, hair). Do not join or chain at the start of rnds. Mark the first st of every rnd and move the marker up.
- Work tightly for a smooth, hole-free fabric.
- Change color on the last yarn-over of the last st of the old color.
- Stuff as you go; it is hard to pack fiberfill through a nearly closed opening. Stuff the body and head firmly, the arms lightly, and the hat very lightly (or leave the tip empty) so it flops.
- Invisible decreases keep the surface smooth; use them on all even-count decrease rnds.
- Pin every piece before sewing. A 12–15" Santa is large enough that ¼" (6 mm) of misplacement reads clearly on the face.
- Parenthetical math confirms the new count, for example: (6 inc → 12 + 6 = 18 ✓).
Pattern
Legs and boots (make 2)
Begin with D (black) for the boot.
Rnd 1: 6 sc in MR. [6] Rnd 2: inc in each st. (6 inc → 6 + 6 = 12 ✓) [12] Rnd 3: (sc, inc) around. (6 inc → 12 + 6 = 18 ✓) [18] Rnd 4: (2 sc, inc) around. (6 inc → 18 + 6 = 24 ✓) [24] Rnds 5–8: sc around. [24] (4 rnds)
Stuff the boot firmly. If using cardboard soles, insert a 1½" (4 cm) circle now, then add more stuffing on top.
Change to A (red).
Rnds 9–16: sc around. [24] (8 rnds)
Stuff the leg firmly as you go, leaving the last 2 rnds lightly stuffed so the join is easy to work.
First leg: FO. Weave in the end.
Second leg: Do not fasten off. Continue to Joining the legs.
Joining the legs and body
You are still on Leg 2, with A (red). The two legs sit side by side; the chain-3 bridge becomes the crotch.
Join rnd: Ch 3. Sc in any stitch of Leg 1 (this becomes st 1 of the new rnd), sc in next 23 sts of Leg 1, sc in each of the 3 ch, sc in the remaining 24 sts of Leg 2 (begin in the stitch immediately after the chain), sc in the remaining loops of each of the 3 ch. [24 + 24 + 3 + 3 = 54 ✓] [54]
Place the marker in the first sc of this rnd. The 3-st bridges should sit between the legs, front and back. If a bridge has twisted, untwist before continuing.
Change to B (white) for the coat hem.
Rnds 1–4: sc around. [54] (4 rnds of white hem)
Change to A (red).
Rnds 5–12: sc around. [54] (8 rnds)
Change to D (black) for the belt.
Rnds 13–15: sc around. [54] (3 rnds)
Change to A (red).
Rnds 16–20: sc around. [54] (5 rnds)
Stuff the body firmly as the tube grows, packing extra fill into the hips so Santa stays chubby.
Rnd 21: (7 sc, dec) around. (6 dec → 54 − 6 = 48 ✓) [48] Rnd 22: sc around. [48] Rnd 23: (6 sc, dec) around. (6 dec → 48 − 6 = 42 ✓) [42] Rnd 24: sc around. [42] Rnd 25: (5 sc, dec) around. (6 dec → 42 − 6 = 36 ✓) [36] Rnd 26: (4 sc, dec) around. (6 dec → 36 − 6 = 30 ✓) [30]
Stuff the shoulders firmly up to the opening. FO, leaving a 24" (61 cm) tail for sewing the head.
Body from the join through Rnd 26 is 26 rnds ≈ 5¼" (13.5 cm). Legs add ≈ 3¼" (8 cm). Neck opening is 30 sts.
Head
With C (peach).
Rnd 1: 6 sc in MR. [6] Rnd 2: inc in each st. (6 inc → 6 + 6 = 12 ✓) [12] Rnd 3: (sc, inc) around. (6 inc → 12 + 6 = 18 ✓) [18] Rnd 4: (2 sc, inc) around. (6 inc → 18 + 6 = 24 ✓) [24] Rnd 5: (3 sc, inc) around. (6 inc → 24 + 6 = 30 ✓) [30] Rnd 6: (4 sc, inc) around. (6 inc → 30 + 6 = 36 ✓) [36] Rnd 7: (5 sc, inc) around. (6 inc → 36 + 6 = 42 ✓) [42] Rnd 8: (6 sc, inc) around. (6 inc → 42 + 6 = 48 ✓) [48] Rnds 9–15: sc around. [48] (7 rnds)
Place eyes between Rnds 11 and 12, 8 sts apart, centered on the face. If using safety eyes, insert the washers on the inside now. For a child-safe toy, skip the hardware and embroider eyes during finishing.
Rnd 16: (6 sc, dec) around. (6 dec → 48 − 6 = 42 ✓) [42] Rnd 17: sc around. [42] Rnd 18: (5 sc, dec) around. (6 dec → 42 − 6 = 36 ✓) [36] Rnd 19: (4 sc, dec) around. (6 dec → 36 − 6 = 30 ✓) [30]
Stuff the head firmly, filling the cheeks well so the face is round. FO, leaving a 12" (30.5 cm) tail. Neck opening is 30 sts, matching the body.
Head is 19 rnds ≈ 3¾" (9.5 cm) tall.
Nose
With C (peach).
Rnd 1: 6 sc in MR. [6] Rnd 2: inc in each st. (6 inc → 6 + 6 = 12 ✓) [12] Rnds 3–4: sc around. [12] Rnd 5: dec around. (6 dec → 12 − 6 = 6 ✓) [6]
Stuff lightly. FO, leaving a 10" (25 cm) tail. Thread the tail through the front loops of the remaining 6 sts and pull closed. Leave the tail for sewing.
Arms (make 2)
Begin with C (peach) for the hand.
Rnd 1: 6 sc in MR. [6] Rnd 2: inc in each st. (6 inc → 6 + 6 = 12 ✓) [12] Rnd 3: (sc, inc) around. (6 inc → 12 + 6 = 18 ✓) [18] Rnds 4–7: sc around. [18] (4 rnds)
Change to B (white) for the cuff.
Rnds 8–9: sc around. [18]
Change to A (red) for the sleeve.
Rnds 10–22: sc around. [18] (13 rnds)
Stuff the hand firmly and the sleeve lightly; leave the last 4 rnds almost empty so the arm sews flat at the shoulder. FO, leaving an 18" (46 cm) tail. Do not close the top; you will sew the 18-st opening to the body.
Each arm is 22 rnds ≈ 4½" (11.5 cm) long.
Hat
Worked from the tip down so the point stays sharp. Begin with A (red).
Rnd 1: 4 sc in MR. [4] Rnd 2: (sc, inc) around. (2 inc → 4 + 2 = 6 ✓) [6] Rnd 3: sc around. [6] Rnd 4: (sc, inc) around. (3 inc → 6 + 3 = 9 ✓) [9] Rnd 5: sc around. [9] Rnd 6: (2 sc, inc) around. (3 inc → 9 + 3 = 12 ✓) [12] Rnd 7: sc around. [12] Rnd 8: (3 sc, inc) around. (3 inc → 12 + 3 = 15 ✓) [15] Rnd 9: sc around. [15] Rnd 10: (4 sc, inc) around. (3 inc → 15 + 3 = 18 ✓) [18] Rnd 11: sc around. [18] Rnd 12: (5 sc, inc) around. (3 inc → 18 + 3 = 21 ✓) [21] Rnd 13: sc around. [21] Rnd 14: (6 sc, inc) around. (3 inc → 21 + 3 = 24 ✓) [24] Rnd 15: sc around. [24] Rnd 16: (3 sc, inc) around. (6 inc → 24 + 6 = 30 ✓) [30] Rnd 17: sc around. [30] Rnd 18: (4 sc, inc) around. (6 inc → 30 + 6 = 36 ✓) [36] Rnd 19: sc around. [36] Rnd 20: (5 sc, inc) around. (6 inc → 36 + 6 = 42 ✓) [42] Rnd 21: sc around. [42] Rnd 22: (6 sc, inc) around. (6 inc → 42 + 6 = 48 ✓) [48] Rnds 23–25: sc around. [48] (3 rnds)
Change to B (white).
Rnds 26–33: sc around. [48] (8 rnds)
FO, leaving a 30" (76 cm) tail for sewing the hat to the head.
Fold the white section up by 4 rnds to form a brim (folded brim ≈ ¾" / 2 cm). The remaining red cone is ≈ 5" (12.5 cm) and will flop to one side if the tip is left unstuffed.
Pompom
With B (white).
Rnd 1: 6 sc in MR. [6] Rnd 2: inc in each st. (6 inc → 6 + 6 = 12 ✓) [12] Rnd 3: (sc, inc) around. (6 inc → 12 + 6 = 18 ✓) [18] Rnds 4–6: sc around. [18] Rnd 7: (sc, dec) around. (6 dec → 18 − 6 = 12 ✓) [12]
Stuff firmly.
Rnd 8: dec around. (6 dec → 12 − 6 = 6 ✓) [6]
FO, close the hole, leave a 10" (25 cm) tail. Sew to the hat tip.
Beard
Worked in turned rows with B (white). Ch 1 at the start of each row does not count as a stitch. The beard is a rounded triangle: narrow at the nose, wide at the hem.
Row 1: Ch 5, sc in 2nd ch from hook and in each ch across, ch 1, turn. [4] Row 2: Inc, sc 2, inc, ch 1, turn. (2 inc → 4 + 2 = 6 ✓) [6] Row 3: Inc, sc 4, inc, ch 1, turn. [8] Row 4: Inc, sc 6, inc, ch 1, turn. [10] Row 5: Inc, sc 8, inc, ch 1, turn. [12] Row 6: Inc, sc 10, inc, ch 1, turn. [14] Row 7: Inc, sc 12, inc, ch 1, turn. [16] Row 8: Inc, sc 14, inc, ch 1, turn. [18] Row 9: Inc, sc 16, inc, ch 1, turn. [20] Row 10: Inc, sc 18, inc, ch 1, turn. [22] Row 11: Inc, sc 20, inc, ch 1, turn. [24] Rows 12–14: Sc across, ch 1, turn. [24] (3 even rows)
Row 15 (shaped hem): (Sc, hdc, dc, hdc, sc) in first st, sk 1 st, sl st in next st, sk 1 st; repeat from * across, ending with (sc, hdc, dc, hdc, sc) in last st. FO, leaving a 24" (61 cm) tail.
The scalloped last row gives a fluffy lower edge. Beard is 15 rows ≈ 3" (7.5 cm) tall at the center and ≈ 4¾" (12 cm) wide at the hem.
Mustache
With B (white).
Ch 13. Work in the 2nd ch from the hook: sl st, sc, hdc, dc, hdc, sc, sl st, sc, hdc, dc, hdc, sc, sl st. [12 sts on a 12-st chain]
FO, leaving a 12" (30.5 cm) tail. Pinch the center sl st so the mustache forms two wings.
Hair (back of head)
With B (white), worked in turned rows.
Row 1: Ch 25, sc in 2nd ch from hook and in each ch across, ch 1, turn. [24] Rows 2–4: Sc across, ch 1, turn. [24]
FO, leaving an 18" (46 cm) tail. This band sits from temple to temple under the hat brim and peeks out at the sides.
Eyebrows (make 2)
With B (white).
Ch 6, sl st in 2nd ch from hook and in each ch across. [5 sl st]
FO, leaving an 8" (20 cm) tail.
Belt buckle
With E (gold), worked in turned rows.
Row 1: Ch 7, sc in 2nd ch from hook and in each ch across, ch 1, turn. [6] Rows 2–5: Sc across, ch 1, turn. [6]
FO, leaving a 12" (30.5 cm) tail. The piece is a 6-st × 5-row rectangle ≈ 1¼" × 1" (3 × 2.5 cm).
Optional outline: with the same tail, sl st around the outer edge for a cleaner frame, working 2 sl st in each corner.
Assembly
Use matching yarn tails and a yarn needle. Pin first, then sew with mattress stitch or whip stitch, taking only the outer loops so seams stay flat.
1. Head to body. Match the 30-st openings. Align so the face looks forward (eyes centered above the belt buckle line). Sew all the way around, adding a last pinch of stuffing at the neck before closing so the head does not wobble.
2. Arms. Flatten each 18-st opening. Sew one arm to each side of the body, tops of the sleeves at Body Rnds 22–24 (just under the neck decrease), thumbs (the hand “front”) facing forward. The white cuffs should sit about halfway down the torso.
3. Nose. Center the nose on Head Rnds 13–14, midway between and just below the eyes. Sew around, pulling slightly so the nose sits snug against the face.
4. Mustache. Sew the pinched center directly under the nose. Tack each wing with two small stitches so it lifts in a classic curl.
5. Beard. Place the narrow top edge of the beard immediately under the mustache. Wrap the sides up onto the cheeks, ending roughly in line with the outer corners of the eyes, at about Head Rnds 14–16. Sew the top and side edges only; leave the scalloped hem free.
6. Hair. Center the 24-st band across the back of the head, top edge at about Head Rnd 8. Sew around all four edges. The short ends should peek out in front of where the hat brim will sit.
7. Eyebrows. Sew one 5-st chain above each eye, following a slight outer tilt, on Head Rnds 9–10.
8. Hat. Fold the white brim up (4 rnds). Tilt the hat so the point falls to Santa’s right or left. Seat the folded brim on the head covering Head Rnds 7–10 (above the eyes, overlapping the hair band). Sew through the inner layer of the brim all the way around so the fold stays put. Do not stuff the upper third of the cone if you want a floppy point.
9. Pompom. Sew the white ball to the hat tip. Tack the pompom to the side of the head or shoulder with one hidden stitch if you want the flop to stay put.
10. Belt buckle. Center the gold rectangle on the front of the 3-rnd black belt. Sew around the edge.
11. Cheeks (optional). With pink yarn or floss, add a small satin-stitch oval on each cheek, just above the beard line, or cut two ½" (1.3 cm) felt circles and stitch them on.
12. Eyes, if embroidered. With black, work a French knot or a small satin-stitch oval in the same spots given for safety eyes (between Head Rnds 11 and 12, 8 sts apart). Add a tiny white highlight stitch on each eye if you like.
Finishing
- Weave in every remaining end, burying them inside the stuffing.
- Steam the hat brim and beard lightly from the wrong side if the acrylic allows; do not crush the stuffing.
- To help Santa stand: pack the boots and legs very firmly and keep the cardboard soles in place. Stand him on a flat surface and massage the hip stuffing until his weight sits over both feet. If he still tips, add a small pouch of poly pellets in each boot before the final packing (not for toys used by young children).
- Expected standing height with this gauge: about 14" (35.5 cm) to the hat fold, 15" (38 cm) to a straight-up hat tip, 13½" (34 cm) with a fully flopped hat — all within the 12–15" (30.5–38 cm) target.
Your Santa is finished. Hang a tiny stitched gift bag from one hand, or leave him as he is — ready for the mantel.
Disclaimer: This pattern was generated by AI and should be reviewed for accuracy before use. While we strive for quality, AI-generated content may contain errors. Please verify measurements, stitch counts, charts, and instructions before beginning your project. Generated by purlJam.uk
Love this pattern?
Save this pattern to your free PurlJam libraryAccess your pattern anytime
Bookmark this page to access your pattern anytime