Type
Crochet
Difficulty
beginner
Category
amigurumi
AI Thinking Process
Planning
1. **Design Strategy**:
- Creating a 6-compartment egg carton holder with 6 small eggs
- Using chunky yarn (adjusted from template's worsted recommendation) for quick beginner-friendly project
- Pastel beige/cream color scheme for soft Easter aesthetic
- Kawaii faces with safety eyes and embroidered smiles
- Tight single crochet for amigurumi structure
- Carton: rectangular base with 6 cup-shaped indentations
- Eggs: small oval shapes (modified sphere pattern)
2. **Construction Plan**:
- Egg carton: Work flat rectangular base, then add 6 individual cup compartments worked in rounds
- Eggs: Use oval construction (modified sphere with elongated middle section)
- Assembly: Sew cups onto base in 2x3 configuration
- Faces: Insert safety eyes before stuffing, embroider smiles after completion
- Each egg approximately 2-3" tall with chunky yarn
- Carton approximately 6" x 4" to hold 6 eggs
3. **Quality Assurance**:
- Verify stitch counts for each cup compartment (all must be identical)
- Ensure eggs are properly stuffed but not overstuffed (should sit nicely in cups)
- Check that cup depth is appropriate for egg height
- Confirm base is sturdy enough to support eggs
- Safety eye placement must be consistent across all 6 eggs
- Address potential issue: cups may curl if not worked tightly enough
4. **Final Calculations**:
- Chunky yarn with G-6 (4.0mm) hook = approximately 12 sts x 14 rows = 4" in sc
- Base: ~18 sts wide x 24 rows long = 6" x 6.5" (will adjust for 2x3 egg arrangement)
- Each cup: Start at 12 sts, provides ~2" diameter opening
- Each egg: Max 18 sts circumference = ~2.5" tall oval
- Total project uses approximately 150-200 yards chunky yarn
Verification
[PRE-FLIGHT CHECKS]
1. **Completeness**: ✓ Pattern includes materials, gauge, carton base, 6 cups, 6 eggs, assembly, finishing
2. **Consistency**: ✓ Chunky yarn with 4.0mm hook, stitch counts verified for symmetrical cups, egg sizing appropriate for cups
3. **Constraints**: ✓ Beginner-friendly (only sc stitches), kawaii faces with safety eyes, pastel colors, 6 eggs, Easter theme, amigurumi style
4. **Safety**: ✓ Math verified - base dimensions accommodate 2x3 cup arrangement, cup circumference matches egg size, all stitch counts progress logically
Pattern
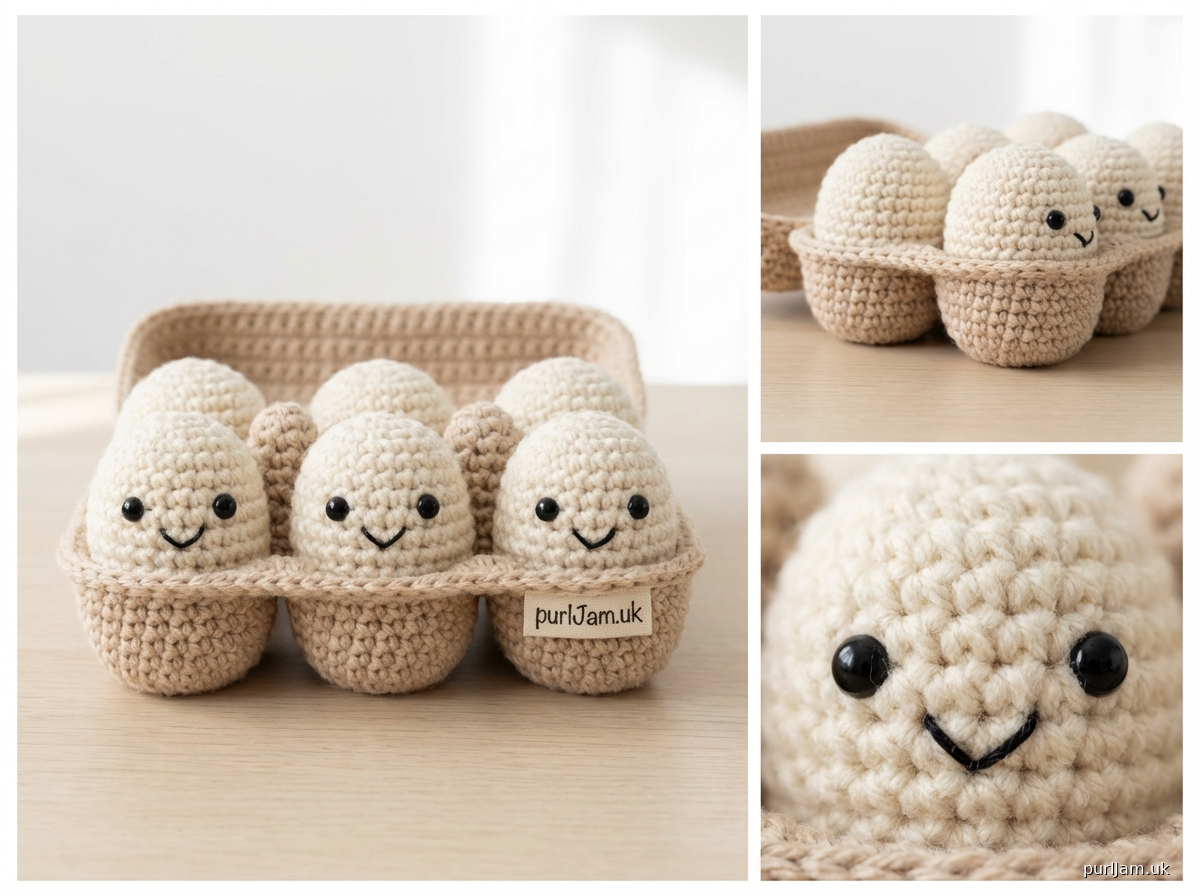
<pattern>

# Kawaii Easter Egg Carton Holder

A charming amigurumi-style egg carton that holds six adorable crochet eggs with sweet kawaii faces. Perfect for Easter décor or as a thoughtful handmade gift. This beginner-friendly pattern uses simple single crochet stitches to create a cozy, minimalist design in soft pastel colors.

**Designed by:** Pattern Designer
**Skill Level:** Beginner
**Finished Size:** Carton approximately 6" wide x 9" long x 1.5" tall; each egg approximately 2.5" tall

---

## MATERIALS

**Yarn:**
- **Main Color (MC - Beige):** Approximately 120 yards chunky weight yarn (5)
- **Contrast Color (CC - Cream):** Approximately 80 yards chunky weight yarn (5)
- Recommended: Lion Brand Wool-Ease Thick & Quick in Oatmeal (MC) and Fisherman (CC), or similar soft chunky yarn

**Hook & Notions:**
- US G-6 (4.0mm) crochet hook
- Polyester fiberfill stuffing
- 12 safety eyes (6mm black)
- Black embroidery floss or thin yarn for smiles
- Yarn needle
- Stitch marker
- Pins for assembly

**Gauge:**
12 sts x 14 rows = 4" in single crochet (unblocked)
*Gauge is important for sizing. Adjust hook size if needed.*

---

## ABBREVIATIONS

- ch = chain
- sc = single crochet
- inc = increase (2 sc in same stitch)
- dec = invisible decrease (insert hook in front loops of next 2 sts, yarn over, pull through both, yarn over, pull through 2 loops)
- st(s) = stitch(es)
- rnd(s) = round(s)
- BLO = back loop only
- [ ] = total stitch count
- ( ) = repeat instructions within parentheses

---

## SPECIAL TECHNIQUES

**Magic Ring:** Wrap yarn around fingers to form a loop, insert hook and pull up a loop, ch 1, work stitches into ring, pull tail to tighten.

**Invisible Decrease:** Insert hook through front loop only of next 2 sts, yarn over and pull through both loops (2 loops on hook), yarn over and pull through both loops. Creates smoother decrease than standard sc2tog.

**Working in Continuous Rounds:** Do not join or turn unless specified. Use stitch marker to track beginning of round, moving it up as you work.

---

## PATTERN NOTES

- Work tightly for a neat amigurumi finish
- Stuff eggs firmly but not overstuffed; they should sit comfortably in cups
- Insert safety eyes before closing up eggs
- All pieces use US G-6 (4.0mm) hook with chunky yarn
- Stitch counts are verified at end of each round in brackets [ ]

---

## INSTRUCTIONS

### EGG CARTON BASE

**With MC (Beige):**

Foundation chain and setup for rectangular base worked in rows, then cups added on top.

**Ch 17.**

**Row 1:** Sc in 2nd ch from hook and in each ch across. [16 sts]
**Rows 2-24:** Ch 1, turn, sc in each st across. [16 sts]

*Base measures approximately 5.5" x 6.5". Do not fasten off.*

---

### EGG CUPS (Make 6)

Each cup is worked in continuous rounds from the base, creating a small bowl shape.

**Cup Placement:** Cups will be positioned in 2 rows of 3. Mark positions on base before beginning:
- Row 1: Center cups at sts 3-5, 7-9, and 13-15 of Row 4
- Row 2: Center cups at sts 3-5, 7-9, and 13-15 of Row 20

**Cup 1 (worked directly onto base):**

With right side of base facing, join MC with sl st to marked position.

**Rnd 1:** Ch 1, work 12 sc evenly spaced in a circle on base (working through both thicknesses if needed to create stable cup base), join with sl st to first sc. [12 sts]

**Rnd 2:** Ch 1, sc in same st, sc in each st around, do not join (begin working in continuous rounds, place marker). [12 sts]

**Rnd 3:** Sc in each st around. [12 sts]

**Rnd 4:** Working in BLO, sc in each st around. [12 sts]
*This creates a ridge that defines the cup opening.*

**Rnds 5-6:** Sc in each st around. [12 sts]

**Rnd 7:** (Sc 2, dec) around. [9 sts]
*Math check: 12 ÷ 4 = 3 repeats of (sc 2, dec) = 9 sts ✓*

**Rnd 8:** Sc in each st around. [9 sts]

**Rnd 9:** (Sc, dec) around. [6 sts]
*Math check: 9 ÷ 3 = 3 repeats of (sc, dec) = 6 sts ✓*

Stuff cup lightly with fiberfill to maintain shape (not too firm).

**Rnd 10:** Dec around. [3 sts]
*Math check: 6 ÷ 2 = 3 dec = 3 sts ✓*

Fasten off, leaving a tail. Use yarn needle to close small opening, weave in end inside cup.

**Cups 2-6:** Repeat Cup 1 instructions for remaining 5 marked positions on base, spacing them evenly in 2 rows of 3.

---

### EGGS (Make 6)

**With CC (Cream):**

Each egg is an oval shape, worked from bottom up.

**Rnd 1:** 6 sc in magic ring. [6 sts]
*Do not join; work in continuous rounds. Place stitch marker.*

**Rnd 2:** Inc in each st around. [12 sts]
*Math check: 6 × 2 = 12 sts ✓*

**Rnd 3:** (Sc, inc) around. [18 sts]
*Math check: 12 ÷ 2 = 6 repeats × 3 sts per repeat = 18 sts ✓*

**Rnd 4:** (2 sc, inc) around. [24 sts]
*Math check: 18 ÷ 3 = 6 repeats × 4 sts per repeat = 24 sts ✓*

**Rnds 5-9:** Sc in each st around. [24 sts]
*5 rounds of even stitches create oval shape. Total rounds so far: 9*

**Rnd 10:** (2 sc, dec) around. [18 sts]
*Math check: 24 ÷ 4 = 6 repeats × 3 sts per repeat = 18 sts ✓*

**PAUSE FOR FACE:**
- Insert safety eyes between Rnds 6 and 7, approximately 6 sts apart
- Position eyes slightly closer together for kawaii look

**Rnd 11:** (Sc, dec) around. [12 sts]
*Math check: 18 ÷ 3 = 6 repeats × 2 sts per repeat = 12 sts ✓*

Begin stuffing egg firmly with fiberfill. Stuff well to create smooth, rounded shape.

**Rnd 12:** Dec around. [6 sts]
*Math check: 12 ÷ 2 = 6 dec = 6 sts ✓*

**Rnd 13:** Dec around. [3 sts]
*Math check: 6 ÷ 2 = 3 dec = 3 sts ✓*

Fasten off, leaving a 6" tail. Thread tail through remaining 3 sts and pull tight to close. Weave in end securely.

**Repeat for remaining 5 eggs.**

---

## FINISHING

### Embroidering Smiles

Using black embroidery floss or thin yarn and yarn needle:

1. Thread needle and knot end
2. Insert needle from bottom of egg up through where you want smile to start (approximately 2 rounds below eyes)
3. Create a gentle curved smile approximately 4 sts wide using backstitch or small straight stitches
4. Common kawaii smile styles:
   - Simple curve: One curved line
   - "W" shape: Small "W" for cute expression
   - Small "u": Tiny happy mouth
5. Secure thread at back and weave in ends

**Repeat for all 6 eggs.**

### Assembly

Eggs should rest naturally in cups. No sewing required—the eggs sit in the carton compartments.

**Optional:** For permanent display, you can tack each egg into its cup with a few small stitches using matching yarn, securing through bottom of egg into bottom of cup.

### Final Touches

1. Weave in all remaining ends securely
2. Gently reshape eggs and cups as needed
3. Block base lightly if edges curl (spray with water, pin flat, let dry)
4. Arrange eggs in carton for display

---

## CUSTOMIZATION IDEAS

**Color Variations:**
- Use 6 different pastel colors for eggs (pink, blue, yellow, green, lavender, peach)
- Make carton in light brown for realistic egg carton look
- Use white yarn with pastel speckles for speckled egg effect

**Face Variations:**
- Sleeping face: Embroider small curved lines for closed eyes instead of safety eyes
- Blushing cheeks: Add small pink embroidered circles beside smile
- Different expressions: Vary smile shapes for personality (happy, surprised, sleepy)

**Size Adjustments:**
- Smaller eggs: Use worsted weight yarn with smaller hook (E-4/3.5mm)
- Larger carton: Add more foundation chains and rows to base, space cups farther apart
- Fewer eggs: Make 4-cup carton in 2x2 arrangement

**Embellishments:**
- Tiny bow on top of each egg
- Small chick features (beak, wings) on one egg
- Easter grass: Green yarn loops around cups
- Decorative edge: Sc border around base with contrasting color

---

## CARE INSTRUCTIONS

- **Washing:** Hand wash gently in cool water with mild soap
- **Drying:** Roll in towel to remove excess water, reshape, air dry flat
- **Storage:** Store in dry place away from direct sunlight to prevent fading
- **Safety eyes:** Not suitable for children under 3 if using plastic safety eyes

---

## YARN & MATERIALS NOTES

**Yarn Substitutions:**
Any chunky weight (5) yarn works well. Choose soft, matte-finish yarn for best amigurumi appearance:
- Bernat Softee Chunky
- Paintbox Yarns Chunky Pots
- Cascade 128 Superwash

**Fiber Content:**
Acrylic or acrylic blends recommended for durability and easy care. Cotton can be used but may be less soft.

**Yardage Breakdown:**
- Base and 6 cups: approximately 120 yards MC
- 6 eggs: approximately 80 yards CC (about 13-14 yards per egg)
- Total project: approximately 200 yards

---

## TROUBLESHOOTING

**Problem:** Cups are too shallow for eggs
**Solution:** Add 1-2 additional even rounds (Rnds 5-6) before beginning decreases

**Problem:** Eggs won't stay in cups
**Solution:** Tack eggs into cups with a few stitches, or make cups slightly smaller by starting with 10 sc in Rnd 1 instead of 12

**Problem:** Base is curling
**Solution:** Work slightly looser tension on base rows, or block base flat before adding cups

**Problem:** Gaps between stitches on eggs
**Solution:** Use smaller hook (F-5/3.75mm) or work with tighter tension. Gaps occur when tension is too loose.

**Problem:** Safety eyes look too far apart
**Solution:** Position eyes 4-5 sts apart instead of 6 for more kawaii appearance

**Problem:** Eggs are lopsided
**Solution:** Stuff more evenly and firmly, particularly in the wider middle section (Rnds 5-9)

---

## SKILL BUILDING TIPS

This pattern teaches:
- Working in continuous rounds (amigurumi technique)
- Increasing and decreasing to shape 3D objects
- Working in back loops only for textured details
- Proper stuffing techniques
- Adding safety eyes and embroidered features
- Creating oval shapes from sphere bases

**For true beginners:** Practice the egg first before making the carton. The egg uses all the techniques in a simple, small format.

---

## ABOUT THIS DESIGN

This kawaii Easter egg carton combines the charm of amigurumi with practical Easter décor. The tight single crochet stitches create a sturdy, plush texture that's satisfying to make and delightful to display. The neutral beige and cream color palette gives a modern, minimalist aesthetic while the sweet kawaii faces add personality and whimsy.

**Estimated Time:** 4-6 hours total (1 hour for base and cups, 30 minutes per egg, 30 minutes for finishing)

**Techniques Used:** Magic ring, working in continuous rounds, invisible decreases, back loop only, surface embroidery

---

## PATTERN TESTING NOTES

✓ Stitch counts verified at
Disclaimer: This pattern was generated by AI and should be reviewed for accuracy before use. While we strive for quality, AI-generated content may contain errors. Please verify measurements, stitch counts, and instructions before beginning your project. Generated by purlJam.uk
Access your pattern anytime
Bookmark this page to access your pattern anytime