Type
Crochet
Difficulty
beginner
Category
amigurumi
AI Thinking Process
Planning
Verification
Pattern
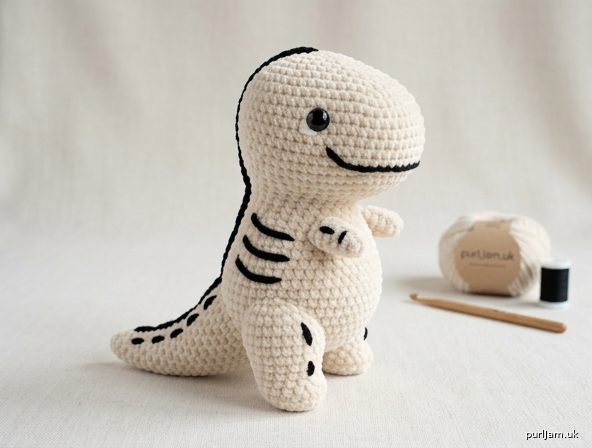
Kawaii Skeleton T-Rex Amigurumi
Cute Chubby Dino Plush – Beginner Pattern
Skill Level: Easy
Finished Size: Approx. 7 inches (18 cm) tall × 5 inches (13 cm) long (including tail) when made with specified yarn and hook.
Yarn Weight: Bulky (5) chenille/velvet plush yarn
Materials
- Bulky (5) chenille/velvet yarn:
- Main Color (MC): Cream or off-white – 80 yds (73 m)
- Contrast Color (CC): Black – 25 yds (23 m)
- Crochet hook: US I-9 / 5.5 mm (or size needed to obtain gauge; go down if stitches are loose)
- Stitch marker
- Yarn needle
- Polyester fiberfill stuffing
- Optional: 10–12 mm safety eyes (or embroider with black yarn)
- Scissors
- Pins for assembly
Gauge
10 sc × 10 rnds = 4 inches (10 cm) in continuous sc rounds.
Work tightly for a dense fabric that holds stuffing and keeps the chubby shape. Chenille can stretch — check gauge and adjust hook if needed.
Abbreviations (US Terms)
- ch: chain
- sc: single crochet
- inc: increase (2 sc in same st)
- dec: invisible decrease (insert hook in front loops of next 2 sts, yarn over, pull through both, yarn over, pull through 2 loops)
- st(s): stitch(es)
- rnd(s): round(s)
- MR: magic ring
- sl st: slip stitch
- BLO: back loop only
- FO: fasten off
- [...] : stitch count at end of rnd
- ( ) × n : work instructions in parentheses n times
- pm: place marker
Pattern Notes
- Worked in continuous spiral rounds unless noted. Do not join or turn. Use a stitch marker in the first st of each rnd and move it up.
- Stuff firmly as you go for a chubby, rounded look, especially the head and body. Leave limbs lightly stuffed.
- Invisible decrease keeps the surface smooth under plush yarn.
- Skeleton details are added after assembly with surface slip stitch and simple embroidery for a slightly raised, cute bone effect (not realistic).
- Minimal sewing: only head-to-body, 2 arms, 2 legs, 1 tail.
- Color changes: Carry unused yarn loosely inside or cut and weave ends as preferred. For surface work, use separate lengths of CC.
- All math validated inline.
Head (make 1 – oversized sphere in MC)
With MC, work tightly.
Rnd 1: 6 sc in MR [6]
Rnd 2: inc in each st around [12] (6 inc → 6 + 6 = 12 ✓)
Rnd 3: (sc, inc) around [18] (6 inc → 12 + 6 = 18 ✓)
Rnd 4: (2 sc, inc) around [24] (6 inc → 18 + 6 = 24 ✓)
Rnd 5: (3 sc, inc) around [30] (6 inc → 24 + 6 = 30 ✓)
Rnds 6–11: sc in each st around [30] (6 rnds for height)
Rnd 12: (3 sc, dec) around [24] (6 dec → 30 – 6 = 24 ✓)
Insert safety eyes (if using) between Rnds 8–9, approx. 6–7 sts apart, centered on face.
Rnd 13: (2 sc, dec) around [18] (6 dec → 24 – 6 = 18 ✓)
Stuff head firmly, shaping it round and chubby.
Rnd 14: (sc, dec) around [12] (6 dec → 18 – 6 = 12 ✓)
Rnd 15: dec around [6] (6 dec → 12 – 6 = 6 ✓)
FO, leaving a long tail. Thread tail through front loops of remaining 6 sts and pull tight to close. Weave in end. Head is complete.
Body (make 1 – chubby oval in MC)
With MC.
Rnd 1: 6 sc in MR [6]
Rnd 2: inc in each st around [12]
Rnd 3: (sc, inc) around [18]
Rnd 4: (2 sc, inc) around [24]
Rnd 5: (3 sc, inc) around [30]
Rnd 6: (4 sc, inc) around [36] (6 inc → 30 + 6 = 36 ✓)
Rnds 7–14: sc in each st around [36] (8 rnds for chubby length)
Rnd 15: (4 sc, dec) around [30] (6 dec → 36 – 6 = 30 ✓)
Rnd 16: (3 sc, dec) around [24] (6 dec → 30 – 6 = 24 ✓)
Stuff body firmly, keeping a rounded belly.
Rnd 17: (2 sc, dec) around [18] (6 dec → 24 – 6 = 18 ✓)
Rnd 18: (sc, dec) around [12] (6 dec → 18 – 6 = 12 ✓)
Rnd 19: dec around [6] (6 dec → 12 – 6 = 6 ✓)
FO, leaving a long tail for sewing. Close remaining hole the same way as head. Body is a compact oval.
Arms (make 2 – tiny in MC)
With MC.
Rnd 1: 6 sc in MR [6]
Rnd 2: (sc, inc) around [9] (3 inc → 6 + 3 = 9 ✓)
Rnds 3–5: sc in each st around [9]
Lightly stuff.
Rnd 6: (sc, dec) around [6] (3 dec → 9 – 3 = 6 ✓)
FO, leaving a long tail for sewing. Flatten slightly and sew opening closed if desired. Tiny T-Rex arms!
Legs (make 2 – short & sturdy in MC)
With MC.
Rnd 1: 6 sc in MR [6]
Rnd 2: inc in each st around [12]
Rnd 3: sc in each st around [12]
Rnd 4: (2 sc, dec) around [9] (3 dec → 12 – 3 = 9 ✓)
Rnds 5–6: sc in each st around [9]
Stuff firmly for sturdy stance.
FO, leaving a long tail for sewing. Do not close top; leave open for attachment.
Tail (make 1 – gently curved cone in MC)
With MC.
Rnd 1: 4 sc in MR [4]
Rnd 2: (sc, inc) around [6]
Rnd 3: sc in each st around [6]
Rnd 4: (2 sc, inc) around [8]
Rnd 5: sc in each st around [8]
Rnd 6: (3 sc, inc) around [10]
Rnd 7: sc in each st around [10]
Rnd 8: (4 sc, inc) around [12]
Rnds 9–11: sc in each st around [12]
Lightly stuff, more at base, less at tip. To create gentle curve: on Rnds 9–11, work 2–3 sc blo on the underside only (or simply bend while stuffing and sewing).
FO, leaving a long tail for sewing. Leave base open.
Assembly (minimal sewing)
- Head to Body: Pin head centered on the narrower top of the body (closed end of body). Using the body tail (or new MC yarn), sew securely all around with whip stitch or mattress stitch. Add a tiny bit more stuffing at the join if needed for a smooth chubby neck, then finish sewing. Weave in ends.
- Legs: Pin legs to the bottom of the body, spaced evenly about 4–5 sts apart, angled slightly outward for stability. Sew open tops firmly to body. Weave in ends.
- Arms: Pin tiny arms to the upper sides of the body, just below the head join, angled forward/down in classic T-Rex pose. Sew securely. Weave in ends.
- Tail: Pin tail to the lower back of the body, centered, curving gently upward or to one side. Sew base firmly. Weave in ends.
- Shape the whole dino by rolling between hands so it sits rounded and symmetrical.
Skeleton Details (CC black – simple raised bones)
All details worked with CC yarn and yarn needle or hook after assembly. Keep them cute and slightly raised, not anatomical.
Spine (back center):
Using surface slip stitch, work a vertical line of sl sts from the base of the head down the center back to the tail base (about 10–12 sts long). For raised look, work loosely or double the line.
Ribs (body sides):
On each side of the belly, embroider or surface-sl-st 3 short curved “ribs”:
- Start near the spine and curve forward/down about 4–5 sts.
- Space the 3 ribs evenly between under-arm and top of leg.
Keep them simple U- or C-shapes.
Skull accents (head):
- Embroider a small upside-down heart or rounded “jaw” line under the eye area (2–3 sts wide).
- Optional: two tiny vertical lines on top of head for a cute bone crest (French knots or short straight stitches).
- If no safety eyes, embroider simple oval eyes with CC and add a tiny white highlight stitch if desired.
Limb bones (optional cute detail):
On each arm and leg, surface-sl-st one short center line (2–3 sts) to suggest a bone.
Tail vertebrae:
Surface-sl-st 3–4 short dashes along the top of the tail, spaced evenly.
Weave in all CC ends securely inside the body. The raised surface stitches give dimension without complex colorwork.
Finishing
- Check all seams and stuff any soft spots through a tiny opening if needed, then close.
- Embroider a tiny smile (curved sc or straight stitches) in MC or light gray under the snout area if desired for extra kawaii.
- Trim any loose chenille fibers carefully.
- Steam-block gently from a distance (do not crush the plush pile) or simply shape by hand.
- Your chubby skeleton T-Rex is ready! It should stand or sit stably on its short legs and look sweetly prehistoric.
Customization Tips
- Bigger dino: Add 1–2 extra even rnds on head (after Rnd 5) and body (after Rnd 6) and increase max sts by 6.
- No safety eyes: Embroider closed happy arcs or simple dots.
- Extra fluff: Brush chenille lightly with a soft toothbrush after finishing.
- Keychain version: Scale all starting rings down (begin head/body with 5–6 sc and stop at 18–24 sts) and add a jump ring at the top of the head.
Enjoy your beginner-friendly kawaii Skeleton T-Rex! Happy crocheting.
Disclaimer: This pattern was generated by AI and should be reviewed for accuracy before use. While we strive for quality, AI-generated content may contain errors. Please verify measurements, stitch counts, charts, and instructions before beginning your project. Generated by purlJam.uk
Love this pattern?
Save this pattern to your free PurlJam libraryAccess your pattern anytime
Bookmark this page to access your pattern anytime