Type
Knitting
Difficulty
intermediate
Category
custom
AI Thinking Process
Planning
Verification
Pattern
Keepsake Stripes Stocking
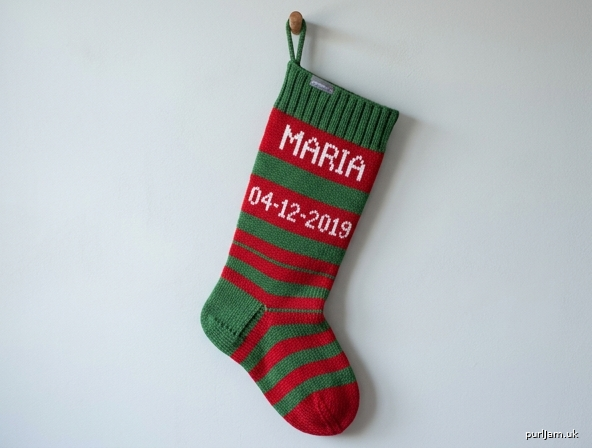
A large mantel Christmas stocking in smooth worsted yarn. A green ribbed cuff sits above bold red and green stripes. The name is knitted in white on the first red band, and the birthdate is knitted in white on the next red band, both centered on the front. The heel is a reinforced green flap with a turned heel and gusset. The foot continues the stripes and ends in a solid red toe.
This is a decorative gift stocking, not a sock to wear. One size.
Finished Measurements
- Circumference: 17½ inches (44.5 cm)
- Cuff depth: 3 inches (7.5 cm)
- Cuff to top of heel: 15½ inches (39.5 cm)
- Foot (back of heel to toe): 12 inches (30.5 cm)
- Overall length: about 27½ inches (70 cm), excluding the hanging loop
Materials
- Green: 250 yards (229 m) worsted weight yarn (CYC #4)
- Red: 230 yards (210 m) worsted weight yarn (CYC #4)
- White: 50 yards (46 m) worsted weight yarn (CYC #4), for the knitted-in lettering
Use a smooth, elastic yarn (wool or wool blend is ideal) so the letters stay crisp. Fuzzy, highly textured, or very dark-heathered yarn will blur the name and date. A wool-acrylic blend is a practical choice if the stocking will be washed often.
Needles
- US 7 (4.5 mm) circular needle, 32 inches (80 cm) long, for magic loop, or a set of US 7 (4.5 mm) double-pointed needles, for the cuff
- US 8 (5 mm) circular needle, 32 inches (80 cm) long, for magic loop, or a set of US 8 (5 mm) double-pointed needles, for the body
- The same US 8 (5 mm) needles, or a shorter circular, for the toe when the stitch count drops
Use whatever needle style you prefer for small circumferences. The gauge, not the needle brand, is what matters. If your stranded fabric is tighter than your solid stockinette, use a US 9 (5.5 mm) needle for the lettering rounds only.
Notions
- Stitch markers (one distinct beginning-of-round marker, plus two side markers)
- Stitch holder or waste yarn
- Tapestry needle
- Graph paper and a pencil, for charting the name and date
- Optional: a small stitch marker or safety pin to mark center front
Gauge
20 stitches and 28 rounds = 4 inches (10 cm) in stockinette stitch in the round, blocked.
This is 5 stitches and 7 rounds per inch. Take time to check gauge. At this gauge, 88 stitches make a 17½-inch stocking. A tighter gauge makes a smaller stocking and may crowd the lettering.
Also work a small red-and-white stranded swatch. If the stranded swatch is narrower than the solid swatch, go up one needle size for colorwork rounds so the name bands do not pull in.
Skills
Intermediate: knitting in the round, stranded colorwork, a slipped-stitch heel flap, a short-row heel turn, gusset decreases, and Kitchener stitch.
Abbreviations
| Abbreviation | Meaning |
|---|---|
| BOR | beginning of round |
| CO | cast on |
| k | knit |
| k2tog | knit 2 together (right-leaning decrease) |
| p | purl |
| p2tog | purl 2 together |
| pm | place marker |
| rep | repeat |
| rnd(s) | round(s) |
| RS | right side |
| sl | slip |
| sm | slip marker |
| ssk | slip, slip, knit: slip 2 stitches knitwise one at a time, return them to the left needle, and knit them together through the back loops (left-leaning decrease) |
| st(s) | stitch(es) |
| WS | wrong side |
| wyib | with yarn in back |
| wyif | with yarn in front |
Pattern Notes
- The stocking is worked in the round from the cuff down. The beginning of the round is at center back. The first 44 stitches are the back (heel) panel. The last 44 stitches are the front (instep) panel, where the name and date are centered.
- Stripe order on the leg, top to bottom: 16-round red name band, 8-round green stripe, 16-round red date band, then 8-round green and 8-round red stripes as written. Green stripes are solid green. Red lettering bands are red with the name or date knitted in white. Plain red stripes are solid red.
- A separate lettering chart is not required. Chart the name and date before you cast on, using the Lettering Guide. If a lettering chart is supplied later, use it for the white motif and keep the colors, placement, and round counts given here.
- On lettering rounds, carry white behind the work all the way around. On the back 44 stitches, catch the white float every 4 stitches so gifts cannot snag long floats. The back is the wall side when the stocking is hung. Keep floats loose. Tight floats will pucker the name.
- You may carry the unused stripe color up the wrong side at the start of the round across an 8-round stripe (about 1 inch / 2.5 cm). Do not carry a color across a 16-round band. Cut white at the end of each lettering band. Cut green before each 16-round red band and rejoin it afterward.
- Slip all slipped stitches purlwise unless told otherwise. The ssk definition above is the exception: those two stitches are slipped knitwise.
Lettering Guide
Prepare this before you cast on. The stocking is readable without any other chart.
Where the words go
- Name: first red band (the red band just under the cuff), knitted in white on red.
- Birthdate: second red band, knitted in white on red.
- Both sit on the front 44 stitches only. The back 44 stitches stay red.
- Use a short date, such as
04-12-2019or12.25.18. A written month will not fit the front panel.
How to chart the words
On graph paper, draw each character in a box 3 or 4 stitches wide and 9, 10, or 11 rounds tall. Leave 1 blank column between characters. Fill the squares that should be white. Leave the background squares red. Use a simple block style: thick enough to read across a room, with no fine serifs.
Every round of the stocking is a right-side round. Read each chart row from right to left, and work the chart from bottom to top.
Width check
The front panel is 44 stitches. Keep the charted text, including the gaps between characters, to 40 stitches or fewer, so a little red shows at each side.
Comfortable limits:
- 4-stitch characters with 1-stitch gaps: up to 8 characters (a 5-character name such as MARIA uses 5 × 4 + 4 gaps = 24 stitches).
- 3-stitch characters with 1-stitch gaps: up to 10 characters (a date such as
12-25-2018uses 10 × 3 + 9 gaps = 39 stitches).
If the name is longer than the panel, use a nickname, initials, or the narrower letter. Do not squeeze letters onto the back panel; those stitches become the heel.
Centering
Let W be the number of stitches in the charted text, including gaps between letters.
- Side margin = (44 − W) ÷ 2.
- If 44 − W is even, work that many plain red stitches, then the chart, then the same number of plain red stitches.
- If 44 − W is odd, work the smaller margin before the chart and the larger margin after it (one extra plain red stitch at the end of the front panel).
Example: a 5-letter name in 4-stitch letters with 1-stitch gaps uses 24 stitches. (44 − 24) ÷ 2 = 10. Across the front 44 stitches, knit 10 red, work 24 chart stitches, knit 10 red. (10 + 24 + 10 = 44 ✓)
Height
Each lettering band is 16 rounds. Center the letters in that band.
- Margin rounds = 16 − letter height.
- If the margin is even, work half of it in plain red, work the lettering, then work the other half in plain red.
- If the margin is odd, work the extra plain round first (it sits at the top of the band when the stocking hangs).
Example: 11-round letters leave a 5-round margin. Work 3 rounds plain red, 11 rounds of lettering, then 2 rounds plain red. (3 + 11 + 2 = 16 ✓)
Work the name band and the date band the same way. If a short name and a short date both fit in 40 stitches, you may put them on the first red band, one above the other, and work the second red band plain. The published layout is one line of name, then one line of date.
Instructions
Cuff
With green and the smaller needles (US 7 / 4.5 mm), CO 88 stitches using the long-tail cast-on. Join to work in the round, being careful not to twist. Place the BOR marker for center back.
Rib round: *K2, p2; repeat from * to end.
Work 22 rounds in rib, or until the cuff measures 3 inches (7.5 cm). (22 repeats of k2, p2 use 88 stitches ✓)
Change to the larger needles (US 8 / 5 mm). Knit 1 round in green.
On the next round, place a side marker after 44 stitches. The stitches just worked are the back panel. The remaining 44 stitches are the front panel. Optional: place a pin 22 stitches into the front panel to mark center front. Keep the side marker in place through the toe. The center-front pin is only a guide for centering the chart.
Leg
Join red. Do not cut green until you need to; you may carry it up the wrong side at BOR across the shorter stripes, but cut it before each 16-round band.
Name band (16 rounds, red with white lettering):
Join white when the lettering rounds begin. Work the back 44 stitches in red, catching the white float every 4 stitches. Work the front 44 stitches in red and white, with the chart centered as in the Lettering Guide. Cut white after the last lettering round of this band, leaving a 6-inch (15 cm) tail. Finish any remaining rounds of the 16 in solid red.
Next stripe: With green, knit 8 rounds.
Date band (16 rounds, red with white lettering):
Work as for the name band, using the birthdate chart. Cut white at the end of the lettering rounds.
Remaining leg stripes:
- With green, knit 8 rounds.
- With red, knit 8 rounds.
- With green, knit 8 rounds.
- With red, knit 8 rounds.
- With green, knit 8 rounds.
- With red, knit 8 rounds.
Leg rounds: 16 + 8 + 16 + 8 + 8 + 8 + 8 + 8 + 8 = 88 rounds, about 12½ inches (32 cm). (✓)
The leg should measure about 15½ inches (39.5 cm) from the cast-on edge to the needles. Cut red.
Heel Flap
The heel is worked flat on the back 44 stitches in green. Place the front 44 stitches on a holder or leave them resting on the cable.
Join green. The RS of the flap begins at BOR (center back edge of the heel stitches).
Row 1 (RS): *Sl 1 wyib, k1; repeat from * to end. Row 2 (WS): Sl 1 wyif, purl to end.
Repeat Rows 1 and 2 until you have worked 36 rows, ending with a WS row. The flap measures about 5 inches (13 cm).
The first stitch of every row is slipped, so each selvedge has 18 chain stitches to pick up later (36 rows ÷ 2 = 18 ✓). The other slipped stitches are the reinforcement in the middle of the flap. Do not pick those up as edge stitches.
Heel Turn
Continue with green. A gap is the small space, made by the turn, between the stitch you just worked and the unworked stitch beside it.
Row 1 (RS): Sl 1 wyib, k24, ssk, k1, turn. Row 2 (WS): Sl 1 wyif, p7, p2tog, p1, turn. Row 3 (RS): Sl 1 wyib, knit to 1 stitch before the gap, ssk, k1, turn. Row 4 (WS): Sl 1 wyif, purl to 1 stitch before the gap, p2tog, p1, turn.
Repeat Rows 3 and 4 until every heel stitch has been worked, ending with a WS row. 26 stitches remain.
Each of these rows decreases 1 stitch. Eighteen decrease rows take the flap from 44 stitches to 26 (44 − 18 = 26 ✓). If you finish the last WS row and still see a gap with an unworked stitch beyond it, work one more row to close it. You should end with 26 stitches and no gaps.
Cut green.
Gusset
Join red. You will resume working in the round. The foot stripe sequence is 8 rounds red, 8 rounds green, repeated, beginning with red. The setup round is Round 1 of the first red stripe.
Setup round: With RS facing, knit across the 26 heel stitches. Pick up and knit 18 stitches along the flap selvedge (one in each chain stitch). Pick up 1 extra stitch in the corner and knit it together with the first instep stitch to close the hole without adding a stitch. Knit across the 44 instep stitches. Pick up 1 stitch in the next corner and knit it together with the last instep stitch. Pick up and knit 18 stitches along the remaining flap selvedge. Knit 13 heel stitches and place the BOR marker here, at center sole.
Stitch count: 26 heel + 18 pickup + 44 instep + 18 pickup = 106 stitches. (✓)
Arrange them as 31 sole stitches, side marker, 44 instep stitches, side marker, 31 sole stitches. The old side marker from the leg can be reused; you need one marker at each end of the instep.
Decrease round: Knit to 3 stitches before the instep marker, k2tog, k1, sm, knit across the instep, sm, k1, ssk, knit to end. (2 stitches decreased)
Even round: Knit, slipping markers.
Work a decrease round every other round 9 times (18 rounds of alternating decrease and even rounds, after the setup round), while keeping the 8-round stripe sequence. Then work even.
Nine decrease rounds remove 18 stitches (9 × 2 = 18). 106 − 18 = 88 stitches: 22 sole stitches, marker, 44 instep stitches, marker, 22 sole stitches. (✓)
The first red stripe is the setup round plus the next 7 rounds. Continue 8 rounds green, 8 rounds red, and so on, without cutting the stripe sequence when the decreases end.
Foot
Continue even in the stripe pattern until the foot measures 8 inches (20.5 cm) from the back of the heel (the deepest point of the heel cup, not from the pickup line), ending after any completed round.
For a shorter gift stocking, you may stop earlier. The toe that follows adds about 4 inches (10 cm). The published foot length is 12 inches (30.5 cm).
Cut the stripe color if it is not red.
Toe
Join red if needed. Work the toe in solid red. Keep the side markers.
Decrease round: Knit to 3 stitches before the marker, k2tog, k1, sm, k1, ssk; repeat those decreases at the next marker, then knit to end. (4 stitches decreased)
Even round: Knit.
Repeat the last 2 rounds 10 more times (11 decrease rounds in all). 88 − 44 = 44 stitches remain (22 instep and 22 sole ✓).
Then repeat the decrease round only, every round, 7 times. 44 − 28 = 16 stitches remain: 8 instep stitches and 8 sole stitches (✓).
Stop. Cut red, leaving a 20-inch (51 cm) tail for grafting.
Finishing
Close the Toe
Move the 8 instep stitches to one needle and the 8 sole stitches to another, with the yarn coming from the back needle. Graft with Kitchener stitch:
- Front needle: insert the tapestry needle knitwise into the first stitch and slip it off. Insert purlwise into the next front stitch and leave it on.
- Back needle: insert purlwise into the first stitch and slip it off. Insert knitwise into the next back stitch and leave it on.
- Repeat until 1 stitch remains on each needle. Draw the yarn through those two stitches and fasten off.
Weave the tail through the graft once more and bring it to the inside.
Hanging Loop
With green and the larger needles, CO 3 stitches. Work i-cord until the cord measures 4 inches (10 cm): *Knit 3, slide the stitches to the other end of the needle, bring the yarn across the back; repeat from *. Bind off. Sew the ends together into a loop.
Sew the loop to the center back of the cuff, stitching through both the cast-on edge and the first rib round so it cannot pull free. The loop should not sit on the front, where it would crowd the name.
Ends and Blocking
Weave in all ends on the wrong side. Weave colorwork tails along the matching color so they do not show through the letters.
Wet-block or steam the stocking gently, following the yarn label. Stuff it with a rolled towel or a stocking blocker and dry it flat in shape. Do not stretch the lettering bands; let them relax to the gauge of the solid stripes. A light steam on the wrong side will even out the white stitches without flattening the rib.
When the stocking is dry, check that the name and date are centered on the front and that the loop hangs from center back.
Stitch-Count Check
| Stage | Stitches |
|---|---|
| Cast on and cuff | 88 |
| End of leg, before heel | 88 (44 back, 44 front) |
| Heel flap | 44, worked flat |
| End of heel turn | 26 |
| After gusset pickups | 106 |
| End of gusset | 88 |
| Start of every-round toe decreases | 44 |
| Before grafting | 16 (8 and 8) |
Care
Follow the yarn label. Wool can felt if agitated in hot water. Wash gently in cool water, press out the water in a towel, and reshape over a towel form. Store the stocking stuffed or flat so the stripes and the white lettering are not creased hard at the same place each year.
Disclaimer: This pattern was generated by AI and should be reviewed for accuracy before use. While we strive for quality, AI-generated content may contain errors. Please verify measurements, stitch counts, charts, and instructions before beginning your project. Generated by purlJam.uk
Love this pattern?
Save this pattern to your free PurlJam libraryAccess your pattern anytime
Bookmark this page to access your pattern anytime