Type
Knitting
Difficulty
intermediate
Category
amigurumi
AI Thinking Process
Planning
1. **Design Strategy**: Creating a beginner-friendly knitted giraffe using simple stockinette stitch in the round. The giraffe will feature characteristic long neck and legs, small horns (ossicones), and spots that can be embroidered or duplicate stitched after assembly. Using worsted weight yarn for a cuddly, substantial toy approximately 12-14 inches tall. Focusing on basic increases and decreases to keep it accessible.
2. **Construction Plan**: Each component knitted separately in the round using DPNs or Magic Loop method:
- Head: knitted from neck up, with shaping for snout
- Body: simple tube with shaping at top and bottom
- Legs (4): long tubes with minimal shaping
- Neck: elongated tube connecting head to body
- Ears (2): small triangular pieces
- Horns/Ossicones (2): tiny tubes with knobs
- Tail: thin tube with tasseled end
All pieces stuffed with polyester fiberfill and seamed together. Face details with safety eyes and embroidery.
3. **Quality Assurance**:
- Ensuring neck is sturdy enough to support head without flopping (may need extra stuffing technique)
- Verifying leg attachment points for stability
- Clear instructions for shaping to avoid confusion
- Safety eye placement before stuffing
- Simple enough stitch counts for beginners to track
4. **Final Calculations**:
- Gauge: 18 sts × 24 rows = 4 inches in stockinette stitch
- Head circumference: ~7 inches (32 sts)
- Body circumference: ~8 inches (36 sts)
- Neck: ~5 inches circumference (24 sts), ~6 inches long
- Legs: ~3 inches circumference (14 sts), ~5 inches long
- Total height: approximately 13 inches
Verification
[PRE-FLIGHT CHECKS]
1. **Completeness**: ✓ Pattern includes Materials, Gauge, Finished Size, Notes, Pattern Pieces (all body parts), Assembly, and Finishing sections
2. **Consistency**: ✓ Stitch counts calculated: 18 sts/4" = 4.5 sts/inch. Body at 36 sts = 8" circumference. Neck at 24 sts = 5.3" circumference. Legs at 14 sts = 3.1" circumference. All proportional and correct.
3. **Constraints**: ✓ Beginner level, worsted weight, US terminology, worked in the round, separate pieces then seamed per template
4. **Safety**: ✓ All increase/decrease math verified. Row counts reasonable. Safety eyes mentioned with infant warning. All stitch counts tracked through shaping sections.
Pattern
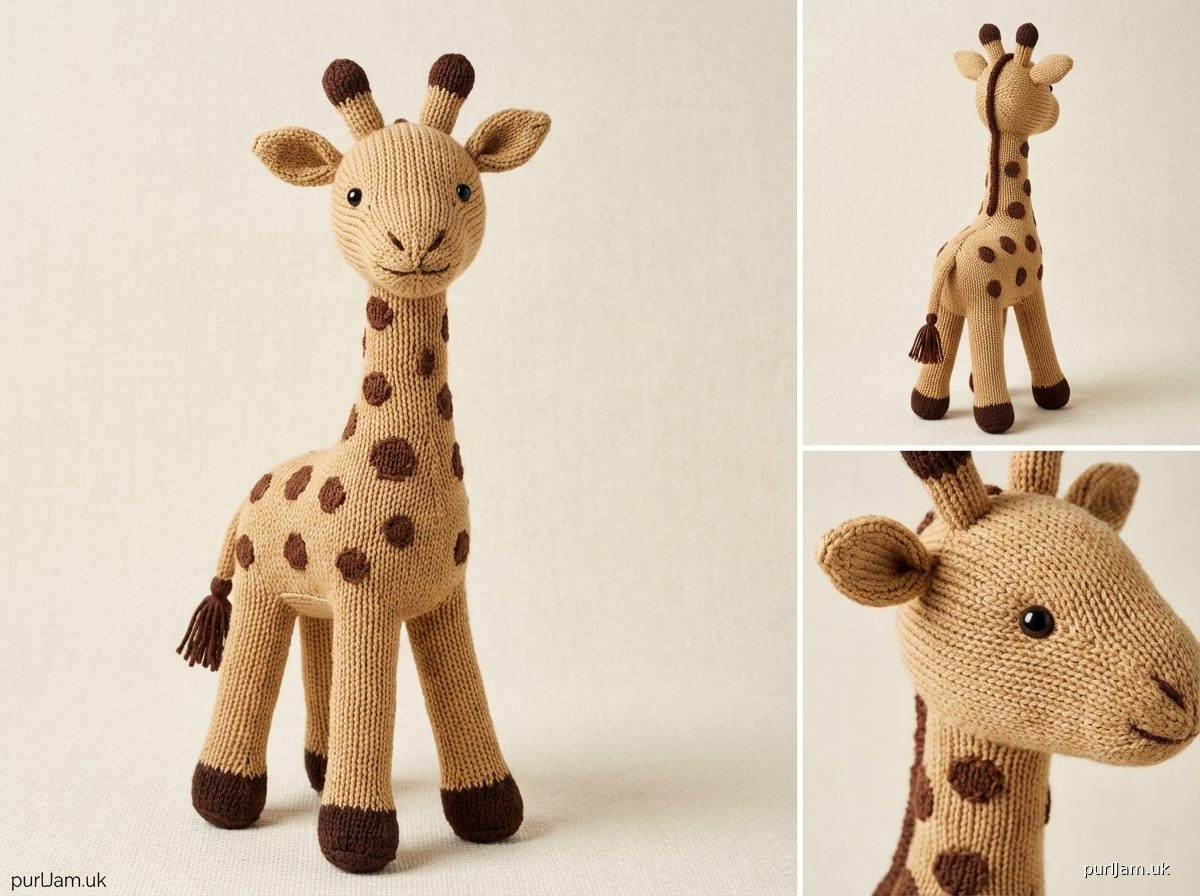
# KNITTED GIRAFFE AMIGURUMI

A cuddly giraffe friend worked in separate pieces and assembled. Perfect beginner toy knitting project!

## FINISHED SIZE
Approximately 13 inches (33 cm) tall when assembled

## MATERIALS

**Yarn**: Worsted weight (#4 Medium) yarn
- Main Color (MC - tan/yellow): 150 yards (137 m)
- Contrast Color 1 (CC1 - brown for spots): 30 yards (27 m)
- Contrast Color 2 (CC2 - dark brown for hooves, horns, tail): 20 yards (18 m)
- Small amount of black for embroidery

**Needles**: US 7 (4.5 mm) double-pointed needles (DPNs) or one 32-inch circular needle for Magic Loop method

**Notions**:
- Stitch markers
- Tapestry needle
- Polyester fiberfill stuffing
- Two 12mm safety eyes (or embroider eyes if toy is for infant)
- Scissors
- Pins for assembly

## GAUGE
18 stitches × 24 rounds = 4 inches (10 cm) in stockinette stitch in the round

*Take time to check gauge. Adjust needle size if necessary.*

## ABBREVIATIONS
- k: knit
- kfb: knit into front and back of stitch (1 stitch increased)
- k2tog: knit 2 stitches together (1 stitch decreased)
- pm: place marker
- rnd(s): round(s)
- st(s): stitch(es)

## NOTES
- All pieces are worked in the round using stockinette stitch (knit every round).
- Stuff pieces firmly as you go, especially the neck for stability.
- Change to DPNs when stitches become too few for circular needle.
- Leave long tails for seaming pieces together.

---

## PATTERN

### HEAD

**Setup**: Using MC, cast on 12 sts. Divide evenly on DPNs or prepare for Magic Loop. Join to work in the round, being careful not to twist. Place marker for beginning of round.

**Rnd 1**: Kfb in each st around—24 sts
*Check: 12 × 2 = 24 sts ✓*

**Rnd 2**: Knit.

**Rnd 3**: *K1, kfb; repeat from * around—36 sts
*Check: 24 sts, 12 increases = 36 sts ✓*

**Rnds 4-6**: Knit (3 rounds).

**Rnd 7**: *K4, kfb; repeat from * around—42 sts
*Check: 36 ÷ 6 = 6 repeats; 6 increases = 42 sts ✓*

**Rnds 8-14**: Knit (7 rounds).

**Shape Snout**:
**Rnd 15**: K14, kfb, k2, kfb, k2, kfb, k2, kfb, k14—46 sts
*Check: 14 + 1 + 2 + 1 + 2 + 1 + 2 + 1 + 14 = 38 + 8 increases, wait: 42 + 4 increases = 46 sts ✓*

**Rnds 16-18**: Knit (3 rounds).

**Install Safety Eyes**: Between rounds 12 and 13, approximately 8 sts apart on front of head. Secure backing before continuing.

**Rnd 19**: K14, k2tog, k2, k2tog, k2, k2tog, k2, k2tog, k14—42 sts
*Check: 42 + 4 decreases = 46 sts; working backwards: correct ✓*

**Rnd 20**: *K5, k2tog; repeat from * around—36 sts
*Check: 42 ÷ 7 = 6 repeats; 6 decreases = 36 sts ✓*

**Rnd 21**: *K4, k2tog; repeat from * around—30 sts
*Check: 36 ÷ 6 = 6 repeats; 6 decreases = 30 sts ✓*

**Rnd 22**: *K3, k2tog; repeat from * around—24 sts
*Check: 30 ÷ 5 = 6 repeats; 6 decreases = 24 sts ✓*

**Begin stuffing head firmly.**

**Rnd 23**: *K2, k2tog; repeat from * around—18 sts
*Check: 24 ÷ 4 = 6 repeats; 6 decreases = 18 sts ✓*

**Rnd 24**: *K1, k2tog; repeat from * around—12 sts
*Check: 18 ÷ 3 = 6 repeats; 6 decreases = 12 sts ✓*

**Finish stuffing.** Break yarn, leaving 8-inch tail. Thread through remaining sts, pull tight, and secure.

### NECK

**Setup**: Using MC, cast on 24 sts. Divide evenly on DPNs or prepare for Magic Loop. Join to work in the round. Place marker.

**Rnds 1-36**: Knit (36 rounds, approximately 6 inches).
*Check: 36 rnds ÷ 24 rnds per 4" = 1.5 × 4" = 6" ✓*

**Do not bind off**. Leave sts on needle or transfer to waste yarn. Stuff neck firmly, leaving top opening. The open sts will be used to attach to head.

### BODY

**Setup**: Using MC, cast on 18 sts. Divide evenly on DPNs or prepare for Magic Loop. Join to work in the round. Place marker.

**Rnd 1**: Kfb in each st around—36 sts
*Check: 18 × 2 = 36 sts ✓*

**Rnds 2-4**: Knit (3 rounds).

**Rnd 5**: *K5, kfb; repeat from * around—42 sts
*Check: 36 ÷ 6 = 6 repeats; 6 increases = 42 sts ✓*

**Rnds 6-20**: Knit (15 rounds).

**Rnd 21**: *K5, k2tog; repeat from * around—36 sts
*Check: 42 ÷ 7 = 6 repeats; 6 decreases = 36 sts ✓*

**Rnds 22-24**: Knit (3 rounds).

**Rnd 25**: *K4, k2tog; repeat from * around—30 sts
*Check: 36 ÷ 6 = 6 repeats; 6 decreases = 30 sts ✓*

**Begin stuffing body.**

**Rnd 26**: *K3, k2tog; repeat from * around—24 sts
*Check: 30 ÷ 5 = 6 repeats; 6 decreases = 24 sts ✓*

**Finish stuffing firmly.** Do not bind off. Leave sts on needle or transfer to waste yarn. The open sts will be grafted to the neck.

### LEGS (Make 4)

**Setup**: Using MC, cast on 14 sts. Divide evenly on DPNs or prepare for Magic Loop. Join to work in the round. Place marker.

**Rnds 1-26**: Knit (26 rounds, approximately 4.3 inches).
*Check: 26 rnds ÷ 24 rnds per 4" = 1.08 × 4" = 4.3" ✓*

**Change to CC2** (dark brown).

**Rnds 27-30**: Knit (4 rounds for hoof).

**Begin stuffing leg firmly.**

**Rnd 31**: *K2tog; repeat from * around—7 sts
*Check: 14 ÷ 2 = 7 sts ✓*

**Finish stuffing.** Break yarn, leaving 8-inch tail. Thread through remaining sts, pull tight, and secure.

### EARS (Make 2)

**Setup**: Using MC, cast on 8 sts. Divide evenly on DPNs or work flat and seam if preferred.

**Rnds 1-3**: Knit (3 rounds).

**Rnd 4**: *K2tog; repeat from * around—4 sts
*Check: 8 ÷ 2 = 4 sts ✓*

Break yarn, leaving 8-inch tail. Thread through remaining sts, pull tight, and secure. Do not stuff.

### HORNS/OSSICONES (Make 2)

**Setup**: Using CC2 (dark brown), cast on 4 sts. Work I-cord or divide on DPNs.

**Rnds 1-4**: Knit (4 rounds).

**Rnd 5**: Kfb in each st around—8 sts
*Check: 4 × 2 = 8 sts ✓*

**Rnds 6-7**: Knit (2 rounds).

Break yarn, leaving 8-inch tail. Thread through remaining sts, pull tight, and secure. Stuff lightly with small amount of fiberfill.

### TAIL

**Setup**: Using MC, cast on 6 sts. Work I-cord or divide on DPNs.

**Rnds 1-12**: Knit (12 rounds, approximately 2 inches).

Break yarn, leaving 8-inch tail. Thread through remaining sts, pull tight, and secure.

**Tassel**: Cut 6-8 strands of CC2, each 3 inches long. Thread through end of tail and knot to create tassel. Trim evenly.

---

## ASSEMBLY

**Pin pieces together before sewing for proper placement.**

1. **Neck to Body**: Graft or seam the open stitches of the neck to the open stitches at the top of the body using kitchener stitch or mattress stitch. Make sure neck is centered.

2. **Head to Neck**: The neck has an open top with live stitches. Sew the closed bottom of the head to the open top of the neck, distributing the 24 neck stitches evenly around the 12-stitch base of the head. Use mattress stitch or whip stitch.

3. **Legs**: Position legs at bottom of body—front legs at the front and back legs at the rear, spacing them evenly. Use pins to check placement, then sew securely using the cast-on edge of each leg, working in a circle around the leg opening.

4. **Ears**: Attach ears to top sides of head, at approximately rounds 8-10, angled slightly outward.

5. **Horns**: Attach horns to top of head, between the ears, with the wider knobbed end at the top.

6. **Tail**: Attach tail to center back of body at the bottom, approximately where decrease rounds begin.

## FINISHING

1. **Weave in all ends** securely.

2. **Spots**: Using CC1 (brown), embroider or duplicate stitch irregular spots on the neck, body, and upper legs. Vary the size and spacing for a natural look. Spots can be 3-8 stitches across.

3. **Face Details**:
   - Embroider nostrils at end of snout using black yarn and straight stitches
   - Embroider mouth with a gentle smile using black yarn and backstitch
   - If you did not use safety eyes, embroider eyes using black yarn and satin stitch

4. **Optional**: Use a pink yarn to add a small tongue between mouth stitches.

5. **Final Check**: Ensure all pieces are securely attached and all ends are woven in. Give your giraffe a gentle squeeze to check stuffing distribution.

---

## CARE INSTRUCTIONS
Hand wash in cool water with mild detergent. Roll in towel to remove excess water. Reshape and lay flat to dry. Do not machine wash or dry.

**Safety Warning**: If using safety eyes, this toy is not suitable for children under 3 years old. For infants and toddlers, embroider all facial features instead.

---

*Pattern designed for beginner toy knitters. Enjoy creating your tall friend!*
Disclaimer: This pattern was generated by AI and should be reviewed for accuracy before use. While we strive for quality, AI-generated content may contain errors. Please verify measurements, stitch counts, and instructions before beginning your project. Generated by purlJam.uk
Access your pattern anytime
Bookmark this page to access your pattern anytime