Type
Crochet
Difficulty
intermediate
Category
shawl
AI Thinking Process
Planning
Verification
Pattern
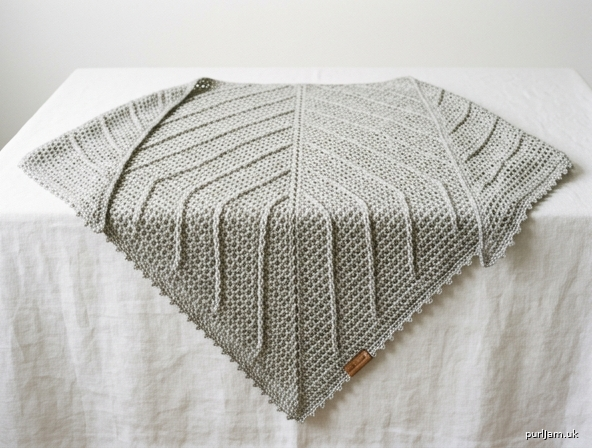
Lacy Raised-Stitch Triangle Shawl
引き上げ編みの三角レースショール
A light triangular shawl worked from the center of the top edge down. Open double-crochet mesh is the ground; front-post double crochet (raised stitches / 引き上げ編み) on every right-side row builds vertical columns of texture. Intermediate: you should already be comfortable with double crochet and chain spaces; post stitches are fully explained below.
Skill level: Intermediate
Construction: Center-top down, turned rows, one piece
Size: One size
Finished measurements
(after wet blocking)
- Wingspan (top edge, tip to tip): 64 in (163 cm)
- Depth (center spine to bottom point): 32 in (81 cm)
Size is easy to change: stop when the unblocked center spine is the depth you want, then block.
Materials
Yarn: Worsted weight (CYC 4), 600 yd (550 m)
Smooth wool, wool blend, or cotton-blend worsted with good stitch definition (so the raised posts show). A lightly heathered or solid color reads the lace best.
Hook: US I-9 / 5.5 mm, or the size that gives a soft, open fabric. If your swatch is stiff, go up to US J-10 / 6 mm.
Notions: Tapestry needle, scissors, locking stitch marker (for the center spine), blocking mats, T-pins or blocking wires, spray bottle or basin for wet blocking.
Gauge
(blocked lace pattern: dc and ch-1 mesh with FPdc on RS rows)
8 dc + 8 ch-1 spaces and 8 rows = 4 in (10 cm)
Count every dc/FPdc and every ch-1 as 1 stitch (16 stitches = 4 in).
Gauge is a drape check, not a fit check. The fabric should feel open and slightly sloppy before blocking. Change hook size until it does.
Notes
- US crochet terms throughout.
- The beginning ch 3 counts as 1 dc on every row. The last stitch of every row is worked into the top of that ch-3.
- Right side (RS) = raised (FPdc) rows. Wrong side (WS) = plain dc mesh. Row 1 is RS.
- Center spine is always (dc, ch 2, dc) in the ch-2 space. Mark that ch-2 with a locking marker and move it up every row.
- Increases: +4 dc every row — 2 dc in the first stitch, (dc, ch 2, dc) in the center, 2 dc in the last stitch. After Row n you will have 4n dc (Row 1 = 4, Row 2 = 8, Row 3 = 12 ✓).
- On mesh rows, skip every ch-1; work only into dc or FPdc (and into the center ch-2).
- Edge pairs of dc stay as regular dc even on RS rows. Only the interior mesh stitches are raised. This keeps the wing edges and the spine smooth.
- Shawl will look narrow and ruffled until it is blocked. That is expected.
Abbreviations
(plain English + Japanese names, because stitch words can be new)
| Abbr. | US name | How to do it | Japanese |
|---|---|---|---|
| ch | chain | Yarn over, pull through the loop on the hook. | 鎖編み |
| sl st | slip stitch | Insert hook, yarn over, pull through stitch and the loop on the hook. | 引き抜き編み |
| sc | single crochet | Insert hook, yo, pull up a loop, yo, pull through both loops. | 細編み |
| dc | double crochet | Yo, insert hook, yo, pull up a loop (3 loops on hook), yo, pull through 2, yo, pull through 2. | 長編み |
| FPdc | front post double crochet | See Special Stitches. This is the raised stitch. | 表引き上げ長編み |
| sp | space | The hole made by a chain (or chains). | 目 / スペース |
| sk | skip | Do not work into the next stitch; pass it. | 飛ばす |
| yo | yarn over | Wrap yarn over the hook from back to front. | 掛け |
| RS / WS | right side / wrong side | Front (posts show) / back. | 表 / 裏 |
| st(s) | stitch(es) | — | 目 |
| rep | repeat | — | 繰り返し |
| beg | beginning | — | 始まり |
Special stitches
Front post double crochet (FPdc) — 表引き上げ長編み
This wraps the hook around the body (post) of the stitch below so the stitch sits in relief on the right side.
- Yarn over.
- Looking at the right side, insert the hook from front to back to front around the post of the indicated stitch (around its “leg,” not into its top loops).
- Yarn over and pull up a loop (3 loops on hook). Bring this loop up to the height of a normal dc.
- Yarn over, pull through 2 loops; yarn over, pull through 2 loops.
The new stitch should be as tall as a regular dc. If it is short, pull the loop up more in step 3.
Picot (for the edging): Ch 3, sl st in the 3rd ch from the hook.
Shawl
Foundation
Ch 4.
Row 1 (RS)
(Dc, ch 2, 2 dc) in the 4th ch from the hook. Turn.
[4 dc, 1 ch-2 sp]
(The skipped 3 ch count as the first dc: 1 + 1 + 2 = 4 dc ✓.)
Row 2 (WS) — mesh, establishes the lace
Ch 3, dc in first dc, ch 1, dc in next dc, ch 1, (dc, ch 2, dc) in ch-2 sp, ch 1, dc in next dc, ch 1, 2 dc in last dc (top of beg ch-3). Turn.
[8 dc, 4 ch-1 sps, 1 ch-2 sp]
(4 + 4 = 8 dc ✓. Place a marker in the center ch-2.)
Row 3 (RS) — first raised row
Ch 3, dc in first dc, *ch 1, FPdc around next dc; rep from * to center ch-2 sp, ch 1, (dc, ch 2, dc) in center ch-2 sp, **ch 1, FPdc around next dc; rep from ** to last dc, ch 1, 2 dc in last dc. Turn.
[12 dc/FPdc]
(8 + 4 = 12 ✓. You will work 3 FPdc on each wing; the edge pairs and the 2 center dc are regular dc.)
Row 4 (WS) — mesh
Ch 3, dc in first dc, *ch 1, dc in next st; rep from * to center ch-2 sp, ch 1, (dc, ch 2, dc) in center ch-2 sp, **ch 1, dc in next st; rep from ** to last dc, ch 1, 2 dc in last dc. Turn.
[16 dc]
(12 + 4 = 16 ✓. “Next st” = the next dc or FPdc; skip every ch-1.)
Repeat
Work the two rows below until the center spine measures about 28 in (71 cm) unblocked, ending after a WS mesh row. At the stated gauge this is about Row 60 and 240 dc (4 × 60 = 240 ✓).
Raised row (RS):
Ch 3, dc in first dc, *ch 1, FPdc around next st; rep from * to center ch-2 sp, ch 1, (dc, ch 2, dc) in center ch-2 sp, **ch 1, FPdc around next st; rep from ** to last dc, ch 1, 2 dc in last dc. Turn.
(+4 dc ✓. FPdc is worked around the post of the dc or FPdc one row below, not around a chain.)
Mesh row (WS):
Ch 3, dc in first dc, *ch 1, dc in next st; rep from * to center ch-2 sp, ch 1, (dc, ch 2, dc) in center ch-2 sp, **ch 1, dc in next st; rep from ** to last dc, ch 1, 2 dc in last dc. Turn.
(+4 dc ✓.)
Count check (optional, every 10 rows): Row 10 = 40 dc, Row 20 = 80 dc, Row 30 = 120 dc, Row 40 = 160 dc, Row 50 = 200 dc, Row 60 = 240 dc (always 4 × row number ✓). If you are off by 2, you missed a center or edge increase; fix on the next row rather than ripping unless the spine has drifted off center.
Edging
With RS facing (turn after the last WS row).
Bottom edge (the long V: left tip → center point → right tip)
Ch 1, sc in first dc, sc in next dc,
*ch 3, sk next ch-1 sp, sc in next dc; rep from * to center ch-2 sp,
(sc, ch 2, picot, ch 2, sc) in center ch-2 sp,
sc in next dc, **ch 3, sk next ch-1 sp, sc in next dc; rep from ** to the last 2 dc,
sc in each of last 2 dc.
Right wing tip
3 sc in the same last dc (corner made).
Top edge (wingspan, worked into row-ends toward the starting point, then out the other wing)
Work sc evenly across the top edge: 2 sc in each dc row-end (the side of each ch-3 or dc). This comes to about 120 sc along the top if you worked 60 rows (2 × 60 = 120 ✓). Do not work extra chains here — a firm top edge helps the shawl hang straight.
Left wing tip
3 sc in the first stitch of Row 1’s starting point (the original 4th ch). Sl st to the first sc of the edging.
Fasten off.
Finishing
Weave in ends on the WS, following the path of the stitches so nothing shows on the raised columns.
Blocking (required for drape)
The shawl will not look like the finished measurements — or like lace — until it is blocked. Do not skip this.
- Soak in lukewarm water for 15–20 minutes (add a drop of wool wash if using animal fiber). Do not agitate.
- Lift out, support the full weight, and press out water in a towel. Do not wring.
- Lay on blocking mats in a triangle: pin the center of the top edge first, then the two wing tips so the top edge is a straight line 64 in (163 cm) wide. Pin the bottom point so the center spine is 32 in (81 cm) deep.
- Pin along the top edge every 2–3 in (5–8 cm). Then pin the two bottom sides, opening each ch-3 arch of the edging. Stretch until the mesh holes are even and the FPdc columns run in straight lines from neck to edging.
- If using wires, run them through the top-edge sc and through the edging arches, then pin the wires.
- Let dry completely before removing pins.
The fabric should feel soft, open, and slightly springy, with the raised stitches sitting clearly on the surface.
How to wear
Drape the straight top edge around the shoulders with the point down the back, or fold the top edge once for a narrower scarf-like wrap. The raised columns run from the neck toward the hem and will catch the light on the right side — wear that side out.
Quick reference
| Row | Side | What you work | Dc count |
|---|---|---|---|
| 1 | RS | Start in 4th ch | 4 |
| 2 | WS | Mesh (dc, ch 1) | 8 |
| 3, 5, 7… | RS | FPdc mesh (raised) | 4 × row number |
| 4, 6, 8… | WS | Mesh (dc, ch 1) | 4 × row number |
| Last RS | RS | Picot-arch edging + top sc | — |
Every body row: ch 3, dc in first st … (dc, ch 2, dc) in center … 2 dc in last st.
+4 dc per row, always.
Disclaimer: This pattern was generated by AI and should be reviewed for accuracy before use. While we strive for quality, AI-generated content may contain errors. Please verify measurements, stitch counts, charts, and instructions before beginning your project. Generated by purlJam.uk
Love this pattern?
Save this pattern to your free PurlJam libraryAccess your pattern anytime
Bookmark this page to access your pattern anytime