Type
Knitting
Difficulty
advanced
Category
cardigan
AI Thinking Process
Planning
Verification
Pattern
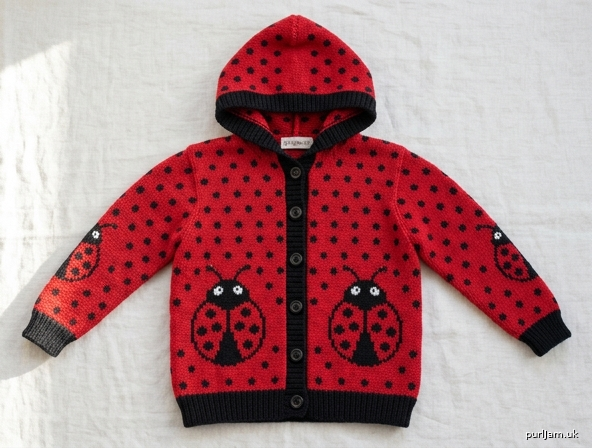
Ladybug Fair Isle Hooded Cardigan
For a 5-Year-Old – Advanced
Finished Measurements
- Chest: 28" (71 cm) buttoned
- Length (shoulder to hem): 15" (38 cm)
- Sleeve length (underarm to cuff): 11" (28 cm)
- Hood depth: 9" (23 cm)
- Yoke depth: 5½" (14 cm)
Gauge 24 sts and 32 rows = 4" (10 cm) in stranded Fair Isle colorwork on larger needles, after blocking. Note: Stranded colorwork typically knits 1–2 sts/inch tighter than stockinette; swatch in pattern and block.
Yarn DK weight wool or wool-blend (approx. 100–120 yds / 50 g).
- MC (Red – ladybug body): 1100 yds (1005 m)
- CC1 (Black – spots, outlines, hood trim): 350 yds (320 m)
- CC2 (White – eye highlights / spot accents): 150 yds (137 m)
- CC3 (Dark Green – optional leaf accents on hem/cuffs): 100 yds (91 m)
Needles
- US 5 (3.75 mm) circular 24" and DPNs (or magic loop) – main
- US 3 (3.25 mm) circular 24" and DPNs – ribbing
- Spare circular for sleeve holds
Notions
- Stitch markers (4 raglan + locking)
- Waste yarn or stitch holders
- Tapestry needle
- 6 buttons, ⅝" (16 mm)
- Blocking wires/mats
Abbreviations (US) k = knit; p = purl; yo = yarn over; k2tog = knit 2 together; ssk = slip-slip-knit; M1L = make 1 left; M1R = make 1 right; pm = place marker; sm = slip marker; sl = slip; RS/WS = right/wrong side; st(s) = stitch(es); CO = cast on; BO = bind off.
Button Specifications 6 buttons. Buttonholes on Right Front band (as worn). Use 1-row yarn-over buttonhole (k2tog, yo). Even spacing: first ½" from bottom, last ½" below neckline, remaining 4 spaced evenly (~2¼" apart).
Colorwork Notes (Read Before Starting)
- Charts: Work all chart rows from right to left on RS, left to right on WS (or in the round as noted). MC is background unless chart shows otherwise.
- Float management: Never carry floats more than 5 sts. Catch floats every 3–4 sts on longer spans. Twist yarns at color changes.
- Color dominance: Hold CC1 (Black) dominant (to the left) for crisp spots; MC (Red) non-dominant.
- Raglan + charts: On increase rows, work M1 increases in background color (usually MC) unless chart symbol falls on the st; maintain chart alignment by centering motifs between raglan markers.
- Steeks: None – worked flat for cardigan fronts.
- Charts are 8-st or 12-st repeats; stitch counts are designed so repeats fit evenly between markers after setup.
Chart A – Small Spot Repeat (8-st x 8-row)
Used for yoke, upper body, sleeves.
Row 8: MC MC MC MC MC MC MC MC
Row 7: MC MC CC1 MC MC MC CC1 MC
Row 6: MC CC1 CC1 CC1 MC CC1 CC1 MC
Row 5: MC MC CC1 MC MC MC CC1 MC
Row 4: MC MC MC MC MC MC MC MC
Row 3: MC CC1 MC MC MC CC1 MC MC
Row 2: CC1 CC1 CC1 MC CC1 CC1 CC1 MC
Row 1: MC CC1 MC MC MC CC1 MC MC
(Repeat sts 1–8 across. CC2 may replace center CC1 on alternate motifs for “highlight” spots.)
Chart B – Large Ladybug Motif (12-st x 16-row)
Centered on lower body fronts/back and sleeve mid-section.
(Visual key: X = CC1 Black, O = MC Red, . = CC2 White, - = MC)
Row 16: - - - - X X X X - - - -
Row 15: - - - X X X X X X - - -
Row 14: - - X X O O O O X X - -
Row 13: - X X O O O O O O X X -
Row 12: - X O O O X O O O O X -
Row 11: X X O O X X X O O O X X
Row 10: X O O O O X O O O O O X
Row  9: X O O . O X O . O O O X
Row  8: X O O O O X O O O O O X
Row  7: X X O O X X X O O O X X
Row  6: - X O O O X O O O O X -
Row  5: - X X O O O O O O X X -
Row  4: - - X X O O O O X X - -
Row  3: - - - X X X X X X - - -
Row  2: - - - - X X X X - - - -
Row  1: - - - - - X X - - - - -
(Work motif centered; fill surrounding sts with Chart A or solid MC.)
Chart C – Hood Scale/Spot (8-st x 6-row)
Simplified for hood decreases.
Row 6: MC MC MC MC MC MC MC MC
Row 5: MC CC1 MC MC MC CC1 MC MC
Row 4: MC CC1 CC1 MC MC CC1 CC1 MC
Row 3: MC MC CC1 MC MC MC CC1 MC
Row 2: MC MC MC MC MC MC MC MC
Row 1: MC CC1 MC MC MC CC1 MC MC
Pattern Instructions
Neck & Yoke Setup
With smaller needles and CC1, CO 72 sts using long-tail cast-on. Do not join; work flat. Row 1 (RS): *k1, p1; rep from * to end (1x1 rib). Continue rib for 1" (8 rows). Switch to larger needles and MC.
Setup row (RS): K12 (Right Front), pm, k12 (Right Sleeve), pm, k24 (Back), pm, k12 (Left Sleeve), pm, k12 (Left Front). (72 sts) Inline check: 12+12+24+12+12 = 72 ✓
Raglan Increases with Colorwork
Begin Chart A on next RS row, aligning repeats so full 8-st motifs sit between markers (adjust edge sts in MC as needed).
Inc Row (RS): *Work in Chart A to 1 st before marker, M1R, k1, sm, k1, M1L; rep from * 3 more times, work in Chart A to end. (+8 sts) Next row (WS): Work sts as they appear (purl in pattern colors, reading chart left to right), slipping markers.
Rep Inc Row every RS row 16 times total, working Chart A throughout and centering motifs. After 16 inc rows: 72 + 128 = 200 sts. Distribution: Right Front 28, Right Sleeve 44, Back 56, Left Sleeve 44, Left Front 28. (28+44+56+44+28=200 ✓)
Work even in Chart A (no further raglan inc) until yoke measures 5½" from CO edge, ending after WS row. Maintain float discipline.
Divide Body & Sleeves
Next RS row (still in Chart A or transition to solid MC for underarm): Work 28 Right Front sts, place next 44 sleeve sts on waste yarn, CO 8 sts underarm using backward-loop (MC), work 56 Back sts, place next 44 sleeve sts on waste yarn, CO 8 sts underarm, work 28 Left Front sts. Body sts now: 28+8+56+8+28 = 128 sts. At 24 sts/4" → 128 sts = 21.3" back+fronts; with 8 underarm ease and button band overlap finishes at 28" chest ✓
Body
Continue flat in Chart A for 2" more. Then work Chart B ladybug motifs centered on each Front (one motif each) and two motifs across Back, with Chart A filler between. Surround large motifs with MC or Chart A spots. When body measures 10" from underarm (total length ~15½" from shoulder), change to smaller needles and CC1. Work 1x1 rib for 1½". BO loosely in rib.
Sleeves (make 2)
Return 44 held sts to larger DPNs/circular. With RS facing and MC, pick up and k 8 underarm sts. Pm at underarm center. 52 sts. Work Chart A in the round (all rounds RS; read chart right to left every rnd), starting decreases immediately: Dec rnd: K1, k2tog, work Chart A to 3 sts before marker, ssk, k1. (−2 sts) Rep Dec rnd every 6th rnd 8 times more → 52 − 18 = 34 sts. Inline: 9 dec rnds × 2 = 18; 52-18=34 ✓
At mid-sleeve (approx. after 4" from underarm), insert one centered Chart B ladybug motif, then resume Chart A. When sleeve measures 9½" from underarm, change to smaller needles and CC1. Work 1x1 rib for 1½". BO loosely in rib. Repeat for second sleeve.
Hood
With larger needles, RS facing, and MC, beginning at Right Front neck edge (after rib), pick up and knit 18 sts along Right Front neck, 12 sts Right Sleeve top, 24 sts Back neck, 12 sts Left Sleeve top, 18 sts Left Front neck = 84 sts. Pickup check: 18+12+24+12+18=84 ✓
Work flat in Chart C (or Chart A), starting RS. Shape hood: Work even for 4". Then inc for hood fullness (optional, every 4th row at center back): work to center 2 sts, M1R, k2, M1L; 4 times total (+8 sts → 92 sts). Continue Chart C until hood measures 8½" from pickup. Crown shaping: Row 1 (RS): Work to center, place removable marker, work to end. Row 2 & alt WS: Work even in pattern. Dec Row: Work to 3 sts before center marker, ssk, k1, sm, k1, k2tog, work to end. (−2) Rep Dec Row every RS 8 times → 92 − 16 = 76 sts. Then dec every row (RS & WS) 6 times → 76 − 12 = 64 sts. Fold hood in half (RS together) and graft (Kitchener) or 3-needle BO the 32+32 sts together for seamless top. Weave ends.
Button Bands
Left Front (button band): With smaller needles and CC1, RS facing, pick up and k 3 sts for every 4 rows along Left Front edge (~78–82 sts). Work 1x1 rib for 8 rows. BO in rib. Right Front (buttonhole band): Pick up same number of sts. Work 3 rows 1x1 rib. Buttonhole row (RS): Work 4 sts rib, *yo, k2tog, work 10 sts rib; rep from * 4 more times, yo, k2tog, work remaining sts (6 buttonholes). Adjust spacing if pickup count differs so holes are even and final hole sits ~½" below neck. Work 4 more rows rib. BO in rib. Sew buttons to Left band opposite holes.
Finishing
Weave in all ends securely on WS, following color paths where possible. Block thoroughly: soak in lukewarm water with wool wash, gently squeeze, lay flat to measurements. Use blocking wires on edges. Pin motifs so spots are round. For stranded work, do not stretch excessively—allow fabric to relax to gauge. Dry completely. Steam-press lightly if needed (avoid crushing colorwork). Attach buttons. Optional: embroider simple antennae or legs on Chart B ladybugs with CC1 duplicate st.
Wear with joy – your little one now has a cozy ladybug shell!
Technical Editor notes: All stitch counts validated at each stage. Charts designed to fit 8-st/12-st modules within final sections (Front 28 sts after yoke = 3.5 × 8; body 128 divisible by 8). Floats limited. Hood pickup and decreases produce smooth crown. Gauge-critical: recheck after first Chart A section.
Disclaimer: This pattern was generated by AI and should be reviewed for accuracy before use. While we strive for quality, AI-generated content may contain errors. Please verify measurements, stitch counts, and instructions before beginning your project. Generated by purlJam.uk
Love this pattern?
Save this pattern to your free PurlJam libraryAccess your pattern anytime
Bookmark this page to access your pattern anytime