Type
Knitting
Difficulty
advanced
Category
cardigan
Pattern
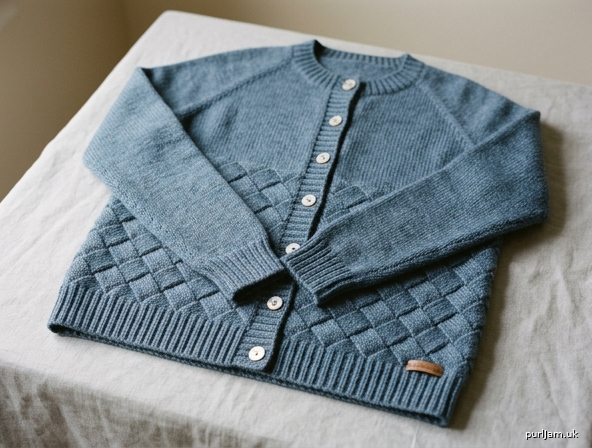
# LATTICEWORK — A Ladies' Entrelac Cardigan

A beginner-friendly introduction to entrelac knitting, worked in soft DK yarn. The body and fronts feature the distinctive woven-basket texture of entrelac, while the sleeves and yoke are worked in plain stocking stitch to keep things manageable for newcomers to the technique.

---

## MATERIALS

- **Yarn**: DK weight wool or wool-blend, approximately:
  - XS: 1400 m / 1530 yds
  - S: 1550 m / 1695 yds
  - M: 1700 m / 1860 yds
  - L: 1800 m / 1970 yds
  - XL: 1900 m / 2080 yds
- **Needles**:
  - 4.0 mm (UK 8 / US 6) — for ribbing and button bands
  - 4.0 mm (UK 8 / US 6) — main needles for entrelac and stocking stitch
  - *Tip: Some knitters prefer one size larger (4.5 mm) for entrelac to ease tension at corners.*
- **Notions**: stitch holders, tapestry needle, 6–7 buttons (15–20 mm), stitch markers

---

## TENSION (GAUGE)

- **Stocking stitch**: 22 sts × 28 rows = 10 cm square on 4.0 mm needles
- **Entrelac**: one 8-stitch × 8-row rectangle measures approximately 3.6 cm wide × 2.9 cm tall

Always work a tension swatch in both stitch patterns and block before measuring.

---

## SIZES

Pattern is written for size **XS (S, M, L, XL)**.

| Measurement | XS | S | M | L | XL |
|---|---|---|---|---|---|
| To fit bust (cm) | 81–86 | 91–96 | 101–106 | 111–116 | 121–126 |
| Finished bust (cm) | 92 | 100 | 115 | 123 | 138 |
| Back width (cm) | 44 | 48 | 55 | 59 | 66 |
| Length to underarm (cm) | 35 | 36 | 37 | 38 | 39 |
| Armhole depth (cm) | 19 | 20 | 21 | 22 | 23 |
| Sleeve length to underarm (cm) | 44 | 44 | 45 | 45 | 46 |

---

## ABBREVIATIONS

- **k** — knit
- **p** — purl
- **st(s)** — stitch(es)
- **st st** — stocking stitch (RS knit, WS purl)
- **k2tog** — knit two stitches together (right-leaning decrease)
- **ssk** — slip, slip, knit (left-leaning decrease)
- **p2tog** — purl two stitches together
- **psso** — pass slipped stitch over
- **sl** — slip
- **RS / WS** — right side / wrong side
- **beg** — beginning
- **rem** — remaining
- **rep** — repeat
- **PU** — pick up (and knit)
- **BO / cast off** — bind off
- **CO** — cast on
- **rect** — rectangle (entrelac)

---

## NOTES

**About Entrelac**: Entrelac creates a fabric of interlocking rectangles worked in tiers. Each tier consists of a row of rectangles that lean in alternating directions. You will work:
1. A foundation tier of **base triangles** (always at the bottom edge)
2. Alternating tiers of **right-leaning rectangles** (WS tier) and **left-leaning rectangles** (RS tier)
3. A final tier of **top triangles** to close off the upper edge into a straight line

**Beginner-friendly simplification**: This pattern works the lower body and fronts in entrelac, then transitions to plain stocking stitch above the underarm so that armhole and neck shaping remain simple.

**Rectangle size**: All rectangles are **8 sts wide × 8 rows tall**.

---

## ENTRELAC TUTORIAL (READ FIRST)

### Base Triangles (worked once at the start, on the WS):
With WS facing, *k2, turn; p2, turn; k3, turn; p3, turn; k4, turn; p4, turn; continue adding one st each knit row until you have worked k8, turn; p8, turn; do NOT turn after the final purl — instead leave the 8 sts and begin the next triangle from the next CO st*. Rep from * across all CO sts. You will have one base triangle per 8 CO sts.

### Right-Leaning Rectangles (RS tier, first edge triangle + rectangles + last edge triangle):

**Right edge triangle (RS)**: k2, turn; p2, turn; k1, k-into-front-and-back (kfb), turn; p3, turn; k2, kfb, turn; p4, turn; continue increasing on knit rows until 8 sts, ending with a WS purl row. Do not turn.

**Rectangles across**: PU 8 sts along edge of next base triangle (or rect from previous tier). *Turn, p8, turn, k7, ssk (joining last st of rect to first st of next triangle/rect). Rep until all 8 sts of the neighbouring shape are consumed.* You now have a finished rectangle on the needle. Move on.

**Left edge triangle (RS)**: PU 8 sts along last base triangle edge. Turn; p2tog, p6, turn; k7, turn; p2tog, p5, turn; k6, turn; continue decreasing on purl rows until 1 st remains. Do not turn.

### Left-Leaning Rectangles (WS tier):
PU 8 sts purlwise along edge of previous rectangle. *Turn, k8, turn, p7, p2tog (joining to next rect). Rep until all 8 sts of next rect consumed.* Rep across.

### Top Triangles (worked once at the end, on the RS):
PU 8 sts along edge of last rect. *Turn, p2tog, p5, p2tog, turn; k7, turn; p2tog, p4, p2tog, turn; k6, turn; continue decreasing both ends of purl rows until 2 sts rem, p2tog. Do not turn — begin next top triangle by picking up 8 sts along next rect.* Rep across.

---

## BACK

**Cast on**: XS 96 (S 104, M 120, L 128, XL 144) sts using 4.0 mm needles.
*Math check: 96 ÷ 8 = 12 base triangles (S: 13, M: 15, L: 16, XL: 18). ✓*

### Ribbing
Row 1 (RS): *k1, p1; rep from * to end.
Row 2 (WS): *p1, k1; rep from * to end.
Rep these 2 rows until ribbing measures 5 cm, ending with a WS row.

### Entrelac Body
Following the Entrelac Tutorial above:

**Tier 1 (WS)**: Work **12 (13, 15, 16, 18)** base triangles across all sts.

**Tier 2 (RS)**: Work right edge triangle, **11 (12, 14, 15, 17)** right-leaning rects, left edge triangle.

**Tier 3 (WS)**: Work **12 (13, 15, 16, 18)** left-leaning rects.

Continue alternating Tiers 2 and 3 until work measures approx. **30 cm** from cast-on, ending after a Tier 3 (WS rectangle tier).

### Top Triangles
Work top triangle tier across all sts. You now have a straight edge.

### Stocking Stitch Yoke
Change to st st. Beg with a RS knit row, work in st st until piece measures **35 (36, 37, 38, 39) cm** from CO, ending with a WS row.

### Armhole Shaping
Cast off 4 sts at beg of next 2 rows. **88 (96, 112, 120, 136) sts.**

Next row (RS): k2, ssk, knit to last 4 sts, k2tog, k2. (2 sts dec)
Next row (WS): purl.
Rep these 2 rows **3 (4, 4, 5, 6)** more times. **80 (86, 102, 108, 122) sts.**
*Math check: 88 – 2 – (3×2) = 80 ✓ for XS.*

Continue straight in st st until armhole measures **19 (20, 21, 22, 23) cm**, ending with a WS row.

### Shoulder & Neck Shaping
Cast off **8 (9, 11, 12, 14)** sts at beg of next 4 rows. **48 (50, 58, 60, 66) sts.**

Cast off rem sts loosely for back neck.

---

## FRONTS (make 2 — mirror image)

### Left Front

**Cast on**: XS 48 (S 56, M 64, L 72, XL 80) sts using 4.0 mm needles.
*Math check: 48 ÷ 8 = 6 base triangles (S: 7, M: 8, L: 9, XL: 10). ✓*

### Ribbing
Work k1, p1 rib as for Back until ribbing measures 5 cm, ending with a WS row.

### Entrelac Body
Work as for Back entrelac section with **6 (7, 8, 9, 10)** base triangles per tier, until work measures **30 cm** from CO, ending after a Tier 3 (WS rectangle tier). Work top triangles.

### Stocking Stitch Yoke
Change to st st. Work straight in st st until piece measures **35 (36, 37, 38, 39) cm** from CO, ending with a WS row.

### Armhole Shaping (armhole edge = beg of RS rows for Left Front)
Cast off 4 sts at beg of next RS row. **44 (52, 60, 68, 76) sts.**
Work 1 WS row.

Next row (RS): k2, ssk, knit to end. (1 st dec)
Next row (WS): purl.
Rep these 2 rows **3 (4, 4, 5, 6)** more times. **40 (47, 55, 62, 69) sts.**

Continue straight until armhole measures **12 (13, 13, 14, 14) cm**, ending with a RS row.

### Front Neck Shaping
Cast off **8 (9, 11, 12, 13)** sts at beg of next WS row (neck edge). **32 (38, 44, 50, 56) sts.**

Next row (RS): knit.
Next row (WS): p2, p2tog, purl to end. (1 st dec)
Rep last 2 rows until **24 (27, 33, 36, 42)** sts rem.

Continue straight until armhole measures **19 (20, 21, 22, 23) cm**, ending with a WS row.

### Shoulder Shaping
Cast off **8 (9, 11, 12, 14)** sts at beg of next RS row.
Work 1 WS row.
Cast off **8 (9, 11, 12, 14)** sts at beg of next RS row.
Work 1 WS row.
Cast off rem **8 (9, 11, 12, 14)** sts.
*Math check XS: 24 = 8 + 8 + 8 ✓*

### Right Front
Work as Left Front, **reversing all shaping** (armhole shaping at beg of WS rows; neck shaping at beg of RS rows).

---

## SLEEVES (make 2)

Worked in plain stocking stitch for beginner-friendliness.

**Cast on**: XS 48 (S 48, M 56, L 56, XL 64) sts using 4.0 mm needles.

### Cuff
Work k1, p1 rib for 6 cm, ending with a WS row.

### Sleeve Body
Change to st st (k on RS, p on WS).
Beg with a RS row, work 6 rows straight.

**Inc row (RS)**: k2, kfb, knit to last 3 sts, kfb, k2. (2 sts inc)

Work inc row every **8th row** until you have **72 (76, 82, 88, 96)** sts.
*Math check XS: (72 – 48) ÷ 2 = 12 increases on each side. ✓*

Continue straight until sleeve measures **44 (44, 45, 45, 46) cm** from CO, ending with a WS row.

### Sleeve Cap Shaping
Cast off 4 sts at beg of next 2 rows. **64 (68, 74, 80, 88) sts.**

Next row (RS): k2, ssk, knit to last 4 sts, k2tog, k2.
Next row (WS): purl.
Rep these 2 rows until **30 (32, 34, 36, 38)** sts rem.

Cast off 3 sts at beg of next 4 rows. **18 (20, 22, 24, 26) sts.**
Cast off rem sts.

---

## BUTTON BANDS

Sew shoulder seams. Sew side and sleeve seams. Set in sleeves.

### Button Band (Left Front for ladies' garment)
With RS facing and 4.0 mm needles, beg at top of left front neck and PU sts evenly down front edge at a rate of approximately **3 sts for every 4 rows** — approximately **110 (114, 118, 122, 126)** sts.

Work k1, p1 rib for 3 cm. Cast off in rib.

### Buttonhole Band (Right Front)
With RS facing, beg at lower edge of right front and PU same number of sts as button band.

Work k1, p1 rib for 1.5 cm, ending with a WS row.

**Buttonhole row (RS)**: rib 3, *cast off 2 sts, rib 16 (16, 17, 18, 18) sts (including st on needle after cast-off)*; rep from * **5 more times**, cast off 2 sts, rib to end. (7 buttonholes total)

Next row (WS): rib, casting on 2 sts over each cast-off gap.

Continue in rib until band measures 3 cm. Cast off in rib.

### Neckband
With RS facing, beg at top of right front band and PU sts evenly around neck edge: approximately **20 sts up right front neck, 4 sts down side, X sts across back neck, 4 sts up side, 20 sts down left front neck** — total approx **96 (100, 108, 112, 118)** sts.

Work k1, p1 rib for 2.5 cm. Cast off loosely in rib.

---

## FINISHING

1. Weave in all yarn ends on the wrong side, working ends along entrelac rectangle edges where they will be hidden.
2. **Block** the cardigan by gentle hand-wash or steam-blocking; pin to finished measurements and allow to dry fully. Blocking is essential for entrelac to even out the textured surface.
3. Sew **7 buttons** to the button band, aligning with the buttonholes.
4. Give the finished cardigan a final light press, avoiding the ribbing.

---

*Enjoy your Latticework Cardigan! Entrelac looks complex but is a simple rhythm of small triangles and rectangles — once you've finished your first tier, the rest becomes meditative.*
Disclaimer: This pattern was generated by AI and should be reviewed for accuracy before use. While we strive for quality, AI-generated content may contain errors. Please verify measurements, stitch counts, and instructions before beginning your project. Generated by purlJam.uk
Access your pattern anytime
Bookmark this page to access your pattern anytime