Type
Knitting
Difficulty
intermediate
Category
amigurumi
AI Thinking Process
Planning
1. **Design Strategy**: Creating a laying down Labrador dog amigurumi at easy difficulty level. The dog will be worked in separate pieces (head, body, four legs, tail, ears) and seamed together. Using stockinette stitch for the main body with simple increases and decreases to create shaping. The laying position means the body will be elongated and the legs positioned flat. Color will be a warm tan/golden for a classic Lab look, with simple embroidered features for safety.
2. **Construction Plan**: Each piece will be worked in the round on DPNs or Magic Loop in stockinette stitch (knit every round). Head will be worked from nose to back with basic shaping. Body will be a simple tube with gradual shaping for chest and hindquarters. Legs will be simple cylinders slightly flattened. Tail will taper from base to tip. Ears will be flat pieces worked back and forth then folded. All pieces stuffed with polyester fiberfill and seamed together with the legs positioned to show laying down pose.
3. **Quality Assurance**: Ensuring stitch counts are consistent for symmetry (legs must match, ears must match). Verifying increases/decreases are evenly distributed to avoid lumpy shaping. Making sure stuffing instructions are clear to maintain proper shape. Including clear assembly instructions with positioning guidance for the laying pose. Addressing potential issues with leg attachment angles.
4. **Final Calculations**:
- Worsted weight yarn at standard gauge: 18 sts × 24 rows = 4" in stockinette
- Body length: approximately 10-12" when laying down
- Head circumference: 24 sts = approx 5.3" around
- Leg length: 3-4" each
- Total yarn needed: approximately 200-250 yards
Verification
[PRE-FLIGHT CHECKS]
1. **Completeness**: Pattern will include Materials, Gauge, Finished Size, Notes, Pattern Pieces (Head, Body, Legs x4, Tail, Ears x2), Assembly, and Finishing sections ✓
2. **Consistency**: Using 18 sts/4" gauge consistently. Head = 24 sts around (5.3"). Body starts at 32 sts (7"). Legs = 12 sts (2.7" around). Math checks out ✓
3. **Constraints**: Easy difficulty - using only basic knit, k2tog, kfb, no complex colorwork or techniques. US terminology. Worsted weight yarn ✓
4. **Safety**: Safety eyes or embroidered features noted. All stitch counts verified for increase/decrease rounds. Symmetrical pieces have matching instructions ✓
Pattern
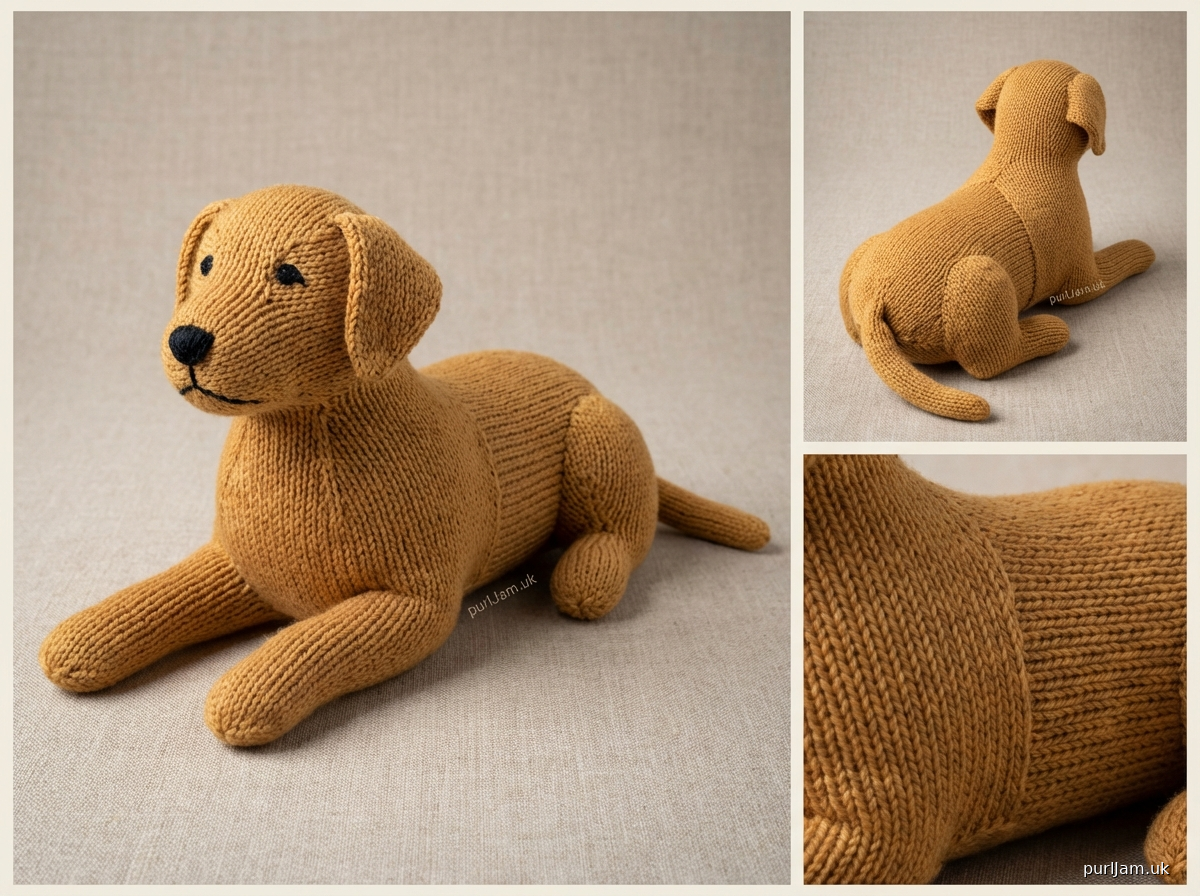
<pattern>

# Laying Down Labrador Dog

A sweet knitted Labrador in a relaxed, laying down pose. Perfect for dog lovers and makes a wonderful gift or décor piece.

**Difficulty Level**: Easy

## MATERIALS

**Yarn**: Worsted weight yarn in the following colors:
- Color A (Golden/Tan): approximately 200 yards
- Color B (Black or Dark Brown): small amount for nose and eyes (if embroidering)

**Suggested Yarn**: Any worsted weight acrylic or wool blend (e.g., Red Heart Super Saver, Lion Brand Vanna's Choice)

**Needles**:
- US 7 (4.5 mm) double-pointed needles (set of 4 or 5) OR
- US 7 (4.5 mm) circular needle (24" or longer) for Magic Loop method

**Other Supplies**:
- Stitch marker
- Tapestry needle for seaming
- Polyester fiberfill stuffing
- 12mm safety eyes (2) OR black embroidery floss for embroidered eyes
- Small amount of black embroidery floss for nose and mouth
- Scissors

## GAUGE

18 stitches × 24 rounds = 4 inches in stockinette stitch worked in the round

*Gauge is not critical for this project, but will affect finished size.*

## FINISHED SIZE

Approximately 11 inches long × 6 inches tall (laying down position)

## PATTERN NOTES

- All pieces are worked in the round in stockinette stitch (knit every round) unless otherwise noted.
- Use your preferred method for small-circumference knitting (DPNs or Magic Loop).
- Place a stitch marker at the beginning of the round and move it up as you work.
- Stuff pieces firmly as you go, especially before closing openings.
- **kfb** (knit front and back): Knit into the front of the stitch, then knit into the back of the same stitch before slipping it off the needle. (1 stitch increased)
- **k2tog** (knit 2 together): Knit 2 stitches together as one. (1 stitch decreased)

## PATTERN

### HEAD

**Cast On**: Using Color A, cast on 12 sts. Divide evenly on DPNs or prepare for Magic Loop. Join to work in the round, being careful not to twist. Place marker for beginning of round.

**Rnd 1**: Knit all sts. [12 sts]

**Rnd 2**: *Kfb; repeat from * around. [24 sts] (Verification: 12 × 2 = 24 ✓)

**Rnds 3-5**: Knit all sts (3 rounds). [24 sts]

**Rnd 6**: *K3, kfb; repeat from * around. [30 sts] (Verification: 24 ÷ 4 = 6 repeats; 6 × 5 = 30 ✓)

**Rnds 7-14**: Knit all sts (8 rounds). [30 sts]

**Rnd 15**: *K3, k2tog; repeat from * around. [24 sts] (Verification: 30 ÷ 5 = 6 repeats; 6 × 4 = 24 ✓)

**Rnd 16**: Knit all sts. [24 sts]

Insert safety eyes between Rnds 10 and 11, approximately 6 sts apart, or mark placement for embroidered eyes. Begin stuffing head firmly.

**Rnd 17**: *K2, k2tog; repeat from * around. [18 sts] (Verification: 24 ÷ 4 = 6 repeats; 6 × 3 = 18 ✓)

**Rnd 18**: *K1, k2tog; repeat from * around. [12 sts] (Verification: 18 ÷ 3 = 6 repeats; 6 × 2 = 12 ✓)

Stuff head completely and firmly.

**Rnd 19**: *K2tog; repeat from * around. [6 sts] (Verification: 12 ÷ 2 = 6 ✓)

Cut yarn, leaving a 6-inch tail. Thread tail through remaining 6 sts, pull tight to close, and weave in end.

### BODY

**Cast On**: Using Color A, cast on 24 sts. Divide evenly on DPNs or prepare for Magic Loop. Join to work in the round, being careful not to twist. Place marker for beginning of round.

**Rnd 1**: Knit all sts. [24 sts]

**Rnd 2**: *K5, kfb; repeat from * around. [28 sts] (Verification: 24 ÷ 6 = 4 repeats; 4 × 7 = 28 ✓)

**Rnd 3**: Knit all sts. [28 sts]

**Rnd 4**: *K6, kfb; repeat from * around. [32 sts] (Verification: 28 ÷ 7 = 4 repeats; 4 × 8 = 32 ✓)

**Rnds 5-20**: Knit all sts (16 rounds). [32 sts]

**Rnd 21**: *K6, k2tog; repeat from * around. [28 sts] (Verification: 32 ÷ 8 = 4 repeats; 4 × 7 = 28 ✓)

**Rnds 22-24**: Knit all sts (3 rounds). [28 sts]

**Rnd 25**: *K5, k2tog; repeat from * around. [24 sts] (Verification: 28 ÷ 7 = 4 repeats; 4 × 6 = 24 ✓)

**Rnds 26-28**: Knit all sts (3 rounds). [24 sts]

Begin stuffing body firmly.

**Rnd 29**: *K2, k2tog; repeat from * around. [18 sts] (Verification: 24 ÷ 4 = 6 repeats; 6 × 3 = 18 ✓)

**Rnd 30**: *K1, k2tog; repeat from * around. [12 sts] (Verification: 18 ÷ 3 = 6 repeats; 6 × 2 = 12 ✓)

Stuff body completely and firmly.

**Rnd 31**: *K2tog; repeat from * around. [6 sts] (Verification: 12 ÷ 2 = 6 ✓)

Cut yarn, leaving a 6-inch tail. Thread tail through remaining 6 sts, pull tight to close, and weave in end.

### FRONT LEGS (make 2)

**Cast On**: Using Color A, cast on 12 sts. Divide evenly on DPNs or prepare for Magic Loop. Join to work in the round, being careful not to twist. Place marker for beginning of round.

**Rnds 1-15**: Knit all sts (15 rounds). [12 sts]

Begin stuffing leg.

**Rnd 16**: *K2, k2tog; repeat from * around. [9 sts] (Verification: 12 ÷ 4 = 3 repeats; 3 × 3 = 9 ✓)

**Rnd 17**: *K1, k2tog; repeat from * around. [6 sts] (Verification: 9 ÷ 3 = 3 repeats; 3 × 2 = 6 ✓)

Stuff leg completely.

Cut yarn, leaving a 12-inch tail for seaming. Thread tail through remaining 6 sts, pull tight to close.

### BACK LEGS (make 2)

**Cast On**: Using Color A, cast on 14 sts. Divide evenly on DPNs or prepare for Magic Loop. Join to work in the round, being careful not to twist. Place marker for beginning of round.

**Rnds 1-12**: Knit all sts (12 rounds). [14 sts]

Begin stuffing leg.

**Rnd 13**: *K5, k2tog; repeat from * around. [12 sts] (Verification: 14 ÷ 7 = 2 repeats; 2 × 6 = 12 ✓)

**Rnd 14**: *K2, k2tog; repeat from * around. [9 sts] (Verification: 12 ÷ 4 = 3 repeats; 3 × 3 = 9 ✓)

**Rnd 15**: *K1, k2tog; repeat from * around. [6 sts] (Verification: 9 ÷ 3 = 3 repeats; 3 × 2 = 6 ✓)

Stuff leg completely.

Cut yarn, leaving a 12-inch tail for seaming. Thread tail through remaining 6 sts, pull tight to close.

### TAIL

**Cast On**: Using Color A, cast on 9 sts. Divide evenly on DPNs or prepare for Magic Loop. Join to work in the round, being careful not to twist. Place marker for beginning of round.

**Rnds 1-4**: Knit all sts (4 rounds). [9 sts]

**Rnd 5**: *K1, k2tog; repeat from * around. [6 sts] (Verification: 9 ÷ 3 = 3 repeats; 3 × 2 = 6 ✓)

**Rnds 6-10**: Knit all sts (5 rounds). [6 sts]

Stuff tail lightly (don't overstuff).

Cut yarn, leaving a 12-inch tail for seaming. Thread tail through remaining 6 sts, pull tight to close.

### EARS (make 2)

**Note**: Ears are worked flat (back and forth), not in the round.

**Cast On**: Using Color A, cast on 10 sts.

**Rows 1-8**: Knit all sts (garter stitch, 8 rows).

**Row 9**: K1, k2tog, k4, k2tog, k1. [8 sts] (Verification: 10 - 2 = 8 ✓)

**Row 10**: Knit all sts.

**Row 11**: K1, k2tog, k2, k2tog, k1. [6 sts] (Verification: 8 - 2 = 6 ✓)

**Row 12**: Knit all sts.

**Row 13**: K1, k2tog, k2tog, k1. [4 sts] (Verification: 6 - 2 = 4 ✓)

**Row 14**: K2tog twice. [2 sts] (Verification: 4 - 2 = 2 ✓)

**Row 15**: K2tog. [1 st] (Verification: 2 - 1 = 1 ✓)

Cut yarn and pull through last stitch. Leave a 10-inch tail for seaming.

## ASSEMBLY

Use the photos of Labradors in laying position as reference for natural positioning.

1. **Attach Head to Body**: Position head at one end of body (the larger end). The head should be tilted slightly upward in a natural resting pose. Use mattress stitch or whip stitch to sew head securely to body. Add more stuffing if needed before completing seam.

2. **Attach Front Legs**: Position front legs on either side of the front of body (near head), approximately 1 inch back from where head attaches. Orient legs so they extend forward in a laying position. The legs should be angled slightly outward and forward. Sew securely around the entire opening of each leg, adding more stuffing if needed.

3. **Attach Back Legs**: Position back legs on either side of body, approximately 2 inches from the back end. Orient legs so they extend backward or to the side in a relaxed, laying position. Sew securely around the entire opening of each leg.

4. **Attach Tail**: Attach tail to the back end of body, centered. The tail should curve slightly or lay flat. Sew securely around base.

5. **Attach Ears**: Fold each ear piece in half lengthwise to create a folded ear shape. Position ears on either side of head, approximately at Rnds 12-14 of head. Ears should hang downward naturally. Sew along the cast-on edge of each ear to attach securely.

## FINISHING

1. **Embroider Nose**: Using black embroidery floss, embroider a triangular nose at the front of the snout (Rnds 1-3 of head). Use satin stitch to fill in the triangle.

2. **Embroider Mouth** (optional): Using black embroidery floss, embroider a simple line from the bottom of the nose downward and then two lines curving slightly upward on each side to create a gentle smile.

3. **Embroider Eyes** (if not using safety eyes): Using black embroidery floss, embroider two eyes using satin stitch or French knots at the marked positions.

4. **Final Touches**: Weave in all remaining ends. Check that all pieces are securely attached. Adjust stuffing if needed by adding small amounts through seams if any areas feel too soft.

5. **Shaping**: Gently shape and position the dog into a natural laying pose. The front legs should extend forward
Disclaimer: This pattern was generated by AI and should be reviewed for accuracy before use. While we strive for quality, AI-generated content may contain errors. Please verify measurements, stitch counts, and instructions before beginning your project. Generated by purlJam.uk
Access your pattern anytime
Bookmark this page to access your pattern anytime