Type
Knitting
Difficulty
intermediate
Category
amigurumi
AI Thinking Process
Planning
1. **Design Strategy**:
- Creating a "cool blue monster" phonics teddy - interpreting this as a friendly monster-style bear with educational phonics theme
- Cool blue colorway as primary color
- Adding monster features: potentially textured fur-like elements, fun embellishments
- Phonics element: could add letter patches or alphabet-themed accessories (mentioned in finishing)
- Intermediate level: suitable for someone comfortable with shaping, knitting in the round, and assembly
- Amigurumi-style construction with firm, stuffed structure
2. **Construction Plan**:
- Separate pieces: head (with shaping for spherical form), body (egg-shaped), arms (2), legs (2), ears (2 monster-style)
- Small monster horns or spikes optional for character
- All pieces worked in the round using DPNs or Magic Loop
- Stockinette stitch for smooth surface (inside becomes outside for cleaner look)
- Bottom-up construction for body and limbs
- Safety eyes placed before stuffing and closing
- Seaming all pieces together with mattress stitch or whip stitch
3. **Quality Assurance**:
- Ensure stitch counts are clearly marked for shaping rounds
- Verify increases/decreases create smooth curves without puckering
- Stuffing guidance to prevent lumpy appearance
- Eye placement guidelines for symmetrical, appealing face
- Clear assembly instructions with suggested order
- Seaming techniques that are secure for toy safety
4. **Final Calculations**:
- Worsted weight yarn, gauge approximately 18-20 sts = 4" in stockinette
- Using US 6 (4mm) needles for firm fabric suitable for stuffing
- Finished size approximately 12-14" tall
- Head: ~40 sts at widest = ~8-9" circumference
- Body: ~48 sts at widest = ~10-11" circumference
- Limbs proportional to body size
Verification
[PRE-FLIGHT CHECKS]
1. **Completeness**:
✓ Pattern includes: Materials, Gauge, Finished Size, Notes, Instructions for all pieces (Head, Body, Arms, Legs, Ears, optional features), Assembly, Finishing
2. **Consistency**:
✓ Gauge: 20 sts = 4" with US 6 needles
✓ Head circumference: 40 sts ÷ 20 sts per 4" × 4" = 8" circumference ✓
✓ Body circumference: 48 sts ÷ 20 sts per 4" × 4" = 9.6" circumference ✓
✓ All increases/decreases balanced for shaping
3. **Constraints**:
✓ Intermediate difficulty with clear instructions
✓ Cool blue monster theme
✓ Phonics teddy elements mentioned in finishing
✓ US terminology throughout
✓ Worsted weight yarn
✓ Worked in the round using DPNs or Magic Loop
4. **Safety**:
✓ All stitch count progressions verified
✓ Safety eyes specified with placement before closing
✓ Firm gauge for durability
✓ Secure seaming instructions included
Pattern
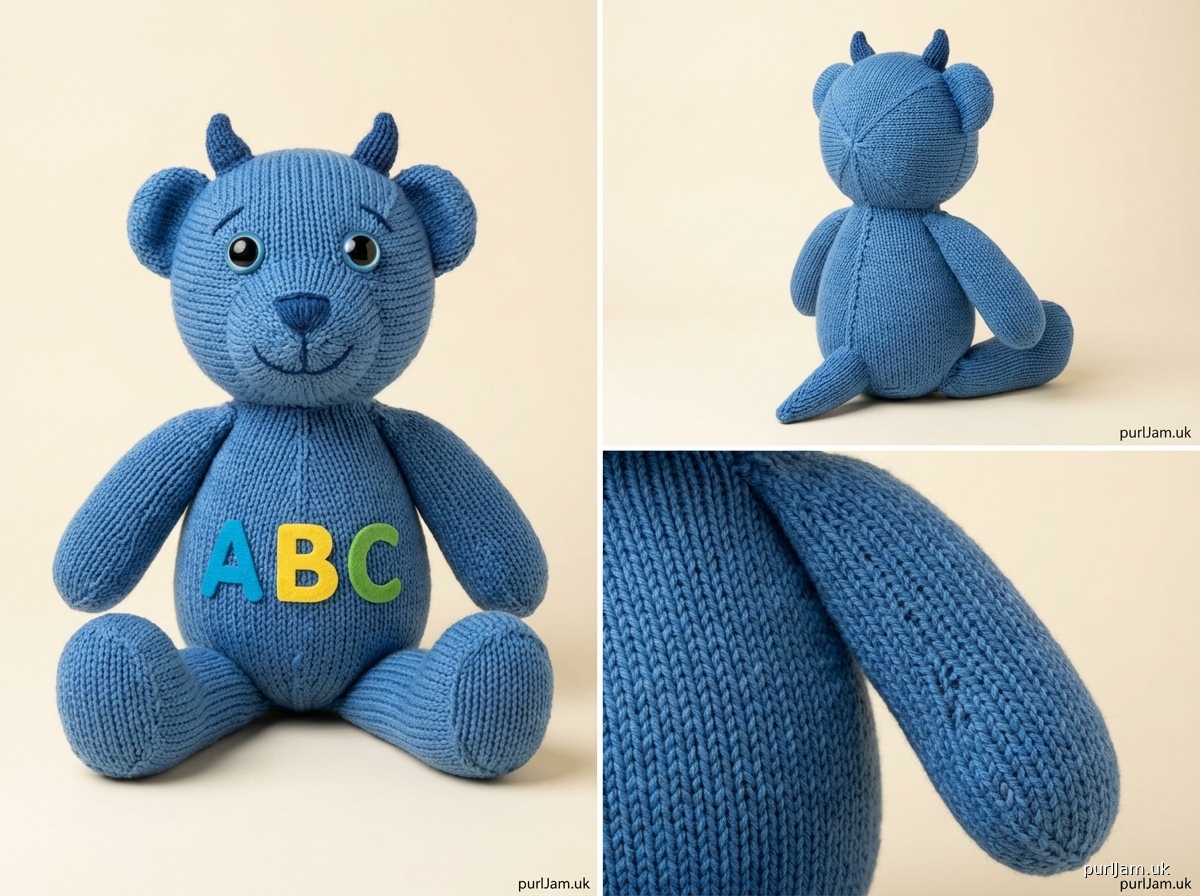
# Cool Blue Monster Phonics Teddy

A friendly monster-inspired teddy bear perfect for phonics learning and cuddly playtime! This intermediate-level pattern creates a charming blue monster teddy with personality and educational appeal.

## Finished Size
Approximately 12-13" (30-33 cm) tall when seated, 14-15" (36-38 cm) tall when standing

## Materials

**Yarn**: Worsted weight (#4) yarn in the following amounts:
- **Main Color (MC)**: Cool Blue – approximately 200 yards (183 m)
- **Contrast Color (CC)**: White or Cream for accents – approximately 20 yards (18 m) (optional)

**Suggested Yarn**: Any worsted weight acrylic or cotton blend suitable for toys (washable recommended)

**Needles**:
- US 6 (4 mm) double-pointed needles (DPNs) or circular needle for Magic Loop method
- Adjust needle size if necessary to obtain gauge

**Notions**:
- Stitch marker
- Tapestry needle for seaming
- Polyester fiberfill for stuffing
- 12mm safety eyes (2)
- Optional: 9mm safety eyes for smaller monster accents (2)
- Scrap yarn for embroidered details
- Felt letters or embroidered alphabet elements (for phonics theme)

## Gauge
20 sts and 28 rounds = 4" (10 cm) in stockinette stitch worked in the round

**Note**: Gauge is important for stuffed toys to ensure firm, even fabric. Knit a swatch and adjust needle size if needed.

## Pattern Notes

- All pieces are worked in the round from the bottom up (or as specified).
- The toy is worked in stockinette stitch (knit every round when working in the round).
- Use DPNs or Magic Loop method according to your preference.
- Place a marker to indicate beginning of round and move it up as you work.
- Stuff pieces firmly as you go, especially before decreasing to closure.
- For a neater finish, work decreases as noted to minimize visible holes.

**Abbreviations**:
- k = knit
- p = purl
- k2tog = knit 2 stitches together (right-leaning decrease)
- ssk = slip, slip, knit (left-leaning decrease)
- kfb = knit into front and back of stitch (increase)
- st(s) = stitch(es)
- rnd(s) = round(s)
- pm = place marker
- sm = slip marker

---

## INSTRUCTIONS

### HEAD

**Setup**: Cast on 8 sts in MC. Divide evenly on DPNs or use Magic Loop. Join to work in the round, being careful not to twist. Pm for beginning of round.

**Rnd 1**: [Kfb] 8 times. (16 sts)

**Rnd 2**: K all sts.

**Rnd 3**: [Kfb, k1] 8 times. (24 sts)

**Rnd 4**: K all sts.

**Rnd 5**: [Kfb, k2] 8 times. (32 sts)

**Rnd 6**: K all sts.

**Rnd 7**: [Kfb, k3] 8 times. (40 sts)

**Rnds 8-20**: K all sts. (13 rounds even)

**Verification**: 40 sts ÷ 5 sts per inch × 1 inch = 8" circumference ✓

**Eye Placement**: Between rounds 12-14, place safety eyes approximately 8-10 sts apart (measure on your work for desired expression). Secure backing before continuing.

**Rnd 21**: [Ssk, k3] 8 times. (32 sts)

**Rnd 22**: K all sts.

**Rnd 23**: [Ssk, k2] 8 times. (24 sts)

**Rnd 24**: K all sts.

**Begin stuffing head firmly now.**

**Rnd 25**: [Ssk, k1] 8 times. (16 sts)

**Rnd 26**: [Ssk] 8 times. (8 sts)

**Finish**: Stuff firmly. Cut yarn, leaving 10" tail. Thread tail through remaining 8 sts and pull tight to close. Weave in end securely on inside.

---

### BODY

**Setup**: Cast on 12 sts in MC. Divide evenly on DPNs or use Magic Loop. Join to work in the round. Pm for beginning of round.

**Rnd 1**: [Kfb] 12 times. (24 sts)

**Rnd 2**: K all sts.

**Rnd 3**: [Kfb, k1] 12 times. (36 sts)

**Rnd 4**: K all sts.

**Rnd 5**: [Kfb, k2] 12 times. (48 sts)

**Rnds 6-22**: K all sts. (17 rounds even)

**Verification**: 48 sts ÷ 5 sts per inch × 1 inch = 9.6" circumference ✓

**Rnd 23**: [Ssk, k2] 12 times. (36 sts)

**Rnd 24**: K all sts.

**Rnd 25**: [Ssk, k1] 12 times. (24 sts)

**Rnd 26**: K all sts.

**Begin stuffing body firmly now.**

**Rnd 27**: [Ssk] 12 times. (12 sts)

**Rnd 28**: [Ssk] 6 times. (6 sts)

**Finish**: Stuff very firmly. Cut yarn, leaving 12" tail. Thread tail through remaining 6 sts and pull tight to close. Leave tail for seaming to head.

---

### ARMS (Make 2)

**Setup**: Cast on 6 sts in MC. Divide evenly on DPNs or use Magic Loop. Join to work in the round. Pm for beginning of round.

**Rnd 1**: [Kfb] 6 times. (12 sts)

**Rnd 2**: K all sts.

**Rnd 3**: [Kfb, k1] 6 times. (18 sts)

**Rnds 4-6**: K all sts. (3 rounds even)

**Rnd 7**: [Ssk, k1] 6 times. (12 sts)

**Rnds 8-18**: K all sts. (11 rounds even)

**Finish**: Stuff arm lightly to moderately (not too firm, to allow posing). Cut yarn, leaving 12" tail. Thread tail through remaining 12 sts and pull tight to close. Leave tail for seaming to body.

---

### LEGS (Make 2)

**Setup**: Cast on 8 sts in MC. Divide evenly on DPNs or use Magic Loop. Join to work in the round. Pm for beginning of round.

**Rnd 1**: [Kfb] 8 times. (16 sts)

**Rnd 2**: K all sts.

**Rnd 3**: [Kfb, k1] 8 times. (24 sts)

**Rnds 4-8**: K all sts. (5 rounds even)

**Rnd 9**: [Ssk, k1] 8 times. (16 sts)

**Rnds 10-22**: K all sts. (13 rounds even)

**Finish**: Stuff leg firmly. Cut yarn, leaving 12" tail. Thread tail through remaining 16 sts and pull tight to close. Leave tail for seaming to body.

---

### EARS (Make 2)

**Setup**: Cast on 6 sts in MC. Divide evenly on DPNs or use Magic Loop. Join to work in the round. Pm for beginning of round.

**Rnd 1**: [Kfb] 6 times. (12 sts)

**Rnds 2-6**: K all sts. (5 rounds even)

**Rnd 7**: [Ssk] 6 times. (6 sts)

**Finish**: Do not stuff (or stuff very lightly for shape). Cut yarn, leaving 10" tail. Thread tail through remaining 6 sts and pull tight to close. Leave tail for seaming to head.

---

### MONSTER HORNS (Optional, Make 2)

**Setup**: Cast on 6 sts in CC (white/cream) or MC. Divide evenly on DPNs or use Magic Loop. Join to work in the round. Pm for beginning of round.

**Rnds 1-4**: K all sts. (4 rounds even)

**Rnd 5**: [Ssk] 3 times. (3 sts)

**Finish**: Do not stuff. Cut yarn, leaving 8" tail. Thread tail through remaining 3 sts and pull tight to close. Leave tail for seaming to head.

---

## ASSEMBLY

**Order of Assembly**:

1. **Attach Head to Body**: Pin head to top of body, aligning as desired (slightly forward for seated pose). Using tapestry needle and yarn tail, whip stitch or mattress stitch securely all the way around. Weave in ends.

2. **Attach Legs**: Position legs at bottom front of body. For seated pose, angle legs slightly forward. Using yarn tails, seam firmly to body using whip stitch. Ensure legs are symmetrically placed. Weave in ends.

3. **Attach Arms**: Position arms on either side of body, approximately 2-3 rounds below where head joins body. Seam securely using whip stitch. Weave in ends.

4. **Attach Ears**: Position ears on top/sides of head as desired. For monster look, place slightly more to sides and angled outward. Seam the closed end of each ear to head securely. Weave in ends.

5. **Attach Horns (Optional)**: Position small horns on top of head, between or near ears. Seam securely. Weave in ends.

---

## FINISHING

**Face Details**:
- Using black embroidery thread or yarn, embroider a smiling mouth below eyes using backstitch or straight stitches
- Optional: Add small white highlights to eyes using white embroidery thread
- Optional: Embroider small nostrils with CC yarn

**Monster Details**:
- For textured "fur" effect, you can add small tufts of yarn in CC color on head or body by threading short pieces through knitted fabric and trimming
- Consider adding contrasting belly patch using duplicate stitch or felt appliqué

**Phonics Elements**:
- Create felt letters (A, B, C, etc.) and hand-sew to belly as a teaching tool
- Alternatively, embroider alphabet letters using chain stitch
- Add small felt pocket to hold letter cards
- Attach Velcro-backed felt letters that can be changed for interactive phonics practice

**Final Touches**:
- Weave in all remaining ends securely
- Check all seams for security
- Block lightly with steam if needed to even out any irregularities
- Give your Cool Blue Monster Phonics Teddy a hug!

---

## CARE INSTRUCTIONS

Hand wash in cool water with mild detergent. Squeeze gently (do not wring). Lay flat to dry away from direct heat. If using safety eyes, these are not suitable for children under 3 years old. For young children, embroider eyes instead.

---

## CUSTOMIZATION IDEAS

- **Color Variations**: Try purple, green, or orange for different monster personalities
- **Size Adjustments**: Use bulky yarn and larger needles for a bigger toy, or DK weight and smaller needles for a smaller version
- **Additional Features**: Add a small tail, wings, or spikes down the back
- **Educational Add-ons**: Create a set of removable numbers or sight words on felt pieces
- **Clothing**: Knit a simple vest or scarf for additional play value

---

## DESIGN NOTES

This Cool Blue Monster Phonics Teddy combines the cuddly appeal of a traditional teddy bear with fun monster characteristics and educational elements. The intermediate construction involves basic increasing and decreasing in the round, making it a great project for knitters ready to try toy-making. The firm gauge creates a durable toy that can withstand lots of phonics practice and playtime adventures!

---

*Pattern designed for intermediate knitters. All calculations verified for worsted weight yarn at 20 sts/4" gauge.*
Disclaimer: This pattern was generated by AI and should be reviewed for accuracy before use. While we strive for quality, AI-generated content may contain errors. Please verify measurements, stitch counts, and instructions before beginning your project. Generated by purlJam.uk
Access your pattern anytime
Bookmark this page to access your pattern anytime