Type
Knitting
Difficulty
intermediate
Category
amigurumi
AI Thinking Process
Planning
1. **Design Strategy**: A seamless knitted teddy bear worked in stockinette in the round on worsted weight yarn with tight tension, paired with a separately constructed mini mountain bike accessory (frame, two wheels, handlebars) in grey/black to make it a "mountain bike teddy". Bear in warm brown, bike in charcoal grey with chunky knit-tube wheels.
2. **Construction Plan**: All bear pieces (head, body, 2 arms, 2 legs, 2 ears, muzzle) worked separately in the round, stuffed firmly and seamed with mattress stitch; bike built from i-cord tubes and stuffed-ring wheels, then strapped under the bear.
3. **Quality Assurance**:
- Stuffing showing through fabric → use 4mm needles (one size down) for tight tension.
- Lumpy seams between head/body → mattress stitch evenly, stuff firmly first.
- Bike wheels collapsing → form i-cord rings over pipe cleaner/floral wire for shape retention.
4. **Final Calculations**: Tension 22 sts × 30 rows = 10 cm in st st on 4mm. Head cast-on 8 sts → inc to 36 (head ≈ 13 cm circ → ~6 cm dia). Body 8→32 sts. Arms/legs 12 sts. Finished bear ≈ 20 cm tall. Wheels ≈ 6 cm dia each.
Verification
[PRE-FLIGHT CHECKS]
1. **Completeness**: Includes materials (with stuffing estimate), tension note, all bear pieces, bike accessory, assembly order, finishing. ✓
2. **Consistency**: Head increases 8→36 verified (8,16,24,30,36 = increments of 8,8,6,6); body 8→32 (8,16,24,32). Decreases mirror increases. ✓
3. **Constraints**: UK English, metric-first, tension terminology, worsted weight, intermediate level, mountain bike theme all addressed. ✓
4. **Safety**: Math checked inline; safety eyes inserted before closing head; wire ends in bike must be capped (noted). ✓
Pattern
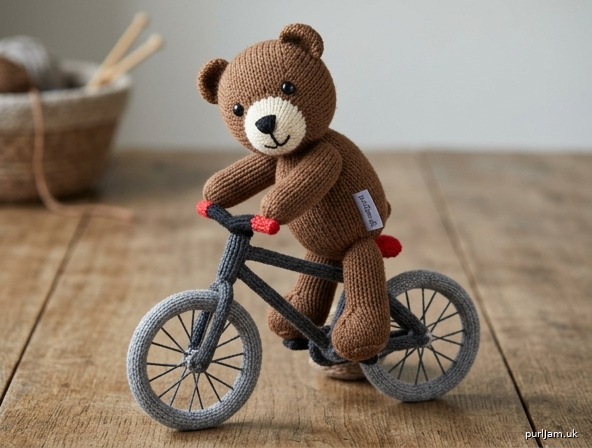
# Trailblazer Ted — Mountain Bike Teddy
*An intermediate knitted amigurumi bear with a removable mini mountain bike*

Worked in the round in stockinette throughout, this little adventurer is seamed from separate pieces. His knitted mountain bike is built from i-cord tubes and firm stuffed wheels, then strapped beneath him so he's always ready to hit the trail.

---

## Finished Measurements
- **Bear:** approx. 20 cm tall (seated approx. 14 cm)
- **Bike:** approx. 14 cm long × 9 cm tall; wheels approx. 6 cm diameter

---

## Materials
- **Yarn (worsted/aran weight, ~190 m/100 g):**
  - Colour A — warm brown: approx. 70 g (bear body, head, limbs, ears)
  - Colour B — cream: approx. 5 g (muzzle, inner ears)
  - Colour C — charcoal grey: approx. 40 g (bike frame, wheels)
  - Colour D — bright accent (red/orange): small amount (bike details, scarf optional)
- **Needles:** 4.0 mm DPNs or one long circular for Magic Loop (one size smaller than the 5 mm typically recommended for worsted, to create tight fabric)
- **Notions:**
  - Polyester fibrefill stuffing — approx. **60–70 g** total (bear ~45 g; bike wheels ~15 g)
  - Two 9 mm safety eyes (or black embroidery floss)
  - Black embroidery floss for nose/mouth
  - Two pipe cleaners or lengths of floral wire (~30 cm each) for wheel shaping
  - Tapestry needle
  - Stitch markers

---

## Tension (Gauge)
**22 sts × 30 rows = 10 cm** over stocking stitch in the round on 4.0 mm needles, worked firmly.

> **Tension note:** Exact stitch count is less important than a **tight, even fabric** that won't let stuffing peek through. If your fabric looks gappy, drop to 3.75 mm. Measure after working a few rounds, as in-the-round stocking stitch can pull differently from flat swatches.

---

## Abbreviations (UK)
- **k** – knit
- **p** – purl
- **kfb** – knit into front and back of stitch (1 st increased)
- **k2tog** – knit two together (1 st decreased)
- **ssk** – slip, slip, knit (1 st decreased)
- **st(s)** – stitch(es)
- **rnd(s)** – round(s)
- **st st** – stocking stitch (knit every round in the round)
- **PM** – place marker
- **rep** – repeat
- **MC/CC** – main/contrast colour

> All pieces begin with a small cast-on closed at the end, or use Judy's Magic Cast-On / a tight long-tail then cinch closed. Work in the round throughout (knit every round = stocking stitch).

---

## HEAD (Colour A) — make 1
Cast on 8 sts, divide over needles, PM, join in the round.

- **Rnd 1:** kfb in every st → **16 sts**
  *(8 + 8 = 16 ✓)*
- **Rnd 2:** knit
- **Rnd 3:** *(k1, kfb)* rep to end → **24 sts**
  *(16 + 8 = 24 ✓)*
- **Rnd 4:** knit
- **Rnd 5:** *(k3, kfb)* rep to end → **30 sts**
  *(24 + 6 = 30 ✓)*
- **Rnd 6:** knit
- **Rnd 7:** *(k4, kfb)* rep to end → **36 sts**
  *(30 + 6 = 36 ✓)*
- **Rnds 8–18:** knit (11 rnds straight)

**Insert safety eyes** between rnds 12 and 13, approx. 7 sts apart, before decreasing closes the head.

- **Rnd 19:** *(k4, k2tog)* rep to end → **30 sts** *(36 − 6 ✓)*
- **Rnd 20:** knit
- **Rnd 21:** *(k3, k2tog)* rep to end → **24 sts** *(30 − 6 ✓)*
- **Rnd 22:** *(k2, k2tog)* rep to end → **18 sts** *(24 − 6 ✓)*

**Stuff firmly now.**

- **Rnd 23:** *(k1, k2tog)* rep to end → **12 sts** *(18 − 6 ✓)*
- **Rnd 24:** *k2tog* rep to end → **6 sts** *(12 − 6 ✓)*

Top up stuffing. Break yarn, thread through remaining 6 sts, cinch and secure.

---

## MUZZLE (Colour B) — make 1
Cast on 6 sts, join in the round.
- **Rnd 1:** kfb in every st → **12 sts** *(6 + 6 ✓)*
- **Rnd 2:** *(k1, kfb)* rep → **18 sts** *(12 + 6 ✓)*
- **Rnds 3–4:** knit

Leave sts live on a holder or work a few rnds straight; do not close. Leave a long tail for sewing. Stuff lightly when attaching.

---

## EARS (Colour A outer, Colour B inner) — make 2
With Colour A, cast on 6 sts, join.
- **Rnd 1:** kfb in every st → **12 sts** *(6 + 6 ✓)*
- **Rnds 2–4:** knit
- Switch to a flat fold: do not stuff. Flatten the tube and seam the cast-on edge closed; pinch base. Use a few cream sts inside if desired, or embroider an inner-ear oval in Colour B.

---

## BODY (Colour A) — make 1
Cast on 8 sts, join.
- **Rnd 1:** kfb in every st → **16 sts** *(8 + 8 ✓)*
- **Rnd 2:** *(k1, kfb)* rep → **24 sts** *(16 + 8 ✓)*
- **Rnd 3:** *(k2, kfb)* rep → **32 sts** *(24 + 8 ✓)*
- **Rnds 4–20:** knit (17 rnds straight)
- **Rnd 21:** *(k2, k2tog)* rep to end → **24 sts** *(32 − 8 ✓)*
- **Rnd 22:** knit
- **Rnd 23:** *(k1, k2tog)* rep to end → **16 sts** *(24 − 8 ✓)*

**Stuff firmly.**

- **Rnd 24:** *k2tog* rep to end → **8 sts** *(16 − 8 ✓)*

Leave the 8 sts live on the working yarn — you'll use the open end to seam to the head. Do not cinch fully yet.

---

## ARMS (Colour A) — make 2
Cast on 6 sts, join.
- **Rnd 1:** kfb in every st → **12 sts** *(6 + 6 ✓)*
- **Rnds 2–14:** knit (13 rnds straight)
- **Rnd 15:** *(k1, k2tog)* rep to end → **8 sts** *(12 − 4 ✓)*

Stuff lightly (keep arms soft and bendy at the top). Flatten the top opening; you'll seam it to the body. Thread tail through last sts loosely.

---

## LEGS (Colour A) — make 2
Cast on 8 sts, join.
- **Rnd 1:** kfb in every st → **16 sts** *(8 + 8 ✓)*
- **Rnds 2–4:** knit
- **Rnd 5:** *(k2, k2tog)* rep to end → **12 sts** *(16 − 4 ✓)*
  *(this shapes the foot)*
- **Rnds 6–16:** knit (11 rnds straight)

Stuff firmly in the foot, lightly up the leg. Leave open top to seam to body. Long tail for sewing.

---

# THE MOUNTAIN BIKE (Colour C unless noted)

### WHEELS — make 2
Each wheel is a stuffed knitted tube formed into a ring around wire.

Cast on 8 sts, join.
- **Rnds 1–onwards:** knit every round until the tube measures **19 cm** (the circumference for a 6 cm-diameter wheel: π × 6 ≈ 18.8 cm ✓).

Bind off leaving a long tail. Thread a pipe cleaner/wire through the tube, stuff lightly around it, then bring cast-on and bound-off ends together to form a ring and seam closed. **Twist and tuck wire ends inside so no sharp points protrude.**

With Colour D, embroider 6–8 straight "spoke" lines across each wheel from a central point.

### FRAME (Colour C) — i-cord tubes
Work all frame bars as 4-st i-cord (k4, slide, repeat).

- **Top tube + down tube (main triangle):** Work a 4-st i-cord **18 cm** long. Fold/bend into a triangle shape (top tube ~7 cm, down tube ~7 cm, seat tube ~4 cm) and tack the joins with matching yarn.
- **Chain stays/forks (rear + front holders):** Work two 4-st i-cords each **8 cm** long. These cradle the wheel axles.

### HANDLEBARS (Colour C)
Work a 4-st i-cord **8 cm** long; bend into a flat-bar shape. Attach Colour D dots at each end for grips.

### SEAT (Colour C)
Cast on 6 sts, knit 4 rnds, flatten and seam to form a small saddle pad.

---

## ASSEMBLY

Work in this order for a balanced, sturdy toy:

1. **Muzzle to head:** Centre the muzzle over rnds 11–15 of the head, between/below the eyes. Stuff lightly and mattress-stitch all around.
2. **Nose & mouth:** With black floss, satin-stitch a triangular nose at the top of the muzzle; add an inverted-Y mouth beneath.
3. **Ears to head:** Pin symmetrically near the top, approx. 6 sts apart. Curve slightly forward and sew the pinched base securely.
4. **Head to body:** Align the head's cinched base with the body's open 8-st top. Mattress-stitch firmly around the join, adding a little extra stuffing at the neck before closing for support. The head should sit upright without flopping.
5. **Legs to body:** Attach at the front-lower edge of the body so the bear can sit. Position symmetrically — measure an equal number of stitches from the centre front on each side. Sew all around each opening.
6. **Arms to body:** Attach at the upper sides, just below the neck seam, symmetrically. Angle slightly forward so the bear can "hold" the handlebars.
7. **Assemble the bike:** Slot each wheel into a fork/stay i-cord, securing the axle ends. Attach handlebars to the front fork and saddle to the seat tube. Tack all frame joins firmly.
8. **Mount the bear:** Sit the bear on the saddle, bend the arms to the handlebars and the legs toward the pedals area; tack lightly with Colour C if you'd like him fixed in place, or leave free so the bike is removable.

---

## FINISHING
- Weave in all ends securely **inside** the stuffed pieces, travelling the tail through the stuffing before trimming so nothing works loose.
- Check that all wire ends in the wheels are fully enclosed.
- Give the bear a gentle shape: roll seams between fingers to even them out.
- **Safety:** If this toy is for a child under 3, omit safety eyes and the wheel wire — embroider eyes in black floss and stuff wheels firmly without wire instead.

---

### Designer's Notes
- For extra trail-ready character, knit a small Colour D scarf (cast on 4 sts, knit i-cord 20 cm) and tie it round the neck.
- Bending the arms and legs gives a dynamic "riding" pose; tack at the joints to hold the position.
- Swap Colour A to white or black for a panda or polar variant — the bike works with any bear.

Happy trails! 🚲🐻
Disclaimer: This pattern was generated by AI and should be reviewed for accuracy before use. While we strive for quality, AI-generated content may contain errors. Please verify measurements, stitch counts, and instructions before beginning your project. Generated by purlJam.uk
Access your pattern anytime
Bookmark this page to access your pattern anytime