Type
Crochet
Difficulty
beginner
Category
amigurumi
AI Thinking Process
Planning
Pattern
Leebit & Han Simple Character Plushies
Beginner amigurumi · worsted weight · US crochet terms
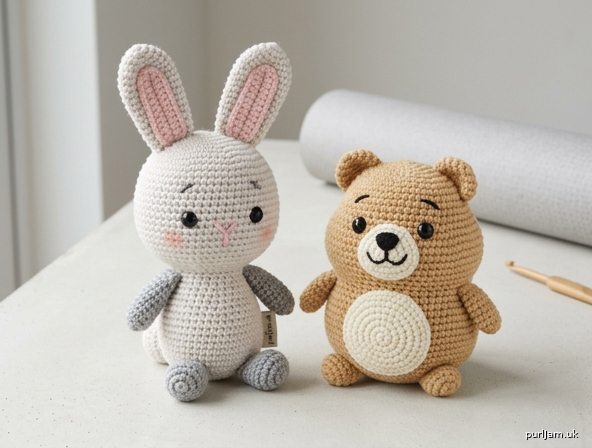
Fan-made sitting plushies of a pale rabbit character (Leebit) and a round quokka character (Han). Both are built from the same beginner toolkit: spheres for heads and bodies, short cylinders for limbs, and small ovals or flattened circles for ears and face patches. No colorwork in the round and no complex joints.
Skill level: Beginner
Techniques: Magic ring, single crochet in continuous rounds, increase, invisible decrease, stuffing, whip-stitch assembly, simple embroidery.
Finished measurements
Worked tightly at the stated gauge.
- Leebit: about 6" (15 cm) tall including ears; sitting body about 4½" (11.5 cm)
- Han: about 4½" (11.5 cm) tall
- Head diameter (both): about 1¾–2" (4.5–5 cm)
- Body diameter (both): about 2¼" (5.5–6 cm)
Materials
Yarn — worsted weight (4), acrylic recommended (soft, washable, holds stuffing)
| Color | Amount | Used for |
|---|---|---|
| Light gray or off-white (Leebit MC) | 50 yd / 46 m (about 1 oz / 28 g) | Leebit head, body, ears, limbs, tail |
| Pale pink | 10 yd / 9 m | Leebit inner ears, nose, optional blush |
| Warm tan / light brown (Han MC) | 50 yd / 46 m (about 1 oz / 28 g) | Han head, body, ears, limbs, tail |
| Cream or beige | 15 yd / 14 m | Han muzzle, belly patch |
| Black | scrap | Eye embroidery (if not using safety eyes) and smiles |
| Dark brown (optional) | scrap | Han nose / mouth extra definition |
Notions
- US E-4 (3.5 mm) crochet hook (one to two sizes smaller than the yarn label — this keeps stitches tight so stuffing does not show)
- Stitch marker
- Yarn needle
- Polyester fiberfill
- 8 mm or 9 mm safety eyes (4 total) or black embroidery yarn
- Pins for placement
- Optional: pink felt scraps for blush; keychain finding if making a bag charm
Safety note: Safety eyes are a choking hazard. Do not use them on toys for children under 3 years — embroider the eyes instead.
Gauge
5 sc and 5 rnds = 1" (2.5 cm) in single crochet worked in the round, tightly.
Gauge is a fabric-density check, not a fit check. If you can see obvious gaps between stitches, go down a hook size. A 1" (2.5 cm) swatch worked as Rnds 1–5 of the Head (ending at 30 sc) should measure about 1¾–2" (4.5–5 cm) across.
Abbreviations (US)
- ch — chain
- sc — single crochet
- inc — 2 sc in the same stitch (1 stitch increased)
- dec — invisible decrease: insert hook through front loop of next 2 stitches, yarn over, pull through both, yarn over, pull through 2 (1 stitch decreased)
- sl st — slip stitch
- st(s) — stitch(es)
- rnd(s) — round(s)
- MR — magic ring
- FO — fasten off
- MC — main color
- ( ) — work the stitches in parentheses the number of times stated
- [ ] — stitch count at the end of the round
Pattern notes
- Work in continuous spirals. Do not join or chain at the start of rounds. Mark the first stitch of every round and move the marker up.
- Magic-ring alternative: ch 2, work the Rnd 1 stitches into the 2nd ch from the hook, then pull the starting tail to close the hole.
- Stuff as you go — it is hard to fill a closed sphere later. Stuff the neck area of the body extra-firm so the head sits upright.
- Work tightly. Amigurumi should feel firm, not drapey.
- Leave long tails (12" / 30 cm) on every piece that will be sewn.
- Pin every piece before sewing. Check both sides and the front view.
- The two characters share the same head, body, arm, leg, and tail recipes. Only colors, ears, and face patches change.
LEEBIT (Rabbit Character)
Palette: light gray MC, pale pink, black (or safety eyes).
Make 1 head, 1 body, 2 outer ears, 2 inner ears, 2 arms, 2 legs, 1 tail.
Head (light gray)
Stuff firmly from Rnd 11 onward. Insert safety eyes before Rnd 13.
- Rnd 1: 6 sc in MR. [6]
- Rnd 2: inc in each st around. (6 increases → 6 + 6 = 12 ✓) [12]
- Rnd 3: (sc, inc) around. (6 increases → 12 + 6 = 18 ✓) [18]
- Rnd 4: (2 sc, inc) around. (6 increases → 18 + 6 = 24 ✓) [24]
- Rnd 5: (3 sc, inc) around. (6 increases → 24 + 6 = 30 ✓) [30]
- Rnds 6–10: sc around. (5 rounds even) [30]
- Rnd 11: (3 sc, dec) around. (6 decreases → 30 − 6 = 24 ✓) [24]
- Rnd 12: sc around. [24]
Eyes: Insert 8–9 mm safety eyes between Rnds 8 and 9, 6 stitches apart, centered on the face. (If embroidering, wait until the head is closed.)
- Rnd 13: (2 sc, dec) around. (6 decreases → 24 − 6 = 18 ✓) [18]
Stuff firmly. - Rnd 14: (sc, dec) around. (6 decreases → 18 − 6 = 12 ✓) [12]
Add more stuffing. - Rnd 15: dec around. (6 decreases → 12 − 6 = 6 ✓) [6]
FO, leaving a 12" (30 cm) tail. Thread the tail through the front loops of the remaining 6 sts and pull closed. Weave in the closing tail; keep the long starting-or-sewing tail if you prefer to use it to attach the head.
Body (light gray)
- Rnd 1: 6 sc in MR. [6]
- Rnd 2: inc in each st around. (6 increases → 12 ✓) [12]
- Rnd 3: (sc, inc) around. (6 increases → 18 ✓) [18]
- Rnd 4: (2 sc, inc) around. (6 increases → 24 ✓) [24]
- Rnd 5: (3 sc, inc) around. (6 increases → 30 ✓) [30]
- Rnd 6: (4 sc, inc) around. (6 increases → 30 + 6 = 36 ✓) [36]
- Rnds 7–12: sc around. (6 rounds even) [36]
- Rnd 13: (4 sc, dec) around. (6 decreases → 36 − 6 = 30 ✓) [30]
- Rnd 14: (3 sc, dec) around. (6 decreases → 30 − 6 = 24 ✓) [24]
Stuff firmly, packing extra fill into the top (neck). - Rnd 15: (2 sc, dec) around. (6 decreases → 24 − 6 = 18 ✓) [18]
- Rnd 16: (sc, dec) around. (6 decreases → 18 − 6 = 12 ✓) [12]
Finish stuffing. - Rnd 17: dec around. (6 decreases → 12 − 6 = 6 ✓) [6]
FO, close the hole as for the head, and weave in. The closed end is the bottom; the Rnd 1–2 area is the neck.
Outer ears (make 2, light gray)
Do not stuff — flatten after fastening off.
- Rnd 1: 6 sc in MR. [6]
- Rnd 2: inc in each st around. (6 increases → 12 ✓) [12]
- Rnds 3–14: sc around. (12 rounds even) [12]
FO, leaving a 10" (25 cm) tail. Flatten the tube into a long petal. The FO end is the base (sewn to the head); the MR end is the tip.
Inner ears (make 2, pale pink)
- Rnd 1: 6 sc in MR. [6]
- Rnd 2: (sc, inc) around. (3 increases → 6 + 3 = 9 ✓) [9]
FO, leaving a 8" (20 cm) tail. Flatten into an oval.
Arms (make 2, light gray)
Stuff the first 3 rounds only, lightly.
- Rnd 1: 6 sc in MR. [6]
- Rnd 2: (sc, inc) around. (3 increases → 9 ✓) [9]
- Rnds 3–6: sc around. (4 rounds even) [9]
- Rnd 7: (sc, dec) around. (3 decreases → 9 − 3 = 6 ✓) [6]
FO, leaving a 10" (25 cm) tail. Flatten the open end slightly.
Legs (make 2, light gray)
Stuff firmly.
- Rnd 1: 6 sc in MR. [6]
- Rnd 2: inc in each st around. (6 increases → 12 ✓) [12]
- Rnds 3–5: sc around. (3 rounds even) [12]
- Rnd 6: (sc, dec) around. (4 decreases → 12 − 4 = 8 ✓) [8]
FO, leaving a 10" (25 cm) tail.
Tail (light gray)
Stuff lightly.
- Rnd 1: 6 sc in MR. [6]
- Rnd 2: inc in each st around. (6 increases → 12 ✓) [12]
- Rnd 3: sc around. [12]
- Rnd 4: dec around. (6 decreases → 6 ✓) [6]
FO, close the hole, leave a 8" (20 cm) tail for sewing.
Leebit face
Using pale pink yarn and a yarn needle, embroider a small upside-down triangle (or a Y) over Rnds 10–11, centered between the eyes, 1 round below them. Add a tiny vertical stitch under the nose for a mouth, or a small curved smile in black. Optional: two small pink stitches (or felt circles) on Rnds 9–10, outside each eye, for blush.
If you did not use safety eyes, embroider two small black ovals or French-knot eyes on Rnds 8–9, 6 stitches apart.
Leebit assembly
- Inner ears. Center each pink oval on the front of an outer ear, leaving a gray border all around. Whip-stitch with the pink tail.
- Ears to head. Pin the ear bases to the top of the head, spanning Rnds 3–6, about 3–4 stitches apart at the inner edges, angling slightly outward. The pink side faces forward. Whip-stitch through both layers of the flattened base. They should stand up; if they flop, take a tiny anchoring stitch on the back of each ear ½" (1.3 cm) above the base.
- Head to body. Pin the head on the body so the face looks forward and the closed body-bottom sits flat. The head sits over the body’s Rnds 1–4. Whip-stitch all the way around, adding a pinch of stuffing at the join if a gap appears.
- Arms. Pin at the sides, just under the head, on body Rnds 6–8. Whip-stitch the open end in a slight forward angle so the character looks like it is sitting with paws in front.
- Legs. Pin on the lower front of the body, Rnds 13–16, pointing forward and slightly out so the plush sits. Whip-stitch.
- Tail. Sew to the lower back, opposite the legs, on Rnds 14–16.
- Weave in every remaining tail. Steam is not needed; shape with your fingers.
HAN (Quokka Character)
Palette: warm tan MC, cream, black (or safety eyes), scrap of pink or dark brown for the nose.
Make 1 head, 1 body, 2 ears, 1 muzzle, 1 belly patch, 2 arms, 2 legs, 1 tail.
Head (tan)
Same recipe as Leebit Head, in tan.
- Rnd 1: 6 sc in MR. [6]
- Rnd 2: inc in each st around. (6 increases → 12 ✓) [12]
- Rnd 3: (sc, inc) around. (6 increases → 18 ✓) [18]
- Rnd 4: (2 sc, inc) around. (6 increases → 24 ✓) [24]
- Rnd 5: (3 sc, inc) around. (6 increases → 30 ✓) [30]
- Rnds 6–10: sc around. (5 rounds even) [30]
- Rnd 11: (3 sc, dec) around. (6 decreases → 24 ✓) [24]
- Rnd 12: sc around. [24]
Eyes: Insert 8–9 mm safety eyes between Rnds 8 and 9, 7 stitches apart (a slightly wider-set quokka face).
- Rnd 13: (2 sc, dec) around. (6 decreases → 18 ✓) [18]
Stuff firmly. - Rnd 14: (sc, dec) around. (6 decreases → 12 ✓) [12]
- Rnd 15: dec around. (6 decreases → 6 ✓) [6]
FO, close, leave a sewing tail.
Body (tan)
Same recipe as Leebit Body, in tan.
- Rnd 1: 6 sc in MR. [6]
- Rnd 2: inc in each st around. [12]
- Rnd 3: (sc, inc) around. [18]
- Rnd 4: (2 sc, inc) around. [24]
- Rnd 5: (3 sc, inc) around. [30]
- Rnd 6: (4 sc, inc) around. [36]
- Rnds 7–12: sc around. [36]
- Rnd 13: (4 sc, dec) around. [30]
- Rnd 14: (3 sc, dec) around. [24]
Stuff firmly, extra at the neck. - Rnd 15: (2 sc, dec) around. [18]
- Rnd 16: (sc, dec) around. [12]
- Rnd 17: dec around. [6]
FO and close.
Ears (make 2, tan)
These are tiny round ears. Do not stuff.
- Rnd 1: 6 sc in MR. [6]
- Rnd 2: inc in each st around. (6 increases → 12 ✓) [12]
FO, leaving a 8" (20 cm) tail. Flatten the circle into a half-moon: fold so Rnd 1 sits on the fold and the Rnd 2 edge is the curved outer rim.
Muzzle (cream)
Worked as a small oval around a chain.
- Ch 5.
- Rnd 1: 2 sc in 2nd ch from hook, sc in next 2 ch, 3 sc in last ch; rotate to work along the opposite side of the chain, sc in next 2 ch, 1 sc in the same ch as the first 2 sc. (2 + 2 + 3 + 2 + 1 = 10 ✓) [10]
- Rnd 2: inc in next 2 sts, sc in next 2 sts, inc in next 3 sts, sc in next 2 sts, inc in last st. (2+2+1+1 + 2+2+2 + 1+1 + 2 = 16 produced from 10 sts ✓) [16]
FO, leaving a 10" (25 cm) tail. Do not stuff. The oval should measure about 1" × ⅝" (2.5 × 1.5 cm).
Belly patch (cream)
- Ch 6.
- Rnd 1: 2 sc in 2nd ch from hook, sc in next 3 ch, 3 sc in last ch; rotate, sc in next 3 ch, 1 sc in the same ch as the first 2 sc. (2 + 3 + 3 + 3 + 1 = 12 ✓) [12]
- Rnd 2: inc in next 2 sts, sc in next 3 sts, inc in next 3 sts, sc in next 3 sts, inc in last st. (2+2 + 1+1+1 + 2+2+2 + 1+1+1 + 2 = 18 produced from 12 sts ✓) [18]
- Rnd 3: (sc, inc) in the next st, inc in next st, sc in next 4 sts, (sc, inc) in next st, inc in next 2 sts, sc in next 4 sts, inc in last st.
Count check: you started with 18. Work this round as: inc, inc, sc 4, inc, inc, inc, sc 4, inc. (6 increases → 18 + 6 = 24 ✓) [24]
FO, leaving a 12" (30 cm) tail. Do not stuff. Oval about 1½" × 1¼" (4 × 3 cm).
Arms (make 2, tan)
Same as Leebit Arms.
- Rnd 1: 6 sc in MR. [6]
- Rnd 2: (sc, inc) around. [9]
- Rnds 3–6: sc around. [9]
- Rnd 7: (sc, dec) around. [6]
FO, stuff the first 3 rnds lightly, leave a sewing tail.
Legs (make 2, tan)
Same as Leebit Legs.
- Rnd 1: 6 sc in MR. [6]
- Rnd 2: inc in each st around. [12]
- Rnds 3–5: sc around. [12]
- Rnd 6: (sc, dec) around. [8]
FO, stuff firmly, leave a sewing tail.
Tail (tan)
Same as Leebit Tail.
- Rnd 1: 6 sc in MR. [6]
- Rnd 2: inc in each st around. [12]
- Rnd 3: sc around. [12]
- Rnd 4: dec around. [6]
FO, stuff lightly, close, leave a sewing tail.
Han face
Pin the cream muzzle onto the lower face, covering Rnds 10–13, centered under the eyes, overlapping the eye line by about 1 round so the eyes sit on the upper edge of the muzzle. Whip-stitch with cream.
Embroider a small dark-brown or black rounded triangle / oval nose at the top center of the muzzle. Under the nose, stitch a wide shallow W or a simple curved smile — quokkas look happiest with a broad grin. Optional pink blush stitches just outside each eye on Rnds 9–10.
If you did not use safety eyes, embroider them on Rnds 8–9, 7 stitches apart, sitting on the muzzle’s top edge.
Han assembly
- Ears to head. Pin each flattened half-moon to the sides of the head, top edge at Rnd 4, bottom at Rnd 7, about 10–12 stitches apart across the crown (they sit lower and rounder than Leebit’s). The fold is sewn to the head; the curved 12-st edge sticks out. Whip-stitch along the fold only.
- Belly patch. Pin to the front of the body, top edge at about Rnd 8, bottom at about Rnd 14, centered. Whip-stitch with cream.
- Head to body. Same as Leebit: face forward, head over body Rnds 1–4, whip-stitch, extra stuffing at the join if needed. Han’s head and body should look like two stacked balls — that round silhouette is the character.
- Arms. Sides, body Rnds 6–8, angled slightly forward.
- Legs. Lower front, body Rnds 13–16, pointing forward so the plush sits.
- Tail. Lower back, Rnds 14–16.
- Weave in all tails. Shape the muzzle and belly with your fingers so they lie smooth.
Finishing (both)
- Check that both plushies sit without tipping. If one rolls, add a little extra stuffing through a small opening in a leg join, or take a hidden stitch between the inner thighs.
- Trim nothing close on the face — weave embroidery tails into the stuffing.
- Spot-clean with cool water and mild soap. Air-dry. Do not machine-dry (the stuffing will shift and the ears will warp).
Optional size changes
- Keychain (~3" / 7.5 cm): stop the head at 18 sts (end increases after Rnd 3), work 3 even rounds, then decrease. Stop the body at 24 sts. Shorten Leebit ears to Rnds 3–8 only. Attach a jump ring through a stitch at the crown.
- Larger (~7–8" / 18–20 cm): add one more increase round on head and body — head to 36 sts, body to 42 sts
(5 sc, inc) around from 36— and add 2 extra even rounds on each. Lengthen Leebit ears by 4 rounds.
Optional details
- Surface slip stitch a faint line down the center of each Leebit outer ear for a gentle crease.
- A tiny pink French knot on each Han cheek.
- Wear-your-heart: embroider a small heart on Han’s belly patch with contrasting scrap yarn.
Stitch-count recap (both characters)
Head 6-12-18-24-30 / even / 24-18-12-6. Body 6-12-18-24-30-36 / even / 30-24-18-12-6. Leebit outer ear 6-12 then 12 even. Leebit inner ear 6-9. Han ear 6-12 flattened. Arms 6-9 even 6. Legs 6-12 even 8. Tail 6-12-12-6. All round counts close.
These are original beginner constructions using simple spheres, cylinders, and ovals. They are not official merchandise.
Disclaimer: This pattern was generated by AI and should be reviewed for accuracy before use. While we strive for quality, AI-generated content may contain errors. Please verify measurements, stitch counts, charts, and instructions before beginning your project. Generated by purlJam.uk
Love this pattern?
Save this pattern to your free PurlJam libraryAccess your pattern anytime
Bookmark this page to access your pattern anytime