Type
Crochet
Difficulty
beginner
Category
amigurumi
AI Thinking Process
Planning
Verification
Pattern
Simple Shapes Giraffe
Crocheted Amigurumi Toy
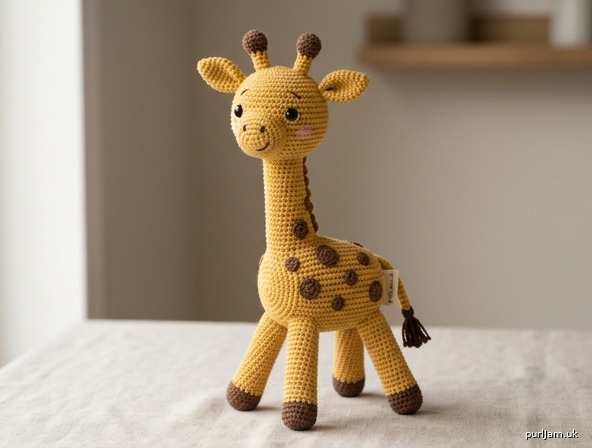
A beginner-friendly giraffe built from basic amigurumi shapes: a sphere head, a long cylinder neck, an elongated sphere body, and cylinder legs. Tiny cylinders become ossicones, flattened rounds become ears, and small circles become spots. Worked in worsted weight yarn with only single crochet, increases, and decreases.
Skill level: Beginner
Finished size: About 8½" (22 cm) tall including ossicones, and 3" (7.5 cm) wide at the body, using the yarn and hook below. Size will change if you use a different yarn, hook, or stuffing density.
Materials
- Worsted weight (4) yarn
- Color A (golden yellow): 55 yd (50 m)
- Color B (medium brown): 30 yd (27 m)
- US E-4 (3.5 mm) crochet hook (go down 1–2 sizes from the yarn label so the fabric is tight)
- 8 mm safety eyes (1 pair), or black embroidery floss if the toy is for a child under 3
- Polyester fiberfill stuffing
- Yarn needle
- Stitch marker
- Straight pins
- Scissors
Optional: Small amount of black or dark brown yarn/floss for nostrils and mouth; pink yarn or felt for cheeks.
Gauge
11 sc and 12 rounds = 2" (5 cm) in single crochet worked in the round.
Gauge is important for a firm fabric that hides stuffing. If your swatch is larger than 2" (5 cm), go down a hook size. If it is smaller, go up a hook size. A slightly tight fabric is better than a loose one.
Abbreviations (US)
- MR – magic ring
- ch – chain
- sc – single crochet
- inc – increase (2 sc in the same stitch)
- dec – invisible decrease (insert hook in front loop of next 2 sts, yarn over, pull through both, yarn over, pull through 2)
- sl st – slip stitch
- st(s) – stitch(es)
- rnd(s) – round(s)
- FO – fasten off
- BLO – back loop only
- [ ] – stitch count at end of round
Pattern Notes
- Work in a continuous spiral. Do not join rounds and do not turn unless the instructions say so.
- Place a stitch marker in the first stitch of every round and move it up as you go.
- Use the invisible decrease for a smooth surface.
- Work tightly so stuffing does not show through the stitches.
- Stuff as you go. It is hard to add stuffing after a piece is nearly closed.
- Leave a long tail (about 12" / 30 cm) on every piece that will be sewn on.
- Color changes: finish the last stitch of the old color until 2 loops remain on the hook, yarn over with the new color, and pull through. Tie the tails together on the inside and weave them in later.
- Safety: Safety eyes are a choking hazard for children under 3 years. For babies and toddlers, embroider the eyes with yarn instead. Supervise play. This pattern makes a soft toy, not a teether.
Head (Color A)
Worked as a sphere.
Rnd 1: 6 sc in MR. [6]
Rnd 2: Inc in each st around. [12] (6 increases → 6 + 6 = 12 ✓)
Rnd 3: (Sc, inc) 6 times. [18] (6 increases → 12 + 6 = 18 ✓)
Rnd 4: (2 sc, inc) 6 times. [24] (6 increases → 18 + 6 = 24 ✓)
Rnds 5–9: Sc in each st around. [24] (5 even rounds)
Insert safety eyes between rnds 6 and 7, about 5 stitches apart, centered on the face. If you are embroidering eyes, skip this and add them at finishing.
Rnd 10: (2 sc, dec) 6 times. [18] (6 decreases → 24 − 6 = 18 ✓)
Stuff the head firmly, rounding it as you stuff.
Rnd 11: (Sc, dec) 6 times. [12] (6 decreases → 18 − 6 = 12 ✓)
Add more stuffing so the head is firm and even.
Rnd 12: Dec 6 times. [6] (6 decreases → 12 − 6 = 6 ✓)
FO, leaving a short tail. Thread the tail through the front loops of the remaining 6 sts and pull closed. Weave in.
Neck (Color A)
Worked as a cylinder. Leave the top open for sewing.
Rnd 1: 6 sc in MR. [6]
Rnd 2: Inc in each st around. [12] (6 increases → 6 + 6 = 12 ✓)
Rnds 3–16: Sc in each st around. [12] (14 even rounds)
Stuff firmly as you go, especially in the middle, so the neck stands up. Do not close. FO, leaving a 12" (30 cm) tail for sewing.
Body (Color A)
Worked as an elongated sphere (oval).
Rnd 1: 6 sc in MR. [6]
Rnd 2: Inc in each st around. [12] (6 increases → 6 + 6 = 12 ✓)
Rnd 3: (Sc, inc) 6 times. [18] (6 increases → 12 + 6 = 18 ✓)
Rnd 4: (2 sc, inc) 6 times. [24] (6 increases → 18 + 6 = 24 ✓)
Rnd 5: (3 sc, inc) 6 times. [30] (6 increases → 24 + 6 = 30 ✓)
Rnds 6–11: Sc in each st around. [30] (6 even rounds)
Rnd 12: (3 sc, dec) 6 times. [24] (6 decreases → 30 − 6 = 24 ✓)
Rnd 13: (2 sc, dec) 6 times. [18] (6 decreases → 24 − 6 = 18 ✓)
Stuff firmly, keeping the shape long rather than perfectly round.
Rnd 14: (Sc, dec) 6 times. [12] (6 decreases → 18 − 6 = 12 ✓)
Add more stuffing.
Rnd 15: Dec 6 times. [6] (6 decreases → 12 − 6 = 6 ✓)
FO, close the hole as for the head, and weave in.
Legs (make 4)
Start at the hoof with Color B, then change to Color A. Worked as cylinders, hoof at the closed end.
With Color B:
Rnd 1: 6 sc in MR. [6]
Rnd 2: Inc in each st around. [12] (6 increases → 6 + 6 = 12 ✓)
Rnd 3: Sc in each st around. [12]
Change to Color A.
Rnds 4–8: Sc in each st around. [12] (5 yellow rounds)
Stuff firmly, packing extra stuffing into the hoof so the leg can support weight. Do not close. FO, leaving a 10" (25 cm) tail for sewing.
Ears (make 2, Color A)
Worked as small rounds, then flattened. Do not stuff.
Rnd 1: 6 sc in MR. [6]
Rnd 2: (Sc, inc) 3 times. [9] (3 increases → 6 + 3 = 9 ✓)
Rnds 3–4: Sc in each st around. [9]
FO, leaving an 8" (20 cm) tail. Flatten the piece into a petal (the open edge becomes the base). The two layers of the open edge will be sewn to the head together.
Ossicones (make 2, Color B)
Tiny cylinders. Lightly stuffed with yarn tails.
Rnd 1: 6 sc in MR. [6]
Rnds 2–5: Sc in each st around. [6] (4 even rounds)
FO, leaving an 8" (20 cm) tail. Push the starting tail up into the tube as stuffing. Do not close; the open end sews to the head.
Spots (Color B)
Make 6 small and 4 medium. Do not stuff.
Small (make 6):
Rnd 1: 6 sc in MR. [6]
Sl st in first sc. FO, leaving a 6" (15 cm) tail.
Medium (make 4):
Rnd 1: 6 sc in MR. [6]
Rnd 2: (Sc, inc) 3 times. [9] (3 increases → 6 + 3 = 9 ✓)
Sl st in first sc. FO, leaving a 6" (15 cm) tail.
Tail (Color A, tuft in Color B)
Row 1: With Color A, ch 12. Sc in 2nd ch from hook and in each ch across. [11]
FO, leaving an 8" (20 cm) tail for sewing.
Tuft: Cut 3 strands of Color B, each 3" (7.5 cm) long. Fold a strand in half, insert the hook through the last stitch at the free end of the tail, grab the fold, pull up a loop, then pull the cut ends through the loop (lark’s head knot). Repeat with the other 2 strands. Trim the tuft to about ¾" (2 cm).
Assembly
Pin every piece before you sew. Use whipstitch or mattress stitch with the yarn tails. Hide knots inside the toy.
1. Head details (do this first)
- Sew the ossicones to the top of the head, on rnds 3–4, about 3 stitches apart and standing straight up.
- Sew the ears to the sides of the head, on rnds 5–7, just behind and slightly below the ossicones. Sew through both layers of the flattened open edge so each ear stands out.
- If you did not use safety eyes, embroider two small eyes in Color B or black floss between rnds 6 and 7, 5 stitches apart.
2. Face
With Color B (or black floss), embroider:
- Two small nostrils (French knots or tiny satin stitches) centered on rnd 8, about 2 stitches apart.
- A short curved smile on rnd 9, just below the nostrils.
Optional: add a tiny pink stitch on each cheek.
3. Neck to head
Pin the open end of the neck to the underside of the head, centered, covering roughly rnds 10–12 of the head. The closed (MR) end of the neck points down toward the body. Whipstitch all the way around. Add a pinch more stuffing at the join if the neck looks dented.
4. Neck to body
Pin the closed end of the neck to the top front of the body (not dead center—slightly toward one of the “long” ends so the giraffe has a forward posture). The neck should sit over rnds 5–8 of the body. Whipstitch securely. The body should sit level when the neck is upright.
5. Legs
Pin all 4 legs to the underside of the body before sewing any of them:
- Two front legs toward the neck end, about 4 stitches apart.
- Two back legs toward the tail end, about 4 stitches apart.
- All four should splay just slightly outward so the toy stands.
Check that the toy stands on a flat surface and that all hooves touch. Then sew each open leg edge to the body. Add stuffing at the join if a leg looks thin.
6. Tail
Sew the chain end of the tail to the back of the body, opposite the neck, on about rnd 8–9, centered between the back legs. The tuft hangs free.
7. Spots
Pin, then sew, spots in Color B:
- Head: 1 small spot on each side, behind the eyes.
- Neck: 2 small spots, staggered down the length.
- Body: 4 medium and 2 small spots, scattered on the sides and back (leave the belly mostly clear).
Sew around the edge of each spot with the matching tail so they lie flat.
8. Optional mane
With Color B, work a line of surface slip stitches down the back of the neck from the base of the ossicones to the body, or make 6–8 short straight stitches along that line. Keep it simple; a giraffe mane is a thin ridge, not a full fringe.
Finishing
- Weave in every remaining tail, burying ends inside the stuffing.
- Roll the head, body, and neck between your palms to even out the stuffing.
- If a seam dimples, add a little stuffing with the needle (push small bits through a stitch gap).
- If the giraffe leans, restuff the legs on the low side or restitch a leg a stitch or two toward the center.
Your giraffe should stand about 8½" (22 cm) tall, with a long firm neck, four sturdy legs, two ossicones, and a spotted yellow coat.
Size adjustments (optional)
- Larger (about 10–11" / 25–28 cm): After head rnd 4, add (3 sc, inc) 6 times to reach 30 sts, work 6 even rounds at 30, then decrease to match the body shaping. Add 4 extra even rounds to the neck and 2 extra even rounds to the body and each leg.
- Smaller / keychain (about 5" / 13 cm): Stop head increases at 18 sts, neck at 9 sts (rnd 1: 6 sc; rnd 2: (sc, inc) 3 times = 9), body at 24 sts, and shorten even rounds by about one third. Embroider eyes; skip safety eyes. Attach a keychain finding at the top of the head with a jump ring sewn through a stitch.
Care
Spot clean with a damp cloth. Do not machine wash if safety eyes are used. Air dry. Reshape while damp if needed.
Disclaimer: This pattern was generated by AI and should be reviewed for accuracy before use. While we strive for quality, AI-generated content may contain errors. Please verify measurements, stitch counts, charts, and instructions before beginning your project. Generated by purlJam.uk
Love this pattern?
Save this pattern to your free PurlJam libraryAccess your pattern anytime
Bookmark this page to access your pattern anytime