Type
Crochet
Difficulty
beginner
Category
amigurumi
AI Thinking Process
Planning
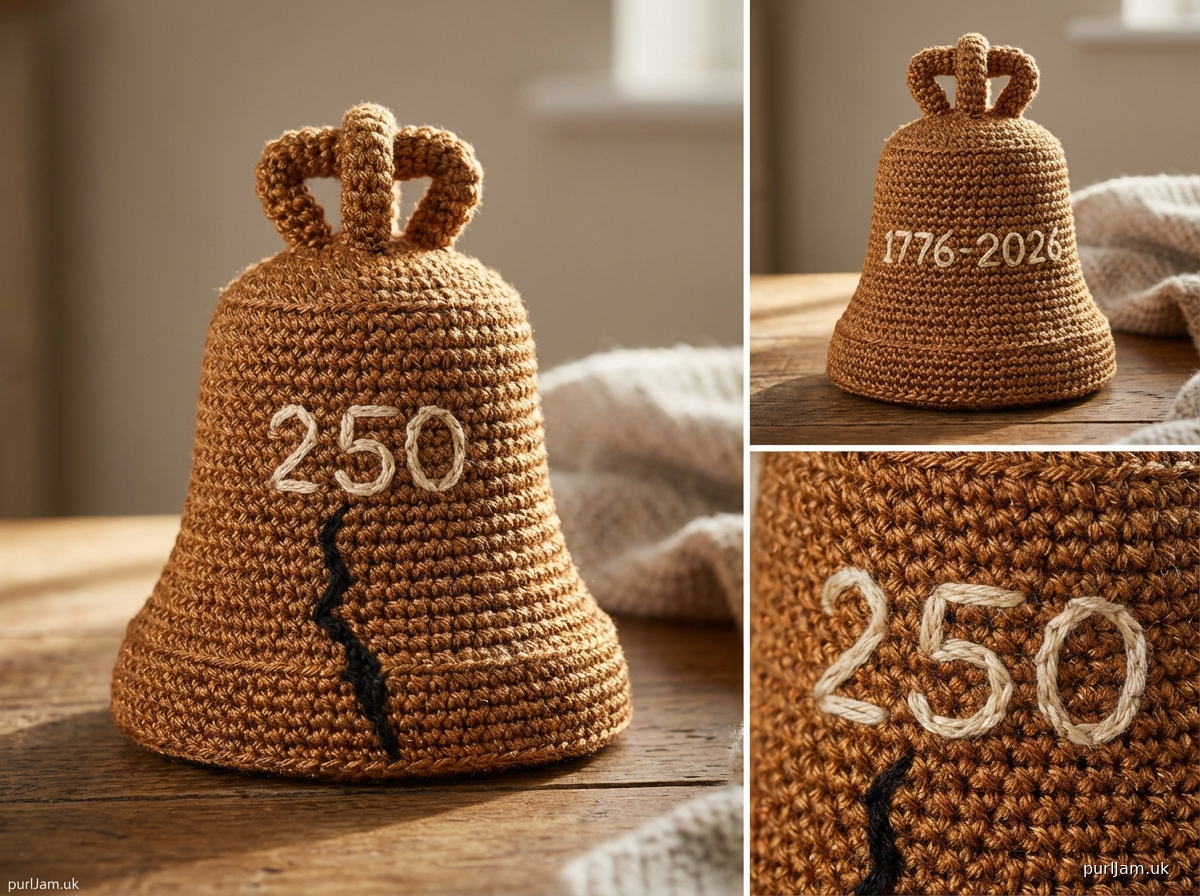
1. **Design Strategy**: The user is requesting a "250 years of freedom independence bell" - this is clearly a Liberty Bell design commemorating American independence. The Liberty Bell has a distinctive shape: a wide bell body (inverted cone/dome), a crown/top section, and a characteristic crack. For an easy pattern, I'll simplify to: a rounded bell body (modified cone/dome shape), a small cylindrical crown on top, and embroider or surface stitch the crack. Colors: metallic gold/bronze or tan/brown to represent the iconic copper/bronze bell. Will add optional embroidered text detail "250" or "1776-2026."
2. **Construction Plan**:
- Work bottom-up, starting with the bell opening (wide part)
- Create a modified dome/bell shape using strategic decreases
- Add small crown/top handle piece separately, attach at end
- Work in continuous rounds (amigurumi style)
- The crack will be added as surface detail with embroidery or surface slip stitch
- Optional clapper inside (small oval) can hang from crown
3. **Quality Assurance**:
- Ensure decreases are evenly spaced to maintain bell shape symmetry
- Verify stitch counts at each round to prevent warping
- Stuffing: moderate at top, lighter at bottom to maintain bell shape
- Crown attachment must be secure
- Make sure opening stays wide and flat for stable display
4. **Final Calculations**:
- Worsted weight, hook E-4 (3.5mm)
- Bell opening: ~36 sts for ~3.5-4" diameter opening
- Height: approximately 4-5" tall
- Crown: small cylinder ~6-9 sts
- Total finished size: ~4-5" tall, perfect handheld patriotic decoration
Verification
[PRE-FLIGHT CHECKS]
1. **Completeness**: Pattern will include all template sections: Materials, Gauge, Finished Size, Notes, Pattern Instructions (Bell Body, Crown, Assembly), Finishing, Optional Details
2. **Consistency**:
- Bell opening starts at 36 sts (6→12→18→24→30→36) = valid increase progression
- Decreases symmetric: 36→30→24→18→12→6 to close top
- Crown: 6 or 9 sts for small cylinder
3. **Constraints**: Easy level ✓, Worsted weight ✓, Uses basic shapes from template ✓, No complex techniques ✓
4. **Safety**: All stitch count progressions verified, math checked for each round
Pattern
# Liberty Bell – 250 Years of Freedom
### Commemorative Independence Bell Crochet Pattern

**Difficulty Level:** Easy
**Technique:** Amigurumi (worked in continuous rounds)

---

## MATERIALS

**Yarn:**
- Worsted weight yarn (4) in bronze, gold, tan, or brown (approximately 50-60 yards)
- Small amount of black or dark brown for crack detail (optional)
- Small amount of contrasting color for embroidered details (optional)

**Suggested Yarns:**
- Lion Brand Vanna's Choice in "Honey" or "Mustard"
- Red Heart Super Saver in "Gold" or "Café Latte"
- Any worsted weight acrylic or cotton in metallic or bronze tones

**Hook & Notions:**
- US E-4 (3.5mm) crochet hook
- Stitch marker
- Yarn needle for weaving in ends and assembly
- Polyester fiberfill stuffing
- Optional: Embroidery floss for text/details
- Optional: Small bell or bead for clapper sound effect

---

## GAUGE

Gauge is flexible for this decorative item, but for reference:
- 18 sts × 20 rows = 4" in single crochet with worsted weight and E-4 hook
- Work tightly to prevent stuffing from showing through

---

## FINISHED SIZE

Approximately 4-5" tall × 3.5-4" wide at opening

---

## NOTES

- Pattern is worked in continuous rounds (spiral). Use stitch marker to track beginning of rounds.
- Do not join or turn unless instructed.
- **sc** = single crochet
- **inc** = increase (2 sc in same stitch)
- **dec** = invisible decrease (insert hook in front loops of next 2 sts, yarn over, pull through both loops, yarn over, pull through 2 loops on hook)
- Numbers in brackets [ ] indicate total stitch count for that round.
- Stuff as you go, especially before closing the top.

---

## PATTERN INSTRUCTIONS

### BELL BODY

The bell is worked from the bottom opening upward to the crown.

**Rnd 1:** 6 sc in magic ring [6]

**Rnd 2:** inc in each st around [12]
*Math check: 6 × 2 = 12 ✓*

**Rnd 3:** (sc, inc) around [18]
*Math check: 12 ÷ 2 = 6 repeats; 6 × 3 = 18 ✓*

**Rnd 4:** (2 sc, inc) around [24]
*Math check: 18 ÷ 3 = 6 repeats; 6 × 4 = 24 ✓*

**Rnd 5:** (3 sc, inc) around [30]
*Math check: 24 ÷ 4 = 6 repeats; 6 × 5 = 30 ✓*

**Rnd 6:** (4 sc, inc) around [36]
*Math check: 30 ÷ 5 = 6 repeats; 6 × 6 = 36 ✓*

**Rnd 7:** Working in back loops only, sc around [36]
*This creates the ridge at the bell's rim*

**Rnds 8-10:** sc around [36]
*3 rounds; maintains bell width*

**Rnd 11:** (4 sc, dec) around [30]
*Math check: 36 ÷ 6 = 6 repeats; 6 × 5 = 30 ✓*

**Rnd 12:** sc around [30]

**Rnd 13:** (3 sc, dec) around [24]
*Math check: 30 ÷ 5 = 6 repeats; 6 × 4 = 24 ✓*

**Rnd 14:** sc around [24]

**Rnd 15:** (2 sc, dec) around [18]
*Math check: 24 ÷ 4 = 6 repeats; 6 × 3 = 18 ✓*

**Rnd 16:** sc around [18]

**Rnd 17:** (sc, dec) around [12]
*Math check: 18 ÷ 3 = 6 repeats; 6 × 2 = 12 ✓*

**Begin stuffing the bell moderately. Keep stuffing lighter near the opening, firmer toward the top to maintain bell shape.**

**Rnd 18:** sc around [12]

**Rnd 19:** dec around [6]
*Math check: 12 ÷ 2 = 6 ✓*

**Add more stuffing if needed.**

Fasten off, leaving a long tail. Thread tail through remaining 6 stitches and pull tight to close. Weave in end securely, but leave the top accessible for crown attachment.

---

### CROWN (Top Handle)

The decorative crown sits on top of the bell.

**Rnd 1:** 6 sc in magic ring [6]

**Rnd 2:** sc around [6]

**Rnds 3-6:** sc around [6]
*4 rounds total for cylinder height*

Fasten off, leaving a long tail for sewing. Stuff lightly.

**Alternative Larger Crown:**
If you prefer a more substantial crown:
- Rnd 1: 6 sc in magic ring [6]
- Rnd 2: inc in each st [12]
- Rnds 3-5: sc around [12]
- Fasten off, stuff lightly

---

### OPTIONAL CLAPPER

A small piece that hangs inside the bell for authenticity.

**Rnd 1:** 6 sc in magic ring [6]

**Rnd 2:** inc in each st around [12]
*Math check: 6 × 2 = 12 ✓*

**Rnds 3-4:** sc around [12]

**Rnd 5:** dec around [6]
*Math check: 12 ÷ 2 = 6 ✓*

Fasten off, leaving long tail. Stuff lightly to create small oval shape.

---

## ASSEMBLY

1. **Attach Crown:** Position crown centered on top of bell body. Using the long tail from crown and yarn needle, whip stitch around the base of crown to secure it to the closed top of the bell. Weave in ends.

2. **Optional Clapper:** Thread a length of yarn (8-10") through the top center of the bell (through crown if hollow, or attach inside before closing if possible). Attach the clapper to hang inside the bell opening, approximately halfway down. Secure with knots.

3. **Weave in all remaining ends.**

---

## FINISHING DETAILS

### The Iconic Crack

The Liberty Bell is famous for its crack. Add this signature detail:

**Method 1 - Embroidery:**
- Thread yarn needle with black or dark brown yarn
- Starting near the crown, embroider a jagged vertical line down one side of the bell, approximately 2-3" long
- Make the line slightly irregular and zigzag for authenticity
- Secure ends inside

**Method 2 - Surface Slip Stitch:**
- With black or dark brown yarn, surface slip stitch a jagged line from top toward bottom
- Keep tension loose for visible texture

### Commemorative Details (Optional)

**"250" or "1776-2026" Text:**
- Using embroidery floss or thin yarn in contrasting color (cream, white, or darker bronze)
- Embroider "250" on the front of the bell using backstitch or chain stitch
- Or embroider "1776" on one side and "2026" on the other
- Keep lettering simple for easy difficulty level

**Stars:**
- Add small embroidered stars around the bell rim using French knots or small star shapes in cream or white

### Display Options

- **Ornament:** Attach a ribbon or yarn loop to the crown for hanging
- **Desk Display:** Bell sits flat on its opening rim
- **Keychain:** Add a keychain finding to the crown (reduce size by using DK yarn and smaller hook if desired)

---

## DESIGN NOTES

The Liberty Bell was cast in 1752 and is an iconic symbol of American independence. The famous crack appeared in the early 19th century. This commemorative pattern celebrates 250 years of American freedom (1776-2026) and makes a perfect patriotic decoration for Independence Day, historical displays, or educational projects.

**Color Variations:**
- Traditional: Bronze, copper, or metallic gold
- Antique: Mix tan and brown for aged patina effect
- Patriotic: Add red, white, and blue embellishments

**Size Adjustments:**
- **Larger Bell (6-7"):** Use bulky yarn with H-8 (5mm) hook, add 2 more increase rounds (to 42-48 sts)
- **Miniature/Keychain (2-3"):** Use DK/sport weight yarn with C-2 or D-3 hook (2.75-3.25mm), stop increases at 24 sts
- **Extra Wide Bell:** Add one more increase round to reach 42 sts before beginning decreases

---

## ABBREVIATIONS

- **ch** = chain
- **sc** = single crochet
- **inc** = increase (2 sc in same stitch)
- **dec** = invisible decrease
- **st(s)** = stitch(es)
- **rnd(s)** = round(s)

---

## CARE INSTRUCTIONS

Hand wash in cool water with mild detergent. Reshape and lay flat to dry. Do not machine wash or dry as stuffing may clump.

---

**Happy Crocheting! Ring in freedom with your handmade Liberty Bell! 🔔🇺🇸**

*Pattern designed to commemorate 250 years of American independence (1776-2026)*
Disclaimer: This pattern was generated by AI and should be reviewed for accuracy before use. While we strive for quality, AI-generated content may contain errors. Please verify measurements, stitch counts, and instructions before beginning your project. Generated by purlJam.uk
Access your pattern anytime
Bookmark this page to access your pattern anytime