Type
Crochet
Difficulty
beginner
Category
amigurumi
AI Thinking Process
Planning
Verification
Pattern
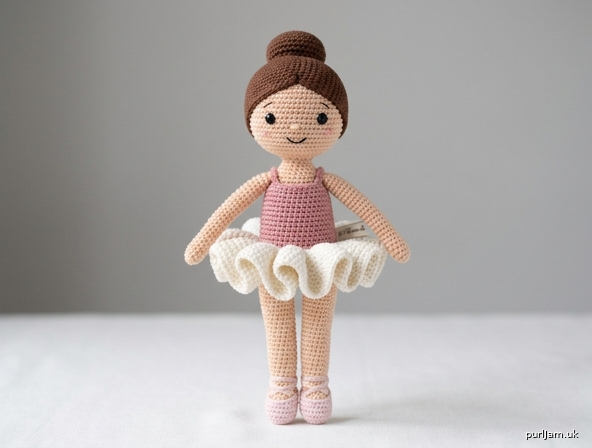
Little Ballerina Amigurumi
A beginner-friendly crocheted ballerina built from simple spheres and cylinders. She wears a fitted leotard, a ruffled tutu, and ballet slippers, with her hair swept up in a classic bun.
Skill level: Beginner
Finished size: About 5½ inches (14 cm) tall, including the bun, using worsted yarn and the hook given below.
Materials
Yarn — worsted weight (4); acrylic or cotton. Approximate amounts:
- Color A (skin): 40 yd (37 m) — peach, beige, or light brown
- Color B (hair): 30 yd (27 m) — brown, black, blonde, or auburn
- Color C (leotard): 20 yd (18 m) — dusty rose, ballet pink, or black
- Color D (tutu): 25 yd (23 m) — white, ivory, or pale pink
- Color E (slippers): 10 yd (9 m) — light pink
- Color F (face): scraps of black or dark brown; optional light pink for cheeks
Hook: US E-4 (3.5 mm) — one to two sizes smaller than the yarn label, for firm fabric
Notions:
- Polyester fiberfill
- Yarn needle
- Stitch marker
- 6 mm safety eyes (1 pair), or embroider eyes with Color F
- Straight pins for assembly
- Scissors
Safety note: Safety eyes are a choking hazard. Do not use them on toys for children under 3 years; embroider the eyes instead.
Gauge
5 sc and 5 rnds = 1 inch (2.5 cm) in single crochet, worked tightly in the round.
Gauge is not critical, but the fabric should be dense enough that stuffing does not show. If your fabric is loose, go down a hook size.
Abbreviations (US)
- ch — chain
- sc — single crochet
- hdc — half double crochet
- inc — increase (2 sc in the same stitch)
- dec — invisible decrease (single crochet 2 together through the front loops only)
- sl st — slip stitch
- st(s) — stitch(es)
- rnd(s) — round(s)
- MR — magic ring
- FO — fasten off
- [ ] — stitch count at the end of the round
- ( ) × N — work the stitches in parentheses N times
Pattern notes
- Pieces are worked in a continuous spiral unless the instructions say to join. Do not join or turn at the end of a spiral round. Mark the first stitch of each round and move the marker up as you go.
- Work tightly for a smooth amigurumi surface.
- Stuff as you go; it is hard to fill a closed piece later. Stuff the head and body firmly, the legs firmly, and the arms only lightly.
- Use the invisible decrease (insert the hook through the front loop only of the next 2 stitches, yarn over, pull through both loops, yarn over, pull through 2) for a smoother fabric.
- Magic-ring alternative: ch 2, work the stated number of sc into the 2nd ch from the hook, then continue as written.
- Pin every piece in place and check the pose from the front and side before sewing.
Head
With Color A. Worked as a sphere.
Rnd 1: 6 sc in MR [6]
Rnd 2: inc in each st [12] (6 increases → 6 + 6 = 12 ✓)
Rnd 3: (sc, inc) around [18] (6 increases → 12 + 6 = 18 ✓)
Rnd 4: (2 sc, inc) around [24] (6 increases → 18 + 6 = 24 ✓)
Rnds 5–8: sc around [24] (4 rounds)
Rnd 9: (2 sc, dec) around [18] (6 decreases → 24 − 6 = 18 ✓)
Place 6 mm safety eyes between Rnds 6 and 7, 5 stitches apart, centered on the face. If you are embroidering eyes, mark the same spots with pins and stitch them after the head is closed. Begin stuffing firmly and keep stuffing through the last rounds.
Rnd 10: (sc, dec) around [12] (6 decreases → 18 − 6 = 12 ✓)
Rnd 11: dec around [6] (6 decreases → 12 − 6 = 6 ✓)
FO. Thread the tail through the front loops of the remaining 6 stitches and pull closed. Weave in the end.
Hair Cap
With Color B. This sits on the head like a wig and is the base for the bun.
Rnd 1: 6 sc in MR [6]
Rnd 2: inc in each st [12] (6 increases → 6 + 6 = 12 ✓)
Rnd 3: (sc, inc) around [18] (6 increases → 12 + 6 = 18 ✓)
Rnd 4: (2 sc, inc) around [24] (6 increases → 18 + 6 = 24 ✓)
Rnds 5–7: sc around [24] (3 rounds)
FO, leaving a 12-inch (30 cm) tail for sewing.
Hair Bun
With Color B.
Rnd 1: 6 sc in MR [6]
Rnd 2: inc in each st [12] (6 increases → 6 + 6 = 12 ✓)
Rnd 3: (sc, inc) around [18] (6 increases → 12 + 6 = 18 ✓)
Rnd 4: sc around [18]
Rnd 5: (sc, dec) around [12] (6 decreases → 18 − 6 = 12 ✓)
Stuff firmly.
Rnd 6: dec around [6] (6 decreases → 12 − 6 = 6 ✓)
FO. Close the remaining hole as for the head. Leave a 10-inch (25 cm) tail for sewing.
Body (Leotard)
With Color C. Starts at the hips and tapers to a neck.
Rnd 1: 6 sc in MR [6]
Rnd 2: inc in each st [12] (6 increases → 6 + 6 = 12 ✓)
Rnd 3: (sc, inc) around [18] (6 increases → 12 + 6 = 18 ✓)
Rnds 4–8: sc around [18] (5 rounds)
Rnd 9: (sc, dec) around [12] (6 decreases → 18 − 6 = 12 ✓)
Rnd 10: sc around [12]
Stuff firmly, with extra filling at the hips (Rnds 1–4) so the legs have a solid base. FO, leaving a 10-inch (25 cm) tail for sewing the neck to the head.
Arms (make 2)
With Color A.
Rnd 1: 6 sc in MR [6]
Rnds 2–8: sc around [6] (7 rounds)
Stuff the hand end (Rnds 1–3) lightly; leave the upper arm nearly empty so it sews flat at the shoulder. FO, leaving an 8-inch (20 cm) tail.
Legs (make 2)
Begin with Color E (slippers).
Rnd 1: 6 sc in MR [6]
Rnd 2: inc in each st [12] (6 increases → 6 + 6 = 12 ✓)
Rnds 3–4: sc around [12]
Rnd 5: (2 sc, dec) around [9] (3 decreases → 12 − 3 = 9 ✓)
Change to Color A (skin). Cut Color E, leaving a 4-inch (10 cm) tail to weave in.
Rnds 6–14: sc around [9] (9 rounds)
Stuff firmly, pushing extra filling into the slipper so the foot keeps its shape. FO, leaving a 10-inch (25 cm) tail.
Tutu
With Color D. Worked in joined rounds. The ch-2 at the start of hdc rounds does not count as a stitch.
Ch 18, join with sl st to the first ch, being careful not to twist the chain. [18]
Rnd 1: ch 1, sc in each ch around, join with sl st to first sc [18]
Rnd 2: ch 2, 2 hdc in each st around, join with sl st to first hdc [36] (18 × 2 = 36 ✓)
Rnd 3: ch 2, (hdc, 2 hdc in next st) around, join with sl st to first hdc [54] (18 repeats → 36 + 18 = 54 ✓)
FO, leaving a 12-inch (30 cm) tail for sewing the inner edge to the waist.
Leotard Straps (make 2)
With Color C.
Ch 10. FO, leaving 6-inch (15 cm) tails at both ends.
Face
If you did not use safety eyes, embroider two small filled ovals or satin-stitch dots with Color F between Rnds 6 and 7, 5 stitches apart.
With Color F, embroider a small curved smile over Rnd 9, centered under the eyes and about 3 stitches wide.
Optional: with light pink, make 2–3 tiny horizontal stitches on each cheek, just outside and below the eyes.
Assembly
Use matching yarn tails and a yarn needle. Pin first, then sew with small whip stitches. Weave in every end as you go.
1. Hair cap. Pin the cap on the head so the front edge sits about 1 round above the eyes (a rounded hairline) and the back and sides cover Rnds 1–7 of the head. The face, from the eyes down, stays uncovered. Sew all around the cap edge.
2. Hair bun. Center the bun on top of the cap, just slightly toward the back of the crown so it reads as a ballet bun, not a topknot over the forehead. Sew securely around the base. Optional: wrap Color B 4–5 times around the base of the bun and tie off to look like a hair elastic.
3. Tutu onto body. Do this before you sew on the head. Slide the tutu ring over the 12-st neck and down onto the 18-st torso. The inner sc round should sit at Rnd 5 of the body (the waist, just above the hips). Leave it loose until the head is attached.
4. Head to body. Pin the 12-st neck (Rnd 10 of the body) to the base of the head, covering the closed hole, with the face looking forward. Sew all the way around. Add a pinch more stuffing at the neck before closing the last stitches if the join feels hollow.
5. Tutu. With the Color D tail, sew the inner edge (Rnd 1) of the tutu to Rnd 5 of the body, catching a body stitch with every tutu stitch so the skirt cannot ride up. Let Rnds 2–3 flare freely.
6. Arms. Pin one arm to each side of the body, tops level with Rnd 9 (just under the neck). Angle them slightly forward. Sew the open top of each arm to the body.
7. Legs. Pin the legs to the closed bottom of the body (Rnds 1–2), side by side, so the dancer can stand. Toes point forward. The inner edges of the legs should almost touch. Sew each leg firmly around its top opening. If she will not stand, add more stuffing at the hips and resew the legs a little farther apart.
8. Straps. Sew one ch-10 strap from the front of the body (about Rnd 8, just beside the neck) up over the “shoulder” and down to the matching spot on the back. Repeat on the other side. The straps should lie flat and not hide the face.
Finishing
Weave in any remaining ends.
Shape the bun with your fingers so it is round. Smooth the tutu so the ruffle hangs evenly.
Optional extra: with Color B, stitch 3–4 short straight stitches at the front hairline for a few wisps, or wrap a second Color B strand once around the bun as a decorative hairpin.
Your ballerina is ready to take the stage.
Disclaimer: This pattern was generated by AI and should be reviewed for accuracy before use. While we strive for quality, AI-generated content may contain errors. Please verify measurements, stitch counts, charts, and instructions before beginning your project. Generated by purlJam.uk
Love this pattern?
Save this pattern to your free PurlJam libraryAccess your pattern anytime
Bookmark this page to access your pattern anytime