Type
Knitting
Difficulty
beginner
Category
pullover
AI Thinking Process
Planning
Verification
Pattern
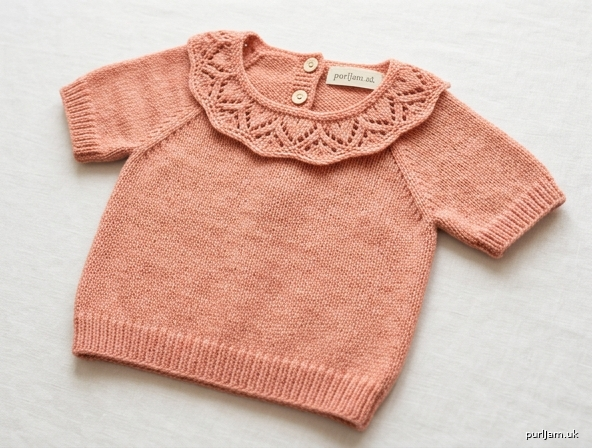
Little Blossom Baby Pullover
A Top-Down Raglan with Short Sleeves & a Lacey Collar
A sweet, seamless baby pullover knit from the top down in soft worsted-weight yarn. Short sleeves keep baby comfortable in warmer weather, while a delicate eyelet lace collar frames the neckline. A back button placket makes dressing quick and fuss-free. There are no seams to irritate delicate skin, and the whole sweater is worked in the round for a smooth, cozy finish.
Skill Level: Beginner
Sizes
Written for 6–12 months (sample). Other baby sizes noted in parentheses where they differ: [0–3m (3–6m, 6–12m)].
| Size | Chest (finished) | Approx. age |
|---|---|---|
| 0–3m | 18" (46 cm) | 0–3 months |
| 3–6m | 20" (51 cm) | 3–6 months |
| 6–12m | ~21.6" (55 cm) | 6–12 months (sample) |
This pattern is written in full for the 6–12 month size. It includes 2–3" positive ease for growing and diaper room.
Materials
- Yarn: Worsted weight (#4), superwash wool, cotton, or acrylic blend — approx. 220–260 yds (200–240 m)
- Choose a soft, machine-washable yarn — parents will thank you!
- Needles:
- US 7 / 4.5 mm circular needle (16" / 40 cm) and set of double-pointed needles (DPNs) or preferred small-circumference method for sleeves
- US 6 / 4 mm circular for collar and ribbing (optional, for tidier edges)
- Notions: 4 stitch markers (1 unique for beginning of round), stitch holders or waste yarn, tapestry needle, 2–3 buttons (½" / 13 mm)
Gauge
20 sts × 26 rows = 4" (10 cm) in stockinette stitch on US 7 / 4.5 mm needles, after blocking. Always knit a gauge swatch — it ensures your baby sweater fits!
Abbreviations
- k = knit
- p = purl
- yo = yarn over
- k2tog = knit 2 together
- ssk = slip, slip, knit
- m1 = make 1 (lifted increase)
- st(s) = stitch(es)
- rnd(s) = round(s)
- RS/WS = right side / wrong side
- PM/SM = place marker / slip marker
Construction Notes
This sweater is worked from the top down. Because of the back button placket, the yoke is worked flat (back and forth) to the underarm, then joined and worked in the round for the body. The collar and sleeves are added last.
PATTERN
Yoke (worked flat with button placket)
With US 7 / 4.5 mm needle, cast on 64 sts.
Set-up row (WS): k3 (garter placket border), p1, PM, p8 (right sleeve), PM, p20 (back), PM, p8 (left sleeve), PM, p1, k3 (garter placket border).
Placket check: 3 + 1 + 8 + 20 + 8 + 1 + 3 = 64 sts ✓ The 4 markers sit at the 4 raglan "seam" stitches (the single sts before each sleeve section). The first and last 3 sts are always knit for the garter button-band border.
Raglan increases are worked on RS rows only (every other row), 8 increases per increase row.
Increase Row (RS): k3, k to 1 st before marker, m1, k1, SM, k1, m1 — repeat from * to * across all 4 markers, k to last 3 sts, k3. (8 sts increased each Increase Row.)
Next row (WS): k3, p to last 3 sts, k3.
Repeat these 2 rows a total of 14 times (14 Increase Rows).
Stitch count check: 64 + (8 × 14) = 64 + 112 = 176 sts ✓
- Back: 20 + 14 = 34 sts
- Front (both borders included): 4 + 14 = 18 sts each front → 36 total
- Each sleeve: 8 + 28 = 36 sts each → wait, sleeves increase on both sides: 8 + (14 × 2) = 38 sts each ✓
Let's confirm the full distribution: Two front sections 9 sts each (including 3 border sts) + 2 raglan sts + back 34 + 2 raglan sts + 2 sleeves at 38 each. Front-left 9 + raglan 1 + sleeve 38 + raglan 1 + back 34 + raglan 1 + sleeve 38 + raglan 1 + front-right 9 = 176 sts ✓
Yoke should measure approximately 4–4.5" (10–11 cm) deep from cast-on. Adjust here for depth if needed (work extra plain rows).
Separate Sleeves & Join for Body
Dividing row (RS):
- k3, k to first marker, remove marker (front-left + 1 raglan st = 10 sts worked).
- Place next 38 sts on holder (right sleeve), remove markers.
- Cast on 4 underarm sts, PM for side.
- k across back 34 sts + 1 raglan st = 35 sts...
For clarity, work the divide as follows:
- Knit front-left 9 + raglan 1 = 10 sts.
- Slip next 38 sts to holder for right sleeve.
- Cast on 4 sts for underarm.
- Knit across back 34 sts + 2 raglan sts = 36 sts.
- Slip next 38 sts to holder for left sleeve.
- Cast on 4 sts for underarm.
- Knit across front-right 9 + raglan 1 = 10 sts.
Body stitch count: 10 + 4 + 36 + 4 + 10 = 64 body sts... plus underarms already counted.
Recount clean: Front sts total (10 + 10 = 20) + Back (36) + underarms (4 + 4 = 8) = 64 sts? That gives a 12.8" body — too small.
Because the button placket keeps the yoke flat, use this corrected division to reach full body width. Set-up the yoke with the corrected counts already given (176 sts). Body stitches = all sts minus two sleeves (38 × 2 = 76) plus underarm cast-on (8): 176 − 76 + 8 = 108 body sts ✓ (= 21.6" / 55 cm ✓)
So after the dividing row you have 108 sts on the needle: front and back sections combined with the underarm stitches. Continue working these 108 sts.
Join Placket & Work Body in the Round
You now finish the button placket and join to work in the round.
Work 6 more rows flat in stockinette (keeping the 3-st garter borders) to complete the placket opening.
Buttonhole rows (RS): k1, yo, k2tog, k to last 3 sts, k2tog, yo, k1 on the border edges — space 2–3 buttonholes evenly along the placket as you work these final flat rows (one buttonhole every ~1"/2.5 cm).
Join round: Overlap the two garter borders (right over left), and knit through both layers where they meet to close the placket base. PM for beginning of round. You now work in the round on 108 sts.
Body: Work in stockinette (knit every round) until body measures 7" (18 cm) from underarm, or 1" (2.5 cm) short of desired length.
Hem ribbing: Work k1, p1 ribbing for 1.5" (4 cm). (108 sts ÷ 2 = 54 rib repeats ✓ — even number works perfectly.)
Bind off loosely in pattern.
Short Sleeves (make 2)
Transfer 38 held sleeve sts to DPNs. Rejoin yarn at center of underarm.
Set-up round: Pick up and knit 4 sts across the underarm cast-on, then knit the 38 sleeve sts. PM for beginning of round. Total: 42 sts ✓
Knit 2 rounds even.
Shaping round: k1, k2tog, k to last 3 sts, ssk, k1. (2 sts decreased.) Repeat Shaping round once more, every 4th round. Stitch count: 42 − 4 = 38 sts ✓
Knit even until sleeve measures 1.5" (4 cm) from underarm (short-sleeve length).
Cuff ribbing: Work k1, p1 ribbing for 1" (2.5 cm). (38 sts ÷ 2 = 19 rib repeats ✓.)
Bind off loosely in pattern.
Repeat for second sleeve.
Lacey Collar
The delicate eyelet collar is picked up around the neckline and worked outward.
With US 6 / 4 mm needle and RS facing, begin at one back placket edge. Pick up and knit 64 sts evenly around the neckline (matching your original cast-on count). Work back and forth (the collar is split at the back placket).
Multiple check: 64 is divisible by 4 (64 ÷ 4 = 16 repeats) ✓ for the 4-st lace pattern.
Row 1 (WS): k1, p to last st, k1.
Row 2 (RS) – Eyelet: k1, yo, k2tog, k2; repeat from * to last 3 sts, yo, k2tog, k1. (Stitch count stays 64 — each yo is balanced by a k2tog ✓.)
Row 3 (WS): k1, p to last st, k1.
Row 4 (RS) – Eyelet: k1, k2, yo, k2tog; repeat from * to last 3 sts, k2, k1. (Offset eyelets for a pretty lace effect; count stays 64 ✓.)
Row 5 (WS): k1, p to last st, k1.
Repeat Rows 2–5 once more (collar measures approx. 1.5" / 4 cm).
Picot bind-off (optional, for extra prettiness): Bind off 2 sts, slip st back to left needle, cast on 2 sts, bind off 4 sts; repeat to end.
Otherwise, bind off loosely knitwise.
Finishing
- Weave in all ends with a tapestry needle.
- Sew buttons to the underlap side of the placket, opposite the buttonholes.
- Block gently to measurements — this opens up the lace collar beautifully.
- Lay flat to dry.
Care Instructions
Machine washable! Wash on a gentle/delicate cycle in cool water and lay flat or tumble dry low, per your specific yarn's label. Using a superwash or cotton/acrylic blend keeps this sweater soft, durable, and easy for busy parents to care for.
Finished Measurements (6–12 months)
- Chest: ~21.6" (55 cm)
- Body length (underarm to hem): ~8.5" (21.5 cm)
- Sleeve length: ~2.5" (6.5 cm) including cuff
- Yoke depth: ~4–4.5" (10–11 cm)
Enjoy knitting this cozy little sweater — congratulations to the lucky little one who gets to wear it! 🧶
Disclaimer: This pattern was generated by AI and should be reviewed for accuracy before use. While we strive for quality, AI-generated content may contain errors. Please verify measurements, stitch counts, and instructions before beginning your project. Generated by purlJam.uk
Access your pattern anytime
Bookmark this page to access your pattern anytime