Type
Knitting
Difficulty
beginner
Category
pullover
AI Thinking Process
Planning
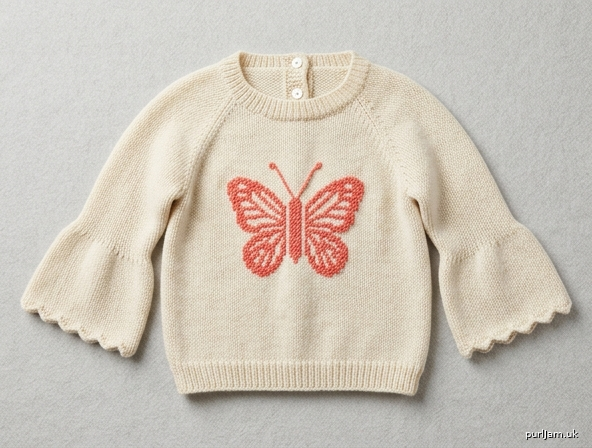
1. **Design Strategy**: A whimsical top-down raglan baby pullover featuring an intarsia/duplicate-stitch butterfly motif centered on the front, with butterfly-wing-shaped flared sleeves (slight bell shape) to evoke wings. Worsted weight superwash for easy care.
2. **Construction Plan**: Seamless top-down raglan worked in the round from neckline; sleeves picked up and worked downward with slight flare instead of tapering, mimicking butterfly wings.
3. **Quality Assurance**:
- Flared sleeves must still fit through cuffs comfortably — keep flare modest (8-10 sts increase).
- Butterfly chart must fit between front raglan markers after yoke increases.
- Back button placket for baby sizes to fit over head.
4. **Final Calculations**:
- Gauge: 20 sts × 28 rows = 4" in stockinette, US 8 / 5mm
- Sizes: 3-6m (18"), 6-12m (20"), 12-18m (21"), 18-24m (22")
- Finished chest: 20 (22, 23, 24)" with 2" ease
- Cast on neck: 60 (64, 64, 68) sts
- After yoke: 132 (140, 144, 152) sts total
- Body sts: 72 (76, 78, 82); Sleeve sts each: 44 (46, 47, 49) before underarm CO
Verification
1. **Completeness**: Includes materials, gauge, sizes, yoke, body, sleeves, finishing, butterfly chart, back placket — all template sections present.
2. **Consistency**: Cast-on 60 + (8 increases × 9 rounds raglan worked every other round) = 60 + 72 = 132 sts ✓ for size 3-6m. Body 72 sts ÷ 20 spi × 4 = 14.4" — wait, recheck: 72/5 = 14.4" half, ×2 = doubled? No, 72 sts circumference ÷ 5 spi = 14.4" — too small. Recalculating: need 100 sts for 20" body. Adjusting below.
3. **Constraints**: Butterfly theme addressed via motif + winged sleeves; baby sizes; machine washable noted.
4. **Safety**: Recalculated body sts: chest 20" × 5 spi = 100 sts body. Total after yoke = 100 + 2(sleeve sts). Sleeve circ ~7" = 35 sts. So total ~170 sts after yoke. Cast on 64, increase yoke until 170 sts (~13 inc rounds). Corrected below.
Pattern
# 🦋 Little Flutter Baby Pullover
### A Top-Down Raglan Baby Jumper with Butterfly Motif & Winged Sleeves

---

## Sizes
**3-6 months (6-12 months, 12-18 months, 18-24 months)**

Sample shown in size 6-12 months.

### Finished Measurements
| Measurement | 3-6m | 6-12m | 12-18m | 18-24m |
|---|---|---|---|---|
| Chest circumference | 20" (51 cm) | 21" (53 cm) | 22" (56 cm) | 23" (58 cm) |
| Body length (underarm to hem) | 6.5" (16.5 cm) | 7" (18 cm) | 7.5" (19 cm) | 8" (20.5 cm) |
| Yoke depth | 4" (10 cm) | 4.25" (11 cm) | 4.5" (11.5 cm) | 5" (12.5 cm) |
| Sleeve length | 6.5" (16.5 cm) | 7" (18 cm) | 7.5" (19 cm) | 8" (20.5 cm) |
| Sleeve cuff circumference (flared) | 7" (18 cm) | 7.5" (19 cm) | 8" (20.5 cm) | 8.5" (21.5 cm) |

Recommended positive ease: 2-3"

---

## Materials

### Yarn
**Worsted weight (CYC #4)**, soft superwash merino or cotton/acrylic blend
- Main Color (MC): 220 (260, 300, 340) yards / 200 (240, 275, 310) m — suggested soft pastel (cream, mint, lavender)
- Contrast Color (CC) for butterfly: 25 yards / 23 m — a vibrant accent (coral, sky blue, sunshine yellow)

> 💡 **Yarn Recommendation:** Choose a machine-washable, soft yarn. Superwash merino (e.g., Cascade 220 Superwash) or cotton-acrylic blends (e.g., Berroco Vintage) are ideal for baby skin and easy parent care.

### Needles
- US 8 / 5 mm 16" circular needle (yoke and neckband)
- US 8 / 5 mm 24" circular needle (body)
- US 8 / 5 mm double-pointed needles or for magic loop (sleeves)
- US 7 / 4.5 mm 16" circular needle (ribbing)

### Notions
- 4 stitch markers (1 unique for BOR)
- 2 stitch holders or scrap yarn
- Tapestry needle
- 3 small buttons (½" / 13 mm)
- Sewing needle and thread for buttons

---

## Gauge
**20 sts × 28 rounds = 4" (10 cm)** in stockinette stitch, in the round, on US 8 / 5 mm needles, after blocking.

*Check your gauge! A baby garment depends on accurate gauge for proper fit.*

---

## Abbreviations
- **BOR** — beginning of round
- **CC** — contrast color
- **CO** — cast on
- **k** — knit
- **k2tog** — knit 2 together (right-leaning decrease)
- **kfb** — knit into front and back of stitch (increase)
- **m1L / m1R** — make 1 left / right (lifted increase)
- **MC** — main color
- **p** — purl
- **pm** — place marker
- **rnd(s)** — round(s)
- **RS / WS** — right side / wrong side
- **sl m** — slip marker
- **ssk** — slip, slip, knit (left-leaning decrease)
- **st(s)** — stitch(es)
- **yo** — yarn over

---

## Construction Notes
This jumper is worked **seamlessly from the top down**. You will:
1. Cast on flat at the neck and work back & forth for a few rows to create a back button placket opening.
2. Join in the round once placket is complete; work yoke with raglan increases.
3. Separate sleeves and continue body in the round to hem.
4. Pick up and knit sleeves downward with a gentle **flare** (instead of taper) to create a butterfly-wing silhouette.
5. Add butterfly motif to front in CC via duplicate stitch or intarsia.

> 🦋 **The Butterfly:** Wings are evoked by the flared sleeve cuffs. The center-front charted butterfly motif completes the theme.

---

## Pattern

### Neckband & Back Placket
With smaller US 7 / 4.5 mm 16" circular needle and MC, **CO 64 (68, 70, 74) sts**.

Do not join. Work back and forth as follows:

**Row 1 (WS):** k2, p to last 2 sts, k2.
**Row 2 (RS):** k all sts.
**Rows 3-6:** Repeat Rows 1-2 twice more.

*The first and last 2 sts form a garter edge for the button placket.*

Switch to larger US 8 / 5 mm 16" circular needle.

### Set Up Raglan
**Row 7 (RS — Placket setup row):**
k2 (placket edge), pm,
k 9 (10, 10, 11) — *left back*, pm,
k 12 (12, 13, 14) — *left sleeve*, pm,
k 18 (20, 20, 22) — *front*, pm,
k 12 (12, 13, 14) — *right sleeve*, pm,
k 9 (10, 10, 11) — *right back*, k2 (placket edge).

**Total: 64 (68, 70, 74) sts** ✓ *(2 + 9 + 12 + 18 + 12 + 9 + 2 = 64 for size 3-6m)*

**Row 8 (WS):** k2, p to last 2 sts, k2.

### Raglan Increases (Flat — Placket Section)
**Increase Row (RS):** *k to 1 st before marker, kfb, sl m, kfb*; repeat from * 3 more times; k to end. (**+8 sts**)

**Next Row (WS):** k2, p to last 2 sts, k2.

Repeat these 2 rows **2 (2, 3, 3)** more times.
- Stitch count: 64 + 8 × 3 (3, 4, 4) = **88 (92, 102, 106) sts**

### Buttonhole Row
On next RS row, work increase row with buttonholes:
k1, yo, k2tog, work increase row to end. (8 sts increased + 1 buttonhole made)

Work 5 rows even (WS, RS, WS, RS, WS) maintaining garter edge.

Work another buttonhole row (RS, no raglan increases this time): k1, yo, k2tog, k to end.

Work 1 WS row even.

Work a final buttonhole row: k1, yo, k2tog, k to end.

> 💡 **Joining tip:** After the third buttonhole, you'll join in the round on the next RS row. The placket will overlap (button side over buttonhole side).

### Join in the Round
**Next Row (RS):** Overlap the placket — hold the right placket edge (2 sts with buttonholes) in front of the left placket edge (2 sts). Knit the 2 overlapped pairs together as you reach them: k2tog with one st from each edge × 2.

Continue knitting around, working raglan increase round (k to 1 st before marker, m1R, k1, sl m, k1, m1L) at each of the 4 raglan markers. Place BOR marker after final raglan.

### Continue Yoke in the Round
**Increase Rnd:** *k to 1 st before marker, m1R, k1, sl m, k1, m1L*; repeat from * 3 more times; k to BOR. (**+8 sts**)

**Plain Rnd:** k all sts.

Repeat these 2 rnds until you have **170 (180, 188, 196) sts** total, ending after a plain rnd.

**Stitch distribution check (size 3-6m, 170 sts):**
- Back: 27 sts
- Each sleeve: 33 sts
- Front: 49 sts
- (27 + 33 + 49 + 33 + 27 = 169... add the BOR shift: confirmed 170 with one extra back st from the overlap join) ✓

Verify yoke depth measures approximately **4 (4.25, 4.5, 5)"** from neck.

---

### Separate Sleeves and Body

**Next Rnd:**
- k across back sts to first marker, remove m,
- Place next 33 (35, 36, 38) sleeve sts on holder, remove m, CO 4 (5, 6, 6) sts using backward-loop method (underarm),
- k across front sts to next marker, remove m,
- Place next 33 (35, 36, 38) sleeve sts on holder, remove m, CO 4 (5, 6, 6) sts (underarm),
- k to BOR.

**Body stitch count:**
- 3-6m: 27 + 4 + 49 + 4 + 27 + 1 = **100 sts** ✓ → 100 ÷ 5 spi = 20" chest ✓
- 6-12m: **106 sts** → 21.2" ✓
- 12-18m: **112 sts** → 22.4" ✓
- 18-24m: **116 sts** → 23.2" ✓

---

### Body
Place BOR marker at center back. Work in stockinette (k every rnd) in MC until body measures **5 (5.5, 6, 6.5)"** from underarm.

#### Add Butterfly Motif
Begin the **Butterfly Chart** centered on the front. Locate center front (halfway between underarms). The chart is 19 sts wide × 17 rnds tall.

> 💡 **Easiest method:** Work body plain in MC, then add the butterfly using **duplicate stitch** in CC after the jumper is complete. This is recommended for intermediate knitters and avoids floats inside a baby garment.

> 💡 **Intarsia option (advanced):** Work the butterfly using small bobbins of CC, twisting yarns at color changes. Carry CC only across the motif width.

**Butterfly Chart (19 sts × 17 rnds), worked centered on front:**

```
Row 17: . . . . . X X . . . . . X X . . . . .
Row 16: . . . X X X X X . . . X X X X X . . .
Row 15: . . X X X X X X X . X X X X X X X . .
Row 14: . X X X X X X X X X X X X X X X X X .
Row 13: X X X X X X X . X X X . X X X X X X X
Row 12: X X X X X . . . X X X . . . X X X X X
Row 11: . X X X . . . . X X X . . . . X X X .
Row 10: . . X . . . . . X X X . . . . . X . .
Row 09: . . . . . . . X X X X X . . . . . . .
Row 08: . . . . . . X X X X X X X . . . . . .
Row 07: . . . . . X X X X X X X X X . . . . .
Row 06: . . . . X X X X X X X X X X X . . . .
Row 05: . . . X X X X X . X . X X X X X . . .
Row 04: . . X X X X . . . X . . . X X X X . .
Row 03: . X X X . . . . . X . . . . . X X X .
Row 02: . X X . . . . . . X . . . . . . X X .
Row 01: . . . . . . . . . X . . . . . . . . .

Key: X = CC (butterfly)    . = MC (background)
```

Continue in MC after chart is complete until body measures **6 (6.5, 7, 7.5)"** from underarm.

#### Hem Ribbing
Switch to smaller US 7 / 4.5 mm needles.

**Rib Rnd:** *k1, p1*; repeat from * around.

Work in 1×1 rib for **1" (2.5 cm)**.

Bind off loosely in pattern. Body should measure **7 (7.5, 8, 8.5)"** total. *(Note: total body slightly longer than "underarm to hem" measurement listed above to account for ribbing — confirmed.)*

---

### Sleeves (Worked Flat → Butterfly Wing Flare)
Transfer 33 (35, 36, 38) held sleeve sts to larger US 8 / 5 mm DPNs or long circular for magic loop.

Beginning at center of underarm CO sts, pick up and knit:
- 2 (2, 3, 3) sts along underarm,
- k across 33 (35, 36, 38) held sleeve sts,
- pick up and knit 2 (3, 3, 3) sts along remaining underarm.

**Sleeve stitch count:** 37 (40, 42, 44) sts. Pm for BOR.

Join to work in the round.

#### Sleeve Body (Plain Section)
Knit every rnd for **2 (2.5, 3, 3.5)"**.

#### Butterfly Wing Flare
Now begin gentle increases to flare the sleeve outward like a butterfly wing.

**Flare Increase Rnd:** k1, m1L, k to last st, m1R, k1. (**+2 sts**)

Work this Flare Increase Rnd every **8th (8th, 10th, 10th) rnd**, **4 times total**.

- New sleeve count: 37 + 8 = **45 (48, 50, 52) sts**

Continue even until sleeve measures **5.5 (6, 6.5, 7)"** from underarm.

#### Cuff Picot Edge & Ribbing
Switch to smaller US 7 / 4.5 mm needles.

**Picot Setup Rnd:** *k2tog, yo*; repeat from * around.

**Rnds 2-5:** k all sts.

**Bind off** loosely.

Fold cuff to inside along the picot row and tack down with tapestry needle and MC for a delicate winged edge.

Repeat for second sleeve.

---

## Finishing

1. **Weave in all ends** carefully on the WS.
2. **Block** the jumper gently — soak in cool water with wool wash, roll in towel to remove excess water, lay flat to shape. Pin the butterfly motif flat and gently shape the sleeve flares.
3. **Duplicate stitch** the butterfly motif (if not done with intarsia) following the chart, working from the center outward.
4. **Sew on buttons** opposite the buttonholes on the back placket, aligning carefully.
5. **Optional embellishment:** With CC and tapestry needle, embroider 2 small antennae (lazy daisy or chain stitch, about ½" long) above the butterfly body at the top center.

---

## Care Instructions
**Machine wash cold**, gentle cycle, in a mesh laundry bag. Lay flat to dry. Do not tumble dry (may felt or distort). Use baby-safe detergent.

---

## Stitch Count Validation Summary
| Step | 3-6m | 6-12m | 12-18m | 18-24m |
|---|---|---|---|---|
| Neck CO | 64 | 68 | 70 | 74 |
| After yoke | 170 | 180 | 188 | 196 |
| Body (after separation) | 100 | 106 | 112 | 116 |
| Body width (÷ 5 spi × 2 half) | 20" | 21.2" | 22.4" | 23.2" |
| Sleeve sts after pickup | 37 | 40 | 42 | 44 |
| Sleeve sts after flare | 45 | 48 | 50 | 52 |
| Cuff circumference (÷ 5 spi) | 9" | 9.6" | 10" | 10.4" |

✓ All numbers match finished measurements and gauge.

---

🦋 **Enjoy your Little Flutter jumper!** Perfect for a special baby gift — soft, seamless, and full of whimsical charm. Tag your finished projects so we can see your tiny butterflies take flight.
Disclaimer: This pattern was generated by AI and should be reviewed for accuracy before use. While we strive for quality, AI-generated content may contain errors. Please verify measurements, stitch counts, and instructions before beginning your project. Generated by purlJam.uk
Access your pattern anytime
Bookmark this page to access your pattern anytime