Type
Knitting
Difficulty
intermediate
Category
custom
AI Thinking Process
Planning
Verification
Pattern
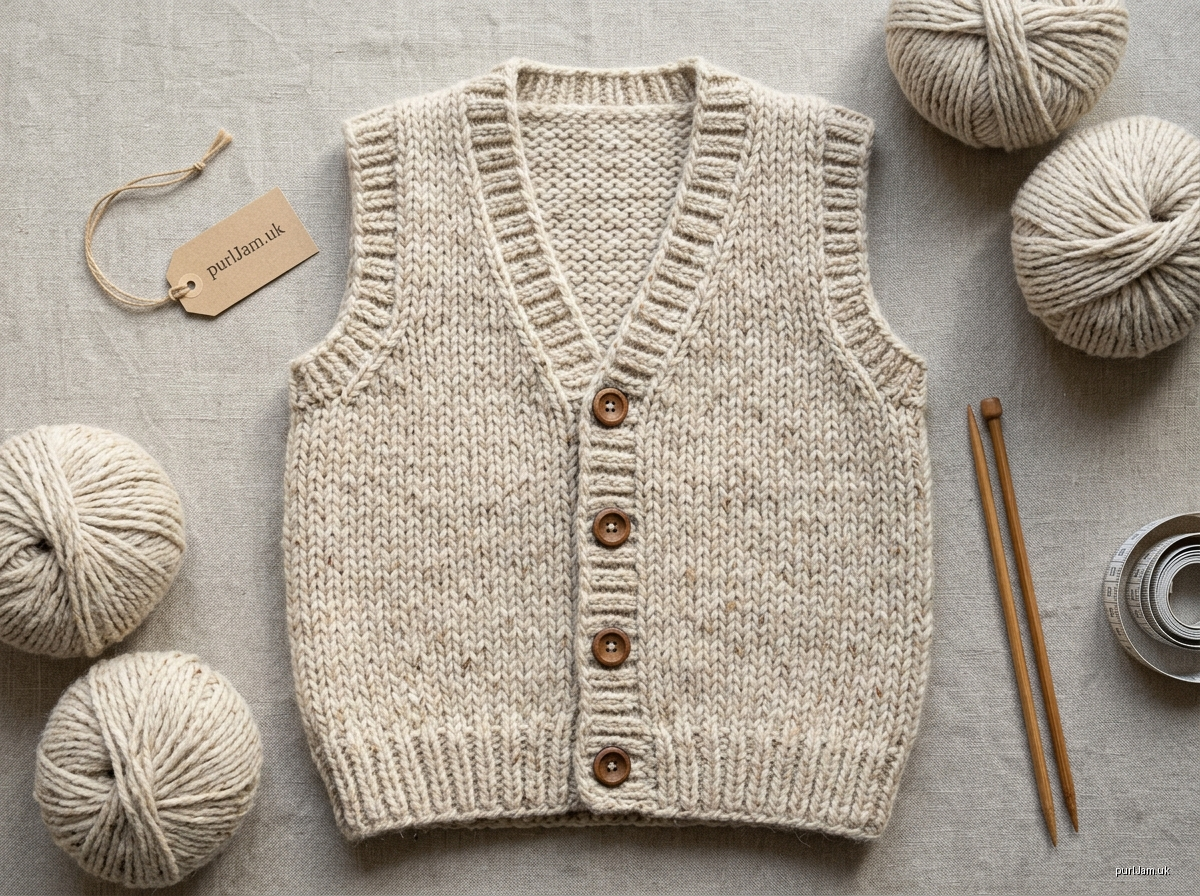
Little Classic Chunky Waistcoat – Age 6
A smart, cosy V-neck waistcoat with a buttoned front, knitted in warm chunky wool. Stocking stitch keeps it simple. The rib bands and neat paired shaping give a crisp, tailored finish, which makes it a great intermediate project and a quick knit.
Size
To fit age: 6 years (chest 61–64 cm / 24–25 in)
| Measurement | cm | in |
|---|---|---|
| Finished chest (buttoned) | 69 | 27¼ |
| Length (shoulder to hem) | 39 | 15¼ |
| Armhole depth | 16 | 6¼ |
| Back width at shoulder | 26.5 | 10½ |
Ease: approximately 5–8 cm (2–3 in), which gives room for a shirt or T-shirt underneath.
Materials
- Yarn: Chunky (bulky) wool or wool blend. You need 3 × 100 g balls (approx. 300–330 m / 330–360 yds in total). Suitable yarns are those with approx. 100–110 m per 100 g.
- Needles:
- 6 mm (US 10) straight needles.
- 5 mm (US 8) straight needles.
- 5 mm (US 8) circular needle, 80 cm long, for the front band.
- 5 mm (US 8) double-pointed needles (or a long circular for magic loop), for the armhole bands.
- Notions:
- 5 buttons, 18 mm (¾ in).
- Tapestry needle.
- 2 stitch markers.
- Pins.
Tension (Gauge)
14 sts and 19 rows = 10 cm (4 in) over stocking stitch on 6 mm needles, after blocking.
Check your tension carefully, because it controls the fit:
- If you have more stitches than stated, try a larger needle.
- If you have fewer stitches, try a smaller needle.
Check: 49 back sts ÷ 14 × 10 = 35 cm ✓
Abbreviations
| Abbreviation | Meaning |
|---|---|
| k | knit |
| p | purl |
| st(s) | stitch(es) |
| st st | stocking stitch (knit RS rows, purl WS rows) |
| RS / WS | right side / wrong side |
| k2tog | knit 2 together (1 st decreased, slants right) |
| ssk | slip, slip, knit: slip 2 sts knitwise one at a time, then knit them together through the back loops (1 st decreased, slants left) |
| yo | yarn over (makes 1 st / eyelet) |
| rep | repeat |
| rem | remaining |
| beg | beginning |
| PM | place marker |
Pattern Notes
- The pieces are worked flat from the bottom up and seamed. The bands are then picked up and knitted.
- Left and right refer to the garment as worn.
- All shaping decreases are worked 2 sts in from the edge. This leaves a smooth selvedge for seaming and picking up.
- Buttonholes: By UK convention, girls' garments button right over left (buttonholes on the right front). Boys' garments button left over right (buttonholes on the left front). The main instructions place them on the right front. An alternative row is given for the left front.
- Pick-up ratio: Along vertical edges, pick up 3 sts for every 4 rows. This stops the band flaring or pulling.
Back
- With 5 mm needles, cast on 49 sts.
- Rib Row 1 (RS): k1, *p1, k1; rep from * to end.
- Rib Row 2 (WS): p1, *k1, p1; rep from * to end.
- Rep these 2 rows 4 more times (10 rib rows in total, approx. 5 cm).
- Change to 6 mm needles.
- Beg with a k row, work 34 rows in st st, ending with a WS row. The piece measures approx. 23 cm from the cast-on edge.
Armhole shaping
| Row | Instruction | Sts |
|---|---|---|
| 1 (RS) | Cast off 3 sts, k to end | 46 |
| 2 (WS) | Cast off 3 sts, p to end | 43 |
| 3 | k2, ssk, k to last 4 sts, k2tog, k2 | 41 |
| 4 | p | 41 |
| 5 | As row 3 | 39 |
| 6 | p | 39 |
| 7 | As row 3 | 37 |
Check: 49 − 6 − 6 = 37 ✓
Rows 8–26: Work 19 rows straight in st st, ending with a WS row (26 armhole rows in total).
Shoulder shaping
| Row | Instruction | Sts |
|---|---|---|
| 27 (RS) | Cast off 5 sts, k to end | 32 |
| 28 | Cast off 5 sts, p to end | 27 |
| 29 | Cast off 5 sts, k to end | 22 |
| 30 | Cast off 5 sts, p to end | 17 |
Cast off the rem 17 sts loosely for the back neck.
Check: 5 + 5 + 17 + 5 + 5 = 37 ✓. Total rows: 10 + 34 + 30 = 74 (≈ 39 cm) ✓
Left Front
For the left front, the neck edge is at the beg of RS rows and the armhole is at the end of RS rows.
- With 5 mm needles, cast on 22 sts.
- Rib row: *k1, p1; rep from * to end. Rep this row 9 more times (10 rows).
- Change to 6 mm needles.
- Work 34 rows st st, ending with a WS row.
Armhole and V-neck shaping (worked together)
| Row | Instruction | Sts |
|---|---|---|
| 1 (RS) | k2, ssk, k to end (neck dec) | 21 |
| 2 (WS) | Cast off 3 sts, p to end | 18 |
| 3 | k to last 4 sts, k2tog, k2 (armhole dec) | 17 |
| 4 | p | 17 |
| 5 | k2, ssk, k to last 4 sts, k2tog, k2 (neck and armhole dec) | 15 |
| 6 | p | 15 |
| 7 | k to last 4 sts, k2tog, k2 (armhole dec) | 14 |
| 8 | p | 14 |
| 9 | k2, ssk, k to end (neck dec) | 13 |
| 10–12 | Work 3 rows st st | 13 |
| 13 | k2, ssk, k to end | 12 |
| 14–16 | Work 3 rows st st | 12 |
| 17 | k2, ssk, k to end | 11 |
| 18–20 | Work 3 rows st st | 11 |
| 21 | k2, ssk, k to end | 10 |
| 22–26 | Work 5 rows st st, ending with a WS row | 10 |
Check: neck decreases on rows 1, 5, 9, 13, 17 and 21 = 6. Armhole: 3 cast off + 3 decreases = 6. 22 − 12 = 10 ✓
Shoulder shaping
| Row | Instruction | Sts |
|---|---|---|
| 27 (RS) | k | 10 |
| 28 (WS) | Cast off 5 sts, p to end | 5 |
| 29 | k | 5 |
| 30 | Cast off rem 5 sts | 0 |
Right Front
For the right front, the armhole is at the beg of RS rows and the neck edge is at the end of RS rows.
- Work the cast-on, rib and 34 rows st st exactly as for the left front.
Armhole and V-neck shaping
| Row | Instruction | Sts |
|---|---|---|
| 1 (RS) | Cast off 3 sts, k to last 4 sts, k2tog, k2 | 18 |
| 2 (WS) | p | 18 |
| 3 | k2, ssk, k to end (armhole dec) | 17 |
| 4 | p | 17 |
| 5 | k2, ssk, k to last 4 sts, k2tog, k2 | 15 |
| 6 | p | 15 |
| 7 | k2, ssk, k to end (armhole dec) | 14 |
| 8 | p | 14 |
| 9 | k to last 4 sts, k2tog, k2 (neck dec) | 13 |
| 10–12 | Work 3 rows st st | 13 |
| 13 | As row 9 | 12 |
| 14–16 | Work 3 rows st st | 12 |
| 17 | As row 9 | 11 |
| 18–20 | Work 3 rows st st | 11 |
| 21 | As row 9 | 10 |
| 22–26 | Work 5 rows st st, ending with a WS row | 10 |
Check: 22 − 3 − 1 = 18 ✓. Final count: 22 − 6 − 6 = 10 ✓
Shoulder shaping
| Row | Instruction | Sts |
|---|---|---|
| 27 (RS) | Cast off 5 sts, k to end | 5 |
| 28 (WS) | p | 5 |
| 29 | Cast off rem 5 sts | 0 |
Making Up and Finishing
Blocking and seams
- Block all pieces to the measurements given. Pin out, mist with water or steam lightly (following your yarn's care label), and leave to dry.
- Shoulder seams: Join the front shoulders to the back shoulders using mattress stitch or backstitch. The 17 back-neck sts remain free between them.
- Side seams: Join the side seams using mattress stitch, matching the rib to the rib.
Front and neck band
- With RS facing and the 5 mm circular needle, begin at the lower edge of the right front. Pick up and knit stitches as follows:
| Section | Sts |
|---|---|
| Right front straight edge, from the cast-on edge up to the first neck decrease (44 rows × ¾) | 33 |
| Right V-neck edge, up to the shoulder seam | 22 |
| Back neck cast-off edge | 17 |
| Left V-neck edge, down to the first neck decrease | 22 |
| Left front straight edge, down to the cast-on edge | 33 |
| Total | 127 |
Check: 33 + 22 + 17 + 22 + 33 = 127 ✓
Tip: Place markers at the start of each V-neck section. This makes it easier to keep the counts even.
-
Work the band rows, flat:
- Row 1 (WS): p1, *k1, p1; rep from * to end.
- Row 2 (RS): k1, *p1, k1; rep from * to end.
- Row 3: As row 1.
- Row 4 (RS, buttonhole row): Rib 2 sts. Yo, k2tog, rib 5 sts. Rep from * to * 3 more times. Then yo, k2tog, and work in rib as set to end.
- Five buttonholes are made, over sts 3–4, 10–11, 17–18, 24–25 and 31–32.
- Check: 2 + (2 + 5) × 4 + 2 = 32 sts worked + 95 rem = 127 ✓
- Rows 5–7: Work in rib as set. On row 5, work each yo as a single st, in pattern.
- Cast off loosely in rib on the next (RS) row.
For left-front buttonholes (boys): Work row 4 as rib 95 sts. Then [yo, k2tog, rib 5] 4 times, then yo, k2tog, rib 2. Check: 95 + 28 + 4 = 127 ✓
Armhole bands (both alike)
-
With RS facing and 5 mm double-pointed needles, begin at the underarm seam. Pick up and knit 58 sts evenly around the armhole:
- 3 sts from each underarm cast-off.
- Approx. 26 sts up each side of the armhole, including the curve.
Check: 3 + 26 + 26 + 3 = 58 ✓
-
PM for the beg of the round and join to work in the round.
-
Round 1: *k1, p1; rep from * to end.
-
Rep this round 3 more times (4 rounds in total).
-
Cast off loosely in rib.
Final touches
- Sew the buttons onto the button band so that they line up with the buttonholes.
- Weave in all ends along the seams.
- Give a final light press or steam to the bands to help them lie flat.
Helpful Tips
- Paired shaping: Ssk at the start of a row and k2tog at the end creates mirror-image decreases that frame the V-neck neatly.
- Loose cast-offs: Use a needle one size larger for the band cast-offs if you tend to cast off tightly. The V-neck must stretch over the head and shoulders.
- Chunky seams: If your yarn is thick or textured, split the plies and use a thinner strand for sewing up. This keeps the seams less bulky.
Disclaimer: This pattern was generated by AI and should be reviewed for accuracy before use. While we strive for quality, AI-generated content may contain errors. Please verify measurements, stitch counts, charts, and instructions before beginning your project. Generated by purlJam.uk
Love this pattern?
Save this pattern to your free PurlJam libraryAccess your pattern anytime
Bookmark this page to access your pattern anytime