Type
Knitting
Difficulty
intermediate
Category
amigurumi
AI Thinking Process
Planning
Verification
Pattern
Little Engineer Doll
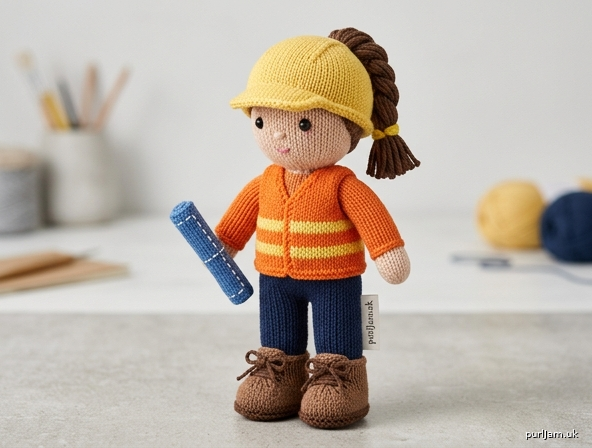
Knitted amigurumi — female site engineer
A small standing doll in work boots, navy pants, a high-visibility vest, and a yellow hard hat, with a ponytail peeking out at the back. Worked in stockinette in the round; pieces are stuffed and seamed. Intermediate: working in the round on a small number of stitches, mid-piece color changes, i-cord, mattress stitch, and simple embroidery.
Finished Size
About 8" (20 cm) tall including the hard hat, and about 6" (15 cm) around at the head and hips.
Size is easy to change: thinner yarn and smaller needles make a smaller doll; thicker yarn and larger needles make a bigger one. Keep the fabric tight either way.
Yarn
Worsted weight cotton or cotton-blend (the label may say “aran / 10-ply”). A typical worsted skein is about 180–220 yd (165–200 m) per 3.5 oz (100 g).
Yardage (approximate):
- Skin (peach, tan, or brown): 40 yd (37 m)
- Navy (pants): 35 yd (32 m)
- Orange (vest): 40 yd (37 m)
- Yellow (hard hat and vest stripes): 30 yd (27 m)
- Hair brown (or black, auburn): 25 yd (23 m)
- Boot brown: 15 yd (14 m)
- Scraps: blue (blueprint), white, black or dark brown, rose (mouth)
One small ball of each color is enough. If you only have Alize Diva (a much thinner yarn), use it with US 2 / 2.75 mm needles; the doll will come out about 5–6" (12.5–15 cm) tall. The stitch counts stay the same.
Gauge
24 sts and 32 rnds = 4" (10 cm) over stockinette stitch in the round, measured on the needles you will use for the doll.
Tight, even fabric matters more than hitting this number exactly. If you can see stuffing through the stitches, go down one needle size. Do not block toy pieces.
Needles
- US 5 / 3.75 mm double-pointed needles (set of 5), or a 32" (80 cm) US 5 / 3.75 mm circular needle for Magic Loop
- This is 1–2 sizes smaller than most worsted labels recommend, on purpose
Notions
- Polyester fiberfill stuffing, about 2 oz (55 g)
- 6 mm or 8 mm safety eyes, or black embroidery floss if you prefer a fully sewn face
- Tapestry needle
- Stitch marker
- Small crochet hook (optional, only for pulling yarn tails to the inside)
- Scissors
- Optional: yellow or orange scrap for a hair-tie on the ponytail
Safety note: Safety eyes are a choking hazard. Do not use them on toys for children under 3 years. Embroider the eyes instead.
Abbreviations (US)
- BO — bind off
- CO — cast on
- k — knit
- kfb — knit into the front and back of the same stitch (1 stitch increased)
- k2tog — knit 2 stitches together (1 stitch decreased)
- rnd(s) — round(s)
- st(s) — stitch(es)
- St st — stockinette stitch (knit every round when working in the round)
- rep — repeat
- rem — remaining
Pattern Notes
- Every piece is worked in the round in stockinette (knit every stitch, every round) unless the pattern says “flat.”
- Join to work in the round on the first round, taking care not to twist. Place a marker for the beginning of the round; treat that jog as the back of the piece.
- For a closed start (crown of the head, sole of the foot, top of the hat): CO 6 sts using a long-tail or circular cast-on, divide onto 3 DPNs (2 sts each), and pull the beginning tail snug after Round 1 so the hole closes. On Magic Loop, CO 6 and split 3/3.
- Change color at the beginning of a round. Knit the first stitch of the new color firmly. Cut the old color, leaving a 6" (15 cm) tail to weave to the inside.
- Stuff as you decrease, a little at a time, packing the filling firmly so the piece is smooth but not stretched.
- Stitch counts are confirmed in parentheses after shaping rounds.
Head
With skin yarn. Start at the crown.
CO 6 sts. Join to work in the rnd.
Rnd 1: [kfb] 6 times — 12 sts (6 increases → 6 + 6 = 12 ✓)
Rnd 2: [k1, kfb] 6 times — 18 sts (6 increases → 12 + 6 = 18 ✓)
Rnd 3: [k2, kfb] 6 times — 24 sts (6 increases → 18 + 6 = 24 ✓)
Rnd 4: [k3, kfb] 6 times — 30 sts (6 increases → 24 + 6 = 30 ✓)
Rnd 5: [k4, kfb] 6 times — 36 sts (6 increases → 30 + 6 = 36 ✓)
Rnds 6–15: Knit. (10 rnds even at 36 sts)
Place features now, while the bottom is still open:
- Safety eyes: Insert between Rnds 11 and 12, 7 sts apart, centered on the front (opposite the beginning-of-rnd marker). Snap the washers on the inside.
- Embroidered eyes (alternative): Wait until the head is stuffed and closed, then stitch two small satin-stitch ovals in black.
Rnd 16: [k4, k2tog] 6 times — 30 sts (6 decreases → 36 − 6 = 30 ✓)
Rnd 17: [k3, k2tog] 6 times — 24 sts (6 decreases → 30 − 6 = 24 ✓)
Rnd 18: [k2, k2tog] 6 times — 18 sts (6 decreases → 24 − 6 = 18 ✓)
Stuff the head firmly, filling the crown first.
Rnd 19: [k1, k2tog] 6 times — 12 sts (6 decreases → 18 − 6 = 12 ✓)
BO all 12 sts. Leave a 12" (30 cm) tail for sewing the head to the body. The bound-off edge is the neck. Weave the CO tail through the 6 crown stitches on the inside and pull the hole closed.
Face embroidery (after stuffing, before or after sewing to the body):
- Mouth: With rose yarn, 3 small horizontal stitches centered, about 3 rnds below the eyes.
- Nose (optional): 2 tiny vertical stitches in a slightly deeper skin shade, midway between eyes and mouth.
- Lashes (optional): 2–3 short straight stitches fanning from the outer top of each eye.
Body
Start at the hips. Navy, then orange vest, then skin neck.
With navy, CO 36 sts. Join to work in the rnd.
Rnds 1–8: Knit. (pants / hips)
Cut navy. Join orange.
Rnds 9–20: Knit. (12 rnds of vest)
Rnd 21: [k4, k2tog] 6 times — 30 sts (36 − 6 = 30 ✓)
Rnd 22: [k3, k2tog] 6 times — 24 sts (30 − 6 = 24 ✓)
Rnd 23: [k2, k2tog] 6 times — 18 sts (24 − 6 = 18 ✓)
Cut orange. Join skin.
Rnd 24: [k1, k2tog] 6 times — 12 sts (18 − 6 = 12 ✓)
Rnds 25–26: Knit. (neck)
Stuff the body firmly, pushing filling into the hip corners so the base sits flat.
BO all 12 sts. Leave a 12" (30 cm) tail. The bound-off edge is the neck opening (12 sts — matches the head ✓).
Legs (make 2)
Start at the sole of the boot.
With boot brown, CO 6 sts. Join to work in the rnd.
Rnd 1: [kfb] 6 times — 12 sts (6 + 6 = 12 ✓)
Rnds 2–6: Knit. (boot)
Cut brown. Join navy.
Rnds 7–18: Knit. (12 rnds of pants)
Stuff firmly, leaving the last ½" (1.3 cm) only lightly filled so the top sews neatly.
BO all 12 sts. Leave a 10" (25 cm) tail for sewing. Close the CO hole at the sole with the beginning tail.
Arms (make 2)
Start at the hand. Closed end after the last decrease is the shoulder.
With skin, CO 6 sts. Join to work in the rnd.
Rnd 1: [kfb] 6 times — 12 sts (6 + 6 = 12 ✓)
Rnds 2–4: Knit. (hand)
Cut skin. Join orange.
Rnds 5–14: Knit. (10 rnds — short vest sleeve)
Stuff lightly — arms should be firm but still able to lie against the body.
Rnd 15: [k2tog] 6 times — 6 sts (12 − 6 = 6 ✓)
Cut yarn, leaving a 10" (25 cm) tail. Thread the tail through the rem 6 sts, pull tight, and fasten off. This gathered end is the shoulder. Close the CO hole at the hand.
Hair Cap
Covers the top and back of the head; the face stays open.
With hair brown, CO 6 sts. Join to work in the rnd.
Rnds 1–5: Work the same as Head Rnds 1–5 — 36 sts
Rnds 6–10: Knit.
BO loosely. Leave a 16" (40 cm) tail for sewing.
Ponytail
With hair brown, CO 4 sts. Work i-cord until the cord measures 3" (7.5 cm):
I-cord: Knit 4. Do not turn. Slide the stitches to the other end of the needle. Bring the yarn behind the work and knit 4 again. Repeat.
BO. Wrap a scrap of yellow or orange yarn tightly around the cord ½" (1.3 cm) from one end and tie off — this is the hair-tie. Weave those ends into the cord.
Hard Hat
Yellow. Slightly larger than the head so it sits over the hair.
With yellow, CO 6 sts. Join to work in the rnd.
Rnds 1–5: Work the same as Head Rnds 1–5 — 36 sts
Rnd 6: [k5, kfb] 6 times — 42 sts (36 + 6 = 42 ✓)
Rnds 7–12: Knit. (6 rnds even)
Rnd 13 (brim): [k6, kfb] 6 times — 48 sts (42 + 6 = 48 ✓)
Rnds 14–16: Knit.
BO loosely. Weave in ends. The brim will roll slightly to the outside; that roll is the visor. Do not flatten it.
Blueprint (optional prop)
With blue, CO 10 sts. Work 16 rows of St st flat (knit RS rows, purl WS rows). BO.
Embroider a few short dashed lines in white. Roll from a short end into a tube and tack the roll with a couple of stitches. Leave a tail to sew it to one hand.
Finishing and Assembly
Weave beginning tails to the inside of each piece as you go. All seams use mattress stitch unless noted. Use the long tails already left on the pieces.
Order matters — follow this sequence:
- Face. Confirm eyes, mouth, and optional lashes/nose are done.
- Hair cap. Pin the cap over the top and back of the head, leaving an open face oval from mid-forehead to the chin. Sew around the cap edge with the BO tail. The front edge of the cap should sit about 2 rnds above the eyes.
- Ponytail. Sew the unbound end of the i-cord to the back of the head, just below where the hat brim will sit, centered on the beginning-of-rnd line.
- Hard hat. Set the hat over the hair, brim parallel to the eyes, visor above the face. The ponytail should emerge from under the back of the brim. Tack the hat down in 4–5 hidden stitches (both sides, back, and front of crown) so it cannot be pulled off. Do not sew the brim flat.
- Head to body. Mattress-stitch the 12-st head neck to the 12-st body neck, matching the beginning-of-rnd markers so both backs line up. Add a pinch more stuffing at the join if the neck looks dented, then close.
- Legs. With the body standing, sew the bound-off edge of each leg to the bottom of the body. Inner edges of the legs sit ½" (1.3 cm) apart; outer edges line up with the sides of the hips. Boots point forward. Check that the doll stands; add or remove a little stuffing in a hip if she lists.
- Arms. Sew the gathered shoulder of each arm to the side of the body at Rnds 21–23 (the start of the shoulder decrease), about 1" (2.5 cm) down from the neck seam, in line with the sides. Thumbs/hands angle slightly forward. Keep both arms at the same height — count rounds on each side.
- Vest stripes. With yellow, duplicate-stitch (or embroider a running stitch) two horizontal bands around the orange torso:
- one on Body Rnd 11
- one on Body Rnd 18
Each stripe is 1 stitch tall and goes all the way around except a 4-st gap at the center front if you want an open-vest look.
- Blueprint. Tack the rolled blueprint to the inside of one hand with 2 stitches.
- Ends. Push every remaining tail into the stuffing with the tapestry needle. Do not leave knots on the outside.
Checklist of pieces
| Piece | Color(s) | Max sts | Make |
|---|---|---|---|
| Head | Skin | 36 | 1 |
| Body | Navy, orange, skin | 36 | 1 |
| Leg | Brown, navy | 12 | 2 |
| Arm | Skin, orange | 12 | 2 |
| Hair cap | Hair brown | 36 | 1 |
| Ponytail | Hair brown | 4 | 1 |
| Hard hat | Yellow | 48 | 1 |
| Blueprint | Blue | 10 | 1 optional |
Stuffing used: about 2 oz (55 g) total.
Care
Spot-clean with a damp cloth. Do not machine-wash if you used safety eyes. Dry flat, reshaping the hat brim as it dries.
You now have a complete engineer doll: skin-tone head, navy work pants, orange hi-vis vest with yellow stripes, brown boots, brown ponytail, and a yellow hard hat, standing about 8" (20 cm) tall.
Disclaimer: This pattern was generated by AI and should be reviewed for accuracy before use. While we strive for quality, AI-generated content may contain errors. Please verify measurements, stitch counts, charts, and instructions before beginning your project. Generated by purlJam.uk
Love this pattern?
Save this pattern to your free PurlJam libraryAccess your pattern anytime
Bookmark this page to access your pattern anytime