Type
Crochet
Difficulty
beginner
Category
amigurumi
AI Thinking Process
Planning
Verification
Pattern
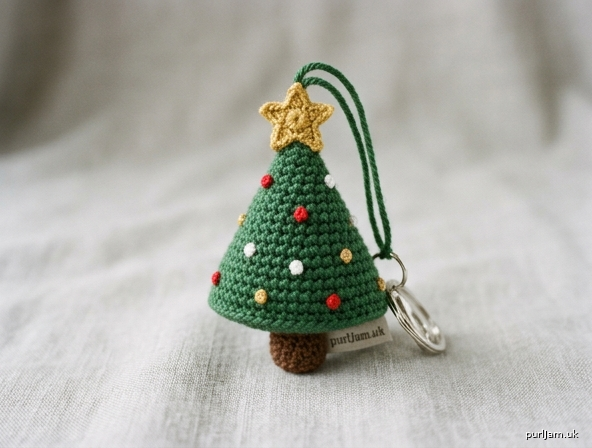
Little Evergreen Christmas Tree Charm
A beginner-friendly amigurumi Christmas tree worked as a small stuffed cone with a brown trunk and a gold star. Hang it from a bag, zipper, wreath, or gift.
Skill level: Beginner
Finished size: About 2.5" (6.5 cm) tall including trunk and star, 1.5" (4 cm) wide at the base, using worsted yarn and a 3.5 mm hook. Size will vary with yarn, hook, and stuffing.
Materials
- Worsted weight yarn (category 4), small amounts:
- Color A (tree): forest or pine green — about 20 yd (18 m)
- Color B (trunk): brown — about 5 yd (4.5 m)
- Color C (star): gold or yellow — about 5 yd (4.5 m)
- Scraps of red, white, and/or gold for ornaments
- Hook: US E-4 / 3.5 mm (or US G-6 / 4.0 mm if you crochet very tightly). Use a hook 1–2 sizes smaller than the yarn label so the fabric is dense.
- Polyester fiberfill stuffing
- Yarn needle
- Stitch marker
- Scissors
- Optional: 8–10 mm jump ring and keychain finding; 4–6 mm beads instead of French knots
Yarn note: Acrylic or cotton worsted both work. Cotton gives sharper stitch definition; acrylic is softer and springier.
Gauge
5 sc and 5 rnds = 1" (2.5 cm) in single crochet, worked tightly in the round.
Gauge is not critical for this charm, but the fabric should be firm enough that stuffing does not show through. If your fabric looks holey, go down a hook size.
Abbreviations (US terms)
| Abbreviation | Meaning |
|---|---|
| ch | chain |
| sc | single crochet |
| inc | increase — 2 sc in the same stitch |
| dec | decrease — single crochet 2 together (invisible decrease preferred) |
| sl st | slip stitch |
| st(s) | stitch(es) |
| rnd(s) | round(s) |
| MR | magic ring |
| FO | fasten off |
| [...] | stitch count at end of round |
Invisible decrease: Insert hook through the front loop only of the next 2 stitches, yarn over, pull through both front loops (2 loops on hook), yarn over, pull through both loops.
Pattern notes
- Use US crochet terms throughout.
- The tree and trunk are worked in continuous spirals (do not join at the end of each round). Place a stitch marker in the first stitch of the round and move it up as you go.
- Work tightly for a smooth amigurumi surface.
- Stuff as you go; it is hard to fill the point of the cone after you start decreasing.
- If a magic ring is new to you, substitute: ch 2, work the Rnd 1 stitches into the 2nd ch from the hook, then pull the tail to close the hole.
- Numbers in brackets are the stitch count at the end of the round. Inline checks confirm the math.
Tree (Color A — green)
Worked from the tip down to the base.
Rnd 1: 4 sc in MR. [4]
Rnd 2: (sc, inc) around. [6] (2 increases → 4 + 2 = 6 ✓)
Rnd 3: sc around. [6]
Rnd 4: (sc, inc) around. [9] (3 increases → 6 + 3 = 9 ✓)
Rnd 5: sc around. [9]
Rnd 6: (2 sc, inc) around. [12] (3 increases → 9 + 3 = 12 ✓)
Rnd 7: sc around. [12]
Rnd 8: (3 sc, inc) around. [15] (3 increases → 12 + 3 = 15 ✓)
Rnd 9: sc around. [15]
Rnd 10: (4 sc, inc) around. [18] (3 increases → 15 + 3 = 18 ✓)
Rnds 11–12: sc around. [18] (2 rounds even)
Begin stuffing the cone firmly, pushing small bits of fiberfill all the way into the tip with the blunt end of the hook or a pencil. Keep stuffing as you decrease so the tree holds a crisp cone shape.
Rnd 13: (sc, dec) around. [12] (6 decreases → 18 − 6 = 12 ✓)
Add more stuffing until the tree is firm but not stretching the stitches.
Rnd 14: dec around. [6] (6 decreases → 12 − 6 = 6 ✓)
FO, leaving a 8" (20 cm) tail. Thread the tail through the front loops of the remaining 6 stitches and pull tight to close the hole. Weave in the end, or leave it if you prefer to use it when sewing on the trunk. The closed base should be roughly circular and about ¾" (2 cm) across.
Trunk (Color B — brown)
Rnd 1: 6 sc in MR. [6]
Rnds 2–4: sc around. [6] (3 rounds even)
Lightly stuff the trunk — just enough to make it a firm little cylinder, not a bulge. FO, leaving a 10" (25 cm) tail for sewing.
Star (Color C — gold or yellow)
Worked in joined rounds, then points are added.
Rnd 1: 5 sc in MR, sl st in first sc to join. [5]
Points: *Ch 3, sl st in 2nd ch from hook, sl st in next ch, sl st in next sc of Rnd 1; repeat from * 4 more times. (5 points ✓)
FO, leaving a 8" (20 cm) tail for sewing. Gently tug each point so they sit evenly around the center.
Hanging loop (Color A or Color C)
With the tree closed and the tip facing you, join yarn with a sl st through the very center of Rnd 1 (the magic-ring hole). Ch 12, sl st in the same center stitch to form a loop. FO and weave in ends securely, tying a small knot on the inside of the tip if needed.
(Optional keychain: open a jump ring, pass it through the hanging loop, add a keychain finding, and close the ring.)
Assembly
- Star. Pin the star over the tip of the tree so the hanging loop comes up through the center of the star. With the gold tail, sew the star in place with small stitches through the star center and the tree tip. Weave in ends.
- Trunk. Pin the trunk to the center of the closed tree base. Check that the tree stands (or hangs) straight. Sew around the top edge of the trunk with the brown tail, catching stitches on the tree base. Weave in ends.
- Tug the hanging loop so the charm hangs with the trunk pointing down and the star on top. Adjust star or trunk if the tree leans.
Embellishments
Keep decorations simple so the charm stays beginner-friendly and the surface stays neat.
French-knot ornaments (recommended):
With red, white, or gold yarn (or embroidery floss), make 6–8 French knots scattered over the tree. To make a French knot: bring the needle up from the inside, wrap the yarn twice around the needle, insert the needle back down one stitch away, and pull through, holding the wraps until they sit on the fabric. Tie off inside the tree.
Optional garland:
With gold or white, work a line of surface slip stitch in a gentle spiral or zigzag down the tree: insert the hook from front to back around a stitch, yarn over, pull a loop through, then insert the hook around the next stitch along your path, yarn over, pull through the stitch and the loop on the hook; repeat. FO and weave in.
Optional beads:
Sew 4–6 mm beads in place of French knots. If this charm will be near children under 3 years, skip beads and use embroidery only.
Do not add safety eyes or a face unless you want a character tree; this pattern is a classic geometric tree.
Finishing
- Weave in every remaining tail on the inside of the tree or under the trunk.
- Steam is not required. If the star points curl, finger-press them or hold a steam iron several inches above (do not press acrylic flat).
- Attach a jump ring and keychain finding through the hanging loop if using as a bag charm.
Safety: This is a decorative charm, not a toy. Small parts (beads, jump rings, stuffed pieces) are a choking hazard for children under 3. Sew all pieces firmly.
Care
Hand wash cold, squeeze gently, reshape, and air dry. Do not machine dry; heat can melt acrylic stuffing and flatten the cone.
Quick stitch-count recap
| Piece | Start | Max | End | Rounds |
|---|---|---|---|---|
| Tree | 4 | 18 | 6 | 14 |
| Trunk | 6 | 6 | 6 | 4 |
| Star | 5 sc + 5 points | — | — | 1 + points |
Tree increases: 4 → 6 → 9 → 12 → 15 → 18.
Tree decreases: 18 → 12 → 6.
All counts verified.
Disclaimer: This pattern was generated by AI and should be reviewed for accuracy before use. While we strive for quality, AI-generated content may contain errors. Please verify measurements, stitch counts, charts, and instructions before beginning your project. Generated by purlJam.uk
Love this pattern?
Save this pattern to your free PurlJam libraryAccess your pattern anytime
Bookmark this page to access your pattern anytime