Type
Crochet
Difficulty
intermediate
Category
custom
AI Thinking Process
Planning
Verification
Pattern
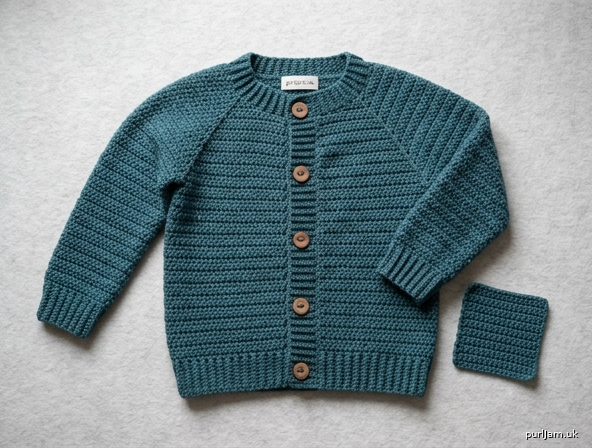
Little Explorer Raglan Cardigan
Button-Front Cardigan for Size 2T (Boy)
A seamless top-down raglan cardigan worked flat through the yoke and body, with sleeves worked in the round from the underarm. Main fabric is half double crochet; hem, cuffs, neckband, and button bands are back-loop-only single crochet worked sideways for a tidy ribbed finish. Five buttons close the front. No seams to sew—only ends to weave in.
Difficulty: Easy
Craft: Crochet · US terminology
Sizes
Size 2T only
| Measurement | Inches | cm |
|---|---|---|
| Actual chest | 20½" | 52 cm |
| Finished chest (buttoned, with ease) | 22½" | 57 cm |
| Positive ease | ~2" | 5 cm |
| Body length from shoulder | 12¼" | 31 cm |
| Sleeve length from underarm | 9" | 23 cm |
Materials
- Yarn: DK / light worsted (weight #3), cotton-acrylic blend, machine washable
Approx 450–500 yd (410–460 m) / 7–9 oz (200–250 g) - Hook A: US G/6 (4.0 mm) for main fabric
- Hook B: US E/4 (3.5 mm) for all bands
- Notions:
– 5 buttons, ¾" (18–20 mm) diameter
– 4 stitch markers
– Yarn needle
– Scissors
– Measuring tape
Gauge
Swatch (important—check before starting):
With Hook A (4.0 mm), ch 22.
Row 1: Hdc in 2nd ch from hook and in each ch across (21 hdc). Ch 1, turn.
Rows 2–16: Hdc in each st across (21 hdc). Ch 1, turn.
Fasten off. Block lightly.
Target: 16 sts and 12 rows = 4" (10 cm) in hdc with Hook A.
Adjust hook size if needed so stitch and row gauge both match. Band fabric (BLO sc, Hook B) is approximately 18 sts and 20 rows = 4" (10 cm); exact band gauge is less critical than main gauge.
Abbreviations (US)
| Abbr | Meaning |
|---|---|
| BLO | back loop only |
| ch | chain |
| hdc | half double crochet |
| PM | place marker |
| rep | repeat |
| rnd(s) | round(s) |
| RS | right side |
| sc | single crochet |
| sl st | slip stitch |
| SM | slip marker |
| st(s) | stitch(es) |
| WS | wrong side |
Special notes
- Ch 1 at beginning of hdc rows/rnds does not count as a stitch. Work the first hdc into the first stitch.
- Ch 1 at beginning of sc/BLO sc rows does not count as a stitch.
- Work into both loops unless instructed to work BLO.
- Join sleeves with sl st to first hdc of the rnd unless working continuous spiral (pattern uses joined rnds).
Pattern Notes
- Cardigan is worked top down. Yoke and body are worked flat in rows with a center-front opening. Sleeves are worked in the round from the yoke down.
- Raglan increases: on every yoke row, work 2 hdc in the stitch before each marker and 2 hdc in the stitch after each marker (8 sts increased per row).
- Stitch count is given in parentheses at the end of every row and round.
- Button bands, neckband, hem, and cuffs are worked sideways in BLO sc with Hook B after the main pieces are complete.
- Buttonholes are worked on the left front band (as worn) for traditional boy’s styling. Buttons are sewn to the right front band.
- Keep a loose, even tension on underarm chains so the underarm sits flat.
Size Schematic (2T)
                    neck opening ~5½" (14 cm)
                   +------------------+
                  /  LF   raglan   RF  \
                 /    \    yoke    /    \
                /      \          /      \
               |  sleeve\ 12¼"  /sleeve  |
               |         \     /         |
               |   9"     \   /    9"    |
               |  sleeve   \ /   sleeve  |
               |            |            |
               |<- ~11¼" back when flat->|
               |            |            |
               |   body     |    body    |
               |  length    |            |
               |  12¼"      |            |
               |            |            |
               +------------+------------+
                    hem ~22½" chest buttoned
                         (57 cm)
Finished chest is measured with fronts overlapped and buttoned. Main body fabric at underarm is 92 hdc ≈ 23" (58.5 cm) before band overlap.
Raglan Increase Placement Table
Starting distribution (after foundation row, 32 hdc):
| Section | Start sts | Inc per row | After 14 inc rows |
|---|---|---|---|
| Left Front (LF) | 6 | +1 | 20 |
| Left Sleeve | 4 | +2 | 32 |
| Back | 12 | +2 | 40 |
| Right Sleeve | 4 | +2 | 32 |
| Right Front (RF) | 6 | +1 | 20 |
| Total | 32 | +8 | 144 |
Marker positions after foundation: after st 6, after st 10, after st 22, after st 26.
At divide: body = LF 20 + ch 6 + Back 40 + ch 6 + RF 20 = 92 sts.
Each sleeve when worked = 32 held sts + 6 underarm sts = 38 sts.
Pattern Instructions
Yoke
With Hook A (4.0 mm), ch 33.
Foundation Row (WS): Hdc in 2nd ch from hook and in each ch across. (32 hdc)
PM after the 6th, 10th, 22nd, and 26th stitches (four markers). Ch 1, turn.
Row 1 (RS, increase): *Hdc in each st to 1 st before next marker, 2 hdc in next st, SM, 2 hdc in next st; rep from * 3 more times, hdc in each st to end. (40 hdc)
Ch 1, turn.
Row 2 (WS, increase): *Hdc in each st to 1 st before next marker, 2 hdc in next st, SM, 2 hdc in next st; rep from * 3 more times, hdc in each st to end. (48 hdc)
Ch 1, turn.
Row 3 (increase): Rep Row 2. (56 hdc)
Ch 1, turn.
Row 4 (increase): Rep Row 2. (64 hdc)
Ch 1, turn.
Row 5 (increase): Rep Row 2. (72 hdc)
Ch 1, turn.
Row 6 (increase): Rep Row 2. (80 hdc)
Ch 1, turn.
Row 7 (increase): Rep Row 2. (88 hdc)
Ch 1, turn.
Row 8 (increase): Rep Row 2. (96 hdc)
Ch 1, turn.
Row 9 (increase): Rep Row 2. (104 hdc)
Ch 1, turn.
Row 10 (increase): Rep Row 2. (112 hdc)
Ch 1, turn.
Row 11 (increase): Rep Row 2. (120 hdc)
Ch 1, turn.
Row 12 (increase): Rep Row 2. (128 hdc)
Ch 1, turn.
Row 13 (increase): Rep Row 2. (136 hdc)
Ch 1, turn.
Row 14 (increase): Rep Row 2. (144 hdc)
Ch 1, turn.
[Check: 32 + (14 × 8) = 144 ✓. Sections: LF 20 | S 32 | B 40 | S 32 | RF 20.]
Yoke depth measures approx 4¾" (12 cm).
Divide for Body and Sleeves
Row 15 (Divide, RS): Hdc in each of next 20 sts (LF), ch 6, skip next 32 sts (left sleeve—place sleeve sts on holder or scrap yarn), hdc in each of next 40 sts (Back), ch 6, skip next 32 sts (right sleeve—place on holder), hdc in each of next 20 sts (RF). (92 hdc on body: 20 + 6 + 40 + 6 + 20)
Ch 1, turn.
Remove raglan markers. Body is now worked flat on these 92 sts.
Body
Row 16 (WS): Hdc in each st across, including 1 hdc in each of the 6 underarm chains on each side. (92 hdc)
Ch 1, turn.
Rows 17–35: Hdc in each st across. (92 hdc)
Ch 1, turn at the end of every row.
[Rows 16–35 = 20 rows after the divide row; together with Row 15 this is 21 body-level rows ≈ 7" (17.5 cm) from underarm.]
After Row 35, body from shoulder measures approx 11¼" (28.5 cm) in hdc. Do not fasten off if continuing directly to hem ribbing with the same yarn; otherwise fasten off and rejoin with Hook B at the left-front hem corner (RS facing for hem start as preferred). Switch to Hook B (3.5 mm) for hem.
Hem Band (sideways BLO sc ribbing)
Hem band is worked sideways along the bottom edge (short rows of BLO sc advancing across the hem).
With Hook B, RS facing, join yarn with sl st at the left-front bottom corner of the body (or continue if yarn is still attached—position so you work across the hem toward the right front).
Setup: Ch 6.
Row 1: Sc in 2nd ch from hook and in each of next 4 ch (5 sc). Sl st in each of next 2 hdc along the body hem edge. Turn. (5 sc)
Row 2: Skip the 2 sl sts, sc BLO in each of next 5 sc. Ch 1, turn. (5 sc BLO)
Row 3: Sc BLO in each of next 5 sc. Sl st in each of next 2 hdc along hem edge. Turn. (5 sc)
Rep Rows 2–3 across the entire hem until all body hem stitches are joined. End with a Row 2 (WS row of band) so the final edge is neat.
Fasten off.
Band width ≈ 1" (2.5 cm). Total body length from shoulder including hem ≈ 12¼" (31 cm).
Sleeves (make 2 alike)
With RS facing and Hook A (4.0 mm), place the 32 held sleeve sts back on working area. Join yarn with sl st at center of underarm chain.
Rnd 1: Ch 1, work 3 hdc across first half of underarm ch, hdc in each of next 32 sleeve sts, work 3 hdc across remaining underarm ch; join with sl st to first hdc. (38 hdc)
[32 + 6 = 38 ✓]
Rnds 2–25: Ch 1, hdc in each st around; join with sl st to first hdc. (38 hdc each rnd)
Sleeve hdc portion measures approx 8¼" (21 cm).
Optional gentle taper (recommended): On Rnds 10 and 18 only, decrease 2 sts evenly (hdc2tog twice, spaced apart):
- Rnd 10: (36 hdc)
- Rnd 18: (34 hdc)
Then work remaining rnds even on 34 sts and use 34 sts for the cuff pick-up below. If skipping taper, continue on 38 sts and decrease 4 sts evenly on the last rnd before the cuff (to 34 sts) so the cuff sits neatly.
Do not fasten off; switch to Hook B for cuff, or fasten off and rejoin.
Cuffs (sideways BLO sc ribbing)
With Hook B, at sleeve edge:
Setup: Ch 6.
Row 1: Sc in 2nd ch from hook and in each of next 4 ch (5 sc). Sl st in each of next 2 sleeve sts. Turn.
Row 2: Skip 2 sl sts, sc BLO in each of next 5 sc. Ch 1, turn. (5)
Row 3: Sc BLO in each of next 5 sc. Sl st in each of next 2 sleeve sts. Turn.
Rep Rows 2–3 around the sleeve edge. Join final band edge to starting edge with whipstitch or sl st seam. Fasten off.
Cuff width ≈ 1" (2.5 cm). Total sleeve length from underarm ≈ 9" (23 cm).
Rep for second sleeve.
Button Bands and Neckband
Bands are worked as one continuous sideways BLO sc strip along right front, around neck, and down left front (or worked in three sections and joined—continuous is shown). Buttonholes are placed on the left front band only.
Pick-up rate: Along each front edge, pick up 1 st per hdc row end (14 yoke + 21 body = 35 row ends per front). Across neck, pick up 1 st per foundation ch / st around the neck edge (approx 32 sts), keeping the neck flat—about 28–32 sc is typical after easing. Exact pick-up count can vary by 1–2 sts; distribute evenly so edges do not ruffle or pull.
Right Front Band (buttons sewn here; no buttonholes)With Hook B, RS facing, join yarn at bottom of right front (hem band outer corner).
Work sideways ribbing up the right front:
Setup: Ch 6.
Row 1: Sc in 2nd ch from hook and in each of next 4 ch (5 sc). Sl st in each of next 2 edge sts/row-ends up the right front. Turn.
Row 2: Skip 2 sl sts, sc BLO in each of 5 sc. Ch 1, turn.
Row 3: Sc BLO in each of 5 sc. Sl st in each of next 2 edge sts. Turn.
Rep Rows 2–3 to the top of the right front (neck corner). Do not fasten off if continuing around neck in one piece.
At the right neck corner, continue the same 5-st (or reduce to 4-st for a ¾–1" / 2 cm neckband) sideways BLO sc around the neck edge, joining with sl st into every 1–2 neck sts / row ends so the neckband lies flat and measures approx ¾–1" (2 cm) wide.
For a true 2 cm (¾") neckband, work ch 5 setup (4 sc) instead of ch 6 (5 sc) around the neck only, then return to 5 sc for the left front if preferred. Keep joins even; do not pull tight.
Continue down the left front with 5-st BLO sc sideways ribbing as for the right front, working from neck to hem, and place 5 buttonholes as calculated below.
Buttonhole Spacing Calculation
- Front edge length available for buttons (below neckband, above hem): approx 10½" (26.5 cm) of band travel.
- 5 buttons, ¾" (18–20 mm).
- Place top buttonhole center ¾" (2 cm) below the lower edge of the neckband.
- Place bottom buttonhole center ¾" (2 cm) above the top of the hem band.
- Distance between top and bottom button centers: 10½" − ¾" − ¾" = 9" (23 cm).
- Remaining 3 buttons divide that span into 4 equal intervals: 9" ÷ 4 = 2¼" (5.7 cm) center-to-center.
Buttonhole positions (centers, measured down from neckband lower edge along left band):
- ¾" (2 cm)
- 3" (7.5 cm)
- 5¼" (13.5 cm)
- 7½" (19 cm)
- 9¾" (24.5 cm)
How to work each buttonhole (on a RS band row that lands at the calculated height):
Work 2 sc BLO, ch 2, skip 2 sc of the band, sc BLO in last st (or: sc BLO 1, ch 2, skip 2, sc BLO 2—adjust so hole is centered on the 5-st band). On the following row, work sc BLO in each sc and 2 sc into the ch-2 space (restore 5 sts).
Repeat at each of the five positions. Between buttonholes, work plain BLO sc ribbing rows as established.
End at hem; fasten off.
Finishing
- Weave in all ends securely on WS.
- Lightly block flat to measurements: chest 22½" (57 cm) buttoned, length 12¼" (31 cm), sleeve 9" (23 cm). Do not overstretch ribbing.
- Sew 5 buttons to the right front band, opposite the buttonholes, centered on the band width. Use yarn or matching thread; anchor firmly through both layers of band if needed.
- Button up and check alignment; adjust button positions by a few millimeters if any gap or pull appears.
- Optional: steam the raglan lines and underarms lightly so increases sit smoothly.
Final Measurement Check
| Area | Target | How to verify |
|---|---|---|
| Chest (buttoned) | 22½" (57 cm) | Measure around body at underarm with cardigan buttoned on child or form |
| Length shoulder to hem | 12¼" (31 cm) | Straight down from shoulder point |
| Sleeve underarm to cuff edge | 9" (23 cm) | Along underarm line |
| Neckband width | ~¾–1" (2 cm) | Outer edge to neck join |
| Button band width | ~1" (2.5 cm) | Outer edge to front edge |
Stitch-Count Quick Reference
- Foundation: 32
- After yoke Row n: 32 + 8n (Row 14 = 144)
- Body after divide: 92 (all body rows)
- Each sleeve Rnd 1: 38 (or 34–36 if tapered)
- Band width: 5 sc (4 sc optional at neck)
End of pattern. Enjoy your Little Explorer cardigan!
Disclaimer: This pattern was generated by AI and should be reviewed for accuracy before use. While we strive for quality, AI-generated content may contain errors. Please verify measurements, stitch counts, charts, and instructions before beginning your project. Generated by purlJam.uk
Love this pattern?
Save this pattern to your free PurlJam libraryAccess your pattern anytime
Bookmark this page to access your pattern anytime