Type
Crochet
Difficulty
beginner
Category
amigurumi
AI Thinking Process
Planning
Verification
Pattern
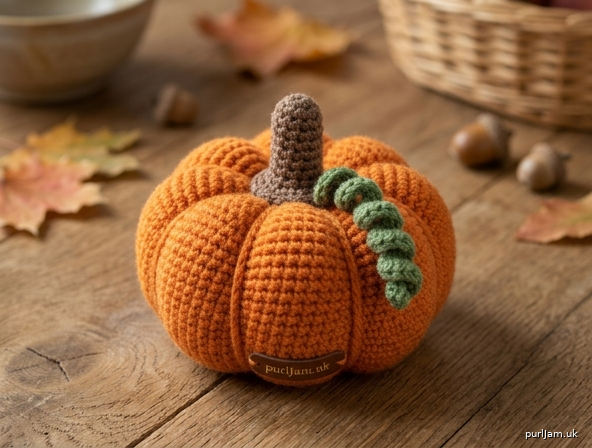
Little Harvest Pumpkin
3-Inch Crochet Fall Decoration
A plump, six-segment pumpkin with a short brown stem — just the right size for a mantel, place setting, or bowl of autumn décor. Worked in basic amigurumi stitches with no color changes on the body, so it is a friendly first toy-style project.
Skill Level: Beginner
Finished Size: Approximately 3 in (7.5 cm) wide × 2.5 in (6.5 cm) tall including stem, after stuffing and shaping.
Materials
- Worsted weight yarn (category 4)
- Color A (pumpkin): orange, 40 yd (37 m)
- Color B (stem): brown, 5 yd (5 m)
- Color C (optional tendril): green, 3 yd (3 m)
- US F-5 (3.75 mm) crochet hook (or size needed to obtain gauge)
- Polyester fiberfill stuffing
- Yarn needle
- Stitch marker
- Scissors
Yarn note: Any worsted acrylic or cotton works. A slightly fuzzy acrylic gives a soft pumpkin look; cotton gives crisper ridges.
Gauge
5 sc × 5 rnds = 1 in (2.5 cm) in single crochet, worked tightly in the round.
Work more tightly than you would for a blanket — stuffing should not show through. If your pumpkin is much smaller than 3 in wide, go up to US G-6 (4.0 mm). If it is larger, go down to US E-4 (3.5 mm).
Abbreviations (US terms)
- ch — chain
- sc — single crochet
- inc — increase (2 sc in the same stitch)
- dec — decrease (single crochet 2 together: insert hook in next st, yarn over, pull up a loop, insert hook in following st, yarn over, pull up a loop, yarn over, pull through all 3 loops on hook)
- sl st — slip stitch
- st(s) — stitch(es)
- rnd(s) — round(s)
- MR — magic ring
- FO — fasten off
Pattern Notes
- The body and stem are worked in a continuous spiral. Do not join at the end of rounds. Mark the first stitch of each round and move the marker up as you go.
- Counts at the end of each round are shown in brackets [ ].
- Stuff as you go. It is hard to fill the pumpkin evenly after the opening is small.
- This is a decoration, not a toy for children under 3. The stem can be a choking hazard if it comes off.
- Invisible decrease (if you already know it) may be substituted for regular dec; it is not required.
Magic ring alternative: If you prefer not to use a magic ring, ch 2, then work the Rnd 1 stitches into the 2nd ch from the hook. Pull the starting tail to close the hole.
Pumpkin Body
With Color A (orange):
Rnd 1: 6 sc in MR. [6]
Rnd 2: Inc in each st around. [12] (6 increases → 6 + 6 = 12 ✓)
Rnd 3: (Sc, inc) around. [18] (6 increases → 12 + 6 = 18 ✓)
Rnd 4: (2 sc, inc) around. [24] (6 increases → 18 + 6 = 24 ✓)
Rnd 5: (3 sc, inc) around. [30] (6 increases → 24 + 6 = 30 ✓)
Rnd 6: (4 sc, inc) around. [36] (6 increases → 30 + 6 = 36 ✓)
Rnd 7: (5 sc, inc) around. [42] (6 increases → 36 + 6 = 42 ✓)
Rnds 8–11: Sc in each st around. [42] (4 rounds even)
Rnd 12: (5 sc, dec) around. [36] (6 decreases → 42 − 6 = 36 ✓)
Rnd 13: (4 sc, dec) around. [30] (6 decreases → 36 − 6 = 30 ✓)
Rnd 14: (3 sc, dec) around. [24] (6 decreases → 30 − 6 = 24 ✓)
Stuff firmly, shaping the piece into a slightly flattened sphere (a little wider than it is tall). Keep stuffing packed into the sides.
Rnd 15: (2 sc, dec) around. [18] (6 decreases → 24 − 6 = 18 ✓)
Rnd 16: (Sc, dec) around. [12] (6 decreases → 18 − 6 = 12 ✓)
Add a last bit of stuffing so the top does not dimple, but do not overfill — the ridges need to be able to pull in.
Rnd 17: Dec around. [6] (6 decreases → 12 − 6 = 6 ✓)
FO, leaving a 10 in (25 cm) tail. Thread the tail onto a yarn needle, weave through the front loops of the remaining 6 sts, and pull closed. Weave in this tail on the inside / bottom. Do not use this tail for the ridges.
Stem
With Color B (brown):
Rnd 1: 6 sc in MR. [6]
Rnds 2–5: Sc in each st around. [6]
FO, leaving an 8 in (20 cm) tail for sewing. Leave the stem unstuffed, or push in a pea-sized bit of fiberfill if you want it firmer. The open end is the bottom (the end you will sew to the pumpkin).
Optional Curly Tendril
With Color C (green):
Ch 16. Starting in the 2nd ch from the hook, sl st in each ch across. [15 sl st]
FO, leaving a 6 in (15 cm) tail. The chain will curl on its own.
Assembly
Ridges (6 segments)
Cut a separate 48 in (122 cm) length of Color A.
- Thread the yarn onto a yarn needle. Insert the needle through the center of the bottom of the pumpkin and out the center of the top, leaving a 4 in (10 cm) tail hanging at the bottom.
- Bring the yarn around the outside of the pumpkin and insert the needle through the bottom center again, then out the top center. Pull snug so a groove forms. This is ridge 1.
- Repeat, spacing each wrap 7 stitches apart at the equator (42 sts ÷ 6 ridges = 7 sts ✓). You will make 6 wraps total, dividing the pumpkin into 6 even lobes.
- Pull each wrap firmly enough that the pumpkin looks segmented, but not so tight that the yarn cuts the stitches. The pumpkin should flatten slightly and measure about 3 in (7.5 cm) across the widest part.
- Tie the starting tail and ending tail together in a square knot at the bottom (or top, under where the stem will sit). Weave in both ends so the knot is buried.
Tip: After the first wrap, pinch the pumpkin to check the groove. Adjust tightness before you add the rest so all six lobes match.
Attach the stem
Pin the open end of the stem over the top center (where all the ridge wraps meet). With the brown tail, sew all the way around through the stem stitches and into the pumpkin. Make several passes so it is secure. Weave in the end.
Attach the tendril (optional)
Sew the tendril to the base of the stem so it spirals down one side of a ridge. Weave in the end.
Finishing
- Weave in any remaining ends.
- Roll the pumpkin gently between your hands to round the lobes.
- If a ridge looks off-center, you can ease the wrap with the needle before the knot is fully buried.
Care: Spot clean. Do not machine wash; stuffing and ridges will shift.
Display in a bowl with other small pumpkins, on a place card, or tucked into a wreath. Make a few in mixed oranges, cream, and rust for a fuller harvest look.
Disclaimer: This pattern was generated by AI and should be reviewed for accuracy before use. While we strive for quality, AI-generated content may contain errors. Please verify measurements, stitch counts, charts, and instructions before beginning your project. Generated by purlJam.uk
Love this pattern?
Save this pattern to your free PurlJam libraryAccess your pattern anytime
Bookmark this page to access your pattern anytime