Type
Knitting
Difficulty
intermediate
Category
cardigan
AI Thinking Process
Planning
Verification
Pattern
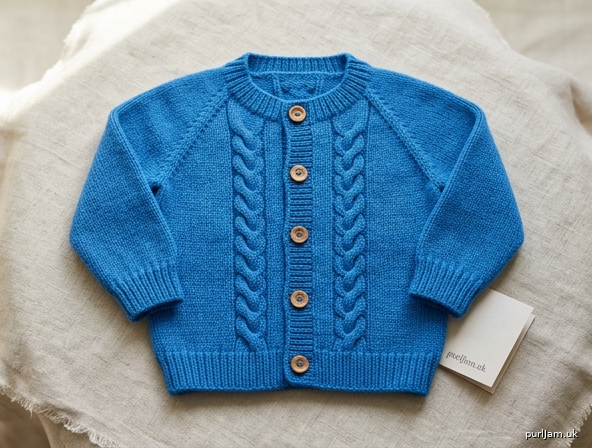
Little Rope Cardigan
Top-down raglan baby cardigan with classic rope-cable panels
A seamless, worsted-weight cardigan worked from the neck down. Six-stitch rope cables run vertically beside each front edge and as a centered pair on the back. The yoke is shaped with raglan increases; sleeves are placed on hold, the body is worked to a ribbed hem, then the sleeves are knit in the round to ribbed cuffs. Button bands are picked up along the front edges and finished with wooden buttons.
Skill level: Intermediate (raglan shaping, cables, picked-up bands, working in the round)
Sizes
3 months (6 months, 12 months, 18 months, 24 months)
Shown in size 12 months. The 6-month and 12-month sizes cover 6–12 months; remaining sizes are included so the pattern grows with the baby.
To fit chest: 16 (17, 18, 19, 20)" [40.5 (43, 45.5, 48, 51) cm]
Instructions are written for the smallest size, with larger sizes in parentheses. When only one number is given, it applies to all sizes. Highlight your size throughout.
Finished measurements
Chest (buttoned): 17¾ (20, 22¼, 24, 26¼)" [45 (51, 56.5, 61, 66.5) cm] Positive ease: approx 1¾–6¼" [4.5–16 cm] (comfortable baby ease) Length (back neck to hem): 10½ (11½, 12½, 13½, 14½)" [26.5 (29, 32, 34.5, 37) cm] Yoke depth (end of neckband to underarm): 4¼ (4½, 5, 5½, 6)" [11 (11.5, 12.5, 14, 15) cm] Sleeve length (underarm to cuff edge): 6 (6½, 7½, 8½, 9½)" [15 (16.5, 19, 21.5, 24) cm] Upper arm: 6¾ (7, 8, 9, 9¾)" [17 (18, 20.5, 23, 25) cm]
Materials
Yarn: Worsted weight (CYC 4), solid bright blue. Superwash wool or wool blend recommended for baby care.
- Yardage: 250 (300, 350, 400, 450) yd [230 (275, 320, 365, 410) m]
- Example: Cascade 220 Superwash (100% superwash wool; 220 yd / 201 m per 100 g skein), color Pacific or similarly bright blue; 2 (2, 2, 2, 3) skeins. A small third skein is wise for the 18-month size if your gauge runs heavy.
Needles:
- US 8 / 5 mm, 32" (80 cm) circular, or size needed to obtain gauge
- US 7 / 4.5 mm, 32" (80 cm) circular (ribbing)
- US 8 / 5 mm double-pointed needles, or a second circular / 12" circular, for sleeves
- US 7 / 4.5 mm DPNs or small circular for sleeve cuffs
Notions:
- 4 stitch markers (one distinct for beginning of round on sleeves)
- Cable needle
- Waste yarn or 2 stitch holders
- Tapestry needle
- 5 (5, 6, 6, 6) wooden buttons, ⅝" (16 mm) diameter
- Sewing needle and thread to match yarn (for buttons)
Gauge
18 stitches and 24 rows = 4" (10 cm) in stockinette stitch on larger needles, blocked.
A 6-stitch rope cable measures about 1" (2.5 cm) wide after blocking.
Gauge swatch: Cast on 24 sts with larger needle. Work 4 rows k1, p1 rib, then 28 rows stockinette, then 4 rows rib. Bind off. Wet-block, dry, then measure 18 sts / 24 rows in the stockinette center. Change needle size if needed — gauge controls chest circumference.
Abbreviations (US)
BO — bind off C6F — cable 6 front: slip 3 sts to cable needle and hold in front of work, k3, k3 from cable needle cn — cable needle CO — cast on k — knit k1tbl — knit 1 through the back loop k2tog — knit 2 together (right-leaning decrease) LF — left front (as worn) M1L — make 1 left: insert left needle from front to back under the strand between sts, knit through the back loop (left-leaning increase) M1R — make 1 right: insert left needle from back to front under the strand between sts, knit through the front loop (right-leaning increase) p — purl patt — pattern pm — place marker rep — repeat RF — right front (as worn) rnd(s) — round(s) RS — right side sm — slip marker ssk — slip, slip, knit: slip 1 knitwise, slip 1 knitwise, insert left needle into the fronts of both slipped sts and knit them together (left-leaning decrease) st(s) — stitch(es) St st — stockinette stitch (knit RS, purl WS; knit every rnd in the round) WS — wrong side wyif — with yarn in front yo — yarn over
Special stitches
6-st Rope Cable (worked over 6 stitches)
Worked flat; 8-row repeat. On WS rows, purl these 6 sts.
Row 1 (RS): K6. Row 2 (WS): P6. Row 3: K6. Row 4: P6. Row 5: C6F. Row 6: P6. Row 7: K6. Row 8: P6.
Repeat Rows 1–8 for Cable Pattern.
Keep a row counter. Every RS row that is not a Row 5 is simply k6 over the cable stitches.
Raglan increase (full, +8 sts)
RS: *Work in patt to 1 st before marker, M1R, k1, sm, k1, M1L; rep from * 3 more times, work in patt to end. (1 st added to each front, 2 sts to each sleeve, 2 sts to the back = 8 sts)
Body-only increase (+4 sts)
Sleeves are worked even; fronts and back continue to grow. RS: Work in patt to 1 st before first marker, M1R, k1, sm, k1, work in St st to 1 st before next marker, k1, sm, k1, M1L, work in patt to 1 st before next marker, M1R, k1, sm, k1, work in St st to 1 st before last marker, k1, sm, k1, M1L, work in patt to end. (RF +1, sleeves +0, back +2, LF +1 = 4 sts)
Garter selvedge
Knit the first and last stitch of every row. This chain-like edge is easy to pick up for the button bands.
Notes
- The cardigan is worked flat through the yoke and body (RS begins at the right front), then the sleeves are worked in the round.
- Cable panels are established on the first yoke row and stay a fixed distance from the front edges and back center. All raglan increases fall in stockinette outside the cables.
- Work WS rows in established pattern: knit the knit sts, purl the purl sts, and knit both selvedge sts. Cable stitches are purled on WS.
- When a size has 0 knit stitches beside a cable, skip that instruction and continue.
- Buttonholes are written for the right front as worn (traditional girls’ / common unisex placement). For traditional boys’ placement, work the buttonholes on the left band instead.
- Sew wooden buttons on very firmly; check them often. Buttons are a choking hazard if they loosen.
Pattern
Neckband
With smaller circular needle and using a long-tail cast-on, CO 52 (54, 60, 64, 70) sts.
Row 1 (RS): K1 (selvedge), *k1, p1; rep from * to last 1 st, k1 (selvedge). Row 2 (WS): K1, *k1, p1; rep from * to last 1 st, k1.
The rib will read as k1, p1 across the interior after the selvedges. Repeat Rows 1–2 two more times, then work Row 1 once more — 7 rows of rib, ending ready for a WS row.
Row 8 (WS): K1, work in established rib to last st, k1.
Neckband measures about ¾" (2 cm). 52 (54, 60, 64, 70) sts.
Yoke
Change to larger circular needle.
The yoke is worked in three phases: full raglan increases, body-only increases, then even rows to depth. At the same time, work the 8-row Cable Pattern over each 6-st cable panel, beginning with Row 1 on the Setup Row.
Setup Row — establish cables and raglan markers
Setup Row (RS):
- Right front: K1 (selvedge), work Cable Pattern Row 1 over next 6 sts, p1, k 0 (0, 2, 2, 4) to the end of the right-front stitches, pm,
- Right sleeve: K 10 (10, 10, 12, 12), pm,
- Back: K 0 (1, 2, 2, 3), p1, work Cable Pattern Row 1 over next 6 sts, p2, work Cable Pattern Row 1 over next 6 sts, p1, k 0 (1, 2, 2, 3), pm,
- Left sleeve: K 10 (10, 10, 12, 12), pm,
- Left front: K 0 (0, 2, 2, 4), p1, work Cable Pattern Row 1 over next 6 sts, k1 (selvedge).
Section check: RF 8 (8, 10, 10, 12) + sleeve 10 (10, 10, 12, 12) + back 16 (18, 20, 20, 22) + sleeve 10 (10, 10, 12, 12) + LF 8 (8, 10, 10, 12) = 52 (54, 60, 64, 70) sts ✓
Next row (WS): K1, work sts as they appear (k the knits, p the purls; purl each 6-st cable) to last st, k1. This is Cable Row 2.
Cables are now set. Maintain them in their columns: on every following RS row, work Cable Pattern over those same 6-st groups (crossing on Row 5 of each repeat) and purl the 1-st (fronts) or 1-st / 2-st (back) gutters beside them. All new stitches from raglan increases are worked in stockinette (knit RS, purl WS).
Phase 1 — full raglan increases
Inc Row A (RS): K1, work in established cable/gutter patt across right front to 1 st before marker, M1R, k1, sm, k1, M1L, knit across sleeve to 1 st before marker, M1R, k1, sm, k1, M1L, work in established cable/gutter patt across back to 1 st before marker, M1R, k1, sm, k1, M1L, knit across sleeve to 1 st before marker, M1R, k1, sm, k1, M1L, work in established cable/gutter patt across left front to last st, k1. 8 sts increased.
WS row: K1, work sts as they appear to last st, k1.
Work Inc Row A, then a WS row, 8 (9, 10, 11, 12) times total.
First-row check (all sizes): 52 (54, 60, 64, 70) + 8 = 60 (62, 68, 72, 78) sts ✓
After 8 (9, 10, 11, 12) increase rows: 8 (9, 10, 11, 12) × 8 sts = 64 (72, 80, 88, 96) sts increased. 52 (54, 60, 64, 70) + 64 (72, 80, 88, 96) = 116 (126, 140, 152, 166) sts ✓
Stitch distribution:
- Right front: 16 (17, 20, 21, 24) sts
- Right sleeve: 26 (28, 30, 34, 36) sts
- Back: 32 (36, 40, 42, 46) sts
- Left sleeve: 26 (28, 30, 34, 36) sts
- Left front: 16 (17, 20, 21, 24) sts
- 16 + 26 + 32 + 26 + 16 = 116; 17 + 28 + 36 + 28 + 17 = 126; 20 + 30 + 40 + 30 + 20 = 140; 21 + 34 + 42 + 34 + 21 = 152; 24 + 36 + 46 + 36 + 24 = 166 ✓
Phase 2 — body-only increases
Sleeves stay at their current counts. Fronts and back continue to increase.
Inc Row B (RS): K1, work in patt across right front to 1 st before first marker, M1R, k1, sm, k1, knit across sleeve to 1 st before next marker, k1, sm, k1, M1L, work in patt across back to 1 st before next marker, M1R, k1, sm, k1, knit across sleeve to 1 st before last marker, k1, sm, k1, M1L, work in patt across left front to last st, k1. 4 sts increased (no sleeve increases).
WS row: K1, work sts as they appear to last st, k1.
Work Inc Row B, then a WS row, 2 (3, 2, 3, 2) times total.
4 sts × 2 (3, 2, 3, 2) = 8 (12, 8, 12, 8) sts increased. 116 (126, 140, 152, 166) + 8 (12, 8, 12, 8) = 124 (138, 148, 164, 174) sts ✓
Stitch distribution:
- Right front: 18 (20, 22, 24, 26) sts [16 + 2 = 18; 17 + 3 = 20; 20 + 2 = 22; 21 + 3 = 24; 24 + 2 = 26 ✓]
- Right sleeve: 26 (28, 30, 34, 36) sts (unchanged)
- Back: 36 (42, 44, 48, 50) sts [32 + 4 = 36; 36 + 6 = 42; 40 + 4 = 44; 42 + 6 = 48; 46 + 4 = 50 ✓]
- Left sleeve: 26 (28, 30, 34, 36) sts (unchanged)
- Left front: 18 (20, 22, 24, 26) sts
- 18 + 26 + 36 + 26 + 18 = 124; 20 + 28 + 42 + 28 + 20 = 138; 22 + 30 + 44 + 30 + 22 = 148; 24 + 34 + 48 + 34 + 24 = 164; 26 + 36 + 50 + 36 + 26 = 174 ✓
Phase 3 — work even to underarm
Continuing Cable Pattern as established, work even (no increases) until yoke measures 4¼ (4½, 5, 5½, 6)" [11 (11.5, 12.5, 14, 15) cm] from the cast-on edge, ending with a WS row.
Count RS rows in Phases 1–2: 10 (12, 12, 14, 14) increase rows = 20 (24, 24, 28, 28) rows, plus the Setup Row and its WS = 22 (26, 26, 30, 30) rows already worked (about 3¾–5"). Add even RS/WS pairs as needed to reach the listed depth. End with a WS row. Stitch count remains 124 (138, 148, 164, 174).
Divide body and sleeves
Divide Row (RS): Work in patt across right front 18 (20, 22, 24, 26) sts, remove marker, slip next 26 (28, 30, 34, 36) sleeve sts onto waste yarn, remove marker, using the knitted (cable) method CO 4 (4, 6, 6, 8) underarm sts, work in patt across back 36 (42, 44, 48, 50) sts, remove marker, slip next 26 (28, 30, 34, 36) sleeve sts onto waste yarn, remove marker, CO 4 (4, 6, 6, 8) underarm sts, work in patt across left front 18 (20, 22, 24, 26) sts.
Body stitches: 18 + 4 + 36 + 4 + 18 = 80 20 + 4 + 42 + 4 + 20 = 90 22 + 6 + 44 + 6 + 22 = 100 24 + 6 + 48 + 6 + 24 = 108 26 + 8 + 50 + 8 + 26 = 118 80 (90, 100, 108, 118) sts ✓
Underarm cast-on stitches are worked in stockinette on following rows.
Body
Working back and forth in established pattern (cables continue down both fronts and the back; underarm sts and all non-cable sts in St st; garter selvedges), work even until body measures 4¾ (5¼, 5¾, 6¼, 6¾)" [12 (13.5, 14.5, 16, 17) cm] from the underarm divide, ending with a WS row.
If you are in the middle of a cable repeat, complete through a WS row of the cable (Row 2, 4, 6, or 8) so the hem rib sits on a non-crossing row.
Hem
Change to smaller circular needle.
Rib Row 1 (RS): K1 (selvedge), *k1, p1; rep from * to last 1 st, k1. Rib Row 2 (WS): K1, *k1, p1; rep from * to last 1 st, k1.
Repeat Rib Rows 1–2 until hem measures 1¼" (3 cm), ending with a WS row — about 8 rows.
Bind off in rib, keeping the selvedge sts knit. Do not pull the bind-off tight; the hem should match the width of the body.
Body from underarm to bind-off: 6 (6½, 7, 7½, 8)" [15 (16.5, 18, 19, 20.5) cm]. Total length from cast-on: 10½ (11½, 12½, 13½, 14½)" [26.5 (29, 32, 34.5, 37) cm] ✓
Sleeves
Work both sleeves the same.
Place held 26 (28, 30, 34, 36) sleeve sts onto larger DPNs (or a small circular / magic loop). With RS facing, beginning at the center of the underarm cast-on, pick up and knit 2 (2, 3, 3, 4) sts along the first half of the underarm, knit the held sleeve sts, pick up and knit 2 (2, 3, 3, 4) sts along the remaining underarm. Place marker for beginning of round.
26 + 4 = 30; 28 + 4 = 32; 30 + 6 = 36; 34 + 6 = 40; 36 + 8 = 44 30 (32, 36, 40, 44) sts ✓
If a small hole appears at either underarm corner, pick up 1 extra st in that gap on this round, then k2tog the extra st with its neighbor on the next round so the count returns to 30 (32, 36, 40, 44).
Knit 1 round even.
Decrease round: K1, k2tog, knit to last 3 sts, ssk, k1. 2 sts decreased.
Work Decrease round every 5th (6th, 6th, 6th, 6th) round 5 (5, 6, 7, 8) times total — that is, knit 4 (5, 5, 5, 5) even rounds between decrease rounds.
2 sts × 5 (5, 6, 7, 8) = 10 (10, 12, 14, 16) sts decreased. 30 − 10 = 20; 32 − 10 = 22; 36 − 12 = 24; 40 − 14 = 26; 44 − 16 = 28 20 (22, 24, 26, 28) sts ✓
Continue even in St st (if needed) until sleeve measures 4½ (5, 6, 7, 8)" [11.5 (12.5, 15, 18, 20.5) cm] from the underarm.
Cuff
Change to smaller DPNs.
Rib round: *K1, p1; rep from * to end.
Work in k1, p1 rib until cuff measures 1½" (4 cm).
Bind off loosely in rib.
Sleeve from underarm to bind-off: 6 (6½, 7½, 8½, 9½)" [15 (16.5, 19, 21.5, 24) cm] ✓
Work the second sleeve.
Button bands
With smaller circular needle and RS facing, pick up and knit stitches along the front edges at a rate of 3 stitches for every 4 rows, including the neckband and hem. Aim for an odd number so the rib can begin and end with k1 (matching the selvedge).
Target counts: 51 (55, 59, 63, 67) sts along each front.
If your row count differs, pick up 3-per-4 and adjust by 1 st if needed to reach an odd number. Do not pick up around the neck — the neckband is already finished.
Right front band (buttonholes — as worn)
With RS facing, beginning at the lower right-front hem, pick up 51 (55, 59, 63, 67) sts up the right front edge to the top of the neckband.
Row 1 (WS): K1, *p1, k1; rep from * to end. Row 2 (RS): K1, *p1, k1; rep from * to end.
Work 1 more WS row in established rib (3 rows total, ending WS).
Place 5 (5, 6, 6, 6) buttonholes. On the next RS row, work 5 (5, 6, 6, 6) (yo, k2tog) buttonholes, spaced as follows:
- First buttonhole 3 sts down from the neck edge
- Last buttonhole 3 sts up from the hem edge
- Remaining 3 (3, 4, 4, 4) buttonholes evenly between them
Tip: Before the buttonhole row, use locking markers or waste yarn to mark the 5 (5, 6, 6, 6) positions on the band, checking that spacing looks even.
Buttonhole row (RS): *Work in rib to the next marked position, yo, k2tog; rep from * until all buttonholes are made, rib to end. Count remains 51 (55, 59, 63, 67) sts ✓ (yo replaces the decreased st).
Work 3 more rows in rib (WS, RS, WS). Band measures about 1" (2.5 cm). Bind off in rib.
Left front band
With RS facing, beginning at the top of the left-front neckband, pick up 51 (55, 59, 63, 67) sts down the left front edge to the hem.
Work 7 rows in k1, p1 rib as for the right band, omitting buttonholes. Bind off in rib.
Finishing
- Weave in all ends on the WS, splitting the plies as you go so tails stay put through baby wash-and-wear.
- Wet-block the cardigan to the finished measurements. Pin the chest, length, and sleeve length; do not stretch the cables flat — they should remain raised ropes. Let dry completely.
- Sew wooden buttons to the left front band, opposite the buttonholes, with sewing thread (stronger than yarn for baby garments). Pass through each button four times and knot securely on the WS. Tug-test every button.
- Optional: add a small snug inside each button (a scrap of felt or a clear plastic backing button) so the wood cannot pull through.
Cable cheat-sheet
Keep this beside your work for the 6-st panels:
| Cable row | RS | WS |
|---|---|---|
| 1 | K6 | — |
| 2 | — | P6 |
| 3 | K6 | — |
| 4 | — | P6 |
| 5 | C6F (cross) | — |
| 6 | — | P6 |
| 7 | K6 | — |
| 8 | — | P6 |
Then return to Row 1. Four cable panels are in work at all times (one on each front, two on the back); they all cross on the same Row 5.
C6F reminder: slip 3 to cn, hold in front, k3 from left needle, k3 from cn.
Schematic (blocked)
                    neck CO
                 11½ (12, 13¼, 14¼, 15½)"
              _____________/  \_____________
             /          yoke 4¼ (4½, 5,     \
            /           5½, 6)"              \
           /                                  \
          |  chest 17¾ (20, 22¼, 24, 26¼)"    |
          |                                    |
          |  total length                      |
          |  10½ (11½, 12½, 13½, 14½)"        |
          |                                    |
           \__________________________________/
                         hem

Sleeves: 6 (6½, 7½, 8½, 9½)" long from underarm
Upper arm: 6¾ (7, 8, 9, 9¾)"
Cuff: 20 (22, 24, 26, 28) sts in 1×1 rib, 1½" deep
Button band: ~1" wide, 5 (5, 6, 6, 6) wooden buttons
Yoke stitch path (after all increases, before divide): RF 18 (20, 22, 24, 26) | S 26 (28, 30, 34, 36) | B 36 (42, 44, 48, 50) | S 26 (28, 30, 34, 36) | LF 18 (20, 22, 24, 26)
Quick size table
| 3 mo | 6 mo | 12 mo | 18 mo | 24 mo | |
|---|---|---|---|---|---|
| To fit chest | 16" | 17" | 18" | 19" | 20" |
| Finished chest | 17¾" | 20" | 22¼" | 24" | 26¼" |
| Length | 10½" | 11½" | 12½" | 13½" | 14½" |
| Sleeve | 6" | 6½" | 7½" | 8½" | 9½" |
| Yarn | 250 yd | 300 yd | 350 yd | 400 yd | 450 yd |
| Buttons | 5 | 5 | 6 | 6 | 6 |
| CO | 52 | 54 | 60 | 64 | 70 |
| Body after divide | 80 | 90 | 100 | 108 | 118 |
| Sleeve after join | 30 | 32 | 36 | 40 | 44 |
Enjoy the little ropes of cable — they bloom after blocking. If you make the 6- or 12-month size first, you already have the 6–12 month cardigan the design was built around; the rest of the range is there when you need it.
Disclaimer: This pattern was generated by AI and should be reviewed for accuracy before use. While we strive for quality, AI-generated content may contain errors. Please verify measurements, stitch counts, charts, and instructions before beginning your project. Generated by purlJam.uk
Love this pattern?
Save this pattern to your free PurlJam libraryAccess your pattern anytime
Bookmark this page to access your pattern anytime