Type
Crochet
Difficulty
intermediate
Category
custom
AI Thinking Process
Planning
Verification
Pattern
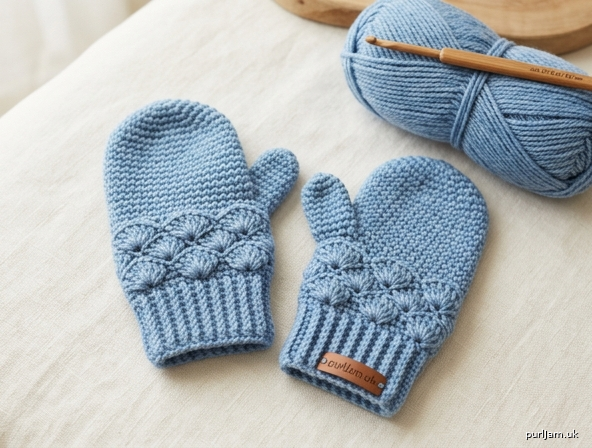
Little Shells Toddler Mittens
A pair of cozy, snug toddler mittens worked in the round in warm worsted yarn. A single decorative shell stitch band wraps the back of the hand just above the cuff for a sweet accent, while the rest of the mitten is worked in simple single crochet for warmth and durability. Designed for confident beginners.
Design note: In these mittens the shell stitch is used as a decorative accent band rather than the whole fabric. A full shell-stitch mitten would be too open and loose to keep little hands warm, so the shells give you the pretty texture you asked for while keeping the mitten cozy and correctly sized.
Sizes
Toddler (fits approximately ages 2–4)
- Finished hand circumference: 5.5 in (14 cm)
- Finished length (cuff to tip): 5.5 in (14 cm)
Instructions are written for a single size; make two identical mittens (mittens are ambidextrous — the thumb sits on the side, so either mitten fits either hand).
Materials
- Yarn: Worsted weight (Weight 4), approx. 60 yds (55 m) total for the pair
- Hook: US G-6 / 4.0 mm (size 4 hook)
- Notions: Yarn needle for weaving in ends and closing tips; stitch marker; scissors
Gauge
16 sc x 18 rounds = 4 in (10 cm) in single crochet, worked in the round.
Check your gauge: 4 sc per inch × 5.5 in = 22 sts around. A gauge swatch is recommended for correct fit.
Abbreviations (US terms)
- ch — chain
- st(s) — stitch(es)
- sl st — slip stitch
- sc — single crochet
- dc — double crochet
- sc2tog — single crochet 2 together (decrease)
- BLO — back loop only
- rnd(s) — round(s)
- rep — repeat
- sk — skip
Shell (special stitch): Work 5 dc all in the same stitch to form one shell.
Pattern Notes
- Mittens are worked in the round in joined rounds. Each round begins with a starting chain and ends by joining with a sl st to the first stitch.
- The beginning ch-1 does NOT count as a stitch (in sc rounds).
- The beginning ch-3 counts as the first dc in the shell round.
- Work in both loops unless the instruction specifies BLO.
- The cuff is worked in sc BLO to create a stretchy ribbed look.
- Stitch counts are given in parentheses at the end of each round.
- Use a stitch marker in the first stitch of each round if it helps you track the join.
Instructions (make 2)
Cuff
Ch 11.
Row 1: Starting in the 2nd ch from hook, sc in each ch across. (10 sc) Rows 2–14: Ch 1, turn, sc BLO in each st across. (10 sc)
You now have a ribbed rectangle. Fold it in half so the two short ends meet, then sl st the two short ends together to form a tube. Do not fasten off.
The tube opening measures approximately 5.5 in around (10 rows ÷ 18 rows-per-4-in × 4 = 2.2 in tall cuff; the seamed edge gives ~22 sts around the opening).
Check: The row ends along the seamed edge give 22 sts to work into for the next round.
Body — Set-Up
Rnd 1: Ch 1, work 22 sc evenly around the top edge of the cuff tube (work into the row ends). Join with sl st to first sc. (22 sc)
Rnd 2: Ch 1, sc in each st around. Join with sl st to first sc. (22 sc)
Shell Accent Round
We first add 2 sts so the count divides evenly for shells.
Rnd 3 (increase): Ch 1, sc in first 11 sts, 2 sc in next st, sc in next 10 sts, 2 sc in last st. Join with sl st to first sc. (24 sc) Check: 11 + 2 + 10 + 2 = 25 stitches placed into 24 positions → 24 sts total, with 2 increases made. ✓
Rnd 4 (shells): Ch 3 (counts as first dc), 4 dc in same st as join (first shell made — 5 dc), sk 3 sts, shell (5 dc) in next st; rep from * around until 3 sts remain after your last shell, sk those 3 sts, join with sl st to top of beginning ch-3.
How the math works: 24 sts ÷ 4 sts per shell repeat (1 shell st + 3 skipped sts) = 6 shells. (6 shells × 5 dc = 30 dc) Check: 6 shells worked over 24 base sts. ✓
Rnd 5 (return to sc): Ch 1, working across the tops of the shells, sc in each dc around. Join with sl st to first sc. (30 sc) Check: 6 shells × 5 dc = 30 sc. ✓
Rnd 6 (decrease back to body count): Ch 1, [sc2tog, sc in next st] 8 times, sc in last 6 sts. Join with sl st to first sc. Check: [sc2tog + sc] × 8 uses 24 sts and makes 16 sts; + 6 sc = 30 sts used, 22 sts remain. ✓ (22 sc)
Hand
Rnds 7–9: Ch 1, sc in each st around. Join with sl st to first sc. (22 sc)
Thumb Opening
Rnd 10: Ch 1, sc in first 3 sts, ch 3, sk 3 sts, sc in remaining 16 sts. Join with sl st to first sc. Check: 3 sc + 3 skipped (bridged by ch-3) + 16 sc = 22 positions. Working stitches this round = 3 + 16 = 19 sc + 3 ch = 22-st circumference maintained. ✓ (19 sc + ch-3 space)
Rnd 11: Ch 1, sc in first 3 sts, sc 3 into the ch-3 space, sc in remaining 16 sts. Join with sl st to first sc. (22 sc) Check: 3 + 3 + 16 = 22 sts. ✓
Upper Hand
Rnds 12–15: Ch 1, sc in each st around. Join with sl st to first sc. (22 sc)
Crown (Top) Shaping
Rnd 16: Ch 1, [sc in next 9 sts, sc2tog] 2 times. Join with sl st to first sc. Check: (9 + 2) × 2 = 22 sts used; 2 decreases → 20 sts. ✓ (20 sc)
Rnd 17: Ch 1, [sc in next 3 sts, sc2tog] 4 times. Join with sl st to first sc. Check: (3 + 2) × 4 = 20 sts used; 4 decreases → 16 sts. ✓ (16 sc)
Rnd 18: Ch 1, [sc in next 2 sts, sc2tog] 4 times. Join with sl st to first sc. Check: (2 + 2) × 4 = 16 sts used; 4 decreases → 12 sts. ✓ (12 sc)
Rnd 19: Ch 1, [sc2tog] 6 times. Join with sl st to first sc. Check: 12 ÷ 2 = 6 → 6 sts. ✓ (6 sc)
Fasten off, leaving a 6 in (15 cm) tail.
Thumb
Join yarn to the ch-3 space at the thumb opening with a sl st.
Rnd 1: Ch 1, sc 3 across the ch-3 bridge, sc 3 into the 3 skipped sts on the opposite side. Join with sl st to first sc. (6 sc) Check: 3 + 3 = 6 sts. ✓
Rnds 2–5: Ch 1, sc in each st around. Join with sl st to first sc. (6 sc)
Rnd 6: Ch 1, [sc2tog] 3 times. Join with sl st to first sc. (3 sc)
Fasten off, leaving a 6 in (15 cm) tail.
Finishing
- Close the top: Thread the 6 in top tail onto a yarn needle. Weave through the front loops of the final 6 sts, pull snug to close, and secure on the inside.
- Close the thumb: Repeat with the thumb tail, cinching the final 3 sts closed.
- Close any thumb gap: Use the tail at the thumb base to close any small hole where the thumb meets the hand.
- Weave in all ends on the wrong side.
- Repeat all steps to make the second mitten. Both are identical and ambidextrous.
- Gently steam or block if desired to even out the shell texture.
Helpful Tips
- Shell round tip: Keep your 5 dc loose and evenly spaced so the shells fan out nicely. Count your dc in each shell to stay accurate.
- Thumb tip: The ch-3 thumb opening is small and snug — perfect for a toddler. If your child has larger hands, you can skip 4 sts and ch 4 instead (adjust thumb Rnd 1 to 8 sc).
- Warmth tip: For extra-cozy mittens, hold a thin strand of the same yarn double for the cuff only.
- Attach a cord: Crochet a chain long enough to thread through a coat's sleeves and sew one end to each cuff so mittens don't get lost!
Enjoy your Little Shells Toddler Mittens! 🧤
Disclaimer: This pattern was generated by AI and should be reviewed for accuracy before use. While we strive for quality, AI-generated content may contain errors. Please verify measurements, stitch counts, and instructions before beginning your project. Generated by purlJam.uk
Access your pattern anytime
Bookmark this page to access your pattern anytime