Type
Crochet
Difficulty
beginner
Category
amigurumi
AI Thinking Process
Planning
Verification
Pattern
Little Sky Airplane Rattle
A flat, plump airplane baby rattle Skill level: Intermediate Terminology: US crochet terms Finished size: Fuselage 5" long × 2" wide × 1" thick (12.5 × 5 × 2.5 cm); wingspan about 5½" (14 cm); handle tube 10" (25.5 cm) long, forming a grasping loop about 3" (7.5 cm) across Time: 4–6 hours
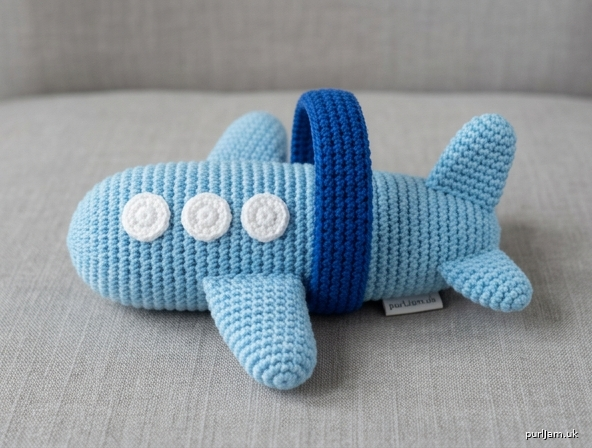
A soft, flat airplane with a rounded nose, plump sky-blue fuselage, small wings, small tail fins, three white window discs, and a dark royal-blue handle running vertically through the center.
Safety First (read before you start)
This is an infant toy. Do not use buttons, beads, safety eyes, bells sewn on the outside, glue, or any hard small part. Windows are crocheted discs, sewn on. The rattle insert must sit inside a sewn fabric pouch and inside the stuffed fuselage. Work at a tight gauge so stuffing cannot escape. Full infant-safety rules are at the end of the pattern — do not gift or use the rattle until every point on that list is checked.
Materials
Yarn — sport weight (category 3), smooth, tightly spun, machine-washable. Cotton or cotton blend preferred for a baby toy (acrylic is an acceptable substitute). Do not use novelty, eyelash, or loosely plied yarn.
- Color A — Sky Blue (fuselage, wings, tail): 50 yd / 46 m (about 20 g)
- Color B — Dark Royal Blue (handle/strap): 25 yd / 23 m (about 10 g)
- Color C — White (windows): 10 yd / 9 m (about 5 g)
Hook: US C-2 / 2.75 mm (go down to US B-1 / 2.25 mm if the fabric shows gaps)
Notions
- Polyester fiberfill, about ½ oz (15 g)
- Yarn needle (blunt, large eye) and a smaller tapestry needle
- 4 stitch markers (plus 1 for the round)
- Straight pins
- Scissors
- 1 sealed plastic rattle disc, 1–1¼" (25–30 mm)
- Lightweight tightly woven cotton fabric, 3" × 3" (7.5 × 7.5 cm), for the rattle pouch
- Sewing needle and strong cotton thread (to sew the pouch)
- Chopstick or stuffing tool
- Optional: small safety pin or bodkin, for threading the handle
Rattle insert note: Use a purpose-made sealed plastic rattle disc only. Do not use coins, dried beans, rice, or loose jingle bells.
Gauge
7 sc and 8 rnds = 1" (2.5 cm) in single crochet, worked tightly in the round, unblocked.
A 4" (10 cm) swatch is 28 sc × 32 rnds.
Gauge is less important than density. The fabric must be tight enough that fiberfill cannot be seen or picked through the stitches. If you see holes, drop a hook size. Do not go up a hook size to match gauge.
Abbreviations (US)
| Abbreviation | Meaning |
|---|---|
| ch | chain |
| sc | single crochet |
| inc | increase — 2 sc in the same stitch |
| sl st | slip stitch |
| st(s) | stitch(es) |
| rnd(s) | round(s) |
| MR | magic ring (magic circle) |
| FO | fasten off |
| RS | right side |
| WS | wrong side |
Special stitches
- inc: 2 sc in the same stitch (1 st → 2 sts).
- 3 inc evenly across N sts: space 3 increases across the next N stitches so the extra stitches are not stacked in one spot (N sts become N + 3 sts).
- sc join: holding two pieces together, sc through both layers in each stitch.
Work through both loops unless stated. Rounds are worked in a continuous spiral unless a slip stitch is written. Move the beginning-of-round marker up each round.
Pattern Notes
- The fuselage, wings, and tail fins are flat ovals worked around a foundation chain. Increases sit only at the two rounded ends so the piece stays a racetrack oval and lies flat.
- One rounded end of the fuselage is the nose; the other is the tail. Mark the nose now so windows, wings, and the fin all face the same way on both panels.
- Make pieces in pairs. Match stitch counts before sewing.
- Leave long tails (12–18" / 30.5–45.5 cm) on pieces that are sewn on.
- Pin, then sew. Check symmetry from the nose before the yarn is locked down.
- Stuff the fuselage plump but flat — about 1" (2.5 cm) thick, not ball-shaped. Extra stuffing in the nose keeps it rounded.
- Color names in the pattern: A sky blue, B royal blue, C white.
Schematic (top view)
                    ║
                    ║  royal-blue handle
                    ║  (through center)
         ┌──────────╫──────────┐
        /           ║           \
 left  /   ●   ●   ●║            \  right
 wing (    windows  ║  fuselage   ) wing
       \            ║            /
        \___________║___________/
                    |
                   /|\   vertical fin
                  / | \
                 ───┴───  horizontal tail
              nose ←         → tail
Windows sit on the forward half of the front (top) panel. The handle passes through the exact center, top to bottom.
Pattern
Fuselage Panels (make 2)
With A, ch 22.
Rnd 1: 2 sc in 2nd ch from hook, sc in next 19 ch, 3 sc in last ch; rotate to work along the opposite side of the foundation chain, sc in next 19 ch, 1 sc in the same ch as the beginning 2 sc. [44 sts] (2 + 19 + 3 + 19 + 1 = 44 ✓)
Place a marker in the first st. Do not join — work in a spiral.
The 3-sc end is the nose. The opposite rounded end is the tail. Mark the nose with a spare marker on both panels.
On each long side you now have 19 sc. Place a marker in the first and last stitch of each 19-sc side (4 markers). The unmarked stitches at each end are the nose end and the tail end. Keep those 19-st sides unmarked-as-ends through Rnd 8; they stay 19 sc every round.
Rnd 2: Inc in next 2 sts, sc in next 19 sts, inc in next 3 sts, sc in next 19 sts, inc in next st. [50 sts] (6 increases → 44 + 6 = 50 ✓)
Rnd 3: 3 inc evenly across the 6 nose-end sts, sc in next 19 sts, 3 inc evenly across the 6 tail-end sts, sc in next 19 sts. [56 sts] (6 increases → 50 + 6 = 56 ✓)
Rnd 4: 3 inc evenly across the 9 nose-end sts, sc in next 19 sts, 3 inc evenly across the 9 tail-end sts, sc in next 19 sts. [62 sts] (6 increases → 56 + 6 = 62 ✓)
Rnd 5: 3 inc evenly across the 12 nose-end sts, sc in next 19 sts, 3 inc evenly across the 12 tail-end sts, sc in next 19 sts. [68 sts] (6 increases → 62 + 6 = 68 ✓)
Rnd 6: 3 inc evenly across the 15 nose-end sts, sc in next 19 sts, 3 inc evenly across the 15 tail-end sts, sc in next 19 sts. [74 sts] (6 increases → 68 + 6 = 74 ✓)
Rnd 7: 3 inc evenly across the 18 nose-end sts, sc in next 19 sts, 3 inc evenly across the 18 tail-end sts, sc in next 19 sts. [80 sts] (6 increases → 74 + 6 = 80 ✓)
Rnd 8: 3 inc evenly across the 21 nose-end sts, sc in next 19 sts, 3 inc evenly across the 21 tail-end sts, sc in next 19 sts. [86 sts] (6 increases → 80 + 6 = 86 ✓) (end check: 24 nose + 19 + 24 tail + 19 = 86 ✓)
Sl st in next st. FO.
Panel 1 (front/top): leave a 12" (30.5 cm) tail. Panel 2 (back/bottom): leave an 24" (61 cm) tail for joining.
Each panel should measure about 5" × 2" (12.5 × 5 cm) and lie flat. If it ruffles, the ends have too many increases; if it cups, the ends have too few. Adjust the next panel before continuing.
Center Eyelets (both fuselage panels)
The handle runs vertically through the center, so each panel needs a small reinforced hole.
- Fold the panel in half both ways and mark the exact center with a pin. The center sits on the starting chain, halfway from nose to tail.
- Do not cut yarn. Ease a small opening between stitches with the blunt needle until it is about ⅜" (1 cm) across — just large enough to squeeze the handle tube through.
- With a 12" (30.5 cm) length of A, work 8–10 tight blanket stitches (buttonhole stitches) around the opening, catching every surrounding stitch. Pull snug so the eyelet is firm and smaller than the handle. Knot on the WS and weave in.
- Repeat on the second panel. Hold the two panels together, nose matching nose, and confirm the eyelets line up.
Wings (make 4)
With A, ch 9.
Rnd 1: 2 sc in 2nd ch from hook, sc in next 6 ch, 3 sc in last ch; rotate, sc in next 6 ch along the opposite side, 1 sc in the same ch as the beginning 2 sc. [18 sts] (2 + 6 + 3 + 6 + 1 = 18 ✓)
Rnd 2: Inc in next 2 sts, sc in next 6 sts, inc in next 3 sts, sc in next 6 sts, inc in next st. [24 sts] (6 increases → 18 + 6 = 24 ✓)
Rnd 3: (Inc, sc) 3 times, sc in next 6 sts, (inc, sc) 3 times, sc in next 6 sts. [30 sts] (6 increases → 24 + 6 = 30 ✓) (9 + 6 + 9 + 6 = 30 ✓)
Rnd 4: (Inc, 2 sc) 3 times, sc in next 6 sts, (inc, 2 sc) 3 times, sc in next 6 sts. [36 sts] (6 increases → 30 + 6 = 36 ✓) (12 + 6 + 12 + 6 = 36 ✓)
Sl st in next st. FO, leaving an 18" (45.5 cm) tail on two of the four pieces (these are the sewing tails). Each wing piece is about 2" × 1" (5 × 2.5 cm).
Horizontal Tail Fin (make 2)
With A, ch 7.
Rnd 1: 2 sc in 2nd ch from hook, sc in next 4 ch, 3 sc in last ch; rotate, sc in next 4 ch, 1 sc in the same ch as the beginning 2 sc. [14 sts] (2 + 4 + 3 + 4 + 1 = 14 ✓)
Rnd 2: Inc in next 2 sts, sc in next 4 sts, inc in next 3 sts, sc in next 4 sts, inc in next st. [20 sts] (6 increases → 14 + 6 = 20 ✓)
Rnd 3: (Inc, sc) 3 times, sc in next 4 sts, (inc, sc) 3 times, sc in next 4 sts. [26 sts] (6 increases → 20 + 6 = 26 ✓) (9 + 4 + 9 + 4 = 26 ✓)
Sl st in next st. FO, leaving an 18" (45.5 cm) tail on one piece. About 1⅝" × ¾" (4 × 2 cm).
Vertical Tail Fin (make 2)
With A, ch 8.
Rnd 1: 2 sc in 2nd ch from hook, sc in next 5 ch, 3 sc in last ch; rotate, sc in next 5 ch, 1 sc in the same ch as the beginning 2 sc. [16 sts] (2 + 5 + 3 + 5 + 1 = 16 ✓)
Rnd 2: Inc in next 2 sts, sc in next 5 sts, inc in next 3 sts, sc in next 5 sts, inc in next st. [22 sts] (6 increases → 16 + 6 = 22 ✓)
Rnd 3: (Inc, sc) 3 times, sc in next 5 sts, (inc, sc) 3 times, sc in next 5 sts. [28 sts] (6 increases → 22 + 6 = 28 ✓) (9 + 5 + 9 + 5 = 28 ✓)
Sl st in next st. FO, leaving an 18" (45.5 cm) tail on one piece. About 1⅞" × ¾" (4.8 × 2 cm).
Windows (make 3)
With C, make a magic ring.
Rnd 1: 6 sc in MR. Pull closed. [6 sts]
Rnd 2: Inc in each st around. [12 sts] (6 increases → 6 + 6 = 12 ✓)
Sl st in first sc. FO, leaving a 14" (35.5 cm) tail for sewing. Each disc is about ⅝" (1.5 cm) across.
Do not substitute a button, bead, or felt circle that is only glued on.
Handle / Strap
A dense tube in B, worked in a spiral. Do not stuff it firmly — a very light wisp of fiberfill, or none, keeps it soft but round.
With B, make a magic ring.
Rnd 1: 10 sc in MR. Pull closed. [10 sts]
Rnds 2–80: Sc in each st around. [10 sts] (80 rnds at 8 rnds per inch → 80 ÷ 8 = 10" / 25.5 cm ✓)
Sl st in next st. FO, leaving a 18" (45.5 cm) tail. Weave the starting tail through Rnd 1 to close the ring, then bury it inside the tube.
The tube should be about 10" (25.5 cm) long and about ½" (1.3 cm) thick, with no gaps between stitches.
Rattle Pouch
Fold the 3" (7.5 cm) cotton square in half. Sew two sides with a tight backstitch, ⅛" (3 mm) from the edge. Slip the sealed rattle disc in. Sew the last side closed with two passes of backstitch. Trim the seam allowance to ¼" (6 mm). Tug every seam — if the disc can work toward an opening, sew it again. This pouch is the first barrier; the crocheted fuselage is the second.
Assembly
Work on a flat table. The front is the panel that will show the windows.
1. Sew the windows
On the front fuselage panel only, RS facing you, nose to the left:
Pin the three white discs in a straight line along the center, on the forward half of the body (between the nose and the center eyelet), so they do not cover the eyelet.
Suggested placement from the nose tip:
- Window 1: 1" (2.5 cm)
- Window 2: 1¾" (4.5 cm)
- Window 3: 2½" (6.5 cm)
Even spacing is ¾" (2 cm) center to center (1" + ¾" + ¾" = 2½" ✓). The third window sits just forward of the handle.
Sew each disc down with the white tail, using small whipstitches through every stitch of Rnd 2. Go around each window twice. Knot on the WS and weave in. Tug each window hard — if it lifts, sew it again.
2. Join the fuselage
Hold the two panels RS out, noses together, eyelets aligned. The windows face out on the front.
With the long A tail (or a new 30" / 76 cm length of A), sc join through both layers around the 86-st edge.
Leave a 1½" (4 cm) opening on one long side, just behind where the wing will sit.
[86 sc around a closed join; opening of about 10 sts → 86 − 10 = 76 sc worked on the first pass ✓]
Do not close the opening yet.
3. Stuff and insert the rattle
Push the rattle pouch inside, offset toward the nose or tail of the center eyelet — the handle must not pierce the pouch. The pouch sits in the middle of the stuffing, not against the fabric.
Stuff with fiberfill around the pouch. Pack the nose a little more firmly so it stays round and plump. Keep the whole fuselage flattened to about 1" (2.5 cm) thick. Smooth lumps with the chopstick.
Close the opening with sc join (or whipstitch if little space remains). Weave in the joining tail through the stuffing, reversing direction twice.
4. Thread the handle through the center
From the front (window side), push the closed end of the royal-blue tube through the front eyelet, through the stuffing, and out the back eyelet. A safety pin on the tube end helps. Take it slowly so you do not snag the rattle pouch.
Center the airplane on the tube so roughly equal lengths of handle extend from front and back. Because the fuselage is 1" (2.5 cm) thick, about 9" (23 cm) of tube remains outside (10" − 1" = 9" ✓).
Bring the two ends together on the front side (or above the plane, so the grasping loop sits over the windows). Overlap the ends ½" (1.3 cm) and sew them together with the royal-blue tail:
- At least 8 tight whipstitches through both layers of both ends
- Then a second pass at right angles
- Then wrap the join tightly with yarn for ½" (1.3 cm) and bury the tail inside the tube
The joined tube is a closed loop 10" (25.5 cm) in circumference — about 3" (7.5 cm) across. That is a grasping loop, not a necklace. Do not lengthen it.
Lock the airplane so it cannot slide: with A, sew 6–8 firm tacking stitches through the handle and the reinforced eyelet on the front, then the same on the back. Knot inside the fuselage and weave in. The handle is now a vertical strap through the center, and the plane is fixed.
5. Assemble and attach the wings
Pair the 4 wing pieces into 2 wings. For each wing, hold two pieces together and whipstitch (or sc join) around the 36-st edge, stuffing very lightly just before closing so the wing is plump but still flat, about ⅜" (1 cm) thick.
[36 sts around ✓]
Pin one wing to each long side of the fuselage, at the midpoint, shifted ¼" (6 mm) toward the nose (about 2¼" / 5.5 cm from the nose tip). The long axis of the wing runs left–right, level with the fuselage. Roots sit on the side seams, opposite each other.
Sew each wing root to the fuselage with two full passes of whipstitch through both wing layers and the fuselage. Knot inside / against the seam and weave in. Check from the nose: the wings must be level and the same length.
Wingspan: 2" + 2" + 2" fuselage − about ½" root overlap = about 5½" (14 cm) ✓
6. Assemble and attach the tail fins
Horizontal fin: Join the 2 horizontal pieces around the 26-st edge with a pinch of stuffing. [26 sts ✓] Pin it across the tail end, centered, so it sticks out equally left and right like a small second pair of wings, in the same plane as the main wings. Sew the middle ¾" (2 cm) of this unit to the tail seam with two passes.
Vertical fin: Join the 2 vertical pieces around the 28-st edge with a pinch of stuffing. [28 sts ✓] Pin it on the front/top of the fuselage at the tail, standing up (same direction the handle leaves the top), centered on the tail. The long axis of the oval is the height of the fin. Sew the lower long edge to the fuselage with two passes.
The vertical fin is behind the handle, at the tail; the handle stays at the center. They do not share a seam.
7. Shape
Steam is optional and light only — do not soak, and do not rest a hot iron on the stuffing. Cup the nose in your palm so it stays rounded. Flatten the fuselage gently between your hands until it is plump but even, about 1" (2.5 cm) thick. Align the wings and tail so the airplane is symmetrical.
Finishing
- Weave in every remaining tail. For each tail: knot once against the fabric, run the needle through the stuffing or along a seam for at least 2" (5 cm), reverse, run again, snip close. No tail may sit on the surface.
- Tug test: pull each wing, each fin, each window, and the handle with more force than a baby will use. Restitch anything that shifts.
- Eyelet check: no fiberfill should show at the handle holes. If you see stuffing, add blanket stitches until the handle is hugged by the fabric.
- Trim nothing that could leave a sharp yarn stub on the outside.
Infant Safety Instructions
Do not skip this section. Do not give the rattle to a child until every item is true.
Age and use
- Intended for supervised use from about 3 months.
- Adult supervision at every use. This is not a crib, bassinet, or sleep toy. Do not leave it in a sleep space. Do not loop the handle around a neck, crib rail, car-seat strap, or stroller frame.
- Not a teether. If the fabric is chewed through, discard the toy.
Construction rules (already built into this pattern)
- No buttons, beads, snaps, bells on the outside, safety eyes, or glued felt. The white windows are crocheted and sewn. Replacing them with real buttons creates a choking hazard.
- The rattle disc is sealed plastic, inside a sewn fabric pouch, inside the stuffed fuselage — two barriers.
- The handle loop is 10" (25.5 cm) in total length, well under the 12" (30.5 cm) cord guideline commonly used for toys for children under 18 months. Do not make the handle longer. Do not add a hanging ribbon or pacifier clip.
- Finished toy is larger than a baby’s mouth. Do not scale this pattern down.
Before the first use, and before every later use
- Squeeze the fuselage: no stuffing should come through the stitches or eyelets.
- Shake: the rattle should sound from inside; nothing should rattle against the outside.
- Pull the handle: the airplane must not slide, and the join in the tube must not open.
- Pull each window, wing, and fin.
- Look for broken yarn, holes, loose ends, or a handle that has stretched.
If anything is damaged, discard the toy. Do not repair a broken rattle insert or a hole that exposes stuffing and then return it to a baby.
Materials and finishes
- Use new, clean, colorfast yarn and new fiberfill. Do not use craft stuffing of unknown fiber.
- No fabric glue, hot glue, paint, varnish, or essential oils.
- Avoid yarns that shed or split; a baby will put this in their mouth.
Care
- Surface-clean with a damp cloth and mild soap; air-dry fully.
- If you must wash it, place in a mesh bag, cold gentle cycle, air-dry. Check every seam and the handle join after washing, before the next use.
- Do not machine-dry (heat can warp the rattle disc and loosen seams).
Gifting
- Include a note: supervised use only; not for sleep; inspect before each use; discard if damaged.
This pattern is a craft design, not a certified commercial toy. If you sell or donate finished rattles, you are responsible for meeting the toy-safety laws in your region (in the US, these include CPSC rules and ASTM F963 for rattles and small parts).
Quick Reference — Piece Count
| Piece | Color | Qty | Final sts / size |
|---|---|---|---|
| Fuselage panel | A | 2 | 86 sts; 5" × 2" (12.5 × 5 cm) |
| Wing | A | 4 (2 pairs) | 36 sts; 2" × 1" (5 × 2.5 cm) |
| Horizontal tail | A | 2 (1 pair) | 26 sts |
| Vertical tail | A | 2 (1 pair) | 28 sts |
| Window | C | 3 | 12 sts |
| Handle tube | B | 1 | 10 sts × 80 rnds; 10" (25.5 cm) |
End of pattern.
Disclaimer: This pattern was generated by AI and should be reviewed for accuracy before use. While we strive for quality, AI-generated content may contain errors. Please verify measurements, stitch counts, charts, and instructions before beginning your project. Generated by purlJam.uk
Love this pattern?
Save this pattern to your free PurlJam libraryAccess your pattern anytime
Bookmark this page to access your pattern anytime