Type
Knitting
Difficulty
beginner
Category
pullover
AI Thinking Process
Planning
Verification
Pattern
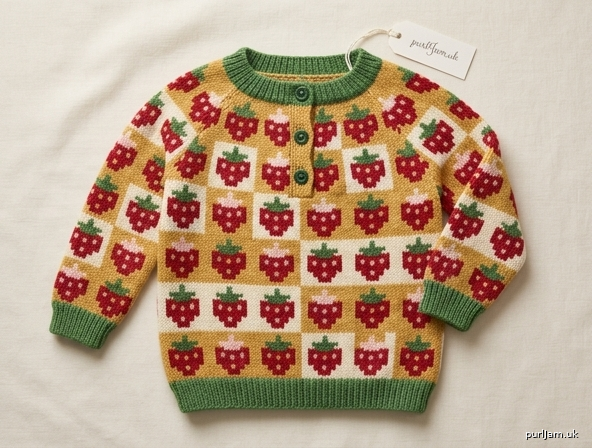
Little Strawberry Pullover
A top-down raglan baby sweater • Size 12 months • Beginner • Knitted
A juicy strawberry for a first (or fifth) birthday: a seamless red pullover with fresh green ribbing for the leafy cap, a soft crew neck, and a three-button back placket so it slips on without a struggle. Worked from the neck down in easy stockinette and 1x1 rib—no seams, no cables, no stranded colorwork. Optional cream “seeds” are stitched on at the end.
Designed for everyday wear. Choose a soft, machine-washable worsted (superwash wool, cotton, or acrylic blend). Parents should not have to hand-wash a baby sweater.
Size
12 months (one size)
To fit chest: 19" (48 cm)
Finished chest: 22" (56 cm), with about 3" (7.5 cm) positive ease for diapers and growing room
Finished measurements
- Chest circumference: 22" (56 cm)
- Length, back neck (cast-on edge) to hem: 12¾" (32.5 cm)
- Yoke depth (first increase to underarm): 4¼" (11 cm)
- Body length (underarm to hem): 7½" (19 cm)
- Sleeve length (underarm to cuff edge): 7" (18 cm)
- Upper arm circumference: 8" (20.5 cm)
- Back neck placket: 3" (7.5 cm) deep, 3 buttons
Yarn
Worsted weight (CYC 4), soft and machine-washable.
- MC – Strawberry Red: 250 yd / 230 m (about 115 g)
- CC – Leaf Green: 80 yd / 75 m (about 40 g)
- Optional seeds: 5 yd / 5 m cream, gold, or pale yellow
Shown in the spirit of: superwash merino or a wool/acrylic washable worsted. Acrylic and cotton blends are excellent if wool is itchy on your baby.
Make a gauge swatch. Two 100 g skeins of MC and one skein of CC will be plenty in most worsted put-ups.
Needles
- US 7 / 4.5 mm — 16" (40 cm) circular, 24" (60 cm) circular, and double-pointed needles (or a long circular for magic loop) for stockinette
- US 6 / 4 mm — 16" (40 cm) circular and double-pointed needles for ribbing
Or sizes needed to match gauge.
Notions
- 4 stitch markers (plus 1 distinct marker for beginning of round)
- Waste yarn or 2 stitch holders
- Tapestry needle
- 3 buttons, ½" (13 mm) — green, red, or strawberry-shaped
- Sewing needle and strong thread (or extra CC) for buttons
Gauge
20 stitches and 28 rounds = 4" (10 cm) in stockinette stitch on larger needles, blocked.
Please swatch. A firm, even fabric (not board-stiff, not see-through) is what you want for a baby sweater.
Abbreviations (US)
- BO – bind off
- BOR – beginning of round
- CC – contrast color (leaf green)
- CO – cast on
- k – knit
- k2tog – knit 2 stitches together (right-leaning decrease)
- kfb – knit into the front and then the back of the same stitch (1 stitch increased)
- MC – main color (strawberry red)
- m – marker
- p – purl
- pm – place marker
- rep – repeat
- rnd(s) – round(s)
- RS – right side
- sl – slip stitch purlwise
- sm – slip marker
- ssk – slip 1 knitwise, slip 1 knitwise, knit those 2 slipped stitches together through the back loop (left-leaning decrease)
- st(s) – stitch(es)
- St st – stockinette stitch (knit every round in the round; knit RS / purl WS when flat)
- WS – wrong side
- wyif – with yarn in front
- yo – yarn over
Pattern notes
- The sweater is a top-down raglan. You start at the neck, grow the yoke with 8 increases every other row/round, park the sleeves, then knit the body and sleeves downward. Length is easy to customize: try it on (or measure against a well-fitting sweater) before the ribbing.
- Back placket: The first 3" (7.5 cm) is worked flat so a slit stays open at center back. Then you join and work in the round. Button bands are picked up at the end—no extra stitches to count during the yoke.
- Raglan increase (used throughout): Work to 1 stitch before a raglan marker, kfb, slip marker, kfb. Four markers = 8 stitches increased.
- Selvedge: On every flat row, slip the first stitch purlwise wyif, then work to the last stitch and knit it (RS) or purl it (WS). This chain edge is easy to pick up for the placket.
- Color story: Green ribbing = strawberry leaves. Red stockinette = the berry. Seeds are optional embroidery, added after blocking.
- Baby safety: Sew buttons down hard (see Finishing). Check them often. Do not use beads, loose sequins, or anything that can come off.
- Care: Follow your yarn label. Superwash and acrylic blends can usually go in the machine on gentle; lay flat to dry.
Special techniques (beginner)
kfb: Knit the stitch as usual but do not slide it off. Knit into the back loop of the same stitch, then slide it off. You have made 2 stitches from 1.
ssk: Slip the next stitch knitwise, slip the following stitch knitwise, insert the left needle into the fronts of those 2 slipped stitches from left to right, and knit them together.
Pick up and knit: With RS facing, insert the needle under the edge strand, wrap the working yarn as if to knit, and pull a loop through. That loop is a new stitch.
Neckband
With CC (leaf green) and smaller needles (US 6 / 4 mm), cast on 54 sts. Do not join. You will work the neckband and the first part of the yoke flat.
Row 1 (RS): Sl 1 wyif, *k1, p1; rep from * to last st, k1.
Row 2 (WS): Sl 1 wyif, *k1, p1; rep from * to last st, p1.
Repeat Rows 1–2 until the neckband measures 1" (2.5 cm) from the cast-on edge, ending after a WS row. About 8 rows.
54 sts.
Cut CC, leaving a 6" (15 cm) tail.
Yoke
Set-up (still flat)
Change to MC (strawberry red) and larger needles (US 7 / 4.5 mm).
Set-up row (RS): Sl 1 wyif, k9, pm, k6, pm, k22, pm, k6, pm, k10.
Stitch map (right back opening toward left back opening, RS facing):
- Right back: 10 sts
- Right sleeve: 6 sts
- Front: 22 sts
- Left sleeve: 6 sts
- Left back: 10 sts
54 sts (10 + 6 + 22 + 6 + 10 = 54 ✓).
Next row (WS): Sl 1 wyif, purl to last st, p1, slipping markers as you meet them.
Raglan increases — worked flat
Increase row (RS): Sl 1 wyif, *knit to 1 st before m, kfb, sm, kfb; rep from * 3 more times, knit to last st, k1.
(8 sts increased)
Next row (WS): Sl 1 wyif, purl to last st, p1, slipping markers.
Repeat the last 2 rows 6 more times — 7 increase rows total.
After Increase Row 1: 54 + 8 = 62 sts ✓
After Increase Row 7: 54 + (8 × 7) = 110 sts ✓
Section counts after 7 increases:
- Right back: 10 + 7 = 17
- Right sleeve: 6 + 14 = 20
- Front: 22 + 14 = 36
- Left sleeve: 6 + 14 = 20
- Left back: 10 + 7 = 17
(17 + 20 + 36 + 20 + 17 = 110 ✓)
The piece now measures about 3" (7.5 cm) from the cast-on edge (1" neckband + about 2" of red yoke). This is the bottom of the back placket.
Join to work in the round
With RS facing, join to work in the round. Do not twist. Place a distinct BOR marker at the join (center back). The slit from the cast-on edge up to this join is your button placket; leave it open.
The 4 raglan markers stay where they are.
Raglan increases — in the round
Increase round: *Knit to 1 st before raglan m, kfb, sm, kfb; rep from * 3 more times, knit to BOR.
(8 sts increased)
Next round: Knit all sts, slipping markers.
Repeat the last 2 rounds 6 more times — 7 more increase rounds (14 increase rows/rounds total).
After all 14 increases: 54 + (8 × 14) = 166 sts ✓
Section counts at end of increases:
- Back (two halves joined): 17 + 7 + 17 + 7 = 48
- Front: 36 + 14 = 50
- Each sleeve: 20 + 14 = 34
(48 + 50 + 34 + 34 = 166 ✓)
Next: Knit even (no increases) until the yoke measures 4¼" (11 cm) from the first increase row, ending after a non-increase round. This is typically 2 extra knit rounds after the round that follows Increase Round 14.
If you are short or long on row gauge, knit even until the raglan line (the path of kfb stitches from neck to underarm) measures 4¼" (11 cm). Do not add more increase rounds—the stitch counts above are the ones that make the 22" chest.
Divide body and sleeves
You are at center back (BOR).
Next round (divide):
- Knit 24 sts (left half of back).
- Place the next 34 sts (left sleeve) on waste yarn or a holder. Remove the two raglan markers that sat on either side of this sleeve.
- Cast on 6 sts onto the right needle for the left underarm. Pm at the center of these 6 sts if you like, to mark the side “seam.”
- Knit 50 sts (front).
- Place the next 34 sts (right sleeve) on waste yarn or a holder. Remove remaining raglan markers.
- Cast on 6 sts for the right underarm.
- Knit remaining 24 sts (right half of back) to BOR.
Body on the needles: 24 + 6 + 50 + 6 + 24 = 110 sts ✓
(166 − 34 − 34 + 6 + 6 = 110 ✓)
Body
Work even in stockinette (knit every round) on 110 sts until the body measures 6" (15 cm) from the underarm cast-on, or 1½" (4 cm) less than the total body length you want.
Length note: Babies need a little extra room through the diaper. 7½" (19 cm) from underarm to hem is the written length. Add or subtract knit rounds here if you want a longer tunic or a shorter crop.
Hem
Change to CC (leaf green) and smaller needles.
Work 1x1 rib as follows: *k1, p1; rep from * around.
Continue until the green hem measures 1½" (4 cm).
Bind off loosely in rib (use a larger needle for the bind-off if your bind-off runs tight). A tight hem will flare or cut in.
Sleeves
Work one sleeve at a time.
Place the 34 held sleeve sts onto larger double-pointed needles (or magic loop). With MC and RS facing, beginning at the center of the underarm cast-on, pick up and knit 3 sts along the first half of the underarm, knit the 34 sleeve sts, pick up and knit 3 sts along the other half of the underarm. Pm for BOR at the center of the underarm.
40 sts (34 + 6 = 40 ✓).
If a small hole appears at either corner of the underarm, snug the first and last picked-up stitches or, on the next round only, knit 2 together at each gap and then pick up 1 extra so you still have 40 sts. You can also close a leftover pin-hole with the tapestry needle at finishing.
Knit 2 rounds even.
Sleeve decreases
Decrease round: K1, ssk, knit to last 3 sts, k2tog, k1.
(2 sts decreased)
Knit 5 rounds even.
Repeat the last 6 rounds 5 more times — 6 decrease rounds total.
40 − (2 × 6) = 28 sts ✓
You have worked about 36 rounds of shaping (about 5" / 12.5 cm).
Knit even, if needed, until the sleeve measures 5½" (14 cm) from the underarm, or 1½" (4 cm) less than the sleeve length you want.
Cuff
Change to CC and smaller needles.
Work *k1, p1; rep from * around on 28 sts until the cuff measures 1½" (4 cm).
Bind off loosely in rib.
Work the second sleeve the same way.
Back button bands
The back opening is about 3" (7.5 cm) tall. You will pick up along each side and work a narrow garter band in green.
Button band (no holes)
With CC, smaller needles, and RS of the back facing you, begin at the top (cast-on edge) of the left side of the opening as you look at the back (child’s right back when worn). Pick up and knit 17 sts evenly down to the base of the slit.
Knit 5 rows (garter stitch — knit every row).
Bind off knitwise on the WS. Cut yarn.
Buttonhole band
With CC, smaller needles, and RS of the back facing you, begin at the base of the slit on the remaining side and pick up and knit 17 sts evenly up to the cast-on edge. (Working this side in the opposite direction keeps both bind-off edges pointing the same way; if you prefer, pick up from the top down instead—it will not change the fit.)
Rows 1–2: Knit.
Row 3 (buttonhole row): K3, yo, k2tog, k3, yo, k2tog, k3, yo, k2tog, k2.
(3 buttonholes; 17 sts — 3 + 2 + 3 + 2 + 3 + 2 + 2 = 17 ✓)
Rows 4–5: Knit.
Bind off knitwise. Cut yarn.
Overlap the buttonhole band on top of the button band at the base of the slit and stitch the bottom edges down neatly on the WS so the placket lies flat.
Finishing
- Weave in all ends on the WS. Do not cut tails until after blocking if you can help it.
- Wet block: Soak in lukewarm water with a little wool wash. Squeeze (do not wring). Lay flat, patting the sweater to the finished measurements. Do not stretch the ribbing. Let dry fully.
- Buttons: Sew 3 buttons to the button band opposite the buttonholes. Use strong thread or doubled yarn. Stitch through each button many times, wrap the shank, and knot on the WS. For extra safety, sew a small backing button or a felt disc on the inside behind each button. Tug-test every button. Recheck them after washing. Buttons are a choking hazard if they loosen.
- Close any remaining underarm pin-holes with the tapestry needle.
Optional strawberry seeds
No chart is needed. After blocking, thread a tapestry needle with cream, gold, or pale yellow yarn.
On the front only, scatter small seeds over the lower two-thirds of the red fabric (leave the upper yoke mostly plain so it still reads as the berry’s shoulder).
- Work duplicate stitch over a single knit stitch here and there, or
- Work a tiny straight stitch about ¼" (6 mm) long, slanted, like a teardrop seed.
Space them about ¾–1" (2–2.5 cm) apart, not in a grid—angle them in different directions, denser toward the hem and sparser toward the chest. A dozen to two dozen seeds is enough; too many will stiffen the fabric. Weave the ends in on the WS and snip.
The green ribbing is the calyx. You do not need to embroider leaves unless you want to: two or three small lazy-daisy stitches in CC at the center-front neck, just below the ribbing, are plenty.
Wear and wash
Pull the pullover on with the buttons open, then button at the back. That is the whole point of the placket.
Wash according to your yarn. Most machine-washable worsteds are happy on a gentle cycle, cold or lukewarm, then laid flat to dry. Do not tumble-dry wool. Recheck buttons after every wash.
Quick number check (for the knitter at the needles)
| Moment | Stitches | Why |
|---|---|---|
| Cast-on / neckband | 54 | 10 + 6 + 22 + 6 + 10 |
| After 7 flat increases | 110 | 54 + 56 |
| After 14 increases | 166 | 54 + 112 |
| Body after divide | 110 | 166 − 68 + 12 |
| Each sleeve | 40 | 34 + 6 underarm |
| Each cuff | 28 | 40 − 12 |
| Finished chest | 22" | 110 sts ÷ 5 sts per inch |
Happy knitting—and may it look good enough to eat (please do not).
Disclaimer: This pattern was generated by AI and should be reviewed for accuracy before use. While we strive for quality, AI-generated content may contain errors. Please verify measurements, stitch counts, charts, and instructions before beginning your project. Generated by purlJam.uk
Love this pattern?
Save this pattern to your free PurlJam libraryAccess your pattern anytime
Bookmark this page to access your pattern anytime