Type
Knitting
Difficulty
beginner
Category
cardigan
AI Thinking Process
Planning
Verification
Pattern
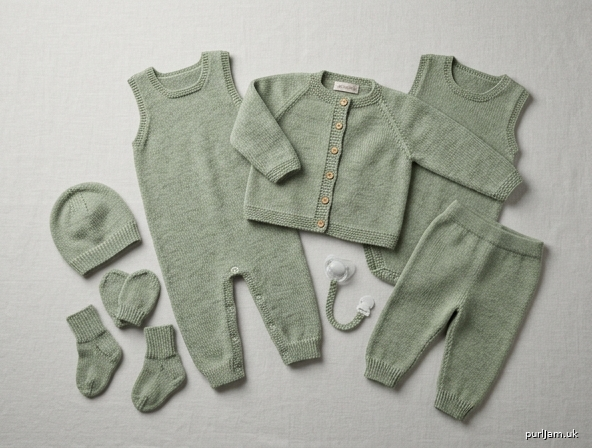
Little Wren Flat-Knit Baby Layette
A complete beginner wardrobe worked entirely flat in stockinette, then seamed. The set includes a set-in-sleeve cardigan, sleeveless jumpsuit, snap-crotch romper, trousers, hat, mittens, socks, and a short dummy (pacifier) strap.
MATERIALS
Yarn: Worsted weight (category 4), approximately 1200 (1400, 1550, 1700, 1800) yards / 1100 (1280, 1420, 1550, 1650) m for the full set. Superwash wool, cotton, or a soft wool-cotton blend is ideal for baby.
Approximate yardage if knitting items separately:
- Cardigan: 200 (250, 300, 350, 400) yd
- Jumpsuit: 280 (350, 420, 500, 580) yd
- Romper: 160 (200, 240, 280, 320) yd
- Trousers: 180 (230, 280, 340, 400) yd
- Hat: 60 (70, 80, 90, 100) yd
- Mittens: 40 (45, 50, 55, 60) yd
- Socks: 50 (55, 60, 70, 80) yd
- Dummy chain: 20 yd
Needles:
- US 7 / 4.5 mm straight needles (main fabric)
- US 5 / 3.75 mm straight needles (ribbing and bands)
- Spare US 7 needle or stitch holder
Notions: Tapestry needle; 4 stitch markers; 5 (5, 6, 6, 7) buttons, ½ in / 12 mm, for the cardigan; 4 buttons, ½ in / 12 mm, for jumpsuit/romper shoulders; 6 (6, 8, 8, 10) plastic snaps or snap tape for crotch closures; ½ in / 12 mm elastic for the trouser waist, 13 (15, 16½, 18, 19½) in long; 1 plastic breakaway pacifier clip; sewing needle and thread.
GAUGE
20 stitches and 26 rows = 4 in / 10 cm in stockinette stitch on US 7 / 4.5 mm needles, after blocking.
Take time to check gauge. If you have too many stitches in 4 in, switch to a larger needle; if too few, switch to a smaller needle.
SIZES
Newborn (0–3 months, 3–6 months, 6–12 months, 12–18 months)
Instructions are written for Newborn with larger sizes in parentheses. When only one number is given, it applies to all sizes.
Finished measurements
| NB | 0–3 | 3–6 | 6–12 | 12–18 | |
|---|---|---|---|---|---|
| Cardigan / romper chest, buttoned | 13½ in | 16 in | 17½ in | 19 in | 21 in |
| Cardigan length, neck to hem | 8 in | 9½ in | 10½ in | 12 in | 13½ in |
| Cardigan sleeve, cuff to underarm | 4 in | 5½ in | 6½ in | 8 in | 8½ in |
| Jumpsuit, shoulder to ankle | 14½ in | 17½ in | 19½ in | 22½ in | 25½ in |
| Torso, shoulder to crotch | 10 in | 11½ in | 12½ in | 14 in | 15½ in |
| Jumpsuit inseam | 4½ in | 6 in | 7 in | 8½ in | 10 in |
| Trousers, waist to ankle | 9½ in | 11½ in | 13 in | 15 in | 17 in |
| Trousers inseam | 4 in | 5½ in | 6½ in | 8 in | 9½ in |
| Trousers waist | 13 in | 15 in | 16½ in | 18 in | 19½ in |
| Hat circumference | 11 in | 12 in | 13 in | 14 in | 15 in |
| Hat height | 4 in | 5 in | 5½ in | 6 in | 6½ in |
| Mitten palm width | 1¾ in | 2 in | 2¼ in | 2½ in | 2¾ in |
| Mitten length | 2¾ in | 3¼ in | 3¾ in | 4¼ in | 4¾ in |
| Sock foot length | 2½ in | 3 in | 3½ in | 4 in | 4½ in |
Choose the size by chest measurement, not age. The Newborn cardigan is designed to the requested 13½ in chest, 8 in length, and 4 in sleeve.
ABBREVIATIONS
- BO — bind off
- CO — cast on
- dec — decrease
- inc — increase
- k — knit
- k2tog — knit 2 stitches together (right-leaning decrease)
- kfb — knit into the front and back of the stitch (1 stitch increased)
- p — purl
- p2tog — purl 2 stitches together
- pm — place marker
- RS — right side
- sl — slip stitch purlwise with yarn in back on RS, yarn in front on WS
- ssk — slip 1 knitwise, slip 1 knitwise, knit those 2 slipped stitches together through the back loop (left-leaning decrease)
- St st — stockinette stitch (knit RS rows, purl WS rows)
- st(s) — stitch(es)
- WS — wrong side
- wyib / wyif — with yarn in back / with yarn in front
- yo — yarn over
NOTES
- The entire set is knitted flat, back and forth. There is no circular knitting.
- Stockinette: Knit on RS rows, purl on WS rows.
- 1x1 rib: (K1, p1) across. On even stitch counts this is balanced; on odd counts, end with k1 and work stitches as they appear on the return row.
- Garter stitch: Knit every row.
- Selvedge: Knit the first and last stitch of every row for a clean seaming edge, unless a bind-off or decrease falls there.
- M1 increase (sleeves and legs): Lift the bar between stitches from front to back and knit it through the back loop. If you prefer, kfb instead — the look is slightly different but the count is the same.
- Button placement: Cardigan buttonholes sit on the right front as worn (the piece on the baby’s right). For a traditionally “boy” closing, reverse the bands.
- Blocking: Lightly steam or wet-block pieces to measurements before seaming.
- Baby safety: Sew every button through a snap or with doubled thread and a backing button. The dummy strap must not exceed 8 in / 20 cm and must use a breakaway clip. Never leave a baby unattended with a pacifier strap; never use it in the crib.
Cardigan
Worked in four pieces (back, two fronts, two sleeves) from the bottom up, with set-in sleeves and picked-up garter button bands.
BACK
With US 5 / 3.75 mm needles, CO 34 (40, 44, 48, 52) sts.
Ribbing: Work 1x1 rib for 1 in / 2.5 cm, ending after a WS row (about 8 rows).
Change to US 7 / 4.5 mm needles. Work in St st until the piece measures 5 (6, 6¾, 7¾, 8¾) in from the cast-on edge, ending after a WS row.
Armhole shaping
Row 1 (RS): BO 2 (3, 3, 4, 4) sts, knit to end. 32 (37, 41, 44, 48) sts.
Row 2 (WS): BO 2 (3, 3, 4, 4) sts, purl to end. 30 (34, 38, 40, 44) sts. (34 − 2 − 2 = 30 ✓; 40 − 3 − 3 = 34 ✓; 44 − 3 − 3 = 38 ✓; 48 − 4 − 4 = 40 ✓; 52 − 4 − 4 = 44 ✓)
Decrease row (RS): K1, ssk, knit to last 3 sts, k2tog, k1. 2 sts decreased.
Next row (WS): Purl.
Repeat the last 2 rows 1 (1, 2, 2, 3) more time(s). 26 (30, 32, 34, 36) sts. (30 − 2×2 = 26 ✓; 34 − 2×2 = 30 ✓; 38 − 2×3 = 32 ✓; 40 − 2×3 = 34 ✓; 44 − 2×4 = 36 ✓)
Continue in St st until the armhole measures 3 (3½, 3¾, 4¼, 4¾) in, ending after a WS row. Total length from cast-on is 8 (9½, 10½, 12, 13½) in.
Shoulders and neck
Next row (RS): BO 5 (6, 6, 6, 6) sts, knit until 5 (6, 6, 6, 6) sts remain, BO those 5 (6, 6, 6, 6) sts. Place the center 16 (18, 20, 22, 24) sts on a holder or bind them off for the back neck. (26 − 5 − 5 = 16 ✓; 30 − 6 − 6 = 18 ✓; 32 − 6 − 6 = 20 ✓; 34 − 6 − 6 = 22 ✓; 36 − 6 − 6 = 24 ✓)
Fasten off.
FRONTS
Make two, with neck and armhole at opposite edges.
Right Front (as worn)
This piece sits on the baby’s right. The armhole is at the left edge when the RS faces you (end of RS rows). The neck is at the right edge (beginning of RS rows).
With US 5 / 3.75 mm needles, CO 20 (24, 26, 28, 30) sts. (Half of back 17 + 3 overlap = 20 ✓ for Newborn.)
Ribbing: Work 1x1 rib for 1 in / 2.5 cm, ending after a WS row.
Change to US 7 / 4.5 mm needles. Work in St st until the piece measures 5 (6, 6¾, 7¾, 8¾) in from the cast-on edge, ending after a RS row (so the armhole bind-off can start on the WS at the side edge).
Armhole (side edge)
Next row (WS): BO 2 (3, 3, 4, 4) sts, purl to end. 18 (21, 23, 24, 26) sts.
Next row (RS): Knit.
Decrease row (WS): P1, p2tog, purl to end. 1 st decreased at armhole.
Next row (RS): Knit.
Repeat the last 2 rows 1 (1, 2, 2, 3) more time(s). 16 (19, 20, 21, 22) sts. (18 − 2 = 16 ✓; 21 − 2 = 19 ✓; 23 − 3 = 20 ✓; 24 − 3 = 21 ✓; 26 − 4 = 22 ✓)
Work even in St st until the armhole measures 1 (1¼, 1½, 1¾, 2) in, ending after a WS row. The piece now measures 6 (7¼, 8¼, 9½, 10¾) in from the cast-on — neck shaping begins 2 in before the shoulder.
Neck shaping
Next row (RS): BO 6 (7, 8, 9, 10) sts, knit to end. 10 (12, 12, 12, 12) sts.
Next row (WS): Purl.
Neck decrease row (RS): K1, ssk, knit to end. 1 st decreased at neck.
Next row (WS): Purl.
Repeat the last 2 rows 4 (5, 5, 5, 5) more times. 5 (6, 6, 6, 6) sts remain. (10 − 5 = 5 ✓; 12 − 6 = 6 ✓)
Work even on these shoulder stitches until the armhole matches the back (3 (3½, 3¾, 4¼, 4¾) in), ending after a WS row. BO remaining 5 (6, 6, 6, 6) sts.
Left Front (as worn)
This piece sits on the baby’s left. The armhole is at the right edge when the RS faces you (beginning of RS rows). The neck is at the left edge (end of RS rows / beginning of WS rows).
With US 5 / 3.75 mm needles, CO 20 (24, 26, 28, 30) sts.
Work ribbing and St st as for the Right Front until the piece measures 5 (6, 6¾, 7¾, 8¾) in from the cast-on edge, ending after a WS row.
Armhole (side edge)
Next row (RS): BO 2 (3, 3, 4, 4) sts, knit to end. 18 (21, 23, 24, 26) sts.
Next row (WS): Purl.
Decrease row (RS): K1, ssk, knit to end. 1 st decreased at armhole.
Next row (WS): Purl.
Repeat the last 2 rows 1 (1, 2, 2, 3) more time(s). 16 (19, 20, 21, 22) sts.
Work even until the armhole measures 1 (1¼, 1½, 1¾, 2) in, ending after a RS row.
Neck shaping
Next row (WS): BO 6 (7, 8, 9, 10) sts, purl to end. 10 (12, 12, 12, 12) sts.
Neck decrease row (RS): Knit to last 3 sts, k2tog, k1.
Next row (WS): Purl.
Repeat the last 2 rows 4 (5, 5, 5, 5) more times. 5 (6, 6, 6, 6) sts remain.
Work even until the armhole matches the back. BO remaining 5 (6, 6, 6, 6) sts.
SLEEVES
Make 2.
With US 5 / 3.75 mm needles, CO 24 (26, 28, 30, 32) sts.
Cuff: Work 1x1 rib for 1 in / 2.5 cm, ending after a WS row.
Change to US 7 / 4.5 mm needles. Work 2 rows St st.
Increase row (RS): K1, kfb, knit to last 2 sts, kfb, k1. 2 sts increased.
Work 5 (5, 5, 6, 5) rows even in St st.
Repeat the last 6 (6, 6, 7, 6) rows 2 (3, 4, 5, 6) more times. 30 (34, 38, 42, 46) sts. (24 + 2×3 = 30 ✓; 26 + 2×4 = 34 ✓; 28 + 2×5 = 38 ✓; 30 + 2×6 = 42 ✓; 32 + 2×7 = 46 ✓)
Work even until the sleeve measures 4 (5½, 6½, 8, 8½) in from the cast-on edge, ending after a WS row.
Sleeve cap
Row 1 (RS): BO 2 (3, 3, 4, 4) sts, knit to end.
Row 2 (WS): BO 2 (3, 3, 4, 4) sts, purl to end. 26 (28, 32, 34, 38) sts.
Decrease row (RS): K1, ssk, knit to last 3 sts, k2tog, k1.
Next row (WS): Purl.
Repeat the last 2 rows 4 (4, 5, 5, 6) more times. 16 (18, 20, 22, 24) sts. (26 − 2×5 = 16 ✓; 28 − 2×5 = 18 ✓; 32 − 2×6 = 20 ✓; 34 − 2×6 = 22 ✓; 38 − 2×7 = 24 ✓)
BO 2 sts at the beginning of the next 4 rows. 8 (10, 12, 14, 16) sts remain. (16 − 8 = 8 ✓)
BO remaining stitches.
BUTTON BANDS
Left front band (button band)
With US 5 / 3.75 mm needles, RS facing, and starting at the neck edge of the Left Front, pick up and knit 40 (48, 52, 60, 68) sts evenly down the front edge (about 3 sts for every 4 rows).
Knit 7 rows (garter stitch). BO knitwise.
Right front band (buttonhole band)
With US 5 / 3.75 mm needles, RS facing, and starting at the hem of the Right Front, pick up and knit 40 (48, 52, 60, 68) sts evenly up the front edge.
Knit 3 rows.
Buttonhole row (RS): Knit, making 4 (5, 5, 6, 6) one-row buttonholes spaced evenly. Place the lowest buttonhole 3 sts from the hem edge and the highest 3 sts from the neck edge; distribute the rest evenly between them.
One-row buttonhole: Bring yarn to the front, sl 1 wyib, bring yarn to the back, [sl 1 wyib, pass first slipped st over] twice (2 sts bound off), sl the last st back to the left needle, turn. Using the cable cast-on, CO 3 sts, turn. Sl 1 wyib, pass the extra cast-on st over. Continue knitting to the next buttonhole position.
Knit 3 more rows. BO knitwise.
Neckband
Sew both shoulder seams with mattress stitch.
With US 5 / 3.75 mm needles, RS facing, pick up and knit 5 sts across the top of the Right Front band, 12 (14, 16, 17, 18) sts down the right front neck, 16 (18, 20, 22, 24) sts across the back neck, 12 (14, 16, 17, 18) sts up the left front neck, and 5 sts across the top of the Left Front band. 50 (56, 62, 66, 70) sts. (5 + 12 + 16 + 12 + 5 = 50 ✓)
Knit 5 rows. BO knitwise.
FINISHING
- Set in the sleeves: pin the sleeve cap into the armhole, matching the underarm bind-offs and the cap center to the shoulder seam. Sew with mattress stitch.
- Sew sleeve seams and side seams in one continuous line from cuff to hem.
- Weave in all ends. Block the cardigan to the finished measurements.
- Sew 4 (5, 5, 6, 6) buttons to the Left Front band, opposite the buttonholes. Use a backing button or snap on the WS of each for security.
Jumpsuit
Sleeveless, worked flat in four pieces (two front legs that join, two back legs that join), with buttoned shoulders and a snap crotch. Chest matches the cardigan: 13½ (16, 17½, 19, 21) in.
JUMPSUIT BACK
Right back leg
With US 5 / 3.75 mm needles, CO 14 (16, 18, 20, 22) sts.
Work 1x1 rib for 1 in / 2.5 cm, ending after a WS row.
Change to US 7 / 4.5 mm needles. Work 2 rows St st.
Increase row (RS): K1, kfb, knit to last 2 sts, kfb, k1. 16 (18, 20, 22, 24) sts.
Work 5 rows even.
Repeat the increase row. 18 (20, 22, 24, 26) sts. For size 12–18 months only, work 5 rows even and increase once more: 18 (20, 22, 24, 28) sts. (14 + 2 + 2 = 18 ✓; 22 + 2 + 2 + 2 = 28 ✓)
Work even in St st until the leg measures 4½ (6, 7, 8½, 10) in from the cast-on, ending after a WS row. Place stitches on a holder.
Left back leg
Work as for the right back leg, but leave stitches on the needle.
Join at crotch
Next row (RS): Knit across the left back leg, cable-cast-on 2 (4, 4, 4, 4) sts, knit across the held right back leg. 38 (44, 48, 52, 60) sts. (18 + 2 + 18 = 38 ✓; 20 + 4 + 20 = 44 ✓; 22 + 4 + 22 = 48 ✓; 24 + 4 + 24 = 52 ✓; 28 + 4 + 28 = 60 ✓)
Work 3 rows even.
Decrease row (RS): K1, ssk, knit to last 3 sts, k2tog, k1.
Work 5 rows even.
Repeat the last 6 rows 1 (1, 1, 1, 3) more time(s). 34 (40, 44, 48, 52) sts. (38 − 2×2 = 34 ✓; 44 − 2×2 = 40 ✓; 48 − 2×2 = 44 ✓; 52 − 2×2 = 48 ✓; 60 − 2×4 = 52 ✓)
Work even until the piece measures 7 (8, 8¾, 9¾, 10¾) in from the crotch join, ending after a WS row.
Armholes
BO 2 (3, 3, 4, 4) sts at the beginning of the next 2 rows. 30 (34, 38, 40, 44) sts.
Decrease 1 st each end of every RS row 2 (2, 3, 3, 4) times, as for the cardigan back. 26 (30, 32, 34, 36) sts.
Work even until the armhole measures 3 (3½, 3¾, 4¼, 4¾) in, ending after a WS row. Total from shoulder line to crotch is 10 (11½, 12½, 14, 15½) in.
Back neck
Next row (RS): K 5 (6, 6, 6, 6) and place these sts on a holder for the right shoulder, BO the center 16 (18, 20, 22, 24) sts, knit the remaining 5 (6, 6, 6, 6) sts.
Working each shoulder separately, work 4 rows garter stitch. BO.
Return to the held shoulder stitches, rejoin yarn at the neck edge, work 4 rows garter, BO.
JUMPSUIT FRONT
Work both front legs, join, decrease, and shape armholes exactly as for the Back until 26 (30, 32, 34, 36) sts remain and the armhole measures 1 (1¼, 1½, 1¾, 2) in, ending after a WS row.
Split for neck
Next row (RS): K 10 (12, 12, 12, 12), join a second ball of yarn, BO the center 6 (6, 8, 10, 12) sts, knit to end. 10 (12, 12, 12, 12) sts each side. (10 + 6 + 10 = 26 ✓; 12 + 6 + 12 = 30 ✓; 12 + 8 + 12 = 32 ✓; 12 + 10 + 12 = 34 ✓; 12 + 12 + 12 = 36 ✓)
Working both sides at once, purl 1 WS row.
Neck decrease row (RS): On the right neck edge (end of the first section) k2tog, k1; on the left neck edge (start of the second section) k1, ssk, knit to end.
Purl 1 row.
Repeat the last 2 rows 4 (5, 5, 5, 5) more times. 5 (6, 6, 6, 6) sts remain each side.
Work even until the armhole matches the back.
Buttonhole tabs: On each front shoulder, work 4 rows garter stitch. On row 3 (RS), work a 2-st buttonhole (yo, k2tog) in the center of the tab. BO.
JUMPSUIT FINISHING
- Overlap the front shoulder tabs on the back shoulders and sew on 4 buttons, two per shoulder.
- Sew side seams from the bottom of the armhole to the crotch join, leaving the inner legs open.
- Sew inner leg seams from ankle rib to 1 in / 2.5 cm before the crotch cast-on, leaving a crotch opening.
- Crotch snap bands: With US 5 / 3.75 mm needles, RS facing, pick up and knit 1 st per stitch plus 1 st per 2 rows around the crotch opening. Knit 6 rows garter. BO. Fit 6 (6, 8, 8, 10) snaps, matching front to back, so the diaper can be changed without removing the jumpsuit.
- Weave in ends and block.
Romper / Vest
Sleeveless romper with a snap crotch and buttoned shoulders. Wear it as a vest by skipping the crotch snaps and seaming the lower sides closed. Length, shoulder to crotch: 10 (11½, 12½, 14, 15½) in. Chest: 13½ (16, 17½, 19, 21) in.
ROMPER BACK
With US 5 / 3.75 mm needles, CO 34 (40, 44, 48, 52) sts.
Knit 6 rows (garter hem / leg edge).
Change to US 7 / 4.5 mm needles. Work in St st until the piece measures 7 (8, 8¾, 9¾, 10¾) in from the cast-on, ending after a WS row.
Shape armholes, then back neck and garter shoulder tabs, exactly as for the Jumpsuit Back.
ROMPER FRONT
With US 5 / 3.75 mm needles, CO 34 (40, 44, 48, 52) sts.
Knit 6 rows.
Change to US 7 / 4.5 mm needles. Work in St st until the piece measures 7 (8, 8¾, 9¾, 10¾) in from the cast-on, ending after a WS row.
Shape armholes as for the Jumpsuit Front, then split the neck, decrease, and work buttonhole tabs exactly as for the Jumpsuit Front.
ROMPER FINISHING
- Button the front shoulder tabs onto the back shoulders (4 buttons).
- Sew side seams, leaving the bottom 1½ (1¾, 2, 2¼, 2½) in open on each side for leg holes.
- With US 5 / 3.75 mm needles, pick up and knit across the entire lower edge of the Front; knit 6 rows garter; BO. Repeat on the Back. Install 6 (6, 8, 8, 10) snaps along these bands, front overlapping back.
- Vest option: Omit the snap bands. Sew the side seams all the way to the hem and skip the crotch snaps.
Trousers
Worked as one flat panel with a center-back seam, split at the crotch into two legs. Waist 13 (15, 16½, 18, 19½) in; length 9½ (11½, 13, 15, 17) in; inseam 4 (5½, 6½, 8, 9½) in.
With US 5 / 3.75 mm needles, CO 66 (76, 84, 90, 98) sts. (66 sts ÷ 5 sts per in = 13.2 in ✓)
Work 1x1 rib for 2 in / 5 cm (this folds in half to form the elastic casing), ending after a WS row.
Change to US 7 / 4.5 mm needles. Work in St st until the piece measures 5½ (6, 6½, 7, 7½) in from the fold line of the casing (i.e., 1 in into the ribbing plus the St st rise), ending after a WS row. Mark the center: 33 (38, 42, 45, 49) sts each half. (33 + 33 = 66 ✓; 38 + 38 = 76 ✓; 42 + 42 = 84 ✓; 45 + 45 = 90 ✓; 49 + 49 = 98 ✓)
Divide for legs
Next row (RS): K 33 (38, 42, 45, 49), place the remaining 33 (38, 42, 45, 49) sts on a holder. Turn and work the first leg only.
First leg
Work 3 rows even.
Decrease row (RS): K1, ssk, knit to last 3 sts, k2tog, k1.
Work 5 rows even.
Repeat the last 6 rows 2 (3, 4, 4, 5) more times. 27 (30, 32, 35, 37) sts. (33 − 2×3 = 27 ✓; 38 − 2×4 = 30 ✓; 42 − 2×5 = 32 ✓; 45 − 2×5 = 35 ✓; 49 − 2×6 = 37 ✓)
Work even until the inseam measures 3 (4½, 5½, 7, 8½) in from the divide, ending after a WS row.
Change to US 5 / 3.75 mm needles. Work 1x1 rib for 1 in / 2.5 cm. BO in rib.
Second leg
Return held stitches to US 7 / 4.5 mm needles, rejoin yarn at the crotch with RS facing, and work as for the first leg.
Trouser finishing
- Sew the inner-leg seams.
- Sew the center-back seam from the waist to the crotch.
- Fold the ribbed waist casing to the WS along the 1 in line and whipstitch, leaving a 1 in gap. Thread 13 (15, 16½, 18, 19½) in of ½ in elastic through the casing, overlap the ends ½ in, sew them firmly, and close the gap.
Hat
Worked flat and seamed up the back. Crown decreases are simple k2tog rows.
With US 5 / 3.75 mm needles, CO 56 (60, 66, 70, 76) sts. (56 sts ÷ 5 = 11.2 in ✓, matching the 11 in Newborn brim with rib stretch.)
Work 1x1 rib for 1 in / 2.5 cm, ending after a WS row.
Change to US 7 / 4.5 mm needles. Work in St st until the hat measures 2¼ (3, 3½, 3¾, 4¼) in from the cast-on, ending after a WS row.
Crown (Newborn — 56 sts)
Row 1 (RS): *K5, k2tog; repeat from * to end. 48 sts. (8 repeats × 7 sts = 56; 8 × 6 = 48 ✓)
Row 2 and all WS rows: Purl.
Row 3: *K4, k2tog; repeat from * to end. 40 sts.
Row 5: *K3, k2tog; repeat from * to end. 32 sts.
Row 7: *K2, k2tog; repeat from * to end. 24 sts.
Row 9: *K1, k2tog; repeat from * to end. 16 sts.
Row 11: *K2tog; repeat from * to end. 8 sts.
Crown (0–3 months — 60 sts)
Row 1: *K4, k2tog; repeat from * to end. 50 sts. (10 repeats × 6 = 60; 10 × 5 = 50 ✓)
Row 3: *K3, k2tog; repeat from * to end. 40 sts.
Row 5: *K2, k2tog; repeat from * to end. 30 sts.
Row 7: *K1, k2tog; repeat from * to end. 20 sts.
Row 9: *K2tog; repeat from * to end. 10 sts.
Crown (3–6 months — 66 sts)
Row 1: *K4, k2tog; repeat from * to end. 55 sts. (11 × 6 = 66; 11 × 5 = 55 ✓)
Row 3: *K3, k2tog; repeat from * to end. 44 sts.
Row 5: *K2, k2tog; repeat from * to end. 33 sts.
Row 7: *K1, k2tog; repeat from * to end. 22 sts.
Row 9: *K2tog; repeat from * to end. 11 sts.
Crown (6–12 months — 70 sts)
Row 1: *K5, k2tog; repeat from * to end. 60 sts. (10 × 7 = 70; 10 × 6 = 60 ✓)
Row 3: *K4, k2tog; repeat from * to end. 50 sts.
Continue as for 0–3 months from its Row 1 count of 50 sts (k3, k2tog onward).
Crown (12–18 months — 76 sts)
Row 1: *K5, k2tog; repeat from * to last 6 sts, k4, k2tog. 65 sts.
Row 3: *K4, k2tog; repeat from * to last 5 sts, k3, k2tog. 54 sts.
Row 5: *K3, k2tog; repeat from * to last 4 sts, k2, k2tog. 43 sts.
Row 7: *K2, k2tog; repeat from * to last 3 sts, k1, k2tog. 32 sts.
Row 9: *K1, k2tog; repeat from * to last 2 sts, k2tog. 21 sts.
Row 11: *K2tog; repeat from * to last st, k1. 11 sts.
All sizes: Cut yarn, leaving an 18 in tail. Thread the tail through the remaining stitches, pull tight, and use the same tail to mattress-stitch the back seam from crown to brim. Weave in ends. The rolled or ribbed brim sits at 4 (5, 5½, 6, 6½) in total height.
Mittens
Thumb-less newborn mittens, worked as one flat piece per mitten and seamed along the side and top. Make 2.
With US 5 / 3.75 mm needles, CO 18 (20, 22, 24, 26) sts. (Folded, 9 sts = 1.8 in palm width ✓ for Newborn.)
Work 1x1 rib for ¾ in / 2 cm, ending after a WS row.
Change to US 7 / 4.5 mm needles. Work in St st until the mitten measures 2¼ (2¾, 3¼, 3¾, 4¼) in from the cast-on, ending after a WS row.
Top shaping
Row 1 (RS): K1, ssk, knit to last 3 sts, k2tog, k1.
Row 2 (WS): Purl.
Repeat these 2 rows 2 more times. 12 (14, 16, 18, 20) sts. (18 − 2×3 = 12 ✓)
BO remaining stitches.
Fold the mitten with RS together so the cast-on edge forms a cuff tube. Mattress-stitch the side seam and across the bound-off top. Turn right-side out. Optional: crochet or sew a 6 in garter-stitch tie (CO 3 sts, knit 6 in, BO) and attach it at the cuff to clip the pair together — keep ties shorter than 6 in and never around the neck.
Socks
Simple flat tube socks with a shaped toe, seamed along the sole and back of the leg. Make 2. Foot length 2½ (3, 3½, 4, 4½) in.
With US 5 / 3.75 mm needles, CO 24 (26, 28, 30, 32) sts. (24 sts = 4.8 in circumference, which hugs a newborn foot of about 4 in ✓)
Work 1x1 rib for 1½ (1¾, 2, 2, 2) in, ending after a WS row.
Change to US 7 / 4.5 mm needles. Work in St st for 2 (2½, 3, 3½, 4) in, ending after a WS row.
Toe
Row 1 (RS): K1, ssk, k 6 (7, 8, 9, 10), k2tog, k2, ssk, k 6 (7, 8, 9, 10), k2tog, k1. 20 (22, 24, 26, 28) sts. (24 − 4 = 20 ✓)
Row 2 (WS): Purl.
Row 3: K1, ssk, k 4 (5, 6, 7, 8), k2tog, k2, ssk, k 4 (5, 6, 7, 8), k2tog, k1. 16 (18, 20, 22, 24) sts.
Row 4: Purl.
Row 5: K1, ssk, k 2 (3, 4, 5, 6), k2tog, k2, ssk, k 2 (3, 4, 5, 6), k2tog, k1. 12 (14, 16, 18, 20) sts.
Row 6: Purl.
BO remaining stitches.
Fold the sock so the two decrease “lines” sit at each side of the foot. Mattress-stitch the toe, then continue the seam along the sole and up the back of the leg. Weave in ends. The stretchy tube sits comfortably without a turned heel — ideal for a 2½ in newborn foot.
Dummy Chain (Pacifier Strap)
A short, flat garter-stitch strap. Maximum finished length 8 in / 20 cm. Use a commercially made breakaway clip.
Safety (read before you knit):
- Do not make this strap longer than 8 in / 20 cm.
- Use only a plastic breakaway pacifier clip designed for infants.
- Never attach the strap to a crib, car seat, or around the neck.
- Never leave a baby unattended with it; never use it during sleep.
- Inspect before every use; discard if the clip or knitting is damaged.
With US 7 / 4.5 mm needles, CO 8 sts.
Work in garter stitch (knit every row) until the strap measures 7 in / 18 cm (it will stretch slightly in wear; do not exceed 8 in finished).
Loop end (dummy ring): Next RS row: K3, BO 2, k3.
Next row: K3, cable-cast-on 2 sts, k3. 8 sts.
Knit 4 more rows. BO.
Thread the bound-off end through a dummy (pacifier) ring and stitch the loop closed if you prefer a sewn loop instead of the buttonhole. Sew the cast-on end firmly to the breakaway clip with sewing thread, going through the knitting several times. Finished length from clip to far end of loop: 8 in / 20 cm or less.
Care
Hand wash or machine wash gentle in cool water if using superwash or cotton. Lay flat to dry. Recheck buttons, snaps, and the dummy clip after every wash.
Disclaimer: This pattern was generated by AI and should be reviewed for accuracy before use. While we strive for quality, AI-generated content may contain errors. Please verify measurements, stitch counts, charts, and instructions before beginning your project. Generated by purlJam.uk
Love this pattern?
Save this pattern to your free PurlJam libraryAccess your pattern anytime
Bookmark this page to access your pattern anytime