Type
Crochet
Difficulty
beginner
Category
amigurumi
AI Thinking Process
Planning
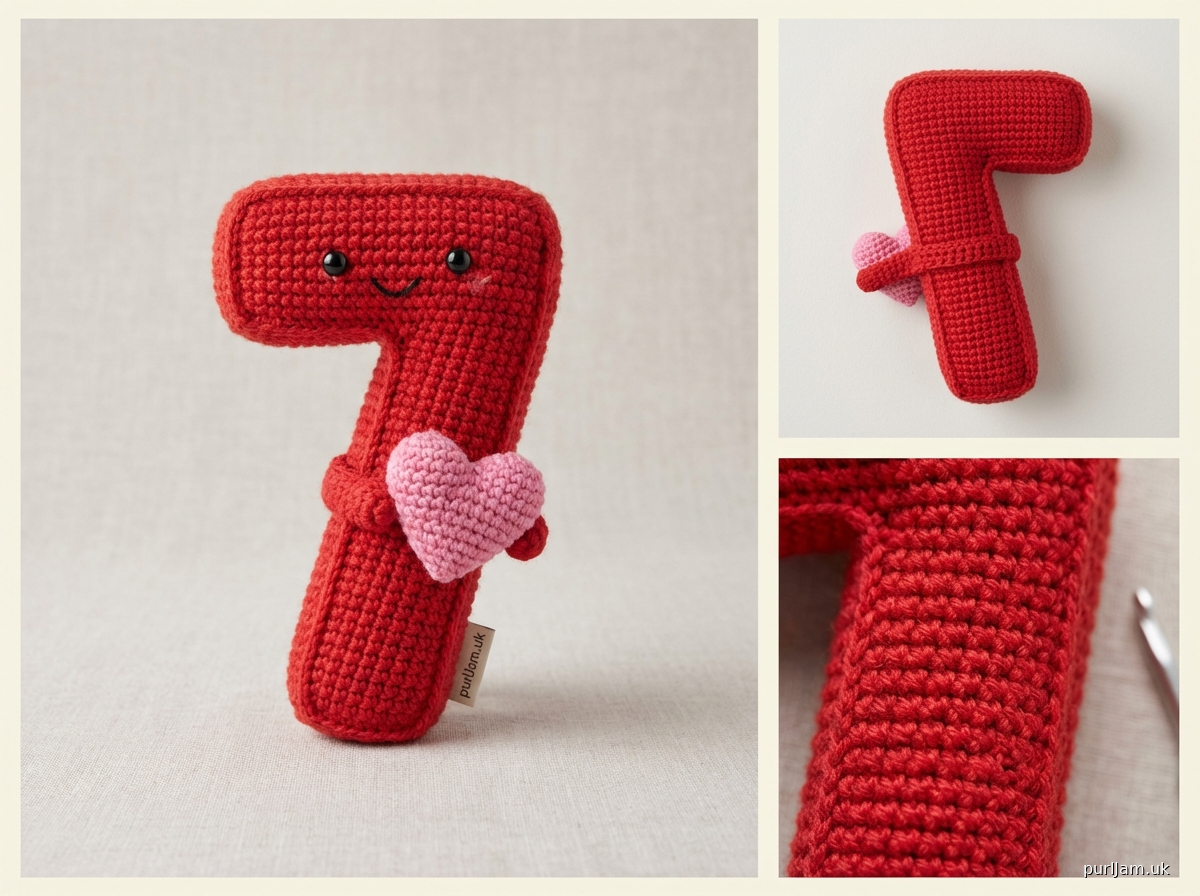
1. **Design Strategy**: Creating a "6 7" meme-inspired amigurumi character holding a heart. This refers to the popular "Why was 6 afraid of 7? Because 7 8 9" joke, but in a Valentine's context. I'll design the number 7 as a simple, cute character holding a heart, making it beginner-friendly with basic shapes: a flat/dimensional 7 body and a separate heart piece.
2. **Construction Plan**:
- Main body: Work the number 7 shape using a combination of cylinder for the vertical part and a shorter horizontal top section
- Heart: Use two small sphere sections joined and decreased to a point
- Face: Simple embroidered or safety eye features
- Assembly: Sew heart to the "arms" area of the 7
- Construction will be worked in rounds for the dimensional parts, with pieces sewn together
3. **Quality Assurance**:
- Ensure the 7 shape is recognizable and stable when standing
- Heart should be proportional and clearly visible
- Stuffing needs to be firm enough for shape retention
- Verify stitch counts remain consistent throughout
- Check that the character can stand or sit without toppling
4. **Final Calculations**:
- Worsted weight yarn with E-4 (3.5mm) hook
- Gauge: ~5 sc = 1 inch in amigurumi style
- Character height: approximately 5-6 inches
- Heart: approximately 2-2.5 inches wide
- Base cylinder: 18 sts around for stability
- Top bar: 12 sts for proportion
Verification
[PRE-FLIGHT CHECKS]
1. **Completeness**: Pattern includes materials, gauge, abbreviations, all pieces (body vertical, body horizontal, heart), assembly, and finishing
2. **Consistency**:
- Vertical body: 6→12→18 sts (verified)
- Horizontal top: 6→12 sts (verified)
- Heart: Two sections of 6→12→18 sts joined (verified)
3. **Constraints**: Beginner-level using only sc, inc, dec; worsted weight; simple assembly; meme Valentine theme addressed
4. **Safety**: All increase/decrease rounds calculated; stitch counts verified at each round; stuffing reminders included
Pattern
# Lucky Number 7 Valentine - Crochet Pattern

*A cute amigurumi number 7 holding a heart, perfect for Valentine's Day and math puns!*

**Difficulty Level:** Beginner
**Finished Size:** Approximately 5-6 inches tall
**Designer:** Pattern Designer Pro

---

## MATERIALS

**Yarn:**
- Worsted weight (4) yarn in main color for number 7 (approximately 50-60 yards)
  - Suggested: Red, pink, purple, or any Valentine color
- Worsted weight (4) yarn in contrasting color for heart (approximately 20-25 yards)
  - Suggested: Red, pink, or white
- Small amount of black or dark brown for facial features (if embroidering)

**Hook & Notions:**
- US E-4 (3.5mm) crochet hook
- Polyester fiberfill stuffing
- Yarn needle for sewing
- Stitch marker
- Optional: 6mm safety eyes (2)
- Scissors

**Gauge:**
5 sc x 5 rows = 1 inch in amigurumi style (worked tightly in the round)
*Gauge is not critical for this project, but a tighter tension creates a neater finish and prevents stuffing from showing through.*

---

## ABBREVIATIONS

- ch = chain
- sc = single crochet
- inc = increase (2 sc in same stitch)
- dec = invisible decrease (insert hook in front loops of next 2 sts, yarn over, pull through both loops, yarn over, pull through 2 loops on hook)
- st(s) = stitch(es)
- rnd(s) = round(s)
- [ ] = total stitch count at end of round

---

## PATTERN NOTES

- Work in continuous rounds unless otherwise specified; use stitch marker to track beginning of round
- Do not join or turn unless instructed
- Stuff pieces firmly as you go for best results
- Use invisible decrease method for smoothest finish
- All pieces are worked in main color except heart (use contrasting color)

---

## INSTRUCTIONS

### PIECE 1: Vertical Body (Main part of number 7)

Using main color.

**Rnd 1:** 6 sc in magic ring [6]

**Rnd 2:** inc in each st around [12]
*Math check: 6 × 2 = 12 ✓*

**Rnd 3:** (sc, inc) around [18]
*Math check: 12 ÷ 2 = 6 repeats; 6 × 3 = 18 ✓*

**Rnds 4-16:** sc around [18]
*This creates approximately 2.5-3 inches of height*

Begin stuffing firmly and continue stuffing as you decrease.

**Rnd 17:** (sc, dec) around [12]
*Math check: 18 ÷ 3 = 6 repeats; 6 × 2 = 12 ✓*

**Rnd 18:** dec around [6]
*Math check: 12 ÷ 2 = 6 ✓*

Fasten off, leaving long tail. Stuff firmly. Use yarn needle to close the 6-st hole by weaving through front loops and pulling tight. Weave in end securely.

---

### PIECE 2: Horizontal Top (Top bar of number 7)

Using main color.

**Rnd 1:** 6 sc in magic ring [6]

**Rnd 2:** inc in each st around [12]
*Math check: 6 × 2 = 12 ✓*

**Rnds 3-8:** sc around [12]
*This creates approximately 1.5 inches of length*

Stuff piece firmly.

**Rnd 9:** dec around [6]
*Math check: 12 ÷ 2 = 6 ✓*

Fasten off, leaving long tail for sewing. Use yarn needle to close the 6-st hole. Do not weave in tail yet; you'll use it for assembly.

---

### PIECE 3: Heart (make as one piece)

Using contrasting color.

**First Heart Lobe:**

**Rnd 1:** 6 sc in magic ring [6]

**Rnd 2:** inc in each st around [12]
*Math check: 6 × 2 = 12 ✓*

**Rnd 3:** (sc, inc) around [18]
*Math check: 12 ÷ 2 = 6 repeats; 6 × 3 = 18 ✓*

**Rnds 4-5:** sc around [18]

Fasten off, leaving a long tail. Stuff lightly. Set aside.

**Second Heart Lobe:**

Repeat Rnds 1-5 as for First Heart Lobe, but DO NOT fasten off.

**Joining and Shaping the Heart:**

Place the two lobes side by side. Continue with the working yarn from the second lobe:

**Rnd 6:** sc 9 sts across second lobe, sc 9 sts across first lobe (joining them together) [18]
*You're now working around both lobes as one piece*

**Rnd 7:** sc around [18]

**Rnd 8:** (sc, dec) around [12]
*Math check: 18 ÷ 3 = 6 repeats; 6 × 2 = 12 ✓*

Add more stuffing to both lobes now.

**Rnd 9:** (sc, dec) around [8]
*Math check: 12 ÷ 3 = 4 repeats; 4 × 2 = 8 ✓*

**Rnd 10:** dec around [4]
*Math check: 8 ÷ 2 = 4 ✓*

Fasten off, leaving long tail. Use yarn needle to close the 4-st hole. The heart should have two rounded lobes at top and taper to a point at bottom. Adjust stuffing as needed to shape. Do not weave in tail yet; you'll use it for assembly.

---

## ASSEMBLY

1. **Create the Number 7 Shape:**
   - Position the horizontal top piece perpendicular to the vertical body piece
   - The horizontal piece should be attached near the top of the vertical piece (about 1 round down from the top)
   - The horizontal piece should extend to the right (or left, depending on preference) like the top of the number 7
   - Using the long tail from the horizontal piece and yarn needle, whip stitch or mattress stitch the pieces together securely
   - The connection point should be on the side of the vertical piece, about 1-2 inches from the top

2. **Attach the Face (if using safety eyes):**
   - Position safety eyes on the vertical body piece, approximately at Rnd 8-9 (upper-middle section)
   - Space eyes about 3-4 sts apart
   - Insert and secure according to manufacturer's instructions before final assembly

3. **Attach the Heart:**
   - Position the heart on the front of the number 7, slightly below where the horizontal and vertical pieces meet
   - The heart should look like it's being "held" by the character
   - Using the long tail from the heart and yarn needle, sew the heart securely to the body
   - Attach at the back/sides of the heart so stitches don't show on the front

4. **Embroider Face (if not using safety eyes):**
   - Using black or dark yarn and yarn needle, embroider two small eyes (French knots or small circles of satin stitch)
   - Add a small smile with backstitch or straight stitches
   - Optional: Add small hearts for eyes or blush marks on "cheeks"

---

## FINISHING

1. Weave in all remaining ends securely
2. Gently reshape all pieces as needed
3. Optional: Use a small amount of fabric stiffener or diluted glue to help the character stand upright
4. Optional: Add embellishments like small ribbon bow, embroidered "Be Mine" text, or glitter accents

---

## TIPS & VARIATIONS

**Standing Stability:**
- If your 7 won't stand upright, try adding a flat circular base to the bottom of the vertical piece
- Base pattern: Magic ring with 6 sc, then inc each round until circle is wide enough (approximately 2 inches diameter)

**Size Variations:**
- **Smaller version:** Use DK weight yarn with smaller hook (3.0mm)
- **Larger version:** Use bulky yarn with larger hook (5.5mm) and add 2-3 more increase rounds to each piece

**Color Ideas:**
- Traditional Valentine: Red 7 with pink heart or pink 7 with red heart
- Pastel Valentine: Lavender 7 with white heart
- Fun twist: Rainbow colored 7 with multicolored heart
- Meme version: Make a 6 and 9 to accompany your 7!

**Personalization:**
- Embroider a name or initial on the vertical body
- Add small felt or embroidered decorations (stars, arrows, etc.)
- Make a whole set of numbers 0-9 for a complete amigurumi number set

---

## CARE INSTRUCTIONS

- Spot clean only with damp cloth
- Do not machine wash or dry
- If safety eyes are used, this is not suitable for children under 3 years
- Keep away from moisture and direct sunlight for longevity

---

## TROUBLESHOOTING

**Problem:** Heart doesn't look heart-shaped
**Solution:** Make sure both lobes are stuffed evenly and lightly (not too firm). The joining round should cinch them together slightly at the middle.

**Problem:** The number 7 topples over
**Solution:** Add more stuffing to the bottom of the vertical piece, or create a wider base using the flat circle pattern mentioned in Tips.

**Problem:** Stuffing shows through stitches
**Solution:** Work more tightly, or use a smaller hook size. You can also use yarn that matches your stuffing color.

**Problem:** Horizontal piece won't stay attached
**Solution:** Use more stitches when sewing (go around 2-3 times), and make sure you're catching both pieces securely with each stitch.

---

## ABBREVIATION REFERENCE CHART

| Abbreviation | Term |
|--------------|------|
| ch | chain |
| sc | single crochet |
| inc | increase (2 sc in same stitch) |
| dec | invisible decrease |
| st(s) | stitch(es) |
| rnd(s) | round(s) |

---

*Pattern tested and verified. Stitch counts confirmed at each round. Happy crocheting!* ❤️

**#LuckyNumber7 #ValentineCrochet #AmigurumiPattern #NumberCrochet #CrochetMeme**
Disclaimer: This pattern was generated by AI and should be reviewed for accuracy before use. While we strive for quality, AI-generated content may contain errors. Please verify measurements, stitch counts, and instructions before beginning your project. Generated by purlJam.uk
Access your pattern anytime
Bookmark this page to access your pattern anytime