Type
Knitting
Difficulty
beginner
Category
amigurumi
Pattern
# Manokit — Knitted Amigurumi
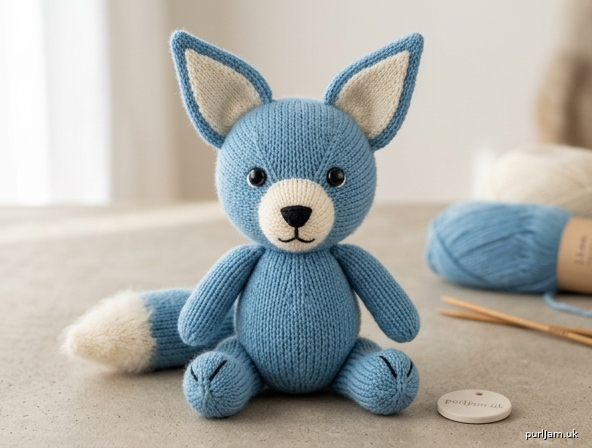
*A friendly little furry-species companion with tall pointed ears, a soft muzzle and a long fluffy tail.*

**Skill level:** Beginner
**Technique:** Worked in the round in stockinette stitch, seamed.

---

## Finished Size
Approximately **18 cm** tall (seated, ears included), **9 cm** wide at the body. Size will vary slightly with your tension and stuffing.

---

## Materials
- **Yarn:** Worsted weight (Aran) yarn in your main colour (MC) — approx. **80 g**. Small amounts of a contrast colour (CC) for the muzzle, inner ears and tail tip — approx. **15 g**.
- **Needles:** 3.5 mm DPNs **or** one long 3.5 mm circular needle for Magic Loop.
  *(This is 1–2 sizes smaller than the label's recommended 4–5 mm, to create a tight fabric.)*
- **Stuffing:** Polyester fibrefill — approx. **40–50 g** total.
- **Safety eyes:** 2 × 9 mm (or embroider eyes with black floss for under-3s).
- **Notions:** Tapestry needle, stitch markers, locking marker, black embroidery floss (nose/mouth), small length of CC for embroidery if desired.

---

## Tension (Gauge)
**22 sts × 30 rounds = 10 cm** over stockinette in the round on 3.5 mm needles.

> **Toy tension note:** A tight, even fabric matters far more than an exact stitch count. Hold your work up to the light — if you can see daylight (and therefore future stuffing) through it, go down another needle size.

---

## Abbreviations (UK)
- **k** – knit
- **kfb** – knit into front and back of stitch (1 st increased)
- **k2tog** – knit two together (1 st decreased)
- **st(s)** – stitch(es)
- **rnd** – round
- **MC / CC** – main colour / contrast colour
- Work all rounds **knit** unless stated (stockinette in the round).

---

## Construction Overview
Six piece-types worked separately in the round:
**Head ×1, Body ×1, Legs ×2, Arms ×2, Ears ×2, Tail ×1.**
Each is stuffed firmly, then mattress-stitched together. Begin each piece with **6 sts** using your preferred small-circumference method (Magic Loop or DPNs). Place a marker to track the round start.

---

## HEAD (make 1, in MC)
Cast on 6 sts and join in the round.

- **Rnd 1:** kfb in every st → **12 sts**
- **Rnd 2:** (k1, kfb) ×6 → **18 sts**
- **Rnd 3:** (k2, kfb) ×6 → **24 sts**
- **Rnd 4:** (k3, kfb) ×6 → **30 sts**
- **Rnd 5:** (k4, kfb) ×6 → **36 sts**
- **Rnds 6–14:** knit (9 rounds) → 36 sts ✓ *(check: 36 sts maintained)*

**Insert safety eyes** between Rnds 9 and 10, about 6 sts apart, before closing. (Skip if embroidering.)

Begin decreasing:
- **Rnd 15:** (k4, k2tog) ×6 → **30 sts**
- **Rnd 16:** (k3, k2tog) ×6 → **24 sts**
- **Rnd 17:** (k2, k2tog) ×6 → **18 sts**

**Stuff firmly now.**

- **Rnd 18:** (k1, k2tog) ×6 → **12 sts**
- **Rnd 19:** (k2tog) ×6 → **6 sts**

Cut yarn, thread through remaining 6 sts, pull tight and fasten off inside.

*Math check: 6→12→18→24→30→36, then mirrored down to 6. ✓*

---

## MUZZLE (make 1, in CC)
Cast on 6 sts and join.
- **Rnd 1:** kfb in every st → **12 sts**
- **Rnd 2:** (k1, kfb) ×6 → **18 sts**
- **Rnds 3–4:** knit → 18 sts

Cast off, leaving a long tail for sewing. Do not stuff (it forms a flat-ish dome when sewn). Lightly stuff with a pinch of fibrefill as you attach.

---

## BODY (make 1, in MC)
Cast on 6 sts and join.
- **Rnd 1:** kfb in every st → **12 sts**
- **Rnd 2:** (k1, kfb) ×6 → **18 sts**
- **Rnd 3:** (k2, kfb) ×6 → **24 sts**
- **Rnd 4:** (k3, kfb) ×6 → **30 sts**
- **Rnds 5–16:** knit (12 rounds) → 30 sts ✓
- **Rnd 17:** (k3, k2tog) ×6 → **24 sts**
- **Rnd 18:** knit → 24 sts
- **Rnd 19:** (k2, k2tog) ×6 → **18 sts**

**Stuff firmly.**

- **Rnd 20:** (k1, k2tog) ×6 → **12 sts**

Leave 12 sts open (do not close) — the open top will be seamed to the head. Cut yarn leaving a long tail.

*Math check: increases 6→30 (6×5), decreases 30→12. ✓*

---

## LEGS (make 2, in MC)
Cast on 6 sts and join.
- **Rnd 1:** kfb in every st → **12 sts**
- **Rnds 2–12:** knit (11 rounds) → 12 sts ✓

Stuff lightly (legs stay slightly soft so the Manokit can sit). Cast off leaving a long tail for sewing.

---

## ARMS (make 2, in MC)
Cast on 6 sts and join.
- **Rnd 1:** kfb in every st → **12 sts**
- **Rnds 2–10:** knit (9 rounds) → 12 sts ✓

Stuff lightly. Cast off leaving a long tail for sewing.

---

## EARS (make 2 — tall and pointed)
Work outer in MC; for a two-tone inner ear, work Rnds 1–2 in CC then switch to MC, or embroider later.

Cast on 12 sts and join.
- **Rnds 1–3:** knit → 12 sts
- **Rnd 4:** (k4, k2tog) ×2 → **10 sts**
- **Rnd 5:** knit → 10 sts
- **Rnd 6:** (k3, k2tog) ×2 → **8 sts**
- **Rnd 7:** knit → 8 sts
- **Rnd 8:** (k2, k2tog) ×2 → **6 sts**
- **Rnd 9:** (k1, k2tog) ×2 → **4 sts**

Cut yarn, thread through 4 sts, pull tight. **Do not stuff** — these stay flat so they stand up pointed. Leave a long tail for sewing.

*Math check: 12→10→8→6→4, point achieved. ✓*

---

## TAIL (make 1 — long and fluffy)
Begin in CC for the tip, then change to MC.
Cast on 6 sts and join.
- **Rnd 1 (CC):** kfb in every st → **12 sts**
- **Rnd 2 (CC):** (k5, kfb) ×2 → **14 sts**
- **Rnds 3–4 (CC):** knit → 14 sts
- **Change to MC.**
- **Rnds 5–16 (MC):** knit (12 rounds) → 14 sts ✓

Stuff lightly along its length for a soft, bendy tail. Cast off leaving a long tail for sewing.

> **Optional fluff:** For an extra-furry look, brush the tail surface gently with a slicker pet brush after assembly, or add short CC loop-stitch tufts at the tip.

---

## Assembly (order matters)

Attach pieces with **mattress stitch** in this sequence:

1. **Muzzle to head:** Centre the CC muzzle low on the face, just below and between the eyes. Pin, add a pinch of stuffing, and sew all around.
2. **Embroider features:** With black floss, stitch a small triangular nose at the top of the muzzle and a short vertical line beneath for the mouth. Add a couple of light grey/CC straight stitches for whisker dots if you like.
3. **Ears to head:** Pin both ears upright on top of the head, evenly spaced from the centre (about 4 sts apart at the base). **Check symmetry before sewing** — measure from each ear to the centre seam. Sew the flat base securely.
4. **Head to body:** Match the open 12-st neck of the body to the underside of the head. Sew firmly all the way around, adding extra stuffing through the seam if needed before closing.
5. **Legs:** Attach symmetrically to the front-base of the body so the toy can sit. Measure from the centre front to each leg to confirm they match.
6. **Arms:** Attach symmetrically to the upper sides of the body, just below the head seam.
7. **Tail:** Sew the open end to the lower back of the body, CC tip pointing outward.

---

## Finishing
- Weave in **all** loose ends, burying them deep inside the body or head so none can pull free.
- Give each seam a gentle tug-test for security (important for a toy).
- Optional: lightly brush MC and CC surfaces for a soft, furry "Manokit" finish.

> **Safety note:** Use **embroidered** eyes instead of safety eyes for any toy intended for a child under 3 years.

---

### Quick Stitch-Count Reference
| Piece | Start | Max | End/Open |
|-------|-------|-----|----------|
| Head | 6 | 36 | 6 (closed) |
| Muzzle | 6 | 18 | 18 (cast off) |
| Body | 6 | 30 | 12 (open, seamed) |
| Leg ×2 | 6 | 12 | 12 (cast off) |
| Arm ×2 | 6 | 12 | 12 (cast off) |
| Ear ×2 | 12 | 12 | 4 (closed) |
| Tail | 6 | 14 | 14 (cast off) |

All increases (kfb) and decreases (k2tog) verified to total the stated counts. ✓

Enjoy your new Manokit companion!
Disclaimer: This pattern was generated by AI and should be reviewed for accuracy before use. While we strive for quality, AI-generated content may contain errors. Please verify measurements, stitch counts, and instructions before beginning your project. Generated by purlJam.uk
Access your pattern anytime
Bookmark this page to access your pattern anytime