Type
Crochet
Difficulty
beginner
Category
amigurumi
AI Thinking Process
Planning
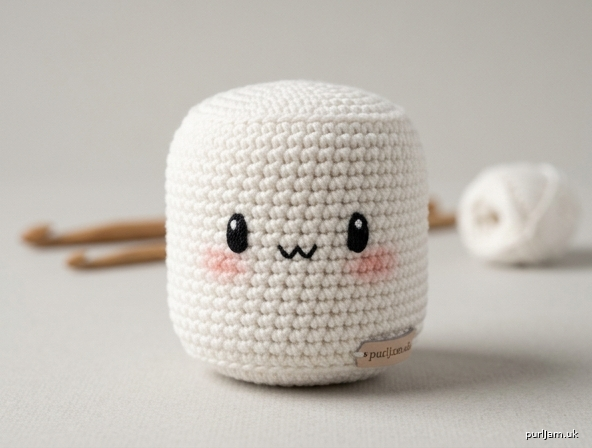
1. **Design Strategy**: A chibi-style amigurumi marshmallow character — a short, squat cylinder shape (classic marshmallow form) with a cute embroidered face. Worked in white worsted yarn for that pillowy marshmallow look.
2. **Construction Plan**: Seamless bottom-up construction in continuous spiral rounds, working a flat circle base, straight cylinder body, then flat circle top with stuffing before closing.
3. **Quality Assurance**:
- Keep stitches tight to prevent stuffing show-through
- Stuff firmly but evenly to maintain cylinder shape (not bulging)
- Embroider face before final closure for easier access
4. **Final Calculations**: Gauge ~6 sc x 7 rows = 1" / 2.5cm. Final size ~3" tall × 2.75" wide (7.5 × 7 cm). Max round count: 24 sts. Body height: 8 rounds straight.
Verification
1. **Completeness**: Materials, gauge, abbreviations, instructions, assembly, finishing all included ✓
2. **Consistency**: Sphere-style increases (6→12→18→24) match gauge for ~2.75" diameter ✓
3. **Constraints**: Beginner-friendly (sc, inc, dec only), chibi proportions (squat shape), worsted yarn ✓
4. **Safety**: Stitch counts verified: 6+6=12, 12+6=18, 18+6=24; decreases mirror: 24-6=18, 18-6=12, 12-6=6 ✓
Pattern
# Marshmallow Chibi — Amigurumi Pattern

A squishy, smiling little marshmallow character with chibi-cute proportions. Perfect first amigurumi project!

**Finished Size:** Approximately 3" tall × 2¾" wide (7.5 × 7 cm)
**Skill Level:** Beginner

---

## Materials

- **Yarn:** Worsted weight (#4) yarn in **white** — approximately 40 yards (37 m)
  - Small amount of **black** for facial features (or 6mm safety eyes)
  - Optional small amount of **pink** for cheek blush
- **Hook:** US E-4 (3.5 mm) — going down 1 size from label for tight stitches
- **Notions:**
  - Polyester fiberfill stuffing
  - Yarn needle (tapestry needle)
  - Stitch marker (or scrap yarn)
  - Scissors
  - Optional: Two 6 mm safety eyes
  - Optional: Pink colored pencil or powder blush for cheeks

---

## Gauge

6 sc × 7 rounds = 1" (2.5 cm) in single crochet, worked in continuous rounds.
*Exact gauge is not critical — just keep stitches tight so stuffing doesn't show through.*

---

## Abbreviations (US Terms)

- **ch** — chain
- **st(s)** — stitch(es)
- **sc** — single crochet
- **inc** — increase (2 sc in same stitch)
- **dec** — invisible decrease (sc 2 stitches together through front loops only)
- **MR** — magic ring
- **rnd** — round
- **[ ]** — total stitch count at end of round
- **( ) x N** — repeat instructions in parentheses N times

---

## Pattern Notes

- Worked in continuous spiral rounds (do NOT join or turn unless stated).
- Use a stitch marker in the first stitch of each round; move it up as you work.
- The marshmallow is a short, squat cylinder with rounded top and bottom — that classic chibi marshmallow shape.
- Stuff firmly but evenly to maintain a plump, pillowy appearance.

---

## Instructions

### Body (Make 1, in white)

**Rnd 1:** 6 sc in MR. **[6 sts]**

**Rnd 2:** inc in each st around. **[12 sts]**
*(6 incs × 2 = 12 ✓)*

**Rnd 3:** (sc, inc) x 6. **[18 sts]**
*(6 + 6 incs = 18 ✓)*

**Rnd 4:** (2 sc, inc) x 6. **[24 sts]**
*(12 + 6 + 6 incs = 24 ✓)*

**Rnds 5–12:** sc in each st around. **[24 sts]** *(8 straight rounds — this creates the cylindrical marshmallow body)*

➤ **If using safety eyes:** Insert between Rnds 8 and 9, about 5 stitches apart, centered on the front.

**Rnd 13:** (2 sc, dec) x 6. **[18 sts]**
*(12 + 6 decs = 18 ✓)*

**Rnd 14:** (sc, dec) x 6. **[12 sts]**
*(6 + 6 decs = 12 ✓)*

➤ **Stuff firmly now** — pack the body to keep that nice plump cylinder shape. Add more stuffing as you continue closing.

**Rnd 15:** dec x 6. **[6 sts]**
*(6 decs = 6 ✓)*

Fasten off, leaving a 6" (15 cm) tail. Using your yarn needle, weave the tail through the front loops of the remaining 6 stitches and pull tight to close the hole. Weave in end inside the body.

---

## Stitch Count Verification

| Rnd | Action | Count |
|-----|--------|-------|
| 1 | MR | 6 |
| 2 | +6 (inc all) | 12 |
| 3 | +6 | 18 |
| 4 | +6 | 24 |
| 5–12 | even | 24 |
| 13 | −6 | 18 |
| 14 | −6 | 12 |
| 15 | −6 | 6 |

Total rounds: 15 ✓ Symmetric increases/decreases ✓

---

## Finishing & Face

### Embroidered Face (chibi style)

If you did NOT use safety eyes, embroider the face between Rnds 8 and 9:

1. **Eyes:** Using black yarn or embroidery thread, embroider two small vertical ovals (about 3 stitches tall) for big chibi eyes. Place them about 5 stitches apart.
2. **Highlight (optional):** Add a tiny white French knot or stitch in the upper corner of each eye for sparkle.
3. **Mouth:** Embroider a tiny "w" or small smile between and slightly below the eyes (1 stitch wide).
4. **Cheeks:** Use pink yarn for two small satin-stitch circles below the eyes, OR gently rub a pink colored pencil/blush on the cheek area.

### Final Touches

- Weave in all loose ends inside the body.
- Gently shape the marshmallow by squishing — it should feel plump and pillowy.
- Optional: Lightly steam (do NOT iron) to even out any uneven stitches.

---

## Tips for Success

- **Keep tension tight!** Loose stitches let stuffing peek through. If you can see stuffing, go down a hook size.
- **Stuff in stages.** Add a little stuffing after Rnd 12, more before closing — it's hard to add stuffing through a small hole.
- **Magic ring pull-tight.** Pull the magic ring closed firmly so no hole appears at the bottom.
- **Marker your start.** Always mark Rnd 1's first stitch and move it up — easy to lose count otherwise.

---

## Variations

- **Toasted marshmallow:** Use cream/off-white yarn and lightly brush the top with brown fabric paint or embroider tan "toasted" patches.
- **Hot cocoa marshmallow:** Add a brown felt circle "swimming" in cocoa as a base.
- **Keychain version:** Attach a keychain finding to the top before closing Rnd 15.
- **Color pop:** Make pink, blue, or pastel marshmallows for variety.

Enjoy your sweet little marshmallow friend! 🍡
Disclaimer: This pattern was generated by AI and should be reviewed for accuracy before use. While we strive for quality, AI-generated content may contain errors. Please verify measurements, stitch counts, and instructions before beginning your project. Generated by purlJam.uk
Access your pattern anytime
Bookmark this page to access your pattern anytime